
17th Oct 2022
Customizing auto charts in PowerPoint
- PowerPoint design
- Comments: 3
Functional presentation slides can be fabulous too! Add a little spice to your live PowerPoint charts with this delicious doughnut chart DIY.

Drop-down menus in PowerPoint allow you to create flexible, interactive slides. PowerPoint drop-down menus can help you make interactive self-led presentations, documents, eLearning, training materials…. the list goes on and on! A drop-down menu in PowerPoint can be used for cleaning up busy slides or combined with hyperlinks for smooth navigation.
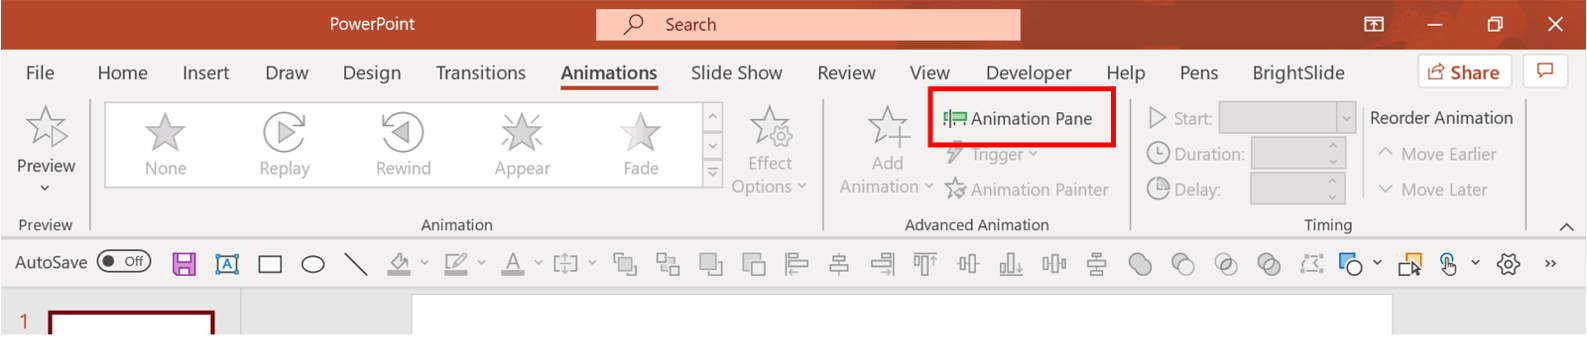
To have a sleek and – most importantly! – fully functional drop-down menu in PowerPoint, you’ll need to get to know the Animation Pane and Selection Pane like never before.
To access the Animation Pane, go to the Animation tab and select Animation Pane.
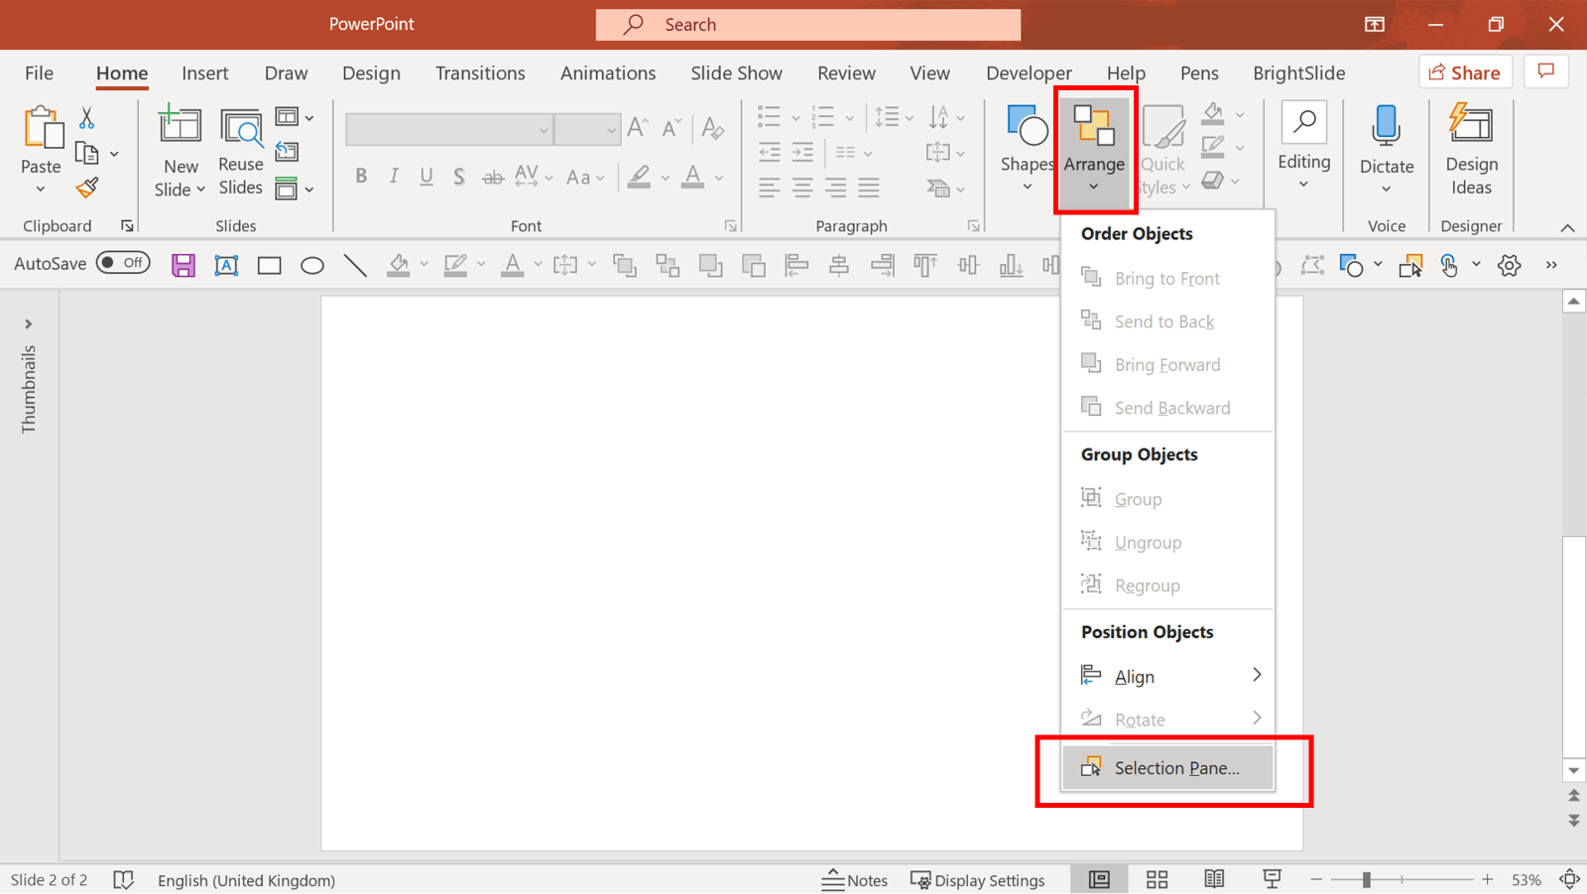
To access the Selection Pane, in the Home tab click Arrange, then scroll down to click Selection Pane or press Alt+F10 on Windows.
Let’s get started!
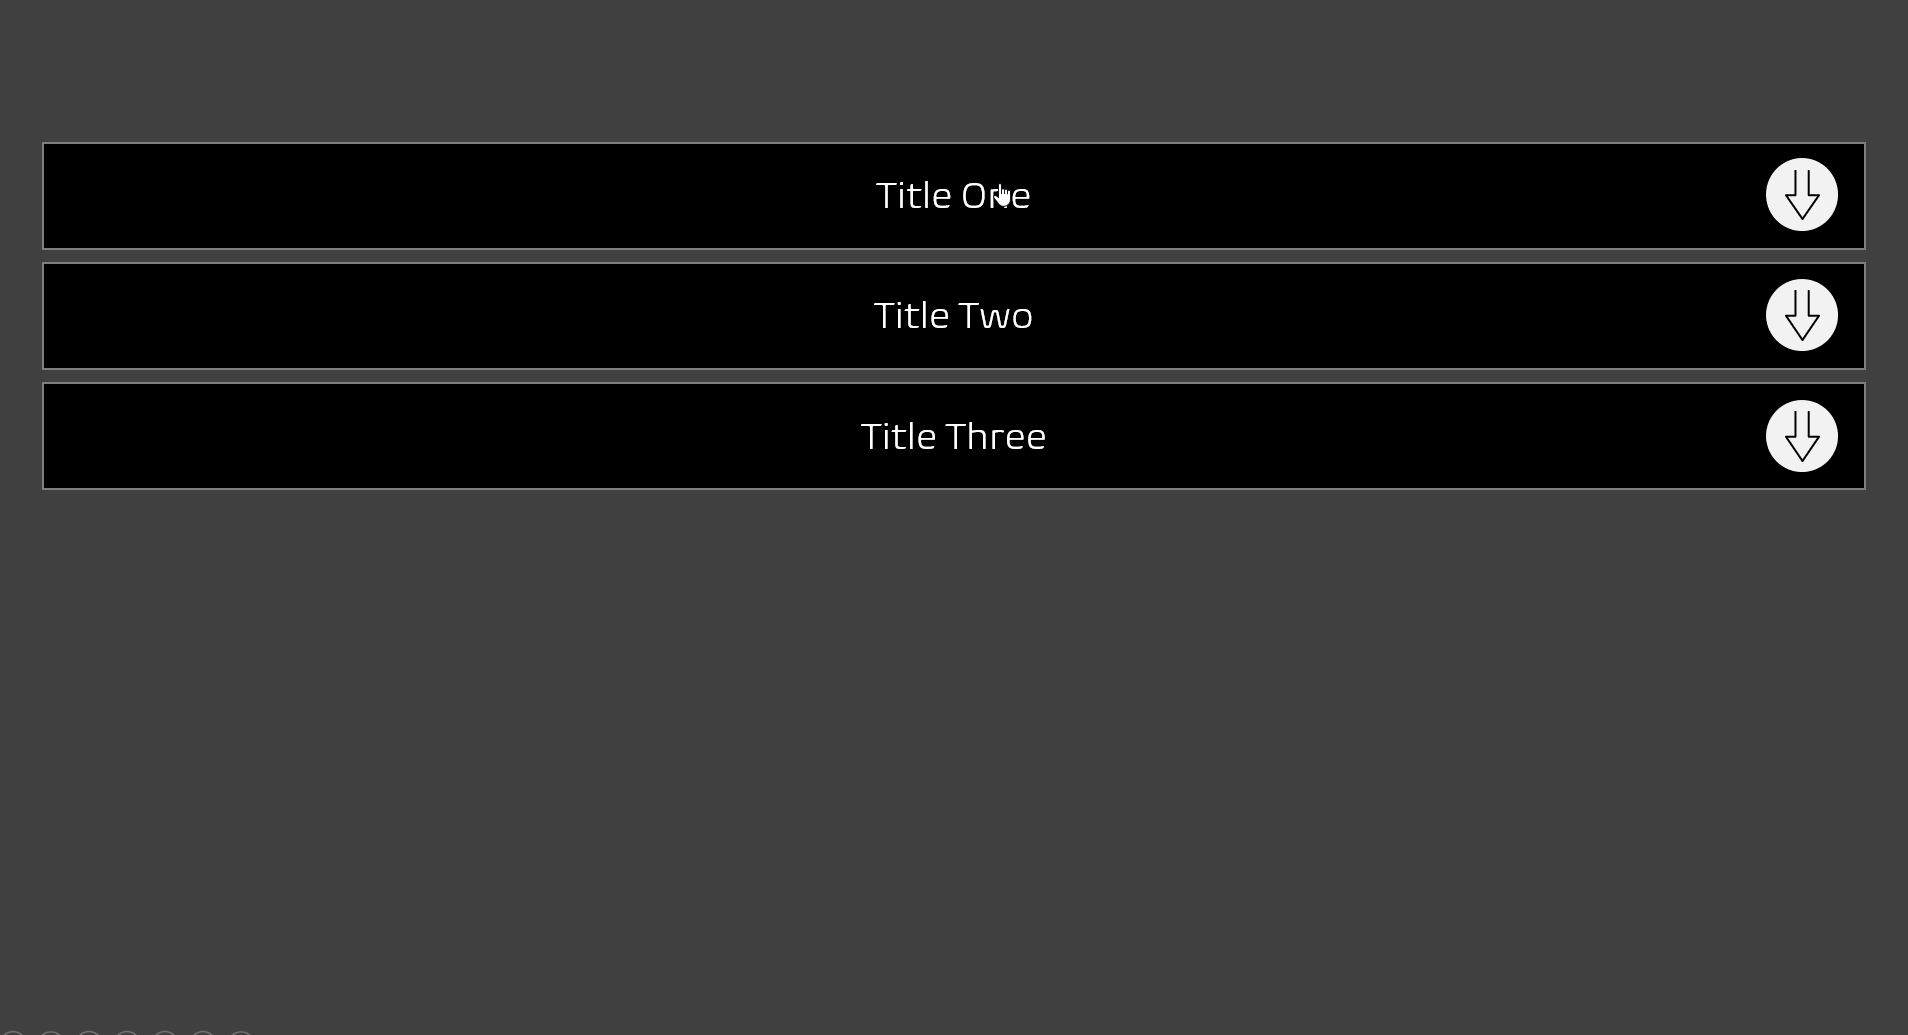
Start by designing your title bars using PowerPoint shapes. These will act as buttons for your users. If you’ve used multiple objects to create a button, group them together by selecting the objects, right clicking and selecting Group. This will make them easier to animate.
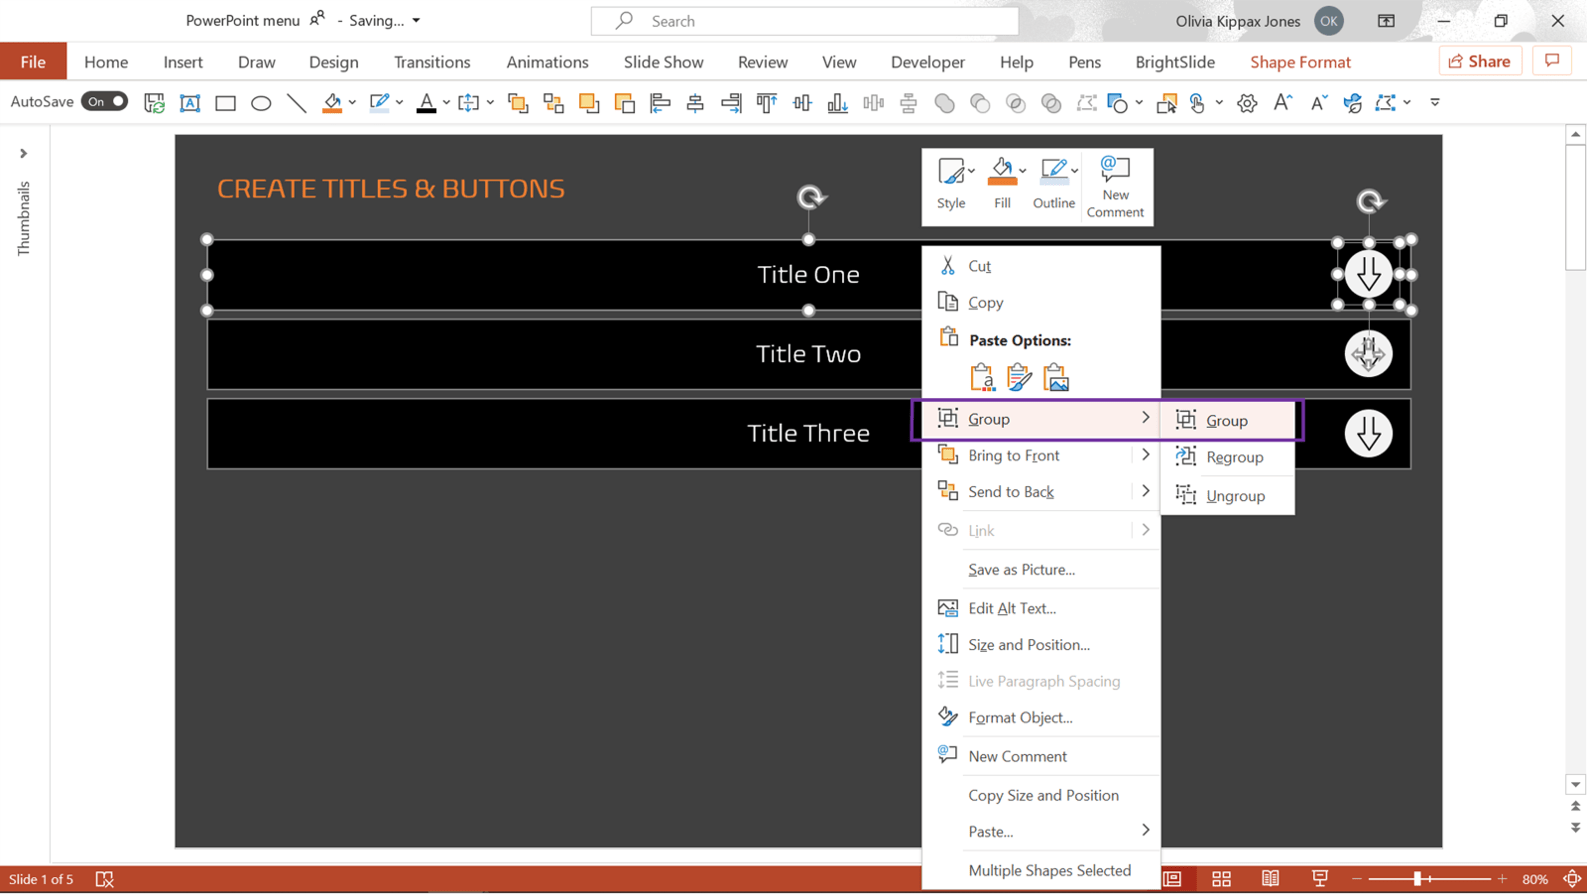
Next, label these groups in the Selection Pane. Naming the different components of the PowerPoint drop-down menu is your key to success as there are so many moving parts (literally!). When you come to animate your drop-down menu in PowerPoint, knowing what is what is really important. I’ve named the button groups: TITLE1, TITLE2, TITLE3.

Next, create the content you want to appear under the first title in your drop-down menu. Again, group your objects together and rename the group in the Selection Pane, something like ‘Content 1’ is fine.
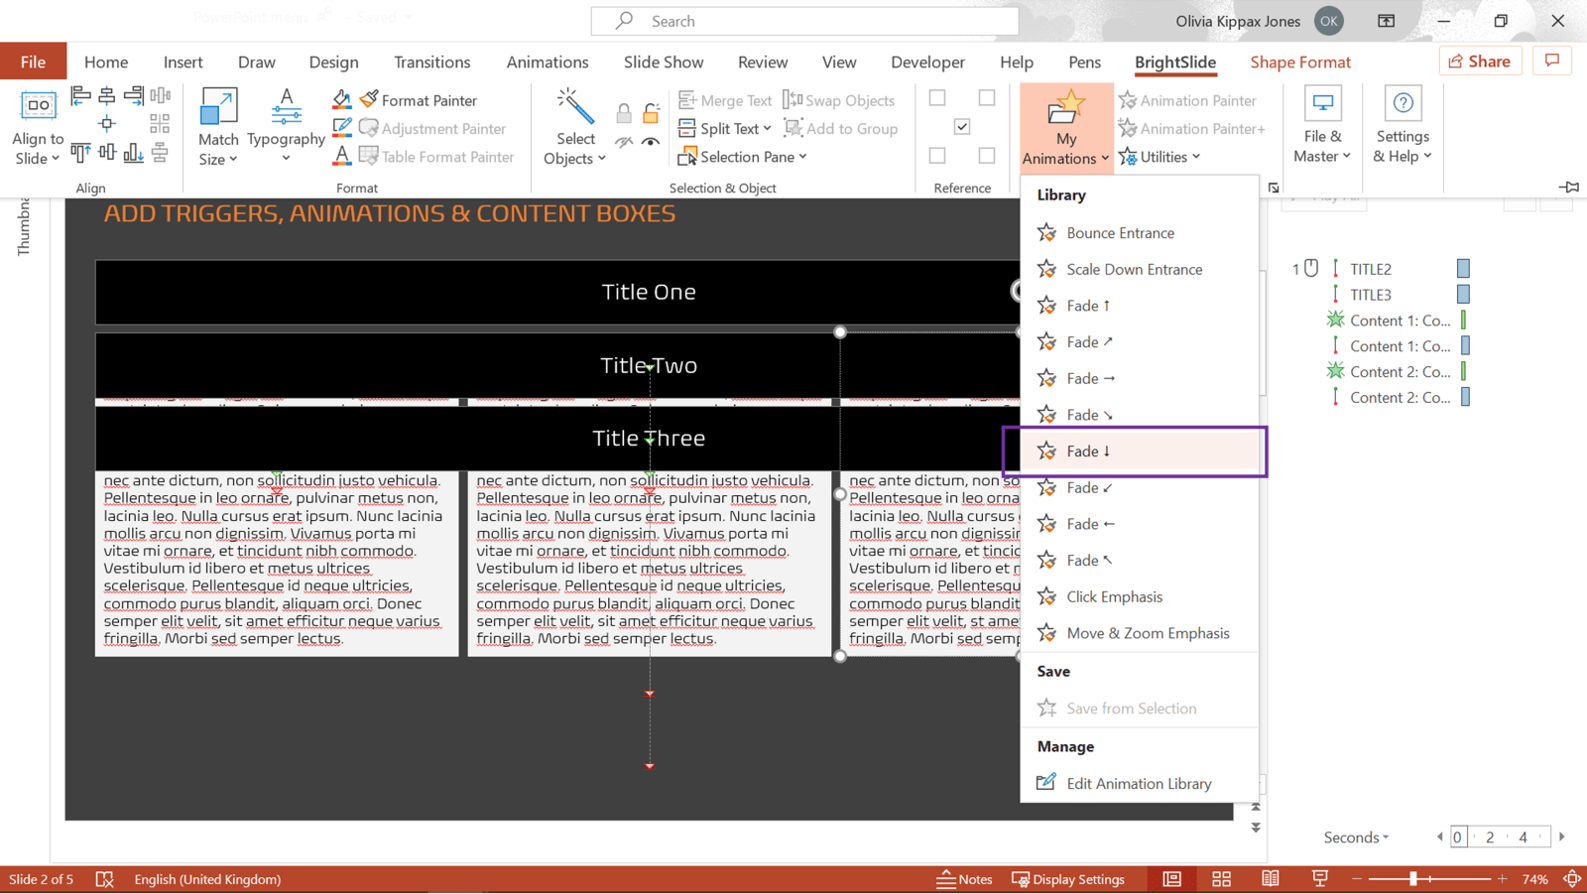
Now it’s time to animate your drop-down menu. Think about what you want to happen when a user clicks on the top title bar. First, the two other options need to move down to make room for ‘Content 1’ – use a Motion Path animation. Next, ‘Content 1’ needs to appear – use a Fade in animation. Alternatively, if you have our free productivity and design add in BrightSlide, head to your animation library and use the Fade down animation for a really sleek look!
Finally, insert a trigger. Usually in PowerPoint animations are initiated by a mouse click (or arrow click). Triggers allow you to initiate a sequence of animations by a user clicking on a specific object on your slide. In this case, you want the animations you have just created to play when you or your user clicks on the first button.
To do this, in the Animation Pane select the first animation in the sequence then select Trigger in the Animation tab. In the menu click On Click of and then TITLE1 (or whatever you named your first button).
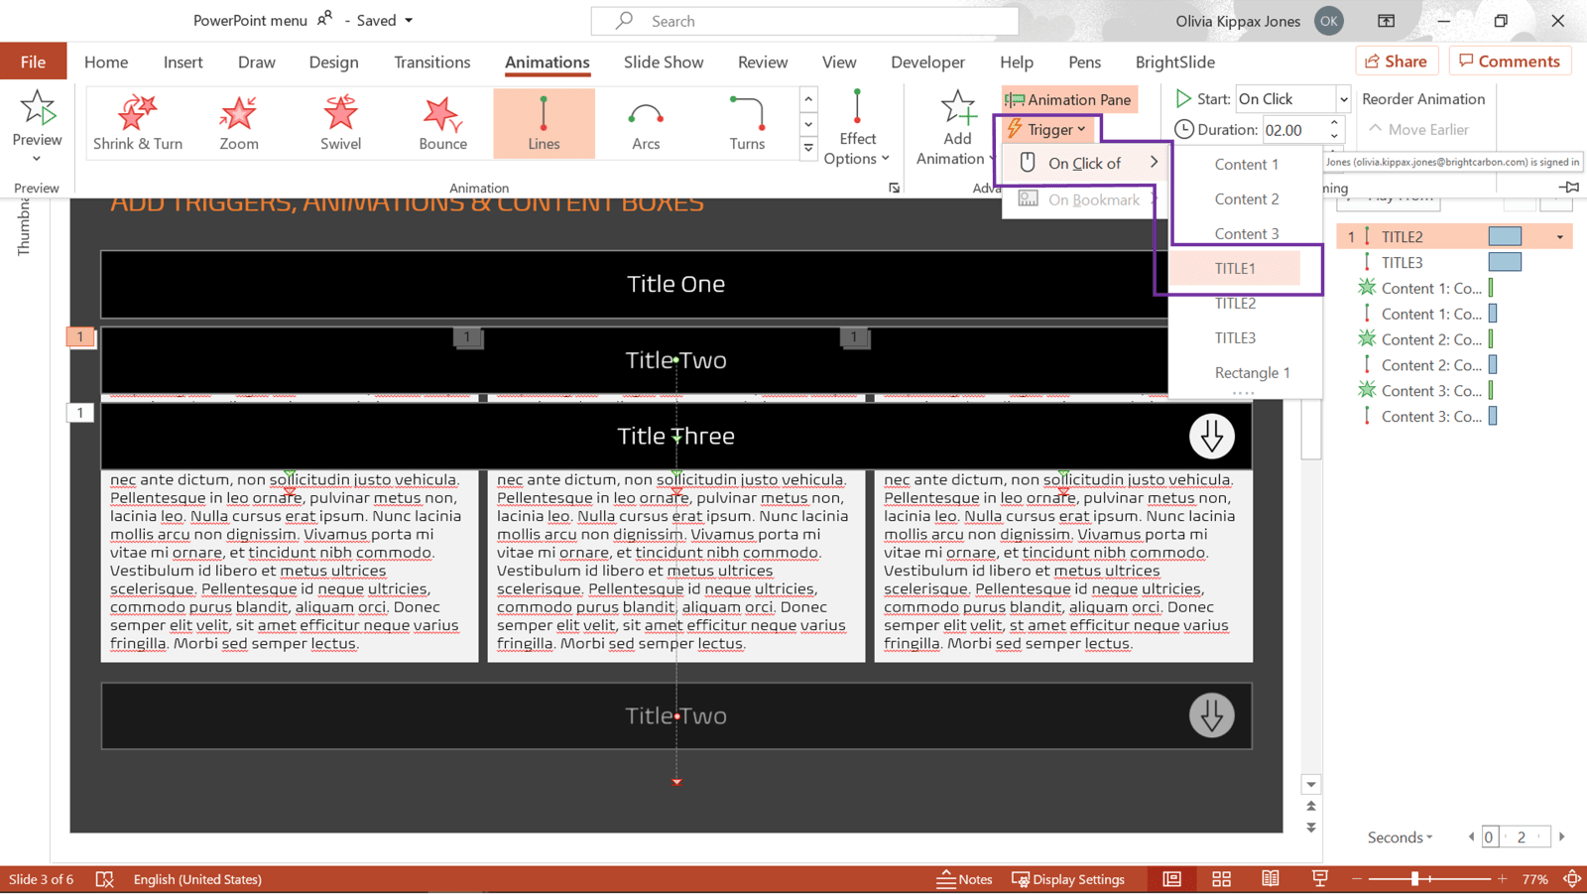
Then drag all the animations you created under the newly created trigger section in the Animation Pane.

You can now test the animation by popping your slide in show mode.
Triggers can be tricky to get your head round at first, if you need a more in-depth guide click here.
Next, insert a mask – a rectangle with a transparent fill and outline – on the slide. It needs to cover Title 2 and Title 3 at the end of their motion path. This mask will stop users from being able to click these options when the content for Title 1 is on screen. Animate the mask to Appear under the trigger you’ve already set up.
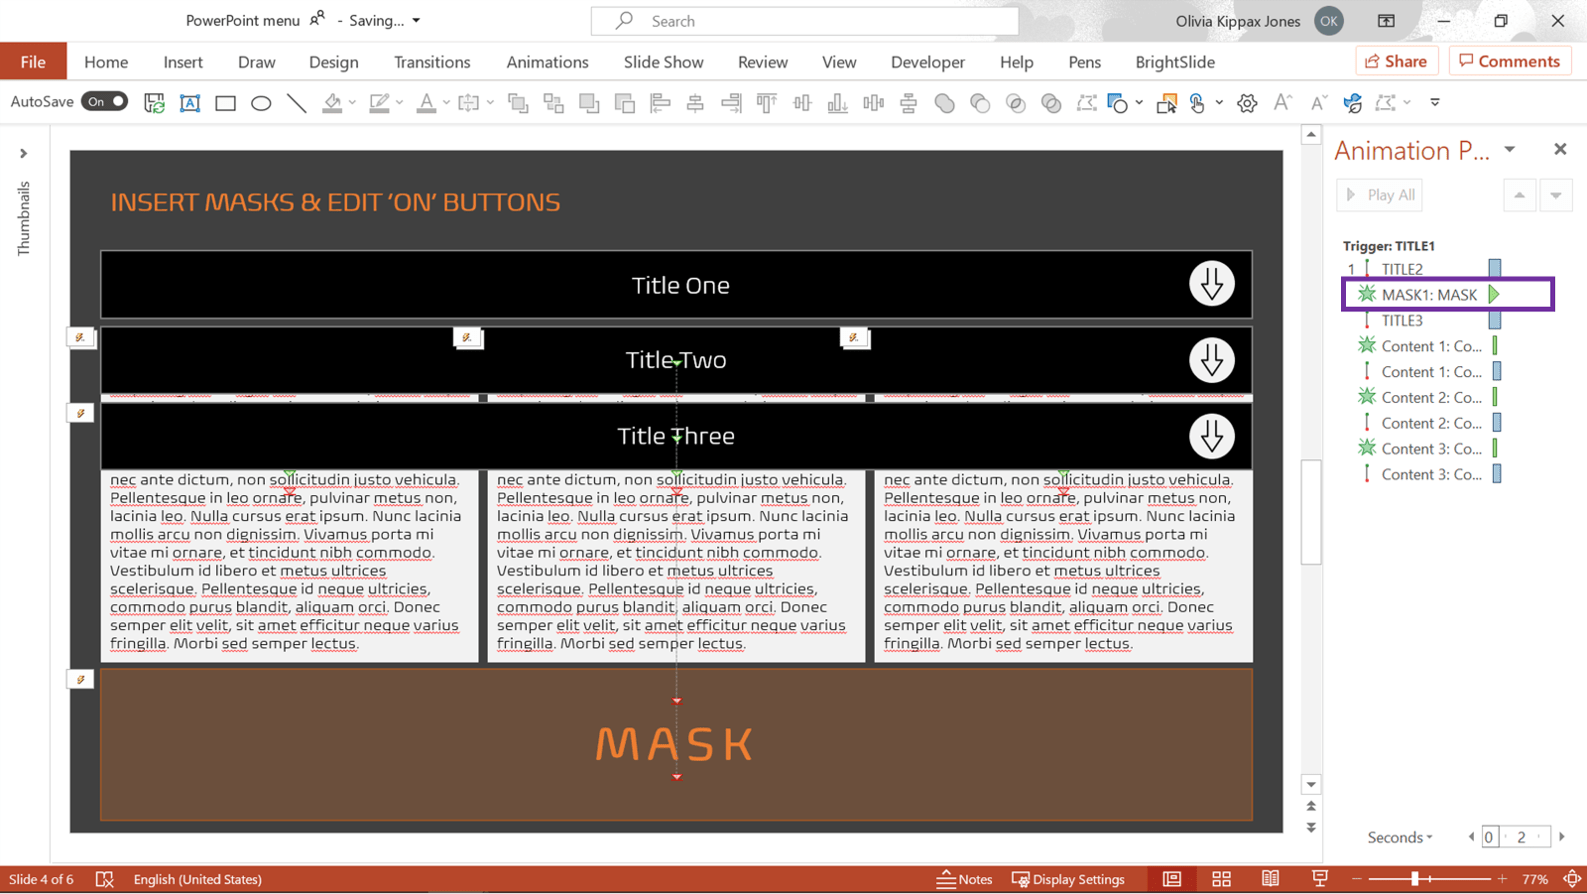
I’ve made the mask orange so you can see where it is, but for your drop-down menu in PowerPoint you will want a transparent mask.
Next, create an ‘on’ state for your title bar. This is what the user will see when they click the bar. Simply duplicate the group and recolour.

Add a Fade animation so this appears when your user clicks the Title 1 button.
Finally, you need to prevent users being able to advance the slide by clicking on it. All the navigation should be controlled by your triggers and the drop-down menu. In the PowerPoint ribbon, go to the Transitions tab, and in the Timings section uncheck the On Mouse Click option.

Top tip: As you have disabled the option to advance on mouse click, you’ll need to add a hyperlinked button to take your users to the next slide. Read more about hyperlinks in PowerPoint.
Phew! Now repeat all the animations you’ve created, but backwards!
Begin by adding a Fade out animation to the ‘on’ version of your title bar. Set a new trigger for this animation to start when the user clicks the ‘on’ version of the Title 1 button. Then:
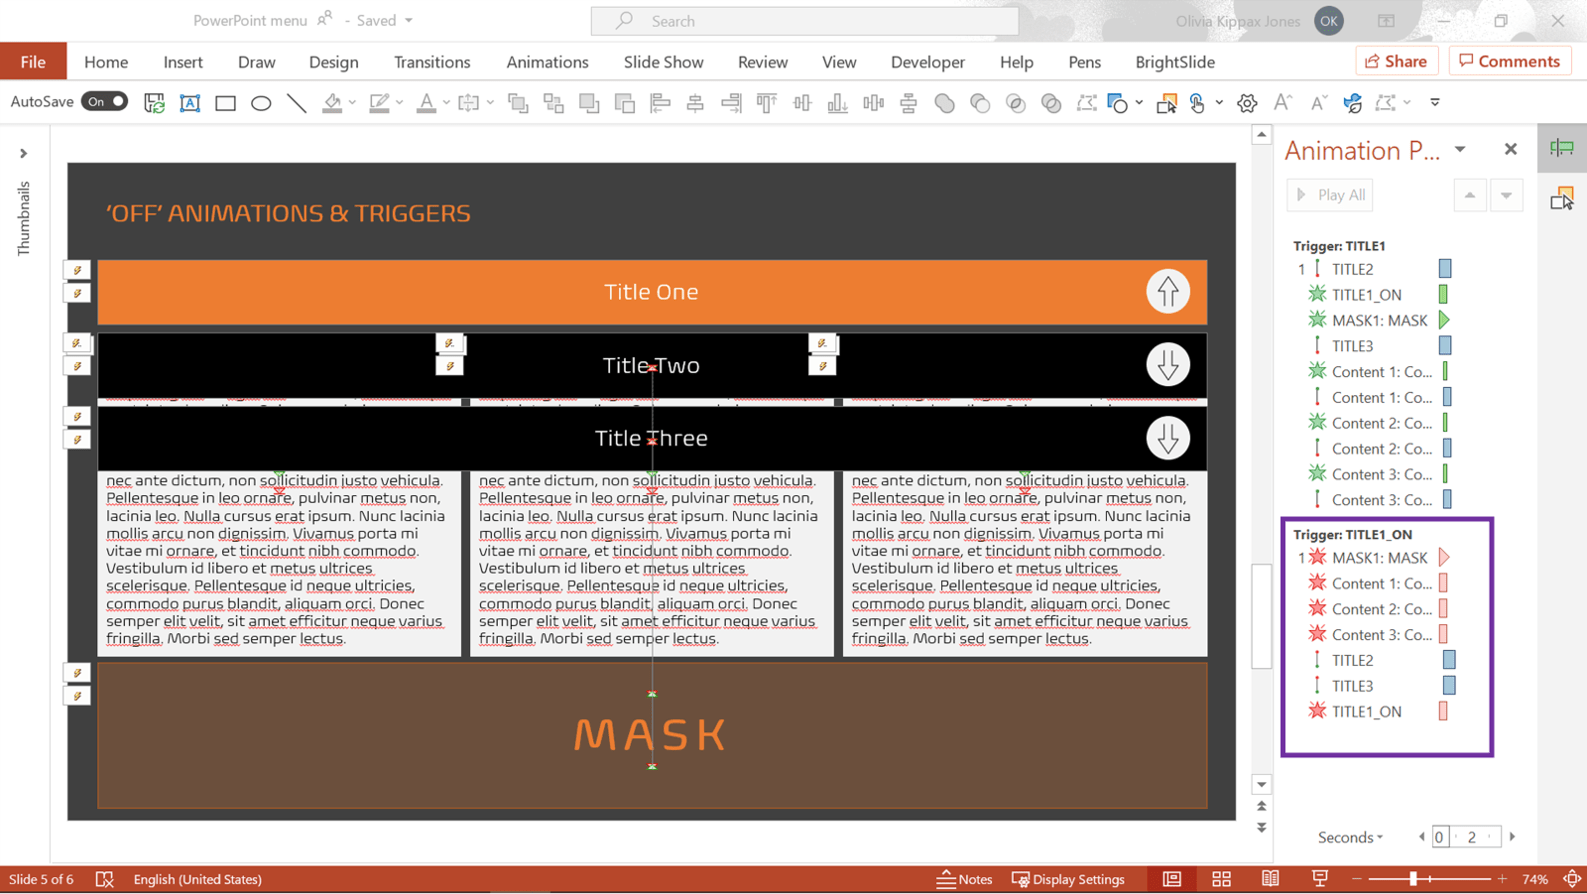
This screenshot shows all the animations I used to reverse the drop-down effect under the second trigger section. Now you should have one group working perfectly.
Repeat these steps for the Title 2 and Title 3 buttons and content. Remember to add in the masks at each stage to stop your users breaking your slide. The more options your users have, the more packed the Animation and Selection Pane will be– this is why it’s so important to label everything.
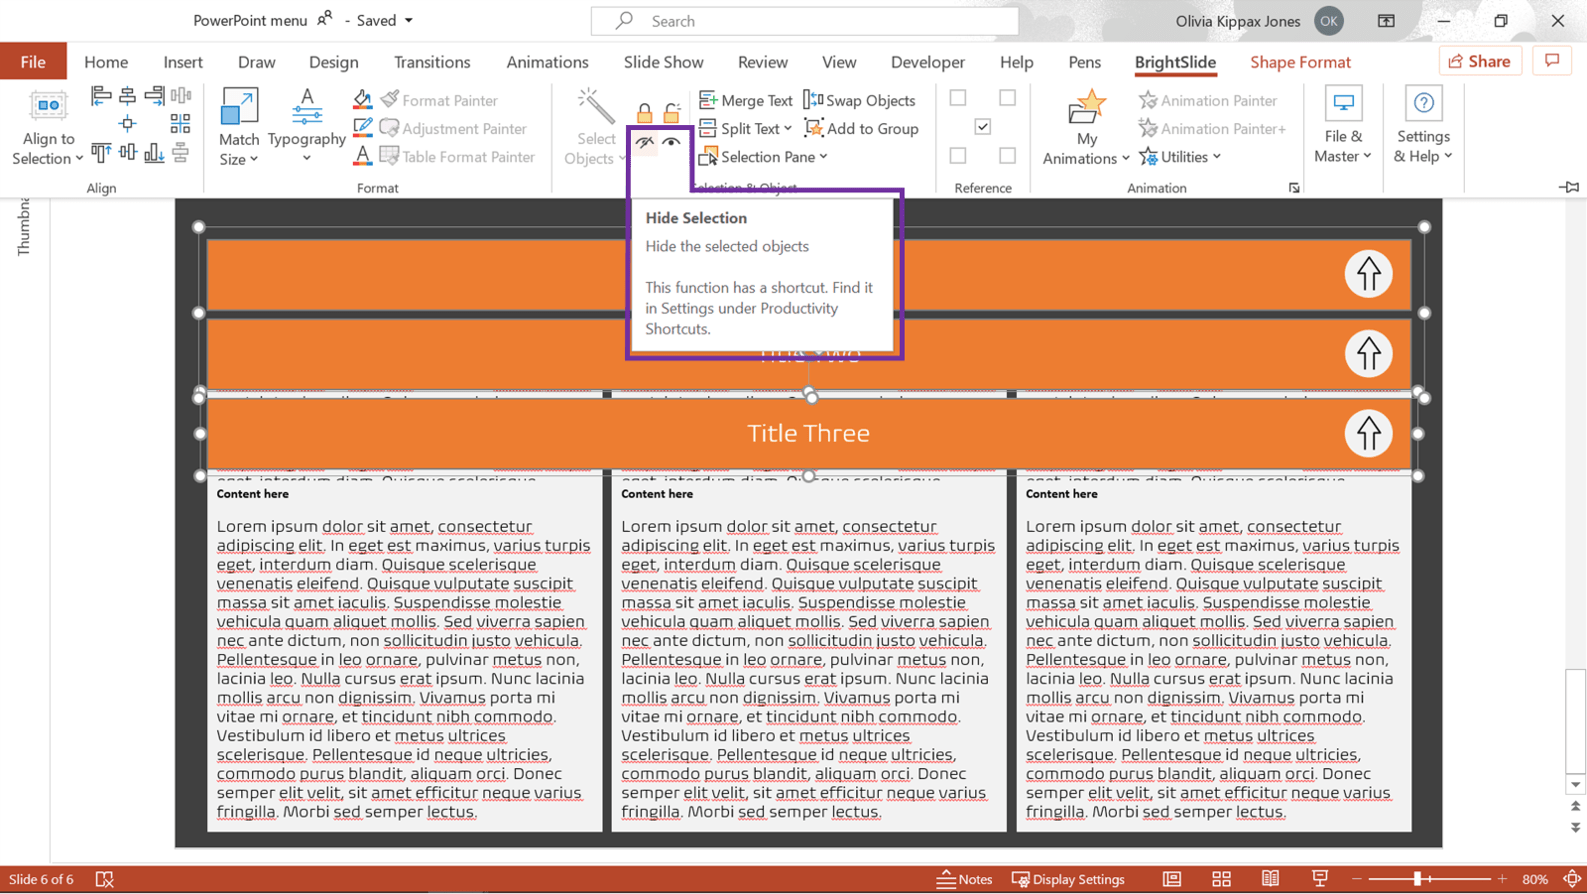
Tip: Use BrightSlide’s Show/Hide feature to help you work on your slide without having to move objects around. Simply click Hide to hide the selected object/s then click Show to show all objects.
This is what your finished PowerPoint drop-down menu should look like. Your user can click the bars in any order, any number of times.
Finally, save the deck as a PowerPoint show (ppsx). Go to File> Save as then select PowerPoint Show.
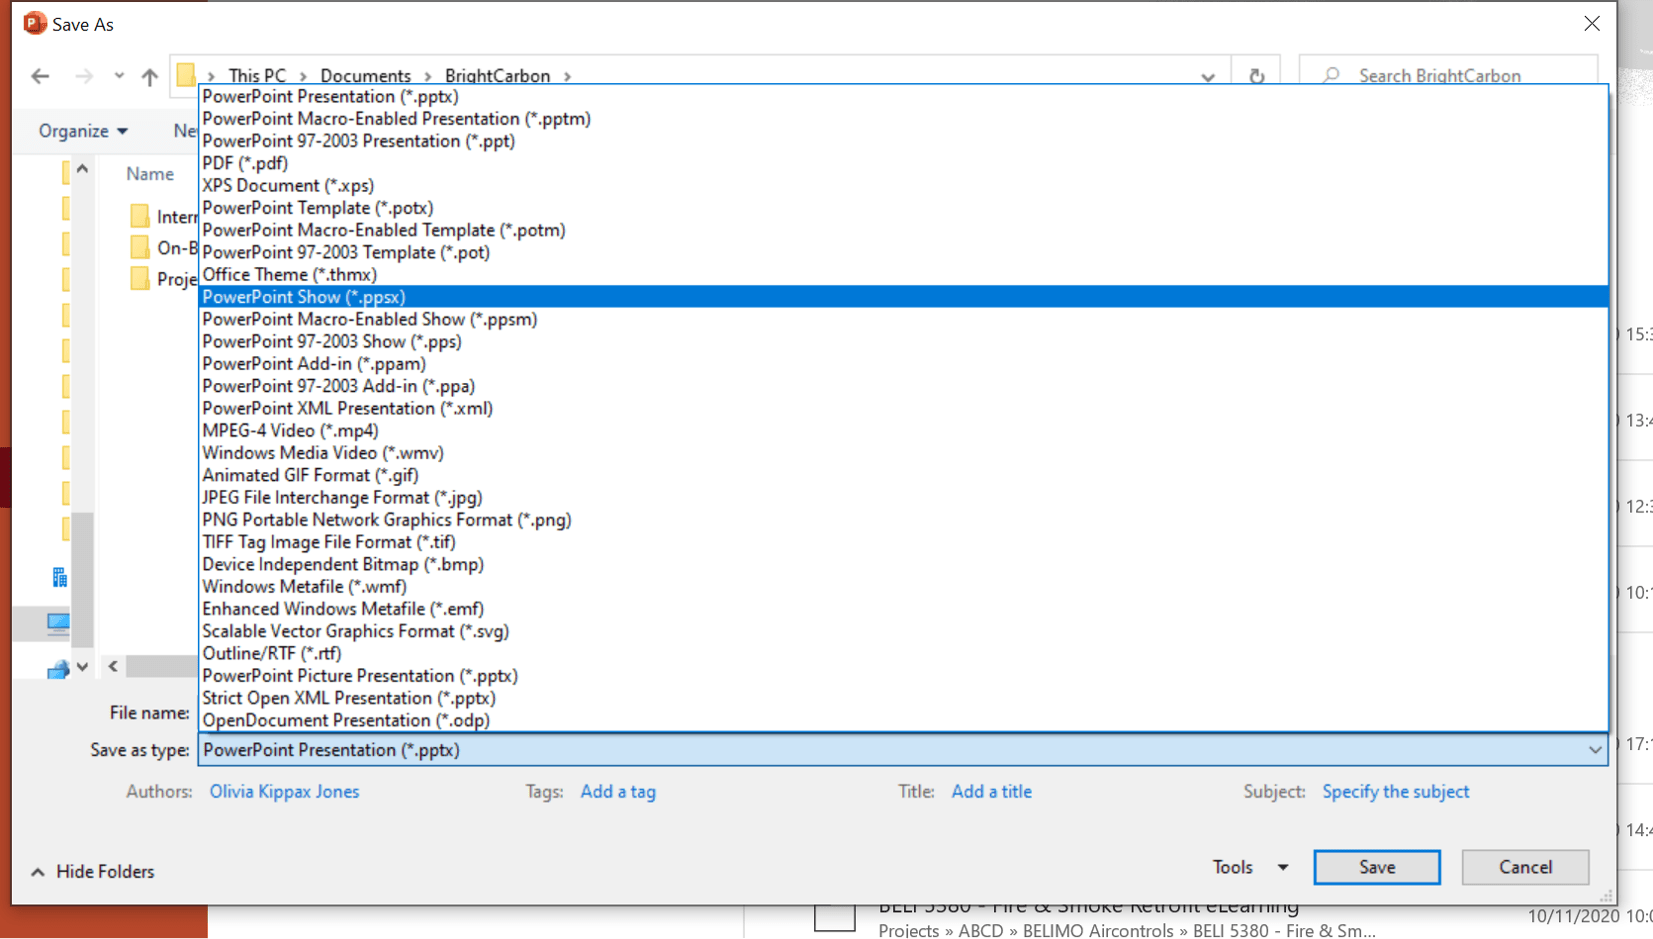
If you save your PowerPoint presentation as a PowerPoint Show it automatically opens the deck in slide show mode when the file is opened so your user doesn’t see the slides in edit mode. This is a great option if you’re sending the deck to colleagues or a client or using it in a booth or kiosk.
And that’s how you create a drop-down menu in PowerPoint! If you have any questions leave them in the comments and we’ll do everything we can to help!
For more on interactive presentations dive into Supercharging PowerPoint interactive presentations with VBA or How to make interactive PowerPoint slides for eLearning.
Leave a commentFunctional presentation slides can be fabulous too! Add a little spice to your live PowerPoint charts with this delicious doughnut chart DIY.
We’ve been investigating what gets lost in translation when you open a file from Microsoft PowerPoint in Google Slides. While both platforms broadly serve the same purpose, there are lots of differences between the two and we’ve noticed certain glitches and issues when you convert PowerPoint to Google Slides. Here's what to look out for.
Sometimes we struggle to find things and get frustrated when they don’t appear, whether it’s locating your house keys, finding Wally in a sea of Wally impostors or hunting down the partner to that lone sock at the bottom of the washing basket. Or maybe it’s replacing fonts that PowerPoint says are present in your file, but you just can’t find and your childhood Wally searching skills are letting you down. Well, this post can help you with PowerPoint, but you’ll have to find the sock yourself, sorry!
Join the BrightCarbon mailing list for monthly invites and resources
Tell me more!I am always astonished at how quickly BrightCarbon consultants pick up the key messages in very complex healthcare services.
Sarah Appleton Brown Practice Plus Group


Is there a video tutorial for this blog by any chance? Or availability for someone to help and walk me through some of the steps?
We don’t have a walk through of this particular example however we do have another example of using trigger animations which you can find here: https://www.youtube.com/watch?v=q9GzugiIODk The principles are the same, so hopefully following this will help you to understand the process and implement the idea to your chosen design.
Is it also possible to save this as a PDF?
Sadly, animations do not carry forward to PDFs once exported from PowerPoint. Therefore the triggers and following animations will not be present in the PDF.
This is great, but step 2 needs a lot more detail — it needs to be broken down into more steps. I got lost
As I have mentioned above, we do have a walk through video of trigger animations that can be found here: https://www.youtube.com/watch?v=q9GzugiIODk
This might be of help to produce each step in the process to your chosen design.