Arvinder: Hi, everyone. Thanks for joining today’s webinar, Navigating Digital Investigations In 2020 Using BlackLight And MacQuisition. My name is Arvinder Garcha. I’m the Director of Channels at BlackBag for Asia Pacific and Latin America. So before we kick things off, there are a few notes we’d like to review. We’re recording this webinar and we’ll share an on demand version after the webinar is complete. If you have any questions, please submit them in the questions window, and we will answer them throughout, or in our Q&A at the end of the webinar.
I’m excited to introduce our speaker today, Tim Thorne, he’s our Senior Solutions Engineer at BlackBag. Tim completed 30 years of service with the Metropolitan Police in London. Prior to roles in digital forensics, he worked for New Scotland Yard in drugs, murder and robbery investigations. He specialized in longterm covert internal corruption investigations, and later became the Anticorruption Command Lab Manager for network and digital forensic investigations. He went on to lead the New Scotland Yard counterterrorism unit, where he managed a team responsible for exploiting digital media associated with those engaged in acts of terrorism, both in and outside of the UK. So thanks for joining us today, everyone and welcome Tim. Tim, if you’re ready, I’ll hand the reins over to you to get started.
Tim: Thanks. So good morning. Good afternoon, everyone. And welcome. I hope you’re all staying safe in these current awful times that we have. So we have just an hour or so. A quick overview of what’s new for 2020 from BlackLight and MacQuisition to assist you with your digital investigations.
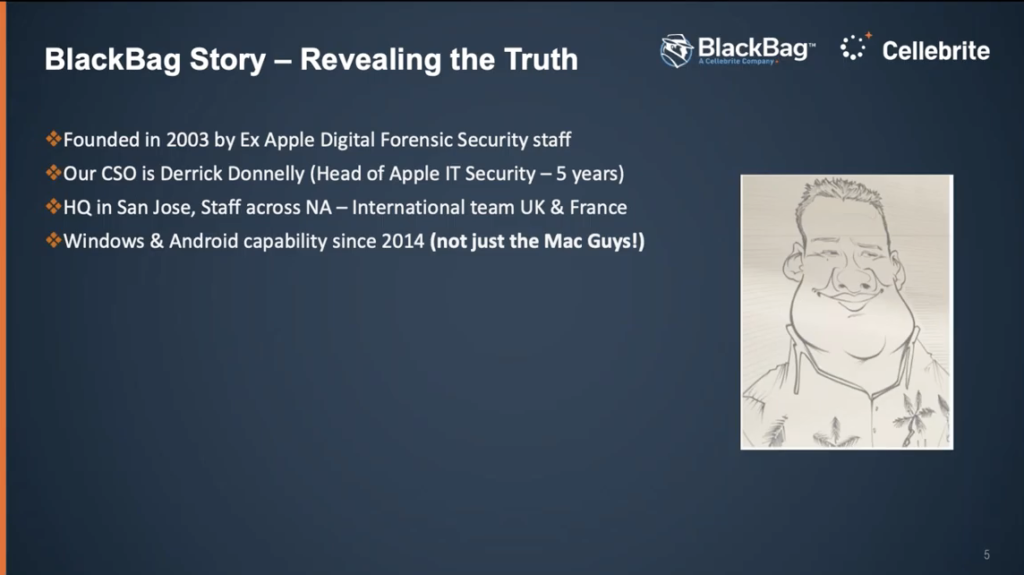
And just to kick things off, I’d like to start off with just a quick potted history of BlackBag. As many of you may know, the company was founded in around about 2003 by some ex-Apple digital forensic security staff, and the guy who’s on the screen there, Derek Donnelly, was one of the founders and he was… or he’s currently our Chief Scientific Officer. So specializing in research and development in and around new technologies coming from Apple and Windows. Of course he was the head of Apple’s digital forensics department for five years. Around the time of when Steve Jobs of course was the boss. So he has some great, interesting stories for what happened back then.
We have our headquarters in San Jose in California, and the vast majority of our staff are based across North America. And we currently only have about 58 staff directly employed by BlackBag. Of course that’s changed as a result of our recent acquisition. More on that in the moment.
We have a small international team based out of the UK and France, and this team is responsible for everything that goes on pretty much outside of North America. Many of you will also be aware that we actually support Windows and Android and have done so since 2014. Many of us have always imagined that BlackBag are just the Mac guys: this is no longer the case. And the reason this came to pass was because we were approached by the investments funding on behalf of the US government and they said, look, we like what you do with Mac forensics. Why can’t you do the same for Windows and Android? So that’s what we did prior to 2014. And since then we’ve been fully supporting Windows, Android, iOS, and Mac with it directly within our forensic tools. We went on, we pushed on with our development in these areas and we have Windows memory forensic support added directly into BlackLight, which I have to say is super easy to use and makes memory analysis, actually, something that’s pretty easy to do.
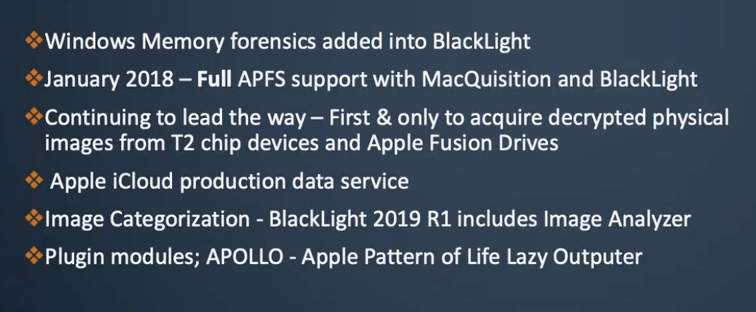
And this the sort of thing I appreciate as a practitioner, because I know we can’t in the forensics world will be expert in every subject within the forensic world. So it’s quite nice for us to have a tool that every examiner can actually operate in respect of a Windows memory and easily find and discover for instance, malicious processes or evidence of malware running on a computer using BlackLight’s built-in memory forensics function. Of course, we like to lead the way with Apple forensics because we are still the leaders in this field. And in January 2018, we were the first to announce that we have full support, but APFS in our acquisition and BlackLight products, this is quite important because we will say that we support APFS fully. Some of the other forensic companies may support APFS, but some of them are… how would you say… honest enough to say that their support is actually limited, whereas we’re happy to say that we will provide you with full support around APFS, which of course is now the preventive file system across all of Apple’s devices, including the iPhone.
We also continue to lead the way in respect of imaging Mac computers. And we still have the first and only tool with MacQuisition that can give you a physical decrypted image from a T2 chip Mac. And the same from Apple fusion drives. This is so important in forensics. Most of you will appreciate the value of getting that physical image there in mobile devices as and when you can, but now with the T2 chip Mac this is equally as important because every single computer coming out of the Mac factory right now has a T2 chip on board.
And all of the competition in this area will give you a logical read, and of course MacQuisition can give you a logical read of a T2 chip Mac, but it goes that extra step. And we’ll give you that physical, full physical decrypted image. And we believe in the attempt to decrypt unallocated space on the T2 chip Mac. Of course, you’ll get varying results depending on how aggressive a trim and the other mechanisms tidying up on allocated space are. But with the physical decrypted image, there’s potential for you to get tens of thousands of more files than you will get with a logical read. And one of the main reasons for this is because the file system, when it gives you a logical read from your forensic tool, that logical read does not give you everything. It’ll give you what the file system wants to give you the file system itself.
We’ll sit on top of some data that is not deleted data, but it’s not critical data, but the file system owns, but is not willing to give you. And that’s why it’s important to get that physical decrypted image whenever you can. Some of the other new things that came 2019 and into the early parts of 2020 include the ability to deal with Apple iCloud productions directly inside BlackLight now.
So when you get your iCloud production from Apple, which I urge you all to try and do, I know this isn’t being taken up particularly vigorously by everyone, but Apple are actually very good at giving you data and giving you information. But you need to ask for it. And one of the first things you should do early in your investigation is approach Apple and make sure they preserve the data that they may hold on your suspects, because they will do this and then provided you get back to them within the requisite time period with the correct paperwork, they will then give you this data. And they are actually very, very helpful in this respect.
Unfortunately, what we’ve seen is a large amount of that data is not easily readable due to encryption and compression and the way in which it’s delivered to you. But now we have a mechanism that means you can do that directly inside BlackLight. So you don’t have to actually send the data outside of your organization any longer, which was the service we provided up until the beginning of this year. Some of the other new things that have come to light since 2019 include things like image categorization some really clever AI built directly into BlackLight, that gives you the ability to categorize your images. We have some technology that we’ve added as plugin modules and our first one is the Apple Pattern of Life Lazy Outputter. I’m going to talk a little bit more about that in a moment.

So perhaps the biggest news for us as employees, and hopefully this will turn out to be really good news for you as our customers, is that we’re now a Cellebrite company. Cellebrite acquired BlackBag at the beginning of this year, and we’re now well into the integration. And I have to say I think this is only going to be good news for our customers because we’ve gone from being a relatively small company, 58-60 employees at any one time at BlackBag, and now we’ve joined a much larger company of 700 plus. And we have access to some amazing resources around R&D, mobile device forensics, and all sorts of other benefits, which I’m sure are going to filter down to the customer with time. It’s kind of exciting, really. So let’s get on with this.
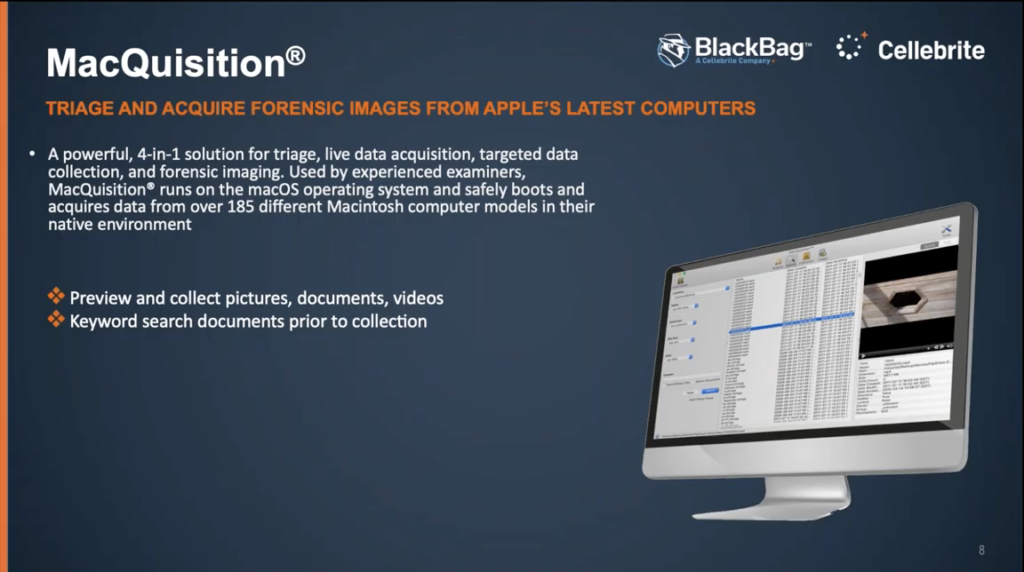
Let’s start to look at the tools themselves. And I’m primarily, or I’m only, going to talk about MacQuisition and BlackLight today. So MacQuisition is now a four in one solution for your Mac investigations. This is because we’ve added some extra functionality. And the slide there, it says we support over 185 different types of Macintosh and models in their native environment. I think that number is actually higher than that. Now some of the new functionality that’s come this year with 2021 acquisition is the ability to preview and collect pictures and documents when you’re running in the live mode. This is excellent. And this is assisting those situations where you need to access a live running Mac. Now maybe that’s because time, maybe that’s because of the worries around encryption and whether or not you have access to passwords, et cetera, but this is what MacQuisition can do for you.
Now, you can actually go and preview all of the documents, pictures, and videos, and before you select them for your collection, can of course be a huge time saver. You can also do keyword searching on a live running system. This is a real bonus. You can actually go and search out specific keywords, either in the file name or within the document, or live in the binary document file. And you can go and then select the files that are relevant to investigation. This could help you if perhaps your warrant limits you in that way.
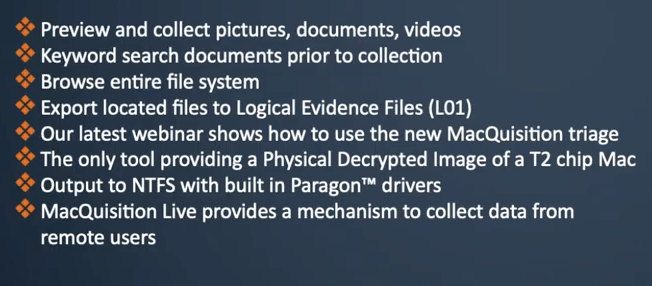
And also you can browse the entire file system live using MacQuisition. Once you’ve made your selection, either by doing this previewing mode, you can actually export that to an [inaudible] file. And this new feature is very useful because it helps protect your metadata. We can wrap up the collective files into a nice logical evidence container, which you can then later bring into BlackLight for full analysis and they would have protected some of your metadata, which of course is very important. We have a webinar that’s out there at the moment called Take It Or Leave It, it’s available on our website. And this goes into some detail around some of that functionality.
And once again, just a reminder, remember, MacQuisition is still the only tool that will give you this physical decrypted image of a T2 chip Mac. We have built in Paragon drivers with MacQuisition now. So this gives you the ability to write to NTFS drives, for instance, because as I’m sure you know, natively your Mac will not write to an NTFS volume. You can read it with a Mac, but you certainly cannot write to it unless you have some extra drivers. We now give you those built directly into BlackLight.
And some of you may have seen that because of the the coronavirus situation, we were able to give our MacQuisition users a mechanism to collect data remotely using MacQuisition by supplying you with a software version of MacQuisition. So this is great. This gives you a way of dealing with those Macs that you physically can’t get to right now because of the restrictions around travel, et cetera. And it gives you a whole new approach to the way in which we can deal with targeted collections from Macs at the moment. And I urge you, if you are a user of MacQuisition, to take a look at our website and you can see there’s a a blog that explains to you how you can get your hands on the software version of MacQuisition to assist with your remote acquisitions right now.
So we’re going to take a look at MacQuisition Live in a moment, but before we do that, we just took another quick overview this time of BlackLight, just to discuss some of the key functions and some of the new things for 2020. BlackLight of course remains the only commercially viable tool that can run on Mac or Windows forensic workstations. And in my opinion, it remains one of the easiest tools to use from a forensic training perspective. We think we can take people with very little forensic experience and give them two days of input. And we can do this online with our virtualized training at the moment, and we can teach them to be productive with BlackLight within those two days. So what this means is they can take a piece of evidence and actually go to a position where they can produce reports that are meaningful and useful to support digital investigations just with those two days of investigations.
So here’s a few of the more recent improvements and developments that apply across both platforms. We’re going to look in some detail in a moment about ingestion, how to deal with your evidence ingestions. This, I always spend a little bit longer on this than perhaps I should do, but for me, it’s almost the… well, it is the second most important phase of your digital investigation, because getting the best forensic images is the first and most important thing for me and forensics. And then the second is actually applying the best processing options to that piece of evidence. And this can mean a number of things. It doesn’t mean applying everything. It means applying what’s right for the situation that you’re investigating. So that’s what I like about the way BlackLight does with this, because it gives you some really flexible ingestion options.
We have some new ways of bringing in our Cellebrite ingestion evidence items. And we have a direct integration with Passware at the moment, which is seamless, which means you won’t even notice that you’re running Passware in the background to mount your BitLocker or other encryption containers directly inside BlackLight. Once you’re at the analysis stage, we’ve redesigned the way in which our filters work, BlackLight has always been exceptionally good at filtering large data sets. But now we’ve gone a step further and we’ve allowing users to create complex file filters and file filter groups. And this is very useful for managing large data sets, which BlackLight is good at, because you can bring in a huge number of evidence items into BlackLight, and then use this complex file filtering system to narrow down to the data that’s relevant to your investigation.

We’ve even made some improvements to our automatic pausing of items, such as account information downloads and cross platform activity, system activity, file system activity. And we’re going to look at that shortly when we go live with the demonstration we’ve also added extra support for log file pausing and the ability to deal with logical evidence files or folders directly within BlackLight. Smart indexing came in towards the end of last year, and this has been extended further now to deal with and capture things from file metadata, which will be indexed now as part of the elastic search, which is a super fast way of dealing with the way in which we index files.
Let’s look at Windows now, specifically some of the new support in Windows. We’ve had the ability to look at the device histories from multiple volumes and multiple volume shadow copies. And we do this in a way in which it’s very easy to reveal a file history on different items. So when you find the file in Windows, there’s a very intuitive way of then comparing what you’ve found with various system backups, volume shadow copies, simply by right clicking on the file. You can go and explore the various historical versions of that file.
We’ve extra support for some of the artifacts under actual intelligence button, in the actual intelligence button. And we’re actually automatically parsing out all of the account info across both platforms, web history, downloads, and Windows 10 timeline activity, and such like directly into BlackLight.
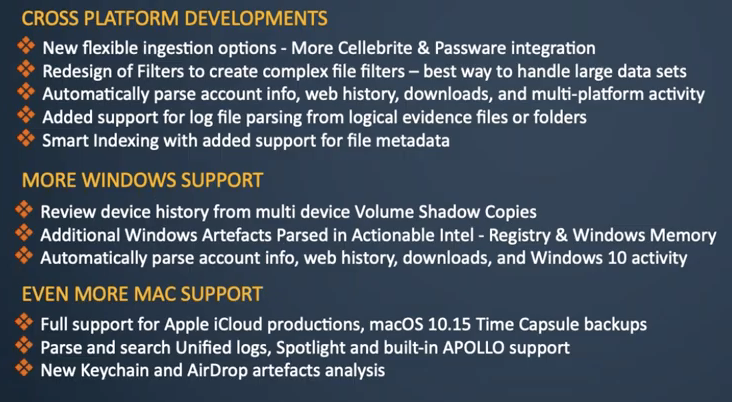
And of course, we continue to develop our, our max support. I’ve mentioned already that we have full support for iCloud productions. We now also fully support the 10.15 Time Capsule backups directly into BlackLight, and we know how awkward they can be. But now BlackLight is making that very easy for you.
We have now built directly into BlackLight the ability to handle and search across unified logs. This is a huge resource of information within the Mac world right now: a lot of the logging has been moved over to this unified logs over the last 18 months. And it’s a huge, huge amount of data. And in fact, you’ll notice when we look at that shortly, you’ll see that you’re not even allowed within BlackLight to review that type of data without applying a filter from the start, because there’s simply too much data to display it all in one go.
We also have support with APOLLO: Apple Pattern of Life Lazy Outputter support. This is some amazing scripts have been written by Sarah Edwards, a former SANS… or I think she’s still a SANS instructor, but she’s employed full time with us now at BlackBag. And this is some amazing stuff on some of those databases, SQL databases in particular, in iOS or even on Android, or even in Linux, you can run this script, these series of scripts, well over 200 of them now, against these databases. And the granularity and the detail in this data that’s being pulled out by these scripts is staggering.
And just recently we added more: a very neat way of dealing with keychain within BlackLight. And I’ll show you how we handle that in the moment. And it’s making the… it’s giving us access directly within BlackLight to try and crack keychain data and reveal more information that is available in your Mac analysis.
And also we’ve done a lot of work on Airdrop to give you a lot more information within the GUI in an easy way to understand Airdrop transfers and to identify files that have been received or sent using Airdrop. And we attempt to identify who the sender and who the recipient was.
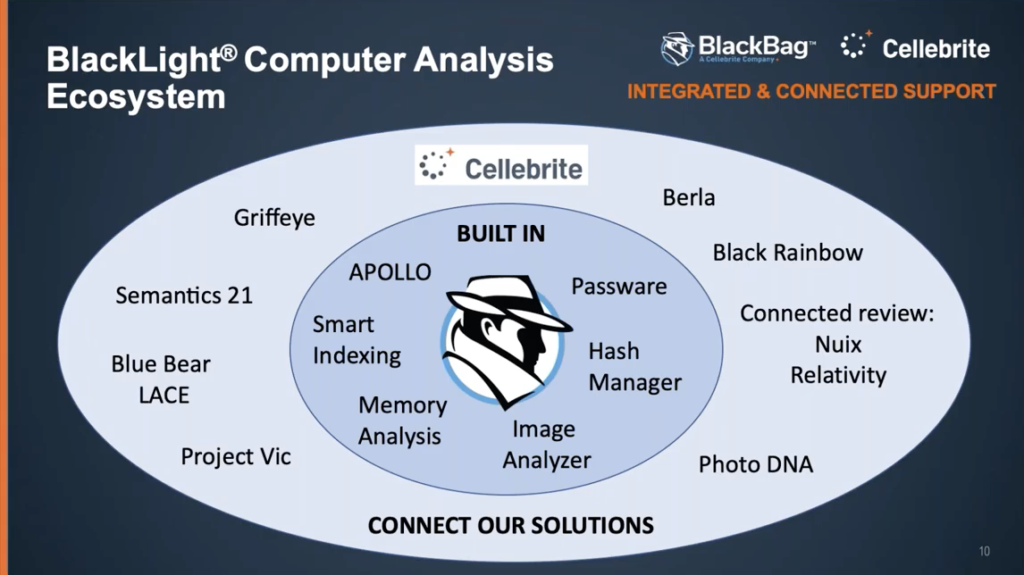
Okay. So what does, what does all of this look like? This is a little bit… a lot of development in the last two years and it sort of has helped develop this, what we call a forensic ecosystem, where in my chart on the screen, now you should see that we have some built-in functionality and the dark blue inner circle there, this is functionality that’s built directly into BlackLight. And it includes the things like APOLLO that we’ve mentioned, smart indexing, memory analysis, image analyzer, Passware, all things I’ve touched on already.
And then just as importantly, around the outside, in the lighter blue colored area, are all of the other tools that we support or we receive, we can ingest evidence items from, or we can export to. So for instance, up in the up in the top right hand corner, we have Berla, which of course they do great work with vehicle telematics extractions, where you can bring those directly into BlackLight now, so you can compare someone’s Berla extraction – their vehicle extraction – along with our iOS and Android and their memory, and then MacOS extractions as well. You can see all of that information in the same interface. Of course we have an even closer working relationship with Cellebrite now and we support their ingestions, and this is something that’s going to get even better as we move forward, without a doubt.
We export and we prepare reports and export functionality to communicate directly with some of the legal review platforms. Our data company send directly out for Nuix ingestion or for tools such as Relativity, making it easy for people perhaps in the corporate sector who use tools like these legal review platforms, you can make sure that BlackLight produces a product that can go directly out into these.
There are, there are plenty of other tools that we support such as Griffeye, and then a relatively new one from the UK called Semantics 21. These are all great tools. We don’t try and restrict you to any one of these, and we like you to have the ability to use BlackLight to to talk to all of these other tools.
So I please feel free… for some of you, you may have noticed on the webinar, there is a Q&A box. So if you have a question as we go through, please fire into there. Unfortunately due to the number of people here, we haven’t really got time to open up the audio for questions, but if you type a question in there and I can get to it, I certainly will do. And I then will be monitoring that box for us as well as we go through.
So what we’re going to do now is we’re just going to jump quickly over to a live demonstration. And what I wanted to do was show you guys MacQuisition, and hopefully I’ve just pulled it up onto your screen there.
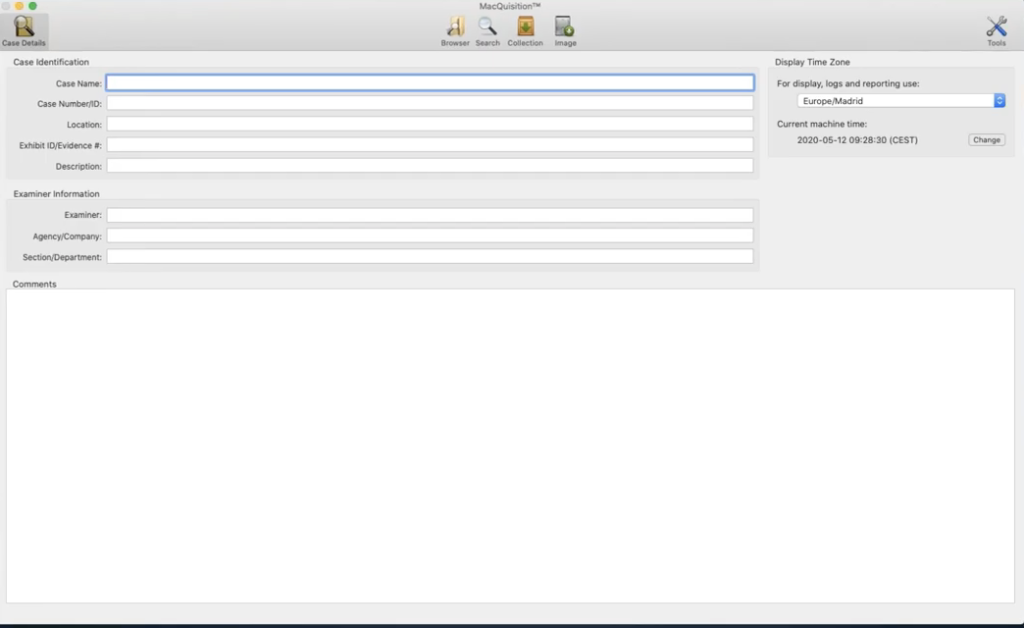
Just double check that we’ve got it… yes, there we go. So MacQuisition for those of you currently using MacQuisition, there’s no obvious GUI interface change right now, but as you look at it in a little bit more detail, you can see that there are a couple of changes to the buttons, and I’m just going to cover those off in a short while at the moment, we have across the top of the screen where my mouse is moving backwards and forwards, this is the area that we’ve referred to in both BlackLight and MacQuisition as the command bar, because it has these buttons that control what’s being displayed to you. So it drives the whole of the interface.
So at the moment, over here in the top left, I have the case details button selected. So this is where the user of acquisition can enter the information relevant to their case. And of course, we encourage you to be as descriptive as possible here, because it’s easy to get in a mess later when you don’t remember exactly what image number 50 or data collection number 60 was all about. This is your opportunity to fill in the data. And here’s a free text box underneath where you can type in some additional comments.
What you would have spotted is over here on the right hand side, this is new within MacQuisition, where it says current machine time. And it’s displaying to you the machine time of the machine on which you are running MacQuisition at this moment in time. So this is me, I’m actually running this live on the machine that I’m doing the presentation to you guys on. And so it’s showing you that I’m based in in central European summertime, and this is the correct date and time for me, where I am right now.
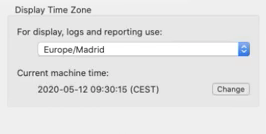
Now, the reason this is important is because recently we discovered that where a Mac goes flat, occasionally when it goes completely flat and the system time is lost because there is no battery power inside the Mac at all, this current machine time will reset to a Mac epoch. In other words in the hex, there will just be zeros. And Mac will record all of those zeros as the beginning of time for whatever epoch is in force. So if it happened to think that all zeros means it’s 1971, then it will display a date and time of 1971 in here.
Now that never used to be a problem, but it is now because our imaging will not like that. And it will not let you image a computer that is so far off the actual date and time. So what we have done with this version is we built in this ability to hit this change button here. And that’ll open up another little box that’ll allow you to set the system clock. So this means you can bring the date and time up to something more meaningful, and you can then go ahead with your imaging. I don’t need to make the change because this is obviously a live running Mac and everything is good.
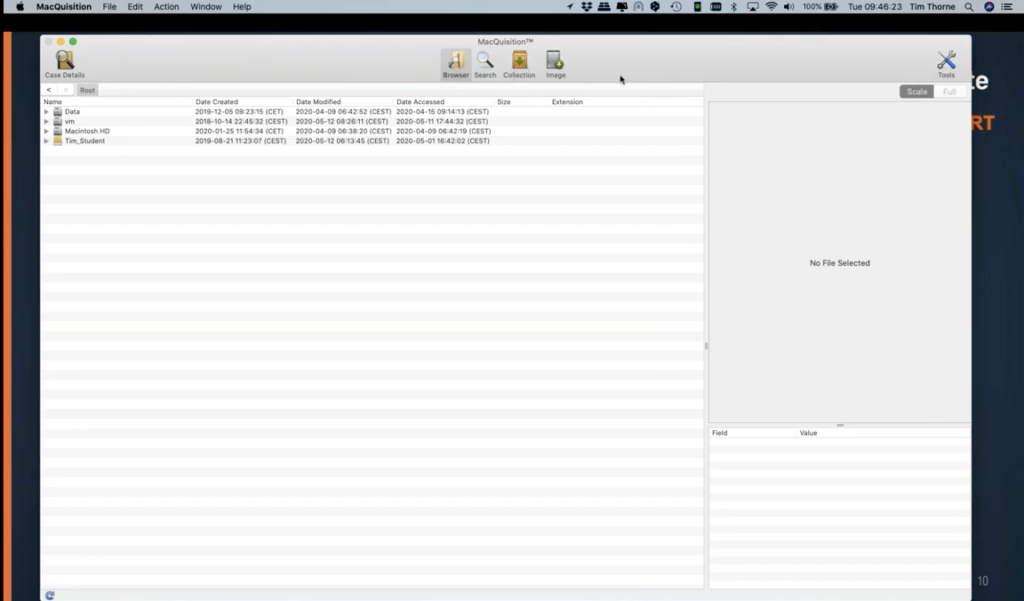
So what’s the next button over? If we come up to the command bar again and scroll over and look at the browser button, this simply gives you as a user pretty much for probably most of you would expect to see anyway, even if you weren’t MacQuisition users, is the ability to browse the file system using the triangles here on the left hand side. So if I wanted to look into my Macintosh HD, I can expand the volume by clicking on the triangle to the left, and I can start to drill down into the file system simply by clicking and expanding all of the triangles and browsers file system up and down, like so. So this may be the way that you choose to get to your user’s data. Maybe your warrant actually says, all you’re entitled to take in this particular case is the whole of the Tim directory.
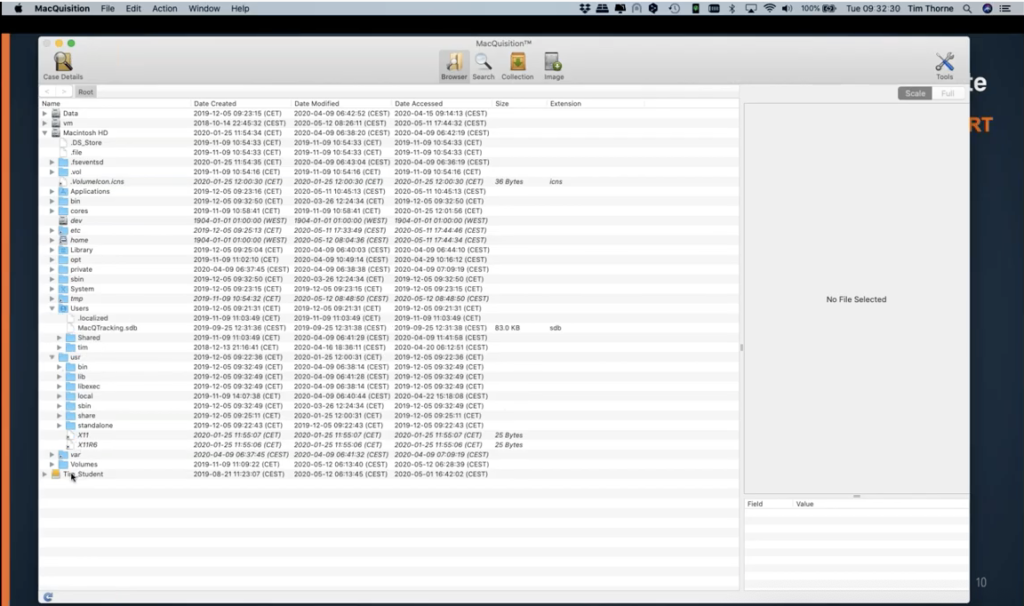
So it says Tim here, as I said, this is my work computer. So you can see that this is where I would go. And I could just take the whole of this directory simply by right clicking on it. And a box opens up saying, add selected items to the collection. If I needed to go down that route. Of course, I’m probably more likely to be going down a little bit more granular than that. And so I would open up maybe what I’m going to be interested in in this case is all of the… say the downloads folder, for instance. And then here’s the downloads folder. If I expand the downloads folder again, or if I double click the downloads folder, I can now see the contents of Tim’s downloads folder.
And if you noticed at the top, just underneath the command bar where my mouse is right now, you can see we have this trail of where we are, which is kind of neat because it gives us the ability to browse up and down the file system without having to click triangles to minimize and maximize. So if I wanted to go back to the users part of the path here, if I just click users, it’ll take me back to users, or if I need to go back to the Macintosh HD I just click to the root of the Macintosh volume, and it takes me there. And then I can use these backwards and forwards arrows just to the left here, where my mouse is. And so I can just go backwards and forwards as though I’m using a web browser to go up and down the file system. It makes navigating super easy.
But what you’re more likely… or what I find it particularly useful when we’re running training classes and people want to know how the best use MacQuisition, they like this new search functionality. So the third button over is the search button. So if I select search: opens up a new window and gives us the ability to do some searching across the evidence item that we’re exploring with MacQuisition. In fact, before I go on, there’s one thing I just realized I wanted to mention to you because this is useful.
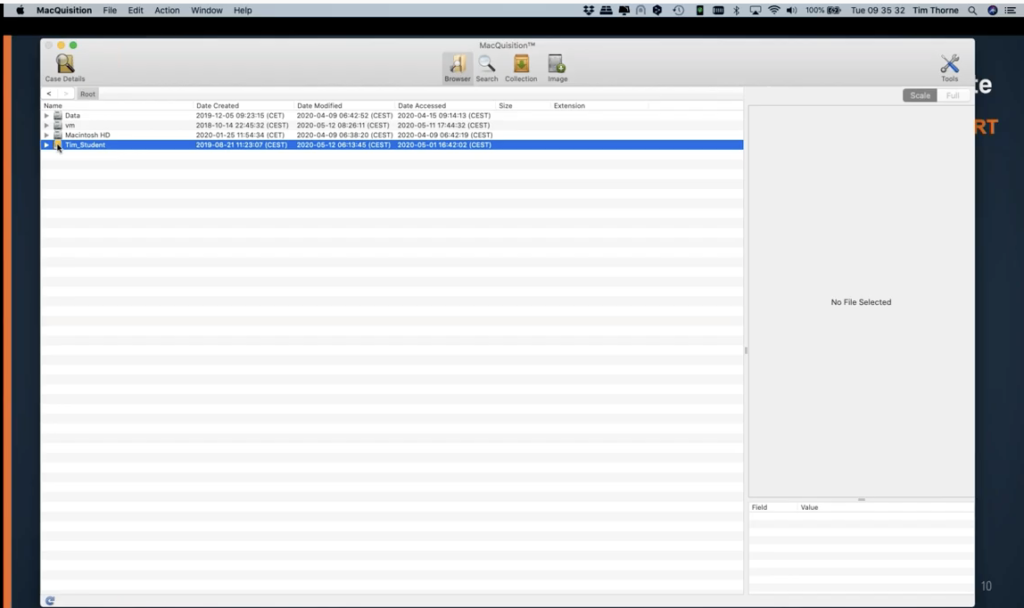
If I go back in the browser view to the root of the drive, I didn’t… what I forgot to show you was, it’ll actually deal with attached volumes as well. So can you see, I have an orange item here called Tim on the school student? Well, this is indicating to me that I have attached to my device. I have a[n] external hard drive attached. This of course is available in exactly the same way. So I can browse this because it’s an attached device, and I can select and add items from here to my collection as well. So that’s worth knowing: when you start to see all sorts of extra devices down here, they are not always going to be internal devices. They can be externally attached devices as well, which could be useful for your investigation.
So back to search. So within the search functionality, you’ve got the ability here to look at particular locations. So if I come over to the left hand side, just underneath the case details button, where it says location it’s possible for me from here to actually determine the location that I want to do my searching in. So let’s focus on Tim’s downloads folder again. So if I just select the downloads folder right now like that, and then if I decide actually, what I want to do, I don’t know the file name right now, but what I’m going to be interested in is a particular file type.
So let’s try this, see how this works. Maybe if I go looking for PDFs, I could put extension is PDF. So let’s hit search. Wow. I need to tidy up my downloads box: there’s plenty of PDFs in my downloads box right now. So we could then extend this and we can start to use this search functionality as a bit of a filter. And if I decided, well actually, maybe all I want to do is look for PDFs that are of a certain size, perhaps if I went in here and I looked for a PDF that is greater than one megabyte, let’s see. So now I’ve narrowed down my search by some filtering and I’ve managed to get it down from quite a big number to the few that I have here.
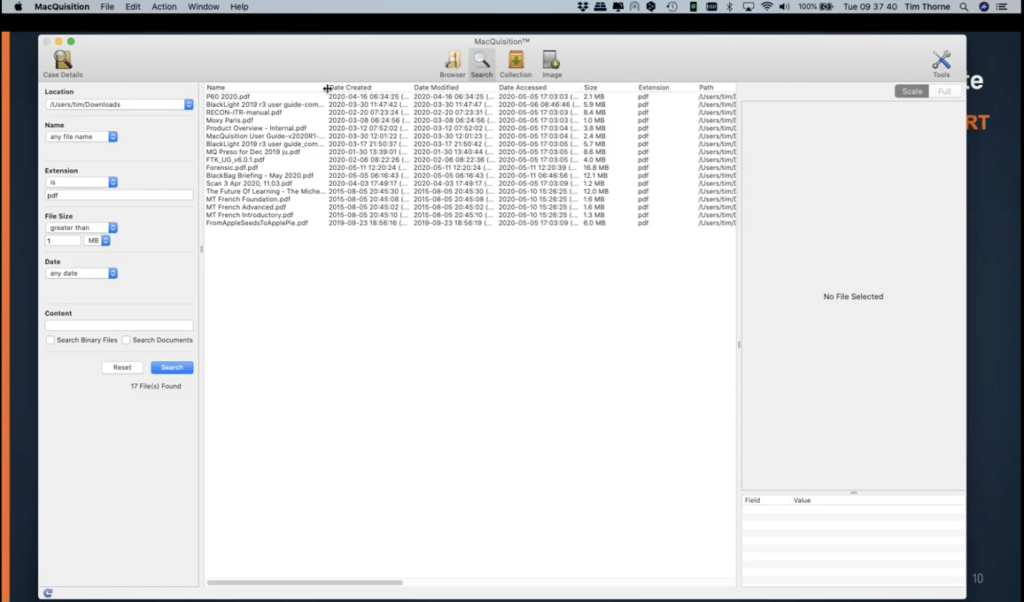
I could narrow down that search even further by date. Perhaps I had some relevant dates that we knew the bad guy had downloaded something for the internet, and I can actually go and look at the dates and be selective and filter on the dates from here.
So let’s come back out of this now, and I want to show you a different way of searching. So I’m going to hit the reset button. If you see there’s a button here that will clear this, giving me the ability to reset. So now that I’ve reset everything, let’s look at doing some searching for a document within within the downloads folder. So I’ve kept my downloads folder available, and now I’m going to search for… I spotted it when we were there a second ago… if I search for British. And if I search within documents and binary files and hit search, BlackLight is now searching across all of my documents and binary files, but only in my downloads folder for the word British. So it’s taking a few seconds because it’s had to look actually inside some of these zip files or these compressed files, binary files for the word British, and sure enough it’s found a couple and I noticed this one earlier, here’s a PDF. And over here on the right hand side, I’m getting a review of the document, and underneath the actual preview of the document, I’m getting some limited metadata about the file.
So what we would do is, if we wanted to add these to our collection, simply all we need to do is come over here, select the files that we want – I’m going to select all of these simply by holding the shift key down and then clicking. So now all four of these files are available to me. And by right clicking, once again, I can add these to my collection. So I’m going to go ahead and add them to the collection. So you can go on and on like that, and do your preview, and keep looking through all of the files and folders that may be of interest to you.
Perhaps once you’ve done that keyword search, you then also want to do a, a collection in the more established way that we used to do these with Mac position using this button here, the fourth button over, the collection button.
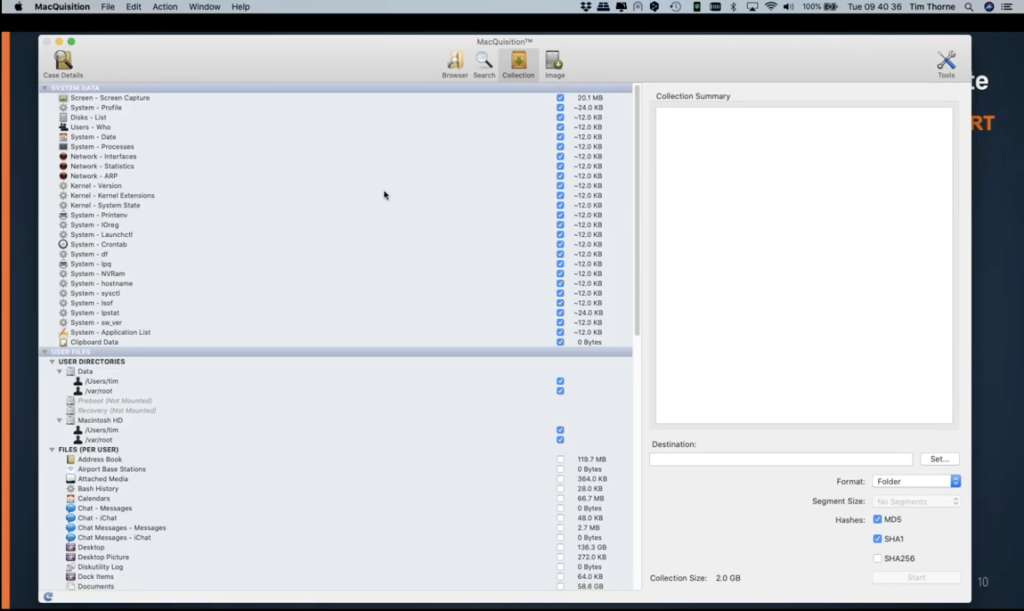
And this is very neat here, because this is where the guys at BlackBag engineering have developed this over the years to give you all sorts of categories of information that you can go and grab simply by selecting them on, by putting blue checks. Like you can see they’re already selected here or some of these system data or items, because we are actually in the system data area where my mouse is hovering now, indicating that we in the system data area, when we come down, the next area for data is called user files where the mouse is right now. You can see user files. And currently I have… there’s only two users on this. We have a root user and Tim me, my user account, and the moment both are selected. Can you see these blue ticks over here to the right?
Well, I’m not going to be interested in the root user for this collection. So I’m going to remove the tick from here. And you’ll notice all of these numbers now are recalculating. The file sizes have all changed now because we’ve narrowed it down just simply to Tim’s data, not the system data. So on a per user basis, you can see MacQuisition has given you all of these categories to select from, and there’s pretty much everything here that you would normally want to go for.
Maybe you’re just interested in email. So if I just highlight this email option here, come across to the size, and you can see actually, there’s quite a lot of email on here. I’ve got a 20.9 gigabytes of email. With that highlighted, over here on the right hand side where the mouse is now, you can see a collection summary of all of that information, and you can see exactly where MacQuisition is going to go and grab all that information for you. And you can see the file paths for all of those files. So it gives you a lot of detail. So you can be sure you’re getting the right information in your collection.

Some of the other things worth pointing out here, we may just be interested in the user’s key chain. And more on this later as well when we look at BlackLight. But down here on the right hand side… on the left hand side, rather, I’ve selected the user’s key chain. And I can see, look at the size of this key chain. There’s 71 megabytes of key chain information available to me from this key chain here. That’s a lot of information about passwords that may be available to us in BlackLight to exploit later.
Lots of other different categories there. Maybe you’re just interested in Chrome artifacts. And in this particular case, I’ve highlighted internet-Chrome, and there’s 2.6 gigabytes of Chrome information available to me in this case, a lot of data here.
So when we scroll down further, some more categories of interest for you here. Maybe you’re interested in the sleep image from this computer. So this is the image that’s generated when the computer’s about to go to sleep. This isn’t the same as when you push the lid down on your laptop. This is an image file that’s generated just before the battery goes dead on you. And you can see I’ve got two gigabytes of information in my sleep image file that could be relevant to my investigation.
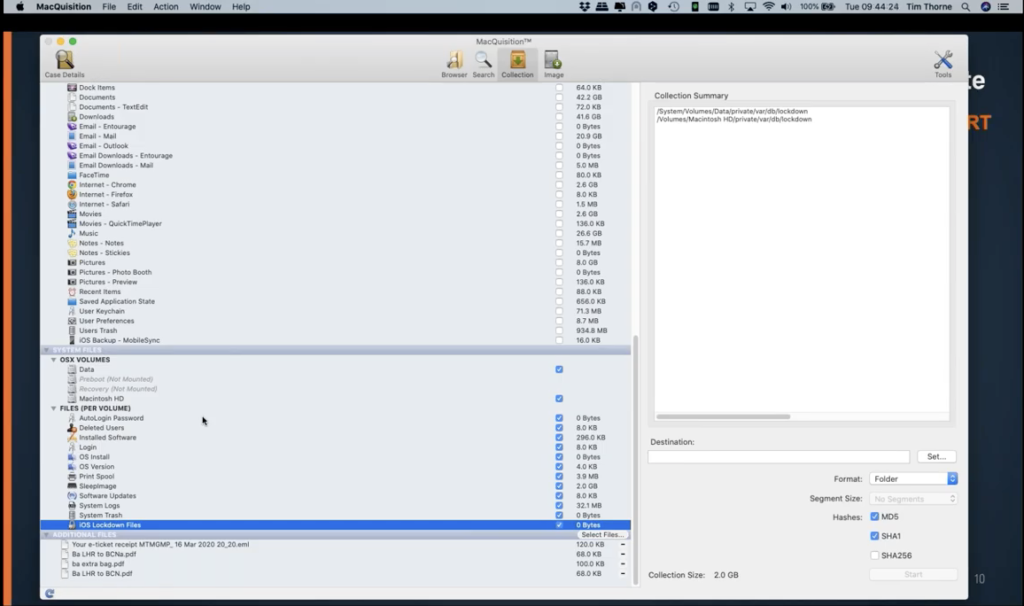
What else is worthy of mention? Of course, the next two or three lines down, you can see there’s iOS lockdown files. Well, this used to be so useful to us, didn’t it? When we could use these in respect to the iPhone analysis and it used to be the case that you could take the lockdown files from a bad guy’s computer, put them onto your own forensic machine, and then convince the attached iPhone that it was back home, and it can see its home computer, and it would give up its data. Still possible with older phones, if you come across them, but not a good tactic for your up to date hardware and the iOS versions.
And then coming right down to just to finish our story with MacQuisition coming right down here, we can see at the very bottom of the screen, I have under additional files, here we have those four files that we found by searching for the word British: they’re listed in my additional files section. We’re not finished here, because if you decide, Oh, actually there’s some more that I need to go for, I could go back to my search button in the command bar, or I can use this little button that’s tucked away over here on the right hand side, where my mouse is circling now, and I can manually go back and I can simply go back into a finder type window, and I can browse using the finder type window to go to wherever it is I want to go to identify additional files to add to my collection.
So I’ll open up another browser window, and I could simply drill down into… maybe this time I’m after some of Tim’s pictures, and I can do that. But of course, in this particular function, you’re not getting that preview that you do when you use the browser button up here in the command bar. Because when I’m using the browser button to come on more, I can do the preview that we’ve been speaking about.
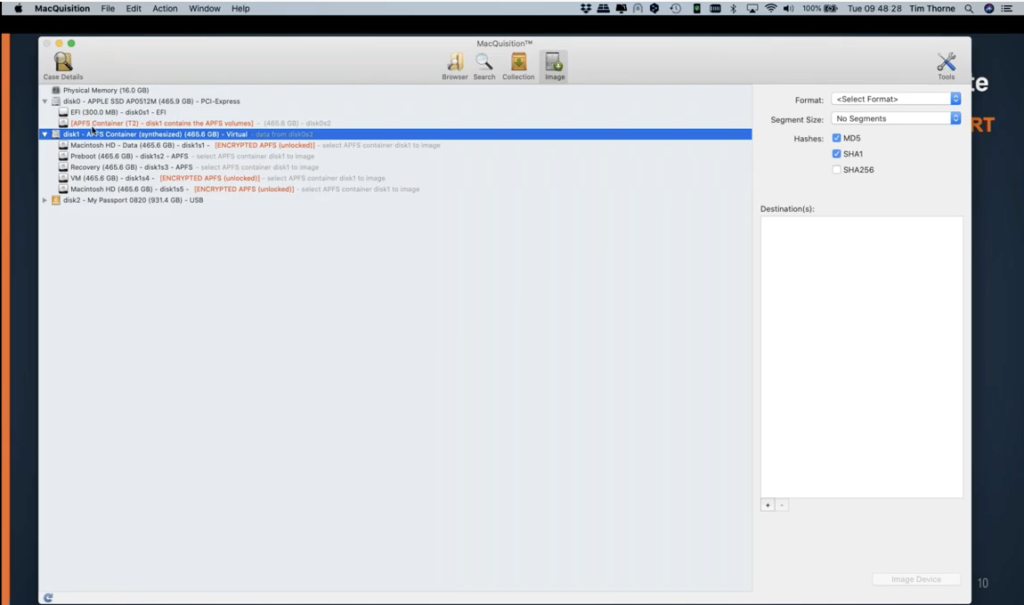
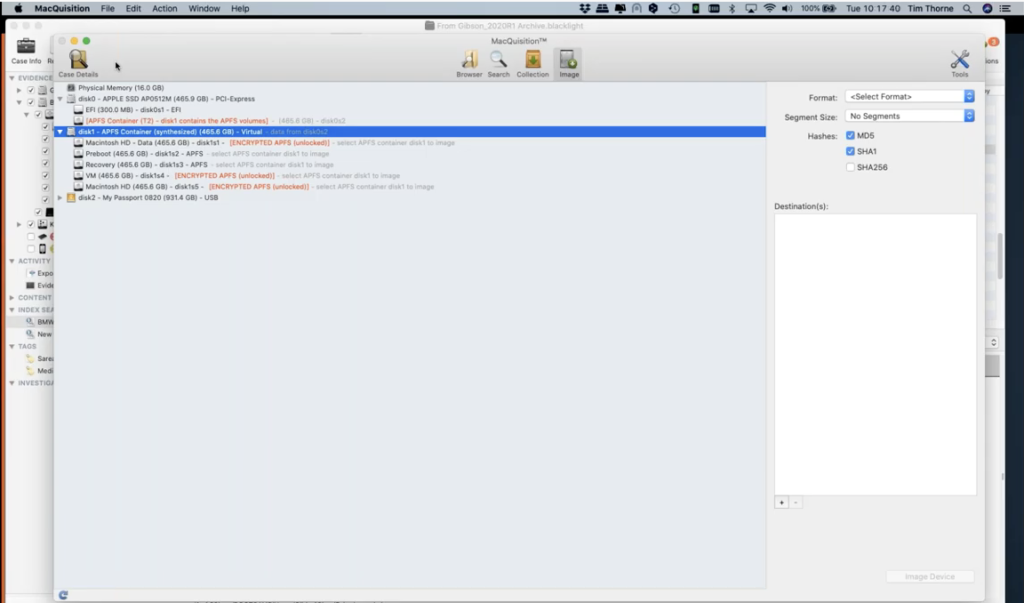
And so finally, the final button, because our time is limited today. The final button that I wanted to talk to you about for imaging was simply this button here for imaging Macs. This is where we do our proper forensic imaging of drives and devices from, and in this case you can see, for instance, we have a physical memory available to us because we logged in as the administrator user on this machine. If I was just a normal user or I didn’t have admin rights, I wouldn’t be seeing the physical memory here.
Just a couple of things worth pointing out: here is the attached – with this orange USB logo here, where my mouse is right now – this is the attached USB hard drive that I mentioned to you earlier. We can see that, but above that, mounted as disk one in this case, is what I expect to see now with a typical Catalina version of Mac OS. I would expect to see what we’re calling an APFS container here. And this data is described as being synthesized. And the important thing to remember here is, this is a virtually mounted desk containing these volumes. And these volumes here all share the same unallocated space. So each volume only contains live logical data, which means the unallocated space, but this disk one actually resides around all of these volumes. It’s important to remember that.
And it’s for this reason that you cannot image any one of these volumes on its own. You have to take them as a whole. You have to take the whole of disk one or the whole of the physical device, because on its own, the Macintosh HD data volume will not be readable in your forensic tool. It acts… it’s often described by people as acting a bit like a RAID, in as much as you can’t just take one of those RAID physical devices and read the data off it, if it’s like a striped RAID, that type of thing, it needs the other devices to be able to put all of the pieces back together. The same is true here with MacQuisition.
So I did mention one of those webinars earlier, but if you want to learn more about the complexities of imaging Macs, please take a look at that. There’s a lot of information on our website to help you with that. And imaging a Mac is significantly different to imaging a Windows device, but MacQuisition does make it a lot easier and clearer for you than most tools.
Over here on the right hand side is where you select the image format. So in this particular case, it’s only offering me two options, which is a advanced file format for in a compressed or uncompressed flavor. This is because this is the only image format that will give you your physical decrypted image from a T2 chip Mac. And this is primarily due to the fact that it’s the only image format at the moment that we’ve been able to use to give you the capability to take a nonlinear image from a T2 chip Mac. Normal imaging starts at sector zero, and then just images sector by sector, by sector, through to the end of the device, or with some tools it will start at the end of the advice and go backwards. You can’t do that with a T2 chip. It’s not possible. I didn’t expect my FaceTime to go off. Sorry about that.
So that’s MacQuisition. I’ve spent far too long on it as normal, but it is important for me because if you want to get the best result from imaging a Mac, you really need to be using MacQuisition right now. It’s the best tool that’s out there for you.
I’m just trying to have a quick look down at some of these questions. I’m sorry, guys. There are so many questions there. I’m not going to get time to actually read through those, but we will answer every single one of them with an email and perhaps Arvinder will have a few for us at the end as well.
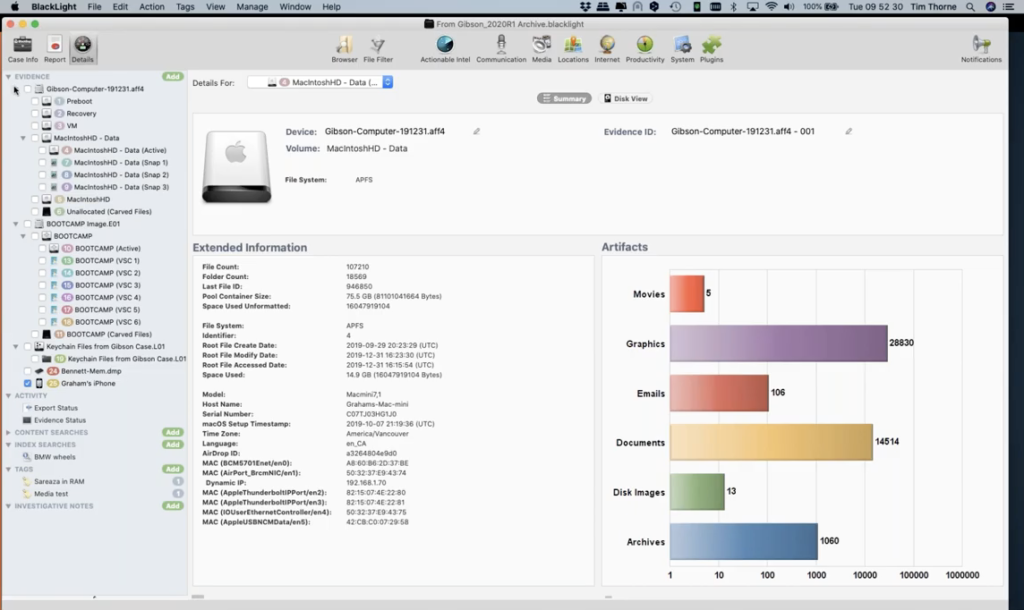
So let’s concentrate on BlackLight now. I’ve fired BlackLight up, it should be on your screens now, let me see. Yes, I can see it. This is what the interface looks like, and I’ll give you a few moments to settle and have a look at what we’re seeing here. There’s a lot of information on the screen, but it is very very nicely laid out and easy to understand the way once again, across the top, we have our command bar, the command bar drives everything that’s going on below it, down here, where my mouse is showing now, drives everything we’re seeing.
So the moment I have the details button selected, the third in from the left. Because I have the details button selected, I am seeing the details of whatever volume I have in my dropdown menu selected. So if I wanted to look at the active Macintosh volume on this computer, I select it there, and I’m getting an overview now of this Macintosh HD data volume.
On the left hand side, in the sort of gray-blue area, this is called the component list. And I appreciate this looks a little confusing when you first have your first glance at it, but when you actually invest a little bit of time and looking at it and working through what you’ve got here, it’s actually quite straightforward. If I straighten out some of these dropdown menus, and then we can have an overview of what we have here.
The first item, called Gibson computer, is an AFF4 image of a Macbook Pro, actually. You can see that. Then the second evidence item in our component list is this image of the bootcamp volume of the same Macbook Pro. So what we’ve done in this case, we’ve actually imaged them separately, the different volumes, different partitions on this Macbook Pro.
Then I have underneath that, I brought in some media here from my case, and I’ll explain to you why we did that in a moment, but I have the key chain files that I extracted out of the Gibson computer and generated my own logical volume of just the key chain files.
Underneath there I’ve also added for the purposes of this demonstration a Windows 10 memory dump, so we can have a look at that in a short while. And I’ve also added a an iPhone. In fact, this iPhone was a backup that I extracted from the Gibson computer image, the first item in out list. So these are the evidential components of our case. I could have one computer in here or I could have 50 computers in here. And this is where they will reside, underneath evidence in the component list.
Directly underneath the component list is my activity list. So this is where I can see what activities I’ve done or enforced on my evidence items. The first one demonstrates to me what exports I may have in the case. And the second one, it actually shows me the status of my evidence, so I can actually see what is going on with my evidence. So let’s select that evidence status now, just to have a very quick look at this.
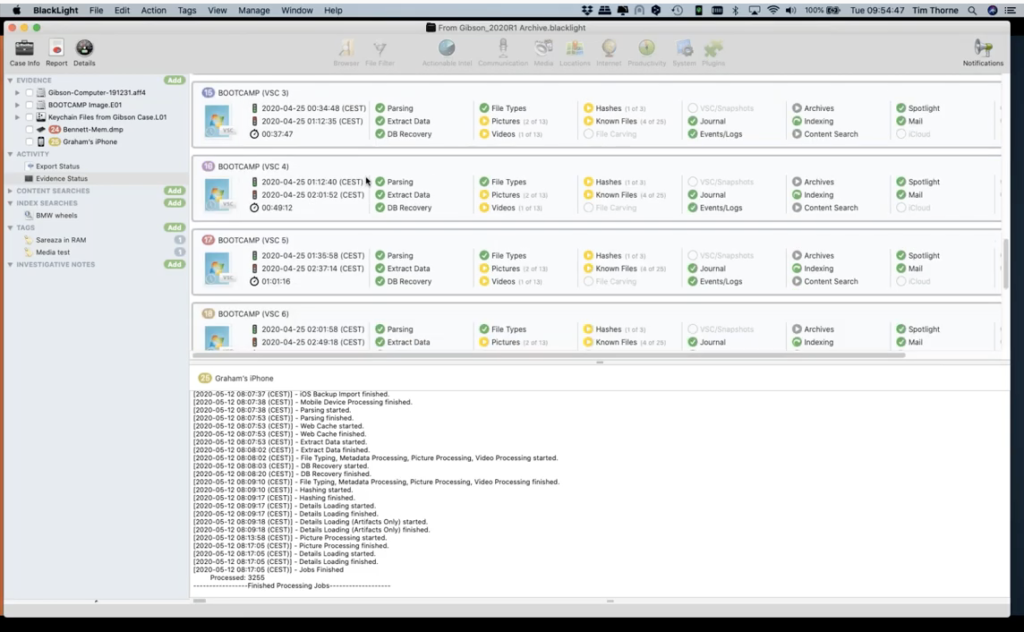
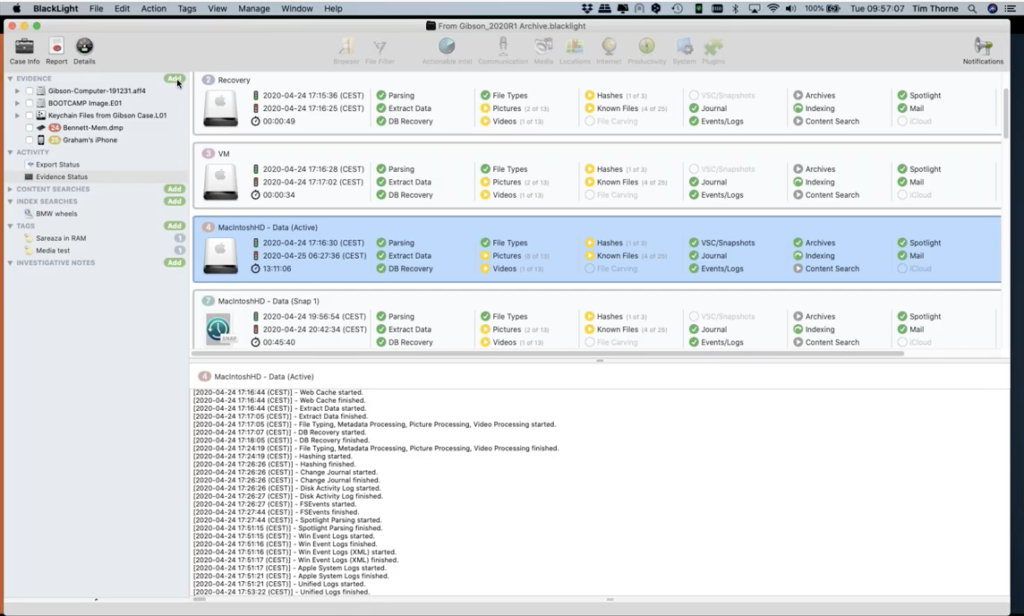
So with evidence status highlighted, I’ve got this list of all of my volumes again, and there are a lot of them in this case. This is why it looks a little bit complicated. So I’m going to scroll to the top of… so for every single volume on my case, I can see exactly what processes have been applied to it. So if I come down to the first meaningful volume, which is this one here, number four, the Macintosh HD active volume. If I highlight that, I can see that this is the user’s data volume for the Mac computer. And I can see that I’ve carried out all of these activities that have got green ticks associated with them. Where I see an orange sort of amber warning triangle is indicating to me that I’ve done some processing in this area, but not all of it.
So for instance, under this Macintosh HD hashing, if I select the play button, I can see a little box opens up to show me, okay, there is still some more hashing activities that I haven’t done. And this is because when I processed my case, I simply went for MD5 hashing and I declined to take SHA-1 or SHA-256 hashing. If I wanted to do that right now, all I needed to do was to add a tick to there. And if I hit okay, BlackLight will go off and it will apply SHA-1 hashing to this particular volume. So this theory, under hash types, can be applied to all of these other items here, where there’s an orange button, an amber button, warning me that there’s more items I could do.
So it looks a bit bewildering with all of the ticks, but once you focus in on it, you can see that actually this gives you a really good, granular way to deal with all of your evidence items. What this means is, is you can focus on the things that are important to your investigation.
What has been done to your case, what processes have been applied to your case, are actually selected at the evidence ingestion stage. So let’s take a very quick look at that right now, the way in which you add a piece of evidence to black flight involves selecting the add – this is one mechanism appear in the component list at the very top – I can add a piece of evidence by selecting the add button, here is where it describes to me the different items that I can add. So I can add attached or mounted devices. If I had an iOS or an Android device attached, I would have the ability… a green button would apply next to this line, to allow me to add and bring in the iOS or Android device, or I can add files, folders, or disc images simply by selecting the add bar here.
That opens a browser button and then you can navigate to a piece of evidence. So in this case, I’m going to select a different E01 file expert witness file format. I select add. So BlackLight has gone off and it’s grabbing that E01 segmented file right now, having a look at it. And this is assessing the contents of the E01 file.
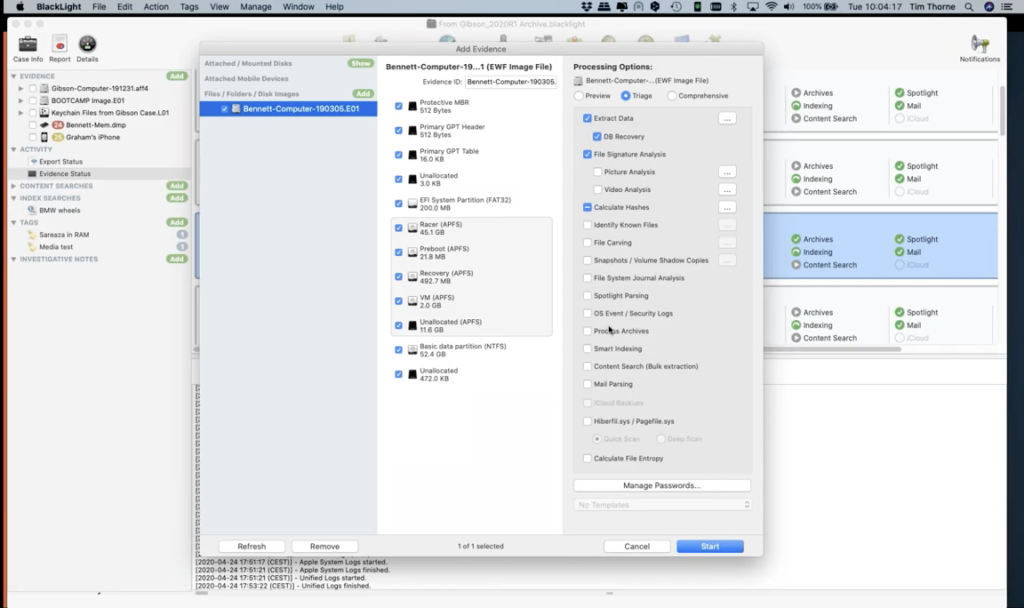
And so what you can see now, this is the data ingestion window or the add evidence window BlackLight has determined for me, and what it thinks is best for me to process in this middle window and the right window. So it’s identified the volumes where it feels there may be some data of use to my investigation. So I, as a user, can decide whether or not I go with BlackLight’s recommendations, or I can add my own. So perhaps in this case, you may notice in this, within this gray area here in the center of the white middle window, there are a number of volumes. These of course have the volumes that make up the APFS container. And at the moment I’ve chosen – or by default, BlackLight has chosen – not to process the unallocated space of this volume – or I should refer to it as a container. I put a tick there. Now you can see I’ve manually been able to add a tick to this particular volume the unallocated space. So I could process my unallocated space.

So once you’ve made your selections here, maybe you want to select all of them. And I could do that by simply coming over here to the main item in the left hand window and putting a tick at the root of the case, so that that’s applied a tick to every volume, if I wanted to process every single volume. And now I come over to the third and final part of the evidence ingestion window, this is where I can select the processes that I want to apply to the volumes that I have selected. So this is where we spend a lot of time when we’re doing our formal training. We spend a good deal of time looking at these options, because this is where you can make or break your case, in many ways.
There is a temptation with some other forensic tools to always hit the find everything button. And for me, that’s not always the most intuitive way to go about your investigation. And in fact, in some ways it’s not the best way, because if I hit the comprehensive button that’s available to me here, you’ll notice that I get a warning menu popping up saying, look, hang on, this is going to be pretty heavy on your resources and will take a long time.
If I hit continue just for the moment, and I’m just going to go through it, you can see that it’s put a tech in virtually all of the categories here. So this is going to do all of the processing BlackLight is capable of doing, so that particular evidence item… this is highly likely not to be a good thing in a case like this, because if we take a look at a particular example, for instance, if we go and look at this area here, snapshots and volume shadow copies. If I have a look, clicking the ellipsis next to the column. Here’s my snapshots and volume shadow copies option. What processing do I want to do to those?
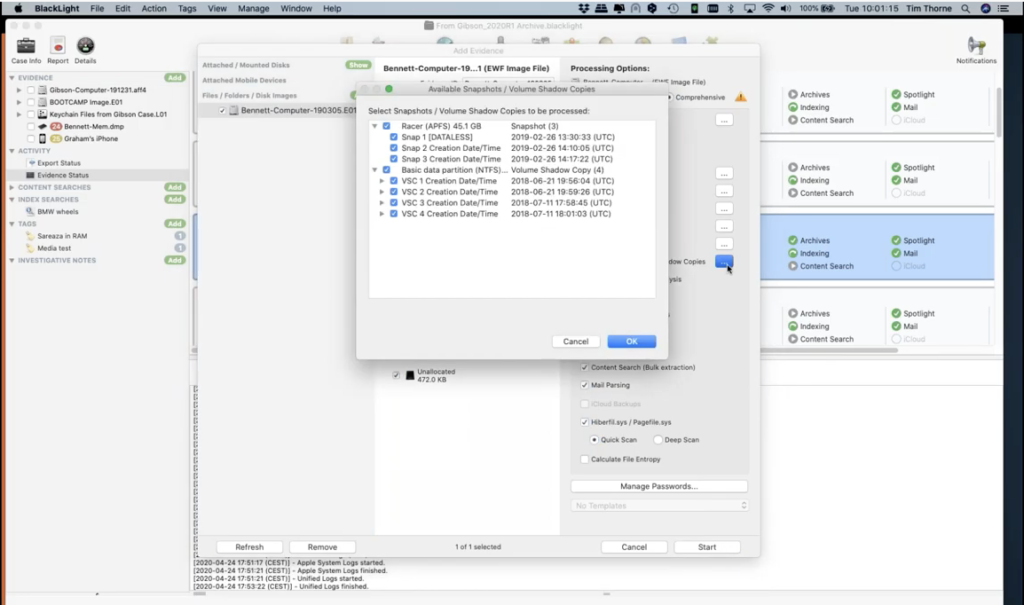
If I collect the ellipsis next to that, I can see what BlackLight has found. And right there, you can see on the Apple side, it’s found three snapshots. And on the Windows side of this investigation, it’s found four volume shadow copies. So this is going to be more or less like processing this computer twice for the active volumes: the Apple volume and the Windows volume, the live ones; and then a further seven times for the various backups. So this is like processing a computer nine times, if I select all of these from the start. So this is why we encourage people not to use the comprehensive button unless they really need to, or they’ve got a good reason to. We encourage people to have a look at all of the options and consider what you want, what is specific to your case.
And we recommend that you build your case, because you may be able to exclude it from your investigation early, when you find out maybe it’s the sons or the daughters, computer of the bad guy, and save yourself a lot of energy later. Because when you hit that comprehensive button, for instance in some of the other forensic tools, like EnCase where you have all of those great EnScripts that you can run well, imagine selecting every single EnScript that has ever been written and running it against every single case: it’s just not the way to investigate digital forensics. So that’s why when you come to ingest your evidence, have a good think about this, and have a look at the options that are available to you, and build your case.
Now, I’m only going to mention a couple more of these, because if you haven’t got BlackLight and you’re about to get a trial of BlackLight, I want you to be aware of a couple of other things that may cause you some difficulties processing archives. Down here where my mouse is going backwards and forwards right now, this is an option I’d invite you to consider whether or not you really need this from the start, because if you select it BlackLight will go ahead and it will process the archives, and it’ll go two levels deep in archives.
So if you have a zip within a zip it’ll process those two zips, but it won’t go any deeper than this. And there’s a good reason for that, because you probably heard of things called zip bombs, where you get zips inside zips inside zips, and they go on and on and on. Well, when we come across those, especially with system files, you’ll find that these can go on and on and on. And as a word of warning, I noticed in a case that I processed without processing the case archives, the case was about 30 gigabytes in size, the case file, for my forensic case. When I processed the archives, just two levels deep, it grew to 90 gigabytes. It was huge. So just be cautious. And the reason you don’t need to worry about this right now is because you can simply process the archives later, or you can select them manually when you identify them as being potentially relevant to your investigation.
So once we start our investigation and you find a zip file within the case, all you’ll need to do is right click on it and process that zip file. So no need to do it from the start, unless you really need to, or perhaps, you know, maybe you’re going off for the weekend and you’re going to leave your machine running for a couple of days, then that’s great. But if you want to get to results quickly, apply a little bit of thought to some of these things.
And then the last one that I mentioned now is calculating file entropy. Again, this one at the very bottom where my mouse is now, this is very resource intensive. And it’s designed to help you identify possible encrypted files or containers. Now, the thing about file entropy is, it’ll take a long time, and the results aren’t always definitive. And in my opinion, there are often better ways of finding encrypted files, not least just simply looking for encrypted applications or encrypted file extensions, or there are other ways of doing this and you’ll save yourself a lot of time not looking at the randomness of every single file, which is what this will do for you.
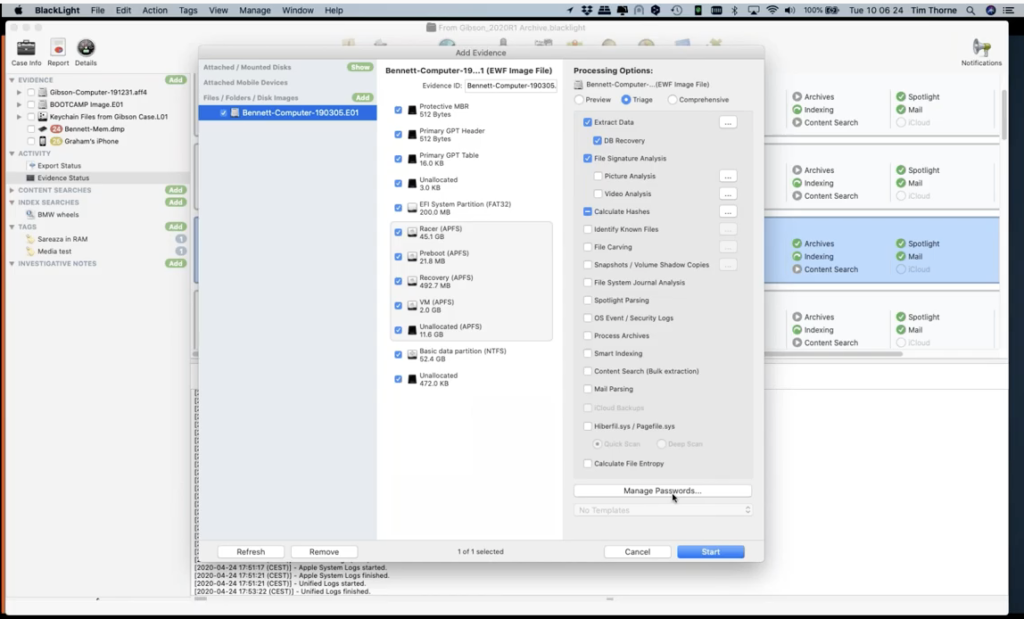
And then finally, the last thing that I’ve got time to mention today here is this new feature here of managing passwords. When we were talking about attacking the user’s key chain, if I select manage passwords now, you’ll notice here that I have a password manager window has popped up, and this gives you the ability to answer any passwords that you have, that you may think will attack the user’s key chain. We’ll already have the system key chain for you, but now with this new version of BlackLight, you have the ability to put in some passwords here, that may assist you [to] attack the user’s key chain file. And this will give you the ability to go after those passwords that may be stored in the key chain. So this could be very useful. So this is where you put your passwords in, you can type them in, or you can import them using this import button right here.
Now you need to process this at the beginning of your case, which is why it’s applied here. And you can actually enter the passwords at this point, but what I tend to do – and I’ve found seems to work really quite well – is I will extract the key chain files out. And if you look in the component list here, I have selected my key chain files from the system, and I put them here. You can see where they all are here. I’m opening this up in browser view. You can see key chains here. And so what this means is when I find additional passwords, I don’t have to process the whole case again. What I can do is, I can come and process just this volume. So I can come back and reprocess this volume, adding my new possible passwords to try and crack the key chains in this particular case. So that’s quite a useful and very quick way of trying to get that useful, extra information out.
Okay. So that was how we add evidence items and the dos and don’ts, and the watch out for us of how to ingest evidence into BlackLight. The final two things, three things down here on the left hand side are content searches and index searches.
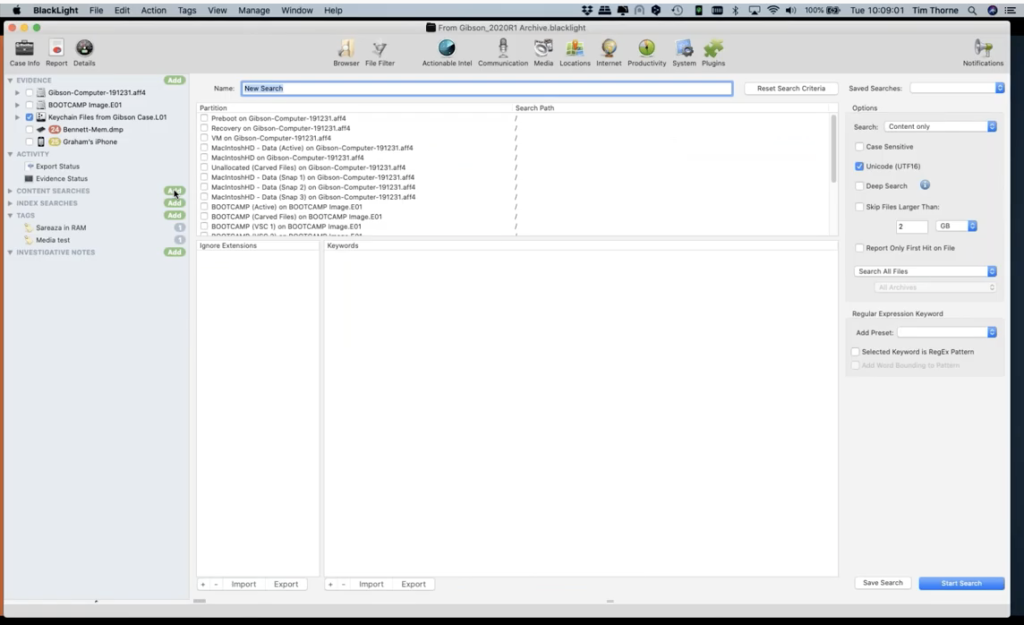
So BlackLight empowers you to do content searches. So this is detailed searches of the entire file system, and also the contents of files or binary blobs of data. However you want to do that search. So this is the traditional keyword searching across the whole of the volume, or however you narrow your focus. And so, for instance, if I wanted to generate a new search here, I’ll just call this test. Maybe I can narrow what I want to search on simply by selecting the volume that I want to carry out my keyword search in.
So just for the purpose of this example, if I wanted to look just in the… let’s go for the active bootcamp volume. So this is the live windows volume. In this box here, under ignore extensions, I could actually list extensions I want to ignore. For instance, I probably wouldn’t want to be doing keyword searching in JPEGs. So I would put JPG here as an extension, if I don’t want to do the keyword search in it.
Here is where I would enter my keyword search. And we’re not going to have time to go into this, but if I was to just search wheel, yeah. That’s the keyword search I could apply to. And at the moment, BlackLight will go and search the keyword wheel in every file on the bootcamp, active volume, but not in JPEGs. So this will take quite a while anyway.
I can narrow down the search over here on the right hand side by perhaps skipping files of a certain size. So I might not want to search in files that are anything other than two megabytes, because I’m only going to be interested in say small document files. I can also decide whether I want to search the content or just the file name. And you can see there are other ways of being more granular with your content search.
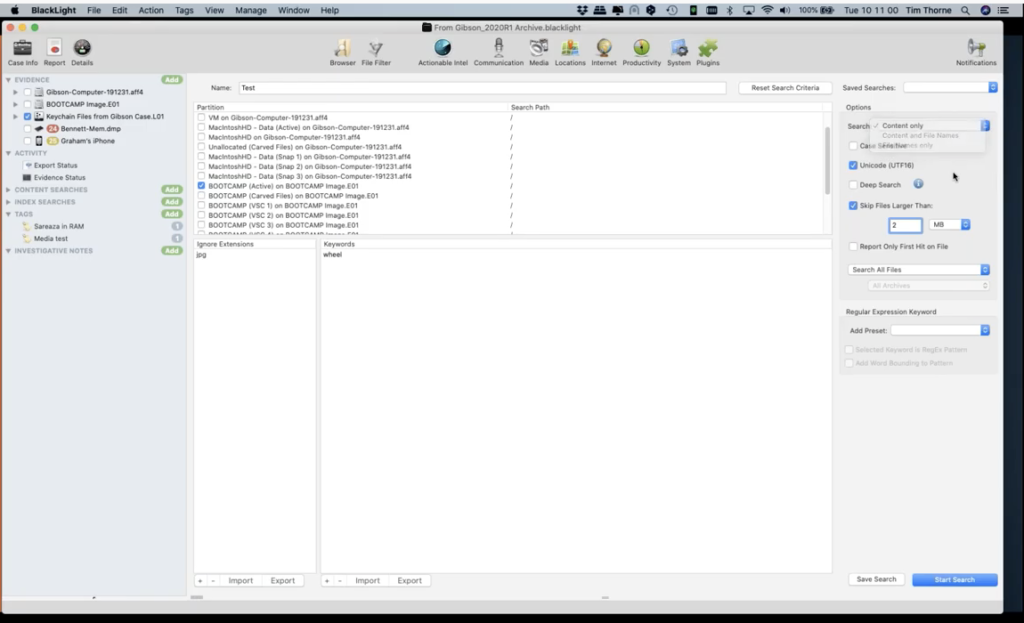
We have a whole load of built in searches that you can run within BlackLight, and you can use the filters as well. So if you had a filter that’s active at the moment, you could just select files that match a filter. And we’re going to look at file filtering in two seconds.
I can actually also do regular expression keyword searching, and you can see, we have some built in regular expressions that will find, for instance, things like Mac addresses, IP addresses, email addresses. These are regular expressions, the open source regular expression format. When you’re ready to go, you simply hit start search. So that’s the traditional searching mechanism within BlackLight. It gives you a really good granular way of drilling into the data that you’re searching for.
But of course, we recently added index searching to BlackLight. This is what we call smart indexing. So we’re only indexing what we believe to be relevant user data. So this is data that’s generated by the user and its associated metadata. So you’re not going to be wasting your time indexing things that you’re never going to search for. And this works quite simply, you would come up to… well, let me just share, I have one here that’s ready to go. I’m calling this one where my mouse is hovering now, I’m giving the query a name, BMW wheels. And in this particular case, my query is this here, that I’ve highlighted in the blue, where I’ve put BMW and wheel.
And when I hit run the query, BlackLight will be searching across the evidence items that you have selected. So this is a good example of how you need to be sure that you have everything that you want to bring into your case. So I’ve just added in the component list. If you see, I’ve put the ticks into the boxes up here, where my mouse is running up and down now. So I brought those evidence items in and the index immediately returned all of these hits. Because it’s an issue because it’s an index search it’s very quick and it’s highlighted this particular file here for me.
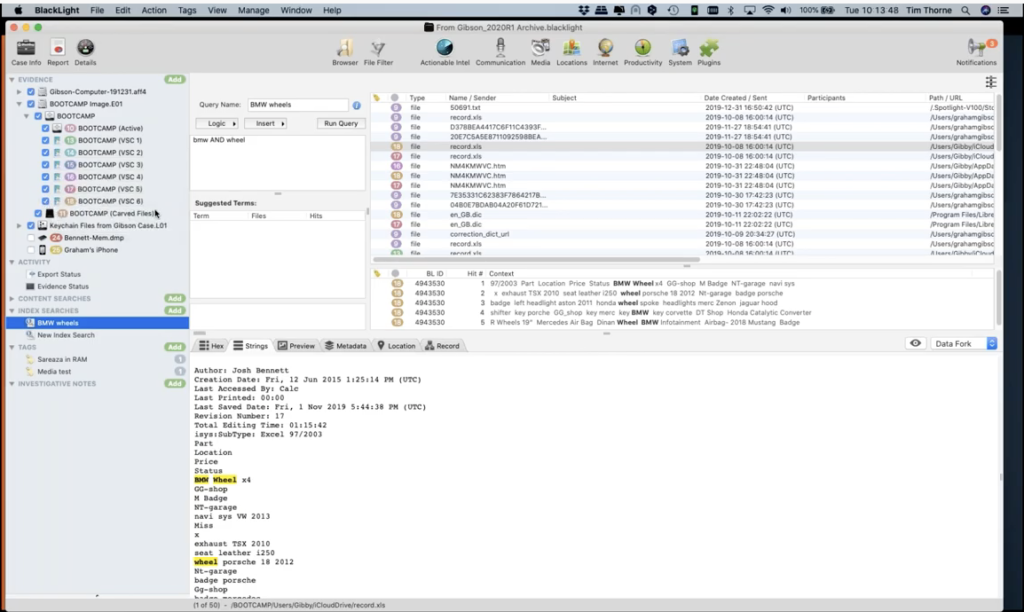
For instance, it’s a spreadsheet which is found on badge number 18. So this is where those numbers and colored badges come into play. I can see that it’s found this on number 18. If I look at number 18 here in my component list, I can see that this was on volume shadow copy number six, this particular hit of this file was found on volume shadow copy number six.
And sure enough, within the file itself, if I hit preview in my file, content viewer here, I can see it’s a spreadsheet that is pre reviewing for us here. And I can see that it’s a spreadsheet and there’s the word BMW wheel, for instance.
Now, just so you’re aware of this particular methodology or tactic, if you want to see this file that we’ve got highlighted here in badge 18, actually in the file system, all you need to do is right click on it. And you get a series of options that come up. And if I wanted to go and see this on the actual file system, if I come down to reveal, I can ask BlackLight to reveal this file to me, where it is in the file browser view. So BlackLight immediately jumped over to where that file is on the file system. And here, it’s highlighted it for me.
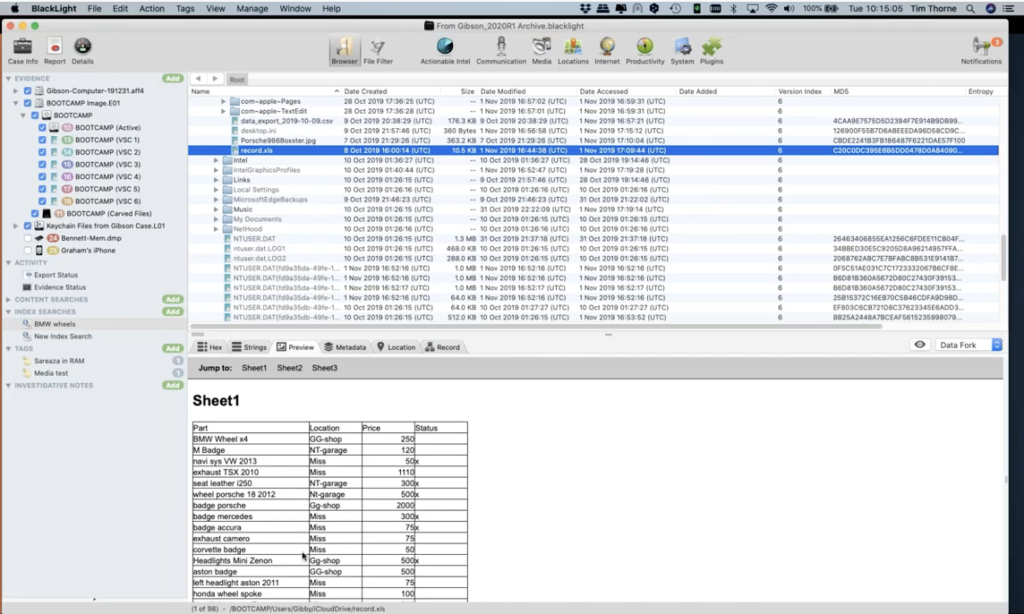
And if you come down to the very bottom of BlackLight, you can see in the status bar here at the very bottom, where hopefully you can see my mouse moving up and down. You can see that this actual version of this record.xls file was found in the user’s directory with iCloud drive. And there it is: record.xls. So that theme runs throughout BlackLight: if you right click on an item and you want to see where it resides in the file system, that’s the way in which you can do that.
Okay. One last thing. I know we’re short of time today, but one last thing here, if you wanted to see file history. I wanted to mention this because I discussed it earlier with you guys. If you right click on the file again, one of the other items that you’ll see that you have here, it’s called file history. If I select file history now, I get this really neat way of displaying to you there are actually seven versions of this file. And if you look here, you could see that you have six of them available in volume shadow copies, and one of them available to you on the live device.
So once again, that functionality is available right through the system within BlackLight, and just makes it very easy to manage these often complicated things, such as volume shadow copies, and such like.
Now I’ve just had a message from Arvinder telling me that I’m talking too much as usual, so I apologize about that. Arvinder, are you feeling we’ve done enough?
Arvinder: I think we’ve done very well. We’ve had a lot of questions come in actually, while you’ve been presenting. Shall we, shall we do it for you?
Tim: Yeah, sure. As long as, as long as they’re not too difficult.
Arvinder: So let’s go with one of these: can MacQuisition image a boot camp volume found on the hard drive?
Tim: Yes, absolutely. And in fact, we had a very quick look at that. I’ll just put MacQuisition… if we just go back up onto the screen here… when you go for your physical device, when you image the actual physical device within BlackLight, you’ll be getting the whole of the physical device. So I haven’t got bootcamp live on my on this particular Mac, so not seeing it here, but if I did have bootcamp installed, you would be seeing it in this view right now. And you could image it directly from here.
Arvinder: Okay. Thank you for that. We’ll do one more. If I acquire image a Mac computer with MacQuisition, is the forensic format compatible with other analysis tools?
Tim: Yes. it is. And once again, do you remember MacQquisition, when we are choosing the type of image we want to generate, if we come up here on the right hand side where I’m choosing my file format here, you can see some of the formats that we can use: raw, DMG, and then different flavors of compression for E01 files. Well, raw and EO1 will be common to any forensic tool. I’m pretty sure every tool supports DMG now, pretty much I think, forensically. And the other format, of course, that concerns people is the AFF4 format, which when we go onto this volume here, remember we looked at this and you could only see AFF4 as our image format. AFF4 is an open source file format, which is supported by several of the forensic tools. Now I know a few of them were looking to bring it online more recently, but certainly X-Ways, and obviously ourselves, and I believe some of the other tools also support AFF4 now as well.
Arvinder: Thank you. Let’s just do one last one then: can MacQuisition target specific user accounts?
Tim: Yes. it can. And we saw that in different modes. You can either do it in the collection mode, which is the one I have active on the screen right now. When I was choosing which user account I wanted to work on from this area of the screen where my mouse is hovering, this is where I could choose to select data from particular user accounts. And of course, the other way was in live mode, where I could choose just to navigate to particular user accounts. So yes, you can be very specific with MacQuisition to be sure that you’re only collecting the data perhaps you’re entitled to, or the data that you want rather than irrelevant user accounts.
Arvinder: Thank you very much, Tim. So we’ve had a lot of other questions come in as well during the presentation that we weren’t able to get to, but we will reach out to you individually after the webinar to answer those questions.
Please be sure to follow us on Twitter, Facebook, YouTube, and LinkedIn, and be sure to subscribe to our blog, which is at blackbagtech.com. If you’re interested in learning more about MacQuisition and BlackLight and any of our other products and services, including those from Cellebrite, please email us: sales@blackbagtech.com and/or reach out to Tim or I as well, if you want to. Thank you all again and have a wonderful day, stay safe and stay healthy. Thank you.
Tim: Thanks everyone.