Front-End Web & Mobile
How to enforce user quota on AWS AppSync with Lambda Authorizer
API Quotas define the valid amount of calls available for a consumer during a specific amount of time. Enforcing quotas protects your API from unintentional abuse, minimizes data exfiltration and protects your resources from excessive usage. Beyond the mentioned security benefits, it can also unlock your capabilities to monetize the digital assets sitting behind the API.
AWS AppSync is a fully managed service that makes it easy to develop GraphQL APIs by handling the heavy lifting of securely connecting to data sources like Amazon DynamoDB, AWS Lambda, and more. Once deployed, it automatically scales your GraphQL API execution engine up and down to meet API request volumes. AWS AppSync manages API quotas based on tokens that effectively measure how different GraphQL queries use resources depending on their complexity. The number of available tokens is a soft limit and can be increased with a support case. This blog post showcases building blocks for applying an additional extra layer to manage quotas based on the number of API calls a user makes using AWS Lambda Authorizer. Thanks to its sub-millisecond latency, Amazon ElastiCache for Redis is used to track the call count in real time. For the end-to-end test of the solution, Amazon Cognito User Pool serves as the OIDC identity provider.
Solution Overview
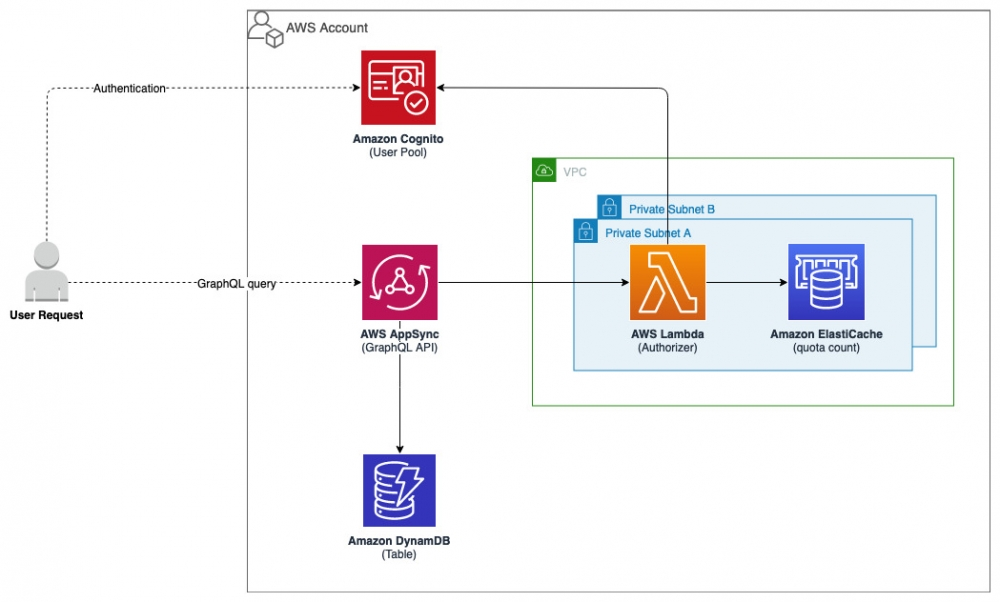
Figure 1. Solution Overview
The solution consists of the following main components:
- Authentication – A Cognito User Pool serves as the OIDC Identity Provider. It stores a set of users that are allowed to consume the AWS AppSync API. A custom attribute “custom:quota” is added to the user profile in order to store the quota value. This attribute can be passed via the CLI at user creation or later by editing it. Please note that this solution is not bounded exclusively to Cognito specifications. With few adjustments you can opt in for another identity provider as long as it follows the OIDC protocol.
- Authorization – A Lambda function acts as the custom authorizer for the AWS AppSync API. It contains the necessary logic to validate the access token provided by the user and authorize the call based on the “custom:quota” attribute. The current number of calls are tracked via an ElastiCache cluster running Redis engine, in the form of hash data type. Every day at midnight hash-es are expired from the cache. Both the Lambda function and the ElastiCache cluster are deployed inside an Amazon VPC on two private subnets. The pre-requisite section provides the necessary information on how to setup.
- Interface – The API is hosted on AWS AppSync and runs the GraphQL engine. Data is sourced from a DynamoDB Table which hosts the moviedata.json dataset. The GraphQL schema is defined according to this dataset attributes. A DynamoDB resolver is used to convert the GraphQL payload to DynamoDB specifications. Two operations are provided from the API. A query for consuming the dataset and a mutation to write new data.
Lambda Authorizer
Next, we explore the anatomy of the Lambda Function which acts as the authorizer for the AWS AppSync API.
The authentication logic and Cognitojwt library are encapsulated in a Lambda layer. From there we import the “auth” method which returns a dictionary (upon successful authentication) with the user attributes fetched from Cognito Userinfo endpoint. For our purpose we need to extract the “username” and “custom:quota” keys.
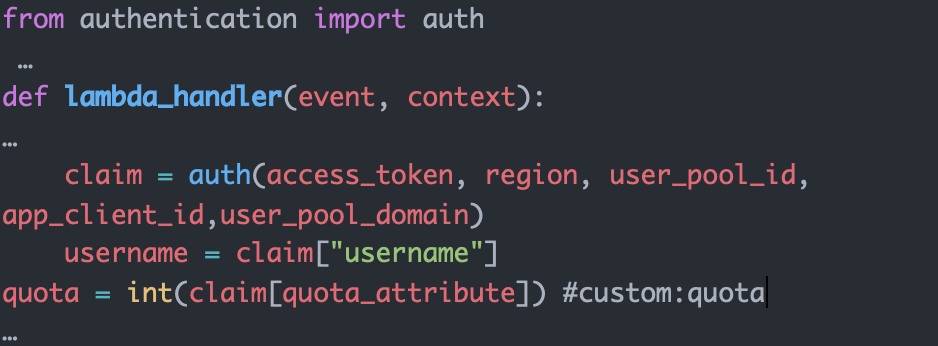
Figure 2. Authentication Method
In the meantime, we open the connection to the redis database which we will use to keep track of the count of calls per user. Daily at 00:00 the entry for every user gets erased.
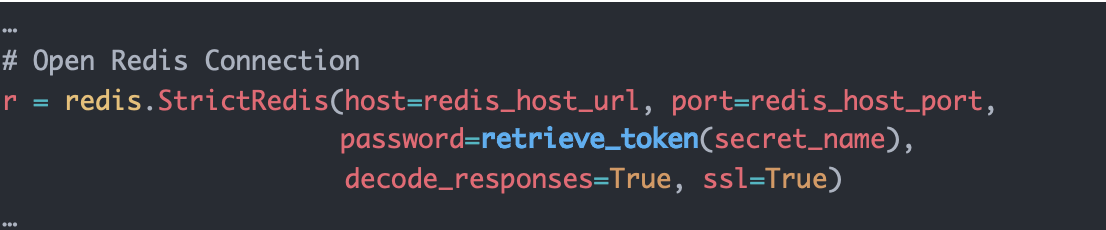
Figure 3. Redis Connection
As a next step the function will query redis to check if the user has already an entry in the database. If the user exists, it will compare the current count to the quota value extracted earlier. If the count is below the quota value, it increments the count for the user by 1, updates the hash in the database and returns a positive response to authorize the query. On the other hand, if the current count is equal or above the quota value, it returns an un-authorized response. For users who are querying the API for the first time that day, the function creates a new hash into the database and sets it to expire by 00:00.
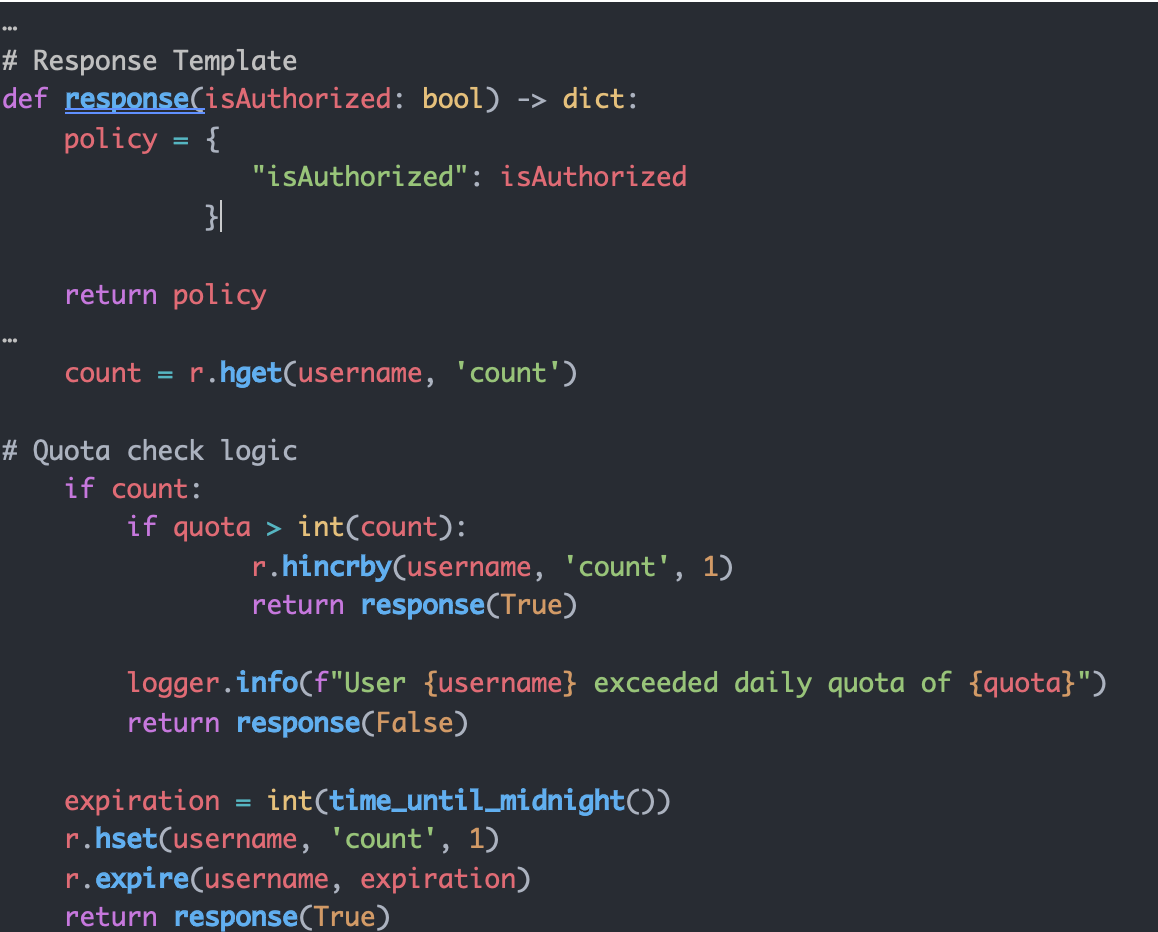
Figure 4. Response model/Quota check logic
Walkthrough
Now we walk you through the various steps in implementing the solution.
Breakdown of the steps to successfully implement and test the solution:
- Step 1: AWS CloudFormation stack deployment
- Step 2: Upload the test data into DynamoDB
- Step 3: Create a test user in Cognito user pool and add the custom attribute
- Step 4: Run a test query
Prerequisites
For this walkthrough, you should have the following prerequisites:
- An AWS account
- An Amazon VPC configured with two private subnets and at least a public one
- A network setup that allows internet connectivity to the Lambda function
- An Amazon S3 bucket for artifact deployment
Step 1: CloudFormation Stack
The resources are created via CloudFormation. The CloudFormation template and the source code for the Lambda function and layer are available in Github.
Following resources are part of the CloudFormation stack:
- AWS AppSync GraphQL API
- Amazon DynamoDB table
- Cognito user pool
- Lambda Authorization function
- Lambda layer containing authentication logic
- ElastiCache for Redis cluster
- Security groups
- AWS IAM roles & policies
The deployment is done using the deploy.sh script.
The script executes the following phases:
- Checks for dependencies
- Builds the Lambda layer
- Builds the Lambda package
- Builds the CloudFormation package
- Deploys the CloudFormation package
Following parameters are required for the deployment to be successful:
- STACK_NAME – CloudFormation stack name
- AWS_REGION – AWS region where the solution will be deployed
- AWS_PROFILE – Named profile that will apply to the AWS CLI command
- ARTEFACT_S3_BUCKET – S3 bucket where the infrastructure code will be stored. (The bucket must be created in the same region where the solution lives)
- VPC – VPC id where the Lambda function and redis cluster will be deployed
- SUBNET_A – Private subnet id where the Lambda function and redis node will be deployed
- SUBNET_B – Private subnet id where the Lambda function and redis node will be deployed
Upon successful deployment, the script will display the CloudFormation output on the console. Take note of the output as it will be used in the following steps.
Step 2: Upload the test data into DynamoDB
In this step we are going to populate the DynamoDB table created with sample data to test the connection to the AWS AWS AppSync API.
To perform this step, we are going to use the script batch_upload_dbb.py
Following parameters are required for the script to run successfully:
- DynamoDBTableName – Value Outputted by the CloudFormation deployment
- AWS_PROFILE – Named profile that will apply to the AWS CLI command
- AWS_REGION – AWS region where the solution will be deployed
- moviedata.json – File already provided with sample data. Located in the git repository, here.
Step 3: Create a Test User in Cognito user pool and add the custom attribute
In this step we are going to create a Cognito test user and add a custom attribute which will be read by the Lambda Function as an extra validation step during authorization.
Following parameters are required for the command to run successfully:
- AWS_REGION – AWS region where the solution will be deployed
- CognitoUserPoolId – Output value from the CloudFormation deployment
The following AWS CLI command can be used to create a new user in Cognito User Pool:
Upon successful run of the CLI Commands, a new user will be present in the user pool with a custom attribute quota value = 10.
Step 4: Run Test Query
In this step we are going to configure Postman and send a test query toward the AWS AppSync API, so you need to make sure Postman is installed in your machine. Upon successful authorization, the API will return the requested values. Once the quota attribute value is hit, all following requests will be DENIED automatically.
Following parameters are required to create a complete request in Postman
- GraphQLUrl – Output Value from CloudFormation deployment
- CognitoAuthUrl – Output Value from CloudFormation deployment
- CognitoAccessTokenUrl – Output Value from CloudFormation deployment
- CognitoAppClientId – Output Value from CloudFormation deployment
- CognitoAppClientSecret – This value needs to be retrieved from the AWS console, in the Cognito user pool service as described here
Follow these steps to setup Postman
- Start Postman in your machine
- Go to File -> Import
- Import the postman collection
- From the collection folder navigate to Sample Request
- Replace all variables in the Sample Request with the parameters mentioned above.
- Navigate to the Authorization tab
- Click on Get New Access Token
- Postman will pop up a new window where you need to type the username and password for the user previously created via CLI
- Once authenticated, a new token will appear in Postman.
- Click on Use Token to add it to the request
- Click Send on the request to POST the HTTP/s request to the API
-
- The API will return in the body of the response a JSON datatype similar to:
- Click on Send multiple times to surpass the quota attribute value added to the user.
-
- Once the quota limit is hit, the following response will be sent by the API:
Cleaning up
To avoid incurring future charges, delete the resources. You can delete the CloudFormation stack by running destroy.sh script.
Following parameters are required to run the script successfully
- STACK_NAME – CloudFormation stack name
- AWS_REGION – AWS region where the solution will be deployed
- AWS_PROFILE – Named profile that will apply to the AWS CLI command
The following commands can be used to run the “destroy.sh” script:
Conclusion
In this blog post, we showed how to apply quota enforcement on AWS AppSync using a Lambda Authorizer with the aid of ElastiCache for Redis. We dove deep in the Lambda function and the authorization logic. Step by step, we walked through the implementation phases. Finally, we showed how to test the solution end-to-end.
If you want to learn more about AWS AppSync, please follow the official documentation.
“Get started with AWS AppSync for free.” https://aws.amazon.com/appsync/
About the authors: