
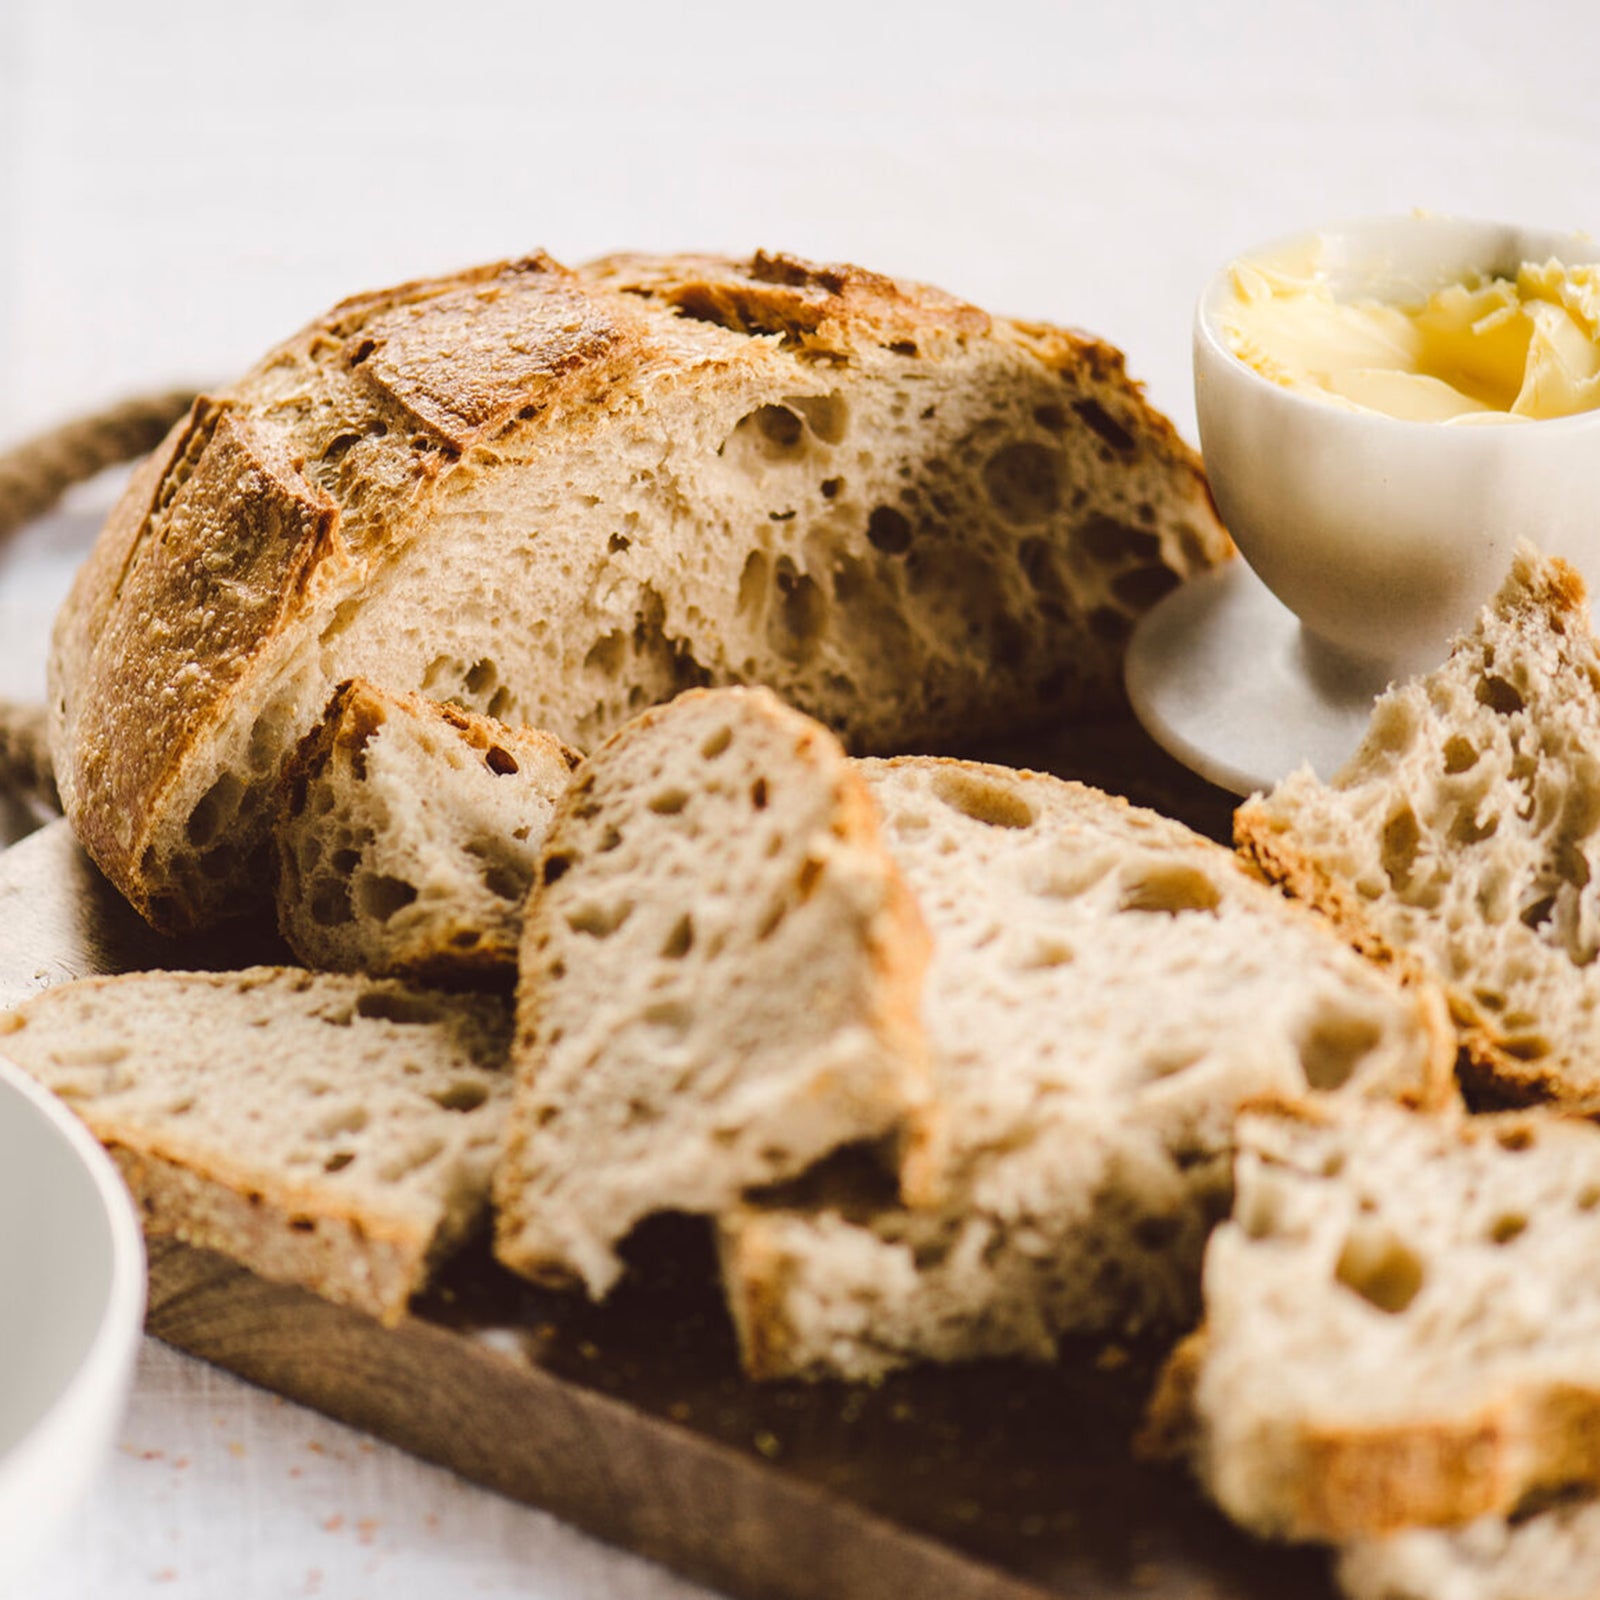
Thanks to a growing interest in all things fermented, sourdough is more popular than ever—and for good reason. The perfect piece of sourdough is chewy and distinctively tangy, more complex in flavor than white bread, and healthier, too.
Raw sourdough is home to the same bacteria that are in yogurt, Lactobacilli, which consumes the flour in the same way as yeast, breaking down some of the gluten proteins while the bread rises. Because of this, some people who struggle to digest gluten find that they can tolerate sourdough bread. The longer the bread rises, the lower the gluten content will be. (That said, store-bought sourdough typically still contains plenty of gluten.)
Fermentation helps lower the bread’s phytic-acid content, explains Lori Nedescu, a registered dietitian and professional cyclist. Phytic acid is an antinutrient that inhibits the body’s ability to absorb minerals by bonding to them, and it’s present in most flours. Ultrarunner and registered dietitian Kylee Van Horn explains that phytic acid binds to iron, zinc, and calcium, which can be a concern for those eating a lot of seeds, grains, and legumes at each meal. “Lessening the phytic-acid content in a food can help increase absorption of these essential minerals,” she says. And athletes, especially those eating vegetarian or vegan diets, are particularly at risk for developing deficiencies.
Research also shows that the carbohydrates in sourdough digest slower, which means you won’t get a blood-sugar spike or the subsequent crash. “Keeping your blood sugar stable will not only help your energy levels and mood throughout the day, but it can help prevent cravings from happening,” says Van Horn. “ Simple carbohydrates—refined sugars, white flour, white rice—can cause a quick burst of energy for the body, but the body simultaneously releases a burst of insulin, which utilizes those sugars quickly. This causes a quick blood-sugar drop, which leads to hunger, jitteriness, trouble concentrating, and a drop in energy.”
“Good sourdough—which will be more rustic and less processed—is my first choice when it comes to bread,” Nedescu says. Opt for homemade or bakery-fresh loaves, Van Horn adds. “Commercial companies typically use a small amount of starter but then add commercial yeast and other flavors, like vinegar, to give it a sour taste,” she says. “The very short leavening process means it doesn’t have the same health benefits.”
Learning to bake sourdough is a great at-home project for athletes and foodies alike, but it does take time to perfect the process. It seems simple—all you need is a starter, flour, salt, and water—but the process is trickier than you might expect and requires patience to get right. Baking is a chemistry experiment, and sourdough is one of the hardest types of bread to perfect, since its yeast-free rising can be influenced by temperature, altitude, and the quality of ingredients, among other factors. Read on to learn how to start your own sourdough journey.
Find Your Starter
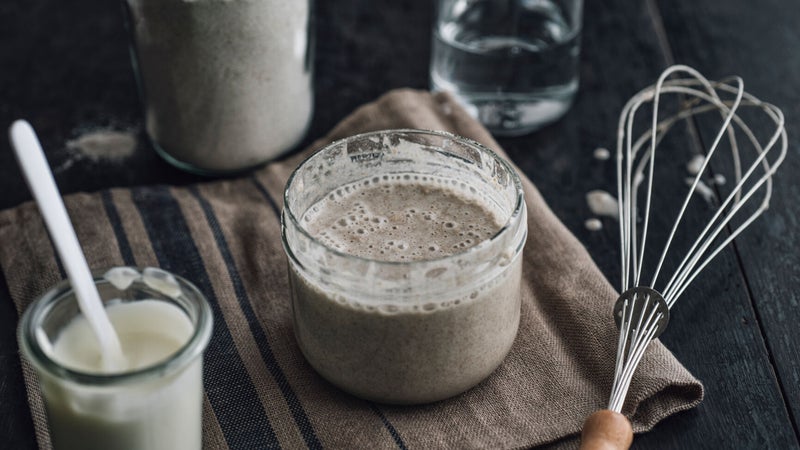
The first thing you’ll need is a sourdough starter, which replaces the yeast you would add to typical bread dough. It looks a little like yogurt, but it’s just flour, water, and salt that has been left at the right temperature to encourage the wild yeast found naturally on flour to ferment. Precise measurements are key with sourdough baking, so you’ll also want to buy a food scale to measure your ingredients in grams. (You can find one for under $10 here.)
Most bakeries will give you a small sourdough starter if you ask—as will sourdough-baking friends—or you can buy one on Amazon. It’s easy to do it yourself, too. In a one-quart mason jar, combine 60 grams of whole-grain flour and 30 milliliters of warm water, and let it sit at room temperature, with the lid loose. After two days, stir in 40 milliliters of warm water and 40 grams of flour to feed it, says baker and bikepacker Karlee Gendron, who teaches a sourdough cooking class at Fort Whyte Farms in Alberta.
Then continue to feed it with 40 milliliters of water and 40 grams of flour daily, which is a standard feeding schedule for any starter kept at room temperature. You’ll notice it bubbling—that means it’s beginning to ferment! At around seven days (or by the time your starter is bubbling consistently), it’s ready to use in baking.
Outgrowing your mason jar? Skip to the sourdough pancake recipe below or discard some of the starter, but don’t stop feeding it. “Each day before feeding, I recommend discarding about two tablespoons of starter in the jar, or you will eventually run out of room,” Gendron warns. “Or you could take it out and use that for something like pancakes, or give it to a friend to start their starter.”
You can slow the fermentation process by storing your starter in the fridge and feeding it only once per week. But be sure to take your starter out of the fridge at least two days prior to baking. You’ll want to feed it twice a day and wait until it’s actively bubbling again before beginning the baking process, Gendron says.
Get Baking
Baking sourdough takes a couple of days, though your actual time in the kitchen will be minimal. You’ll need a Dutch oven: these heavy cast-iron pots hold in heat and trap steam for the perfect baking environment for bread. If you don’t have one, you can use any ovenproof heavy pot with a tight-fitting lid or a baking stone with an inverted roasting pan (as a makeshift lid), but cast-iron does make a difference.
Below, Gendron shares her favorite way to turn a sourdough starter into an edible loaf of bread. She has perfected her recipe after years of trial and error and emphasizes that baking sourdough is hard to get right. Expect a few imperfect loaves before you nail it.
Basic Sourdough Bread
Ingredients
- A food scale
- Sourdough starter
- 950 milliliters water
- 1,200 grams flour
- 20 grams salt
- A Dutch oven
Directions
Day One:
Mix leaven: Add 200 milliliters warm water (roughly 80 degrees), 200 grams flour, and 50 grams starter to a container and stir. Cover with cling wrap or a tea towel, and let sit approximately 12 hours.
Day Two:
Add 250 grams of the leaven to a large mixing bowl. Pour in 700 milliliters of warm water, and mix with your hands until the leaven is dispersed. Add one kilo of flour and mix with your hands until combined and no dry flour is left. Cover your bowl with a towel or cling wrap, and let it sit for 45 minutes in a warm spot to rise. Mix 20 grams salt with 50 milliliters of warm water, dissolving the salt. Pour this over top of the dough, and squeeze the dough with your hands to incorporate the salt water throughout. Cover for 30 minutes, then fold the dough every 30 to 45 minutes, repeating four times (this step takes around three hours). Then let it rest one to two hours untouched and covered. Lightly sprinkle flour on the counter, and cut the dough into two equal halves. With lightly floured hands, shape each half into a loose boule, and let them rest on the counter, covered with a tea towel, for 30 minutes. Place into heavily floured bowls, and leave the dough covered in the fridge overnight.
Day Three:
Place the Dutch oven (lined with parchment paper if so desired) in the oven, and heat to 500 degrees. Place the bread into the Dutch oven by flipping the bowl over atop it, noting that the side of bread facing up in the bowl will be the bottom of the bread in your Dutch oven. Score the top of the bread in the Dutch oven by making two slashes, then cover it with the lid. Bake for 25 minutes with the lid on, then reduce the temperature to 475 degrees and bake for 20 minutes with the lid off. (If using a thermometer, the bread should reach 200 degrees.) Cool for one hour, and enjoy!
Sourdough Pizza
Use the same first steps in the bread recipe, but instead of putting the bread in the Dutch oven on day three, grab your favorite pizza sauce and toppings, then follow these steps:
Once the final shaping is finished, divide the dough into rounded one-pound pieces, cover, and let them rest on the counter for 30 minutes. Preheat the oven to 500 degrees, placing a pizza stone in the oven to heat up at the same time. Dust a cutting board with cornmeal and flour, and press the dough rounds flat until they’re a half-inch thick. Pick up the dough and stretch it using the back of your knuckles, rotating the disc around your hands. Once the dough is at your preferred thickness for a pizza crust, lay it back on the flour-and-cornmeal-dusted cutting board, and assemble your desired toppings. Slide the dough onto the hot pizza stone and bake for about eight minutes, turning the pizza 90 degrees about four minutes in. Cut and serve.
Sourdough Pancakes
That extra starter can make delicious pancakes, with the perfect amount of tartness to cut through the sweet berries or maple syrup that you put on top.
Ingredients
- 1 1/2 cups sourdough starter
- 1 egg
- Optional: 1 tablespoon sweetener of choice (sugar, coconut sugar, etc.)
- 1/2 cup flour
- 1 tablespoon milk
- Butter or oil for frying
Directions
Combine the starter, egg, and sweetener (if using). Add the flour and milk as needed to achieve your desired consistency—thicker batter makes thicker pancakes. Heat a griddle over medium heat, and pour the batter in three-inch circles, flipping them when they begin to bubble. Serve with berries, syrup, or Greek yogurt for a breakfast protein boost.
Common Sourdough Problems
As you prepare your first few loaves, you might make some common mistakes that lead to dough that doesn’t rise or bread that’s too dense. Here, Gendron explains some easy fixes for the most frequent sourdough mishaps:
- The starter may not be active enough. Make sure you are double feeding it (twice a day) the couple days before you plan on baking if you’re having trouble.
- Perhaps the period of folding your bread needs to be longer, so try doing one extra fold and letting it rest for an extra 30 to 45 minutes.
- The moisture level of the bread might be off. Some flours absorb different amounts of water, and things like air temperature and altitude can have an effect as well. Try adding 50 milliliters more water to your initial mix. If scored properly, steam from the water will release from your bread, leaving a light and airy crumb.