")

This ROS tutorial is a preview of the ROS in 5 Days Course. You’ll get a glimpse of what you’ll learn during the course with an introduction to the different parts, and also by seeing some simple examples of each part.
You can also learn this ROS tutorial by using your local ROS or by using ROS Development Studio.
At the end of this ROS tutorial you will have an understanding of:
- How to structure and launch ROS programs (packages and launch files)
- How to create basic ROS programs (Python based)
- Basic ROS concepts: Nodes, Parameter Server, Environment Variables, Roscore
In this ROS tutorial you need to launch the Kobuki simulation:
- If you are doing the tutorial using ROS Development Studio, select the Kobuki simulation and launch the main.launch in the package turtlebot_gazebo
- If you are doing the tutorial executing simulations in your computer, type:
$ roslaunch turtlebot_gazebo main.launch
Contents of this ROS Tutorial:
What is ROS (Robot Operating System)?
This is probably the question that has brought you all here. Well, let me tell you that you are still not prepared to understand the answer to this question, so. . . let’s get some work done first.
Move a Robot with ROS
On the right corner of the screen, you have your first simulated robot: the Turtlebot 2 robot against a large wall.
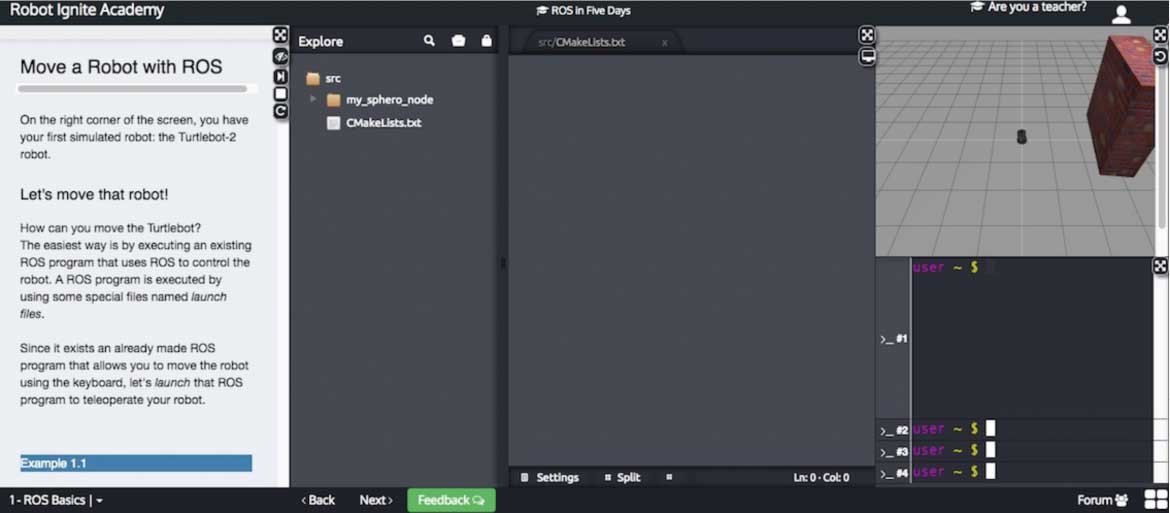
Let’s move that robot!
How can you move the Turtlebot?
The easiest way is by executing an existing ROS program to control the robot. A ROS program is executed by using some special files called launch files.
Since a previously-made ROS program already exists that allows you to move the robot using the keyboard, let’s launch that ROS program to teleoperate the robot.
Example 1.1
Execute the following command in the Webshell #1:
In [ ]: roslaunch turtlebot_teleop keyboard_teleop.launch
You will get the following output:
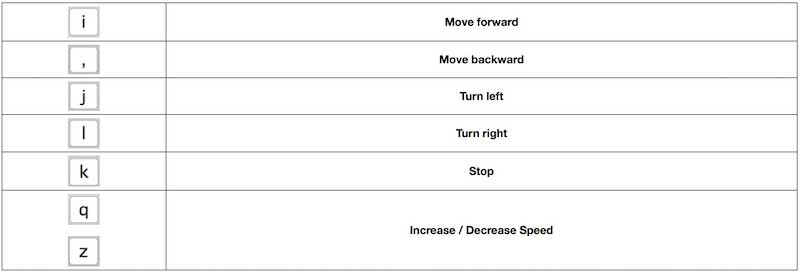
In [ ]: Control Your Turtlebot!
---------------------------
Moving around:
u i o
j k l
m , .

q/z : increase/decrease max speeds by 10%
w/x : increase/decrease only linear speed by 10%
e/c : increase/decrease only angular speed by 10%
space key, k : force stop
anything else : stop smoothly
CTRL-C to quit
Now, you can use the keys indicated in the WebShell Output in order to move the robot around.
Try it!! When you’re done, you can press Ctrl+C to stop the execution of the program.
roslaunch is the command used to launch a ROS program. Its structure goes as follows:
In [ ]: roslaunch <package_name> <launch_file>
As you can see, that command has two parameters: the first one is the name of the package that contains the launch file, and the second one is the name of the launch file itself (which is stored inside the package).
END Example 1.1
Now. . . what’s a package?
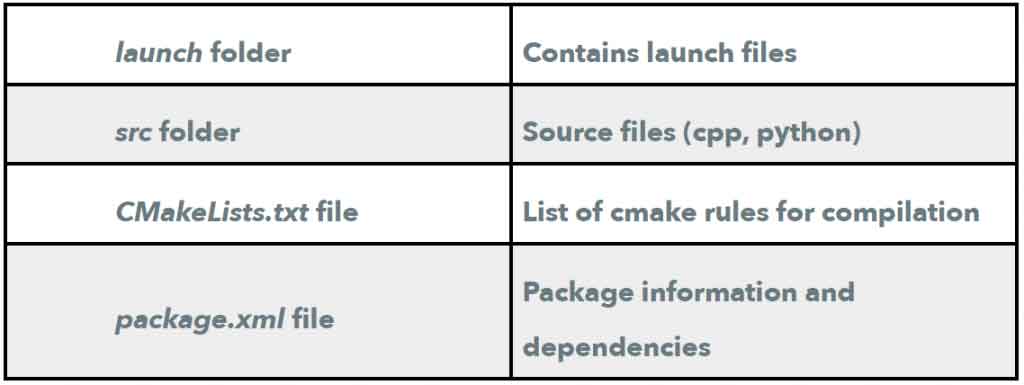
ROS uses packages to organize its programs. You can think of a package as all the files that a specific ROS program contains; all its cpp files, python files, configuration files, compilation files, launch files, and parameters files.
All those files in the package are organized with the following structure:
To go to any ROS package, ROS gives you a command named roscd. When typing:
In [ ]: roscd <package_name>
It will take you to the path where the package package_name is located.
Example 1.2
Go to a shell, navigate to the turtlebot_teleop package, and check that it has that structure.
Execute in the Webshell #1:
roscd turtlebot_teleop
ls

Every ROS program that you want to execute is organized in a package.
Every ROS program that you create will have to be organized in a package.
Packages are the main organization system of ROS programs.
END Example 1.2
And. . . what’s a launch file?
We’ve seen that ROS uses launch files in order to execute programs. But. . . how do they work? Let’s have a look.
Example 1.3
Open the launch folder inside the turtlebot_teleop package and check the keyboard_teleop.launch file.
Execute in the Webshell #1:
roscd turtlebot_teleop
cd launch
cat keyboard_teleop.launch
WebShell #1 Output:
<launch>
  <!-- turtlebot_teleop_key already has its own built in velocity smoother -->
  <node pkg="turtlebot_teleop" type="turtlebot_teleop_key.py" name="turtlebot_teleop_keyboard"  output="screen">
    <param name="scale_linear" value="0.5" type="double"/>
    <param name="scale_angular" value="1.5" type="double"/>
    <remap from="turtlebot_teleop_keyboard/cmd_vel" to="/cmd_vel"/>   <!-- cmd_vel_mux/input/teleop"/-->
  </node>
</launch>
In the launch file, you have some extra tags for setting parameters and remaps. For now, don’t worry about those tags and focus on the node tag.
All launch files are contained within a <launch> tag. Inside that tag, you can see a <node> tag, where we specify the following parameters:
1. pkg=“package_name” # Name of the package that contains the code of the ROS program to execute
2. type=“python_file_name.py” # Name of the program file that we want to execute
3. name=“node_name” # Name of the ROS node that will launch our Python file
4. output=“type_of_output” # Through which channel you will print the output of the Python file
End Example 1.3
Create a package
Until now we’ve been checking the structure of an already-built package. . . but now, let’s create one ourselves.
When we want to create packages, we need to work in a very specific ROS workspace, which is known as the catkin workspace. The catkin workspace is the directory in your hard disk where your own ROS packages must reside in order to be usable by ROS. Usually, the catkin workspace directory is called catkin_ws.
Example 1.4
Now, let’s go to the catkin_ws in your webshell. In order to do this, type roscd in the shell. You’ll see that you are thrown to a catkin_ws/devel directory. Since you want to go to the workspace, just type cd .. to move up 1 directory. You must end up here in the /home/user/catkin_ws.
The whole sequence of commands looks like this:
roscd
cd ..
pwd
Output:
user ~ $ pwd
/home/user/catkin_ws
Inside this workspace, there is a directory called src. This folder will contain all the packages created. Every time you want to create a package, you have to be in this directory (catkin_ws/src). Type in your webshell cd src in order to move to the source directory.
Execute in WebShell #1
cd src
Now we are ready to create our first package! In order to create a package, type in your shell:
catkin_create_pkg my_package rospy
This will create inside our “src” directory a new package with some files in it. We’ll check this later. Now, let’s see how this command is built:
catkin_create_pkg <package_name> <package_dependecies>
The package_name is the name of the package you want to create, and the package_dependencies are the names of other ROS packages that your package depends on.
End Example 1.4
Example 1.5
In order to check that our package has been created successfully, we can use some ROS commands related to packages. For example, let’s type:
rospack list
rospack list | grep my_package
roscd my_package
- rospack list: Gives you a list with all of the packages in your ROS system.
- rospack list | grep my_package: Filters, from all of the packages located in the ROS system, the package named my_package.
- roscd my_package: Takes you to the location in the Hard Drive of the package, named my_package.
You can also see the package created and its contents by just opening it through the IDE (if you are simulating in RDS, use the integrated IDE). You must see something similar to Figure 1.1.
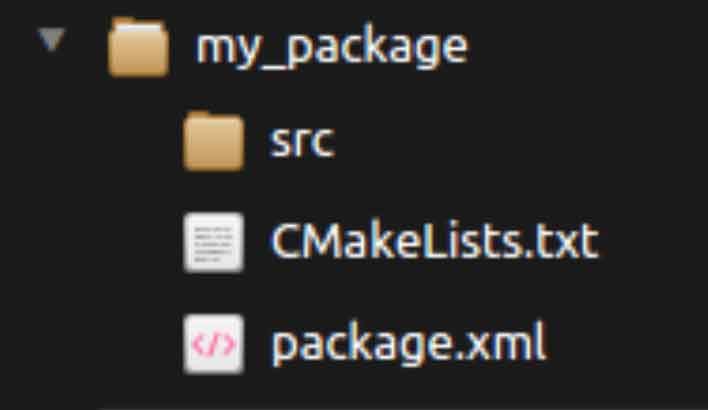
Fig 1.1 – The RDS IDE Showing packages my_package
End Example 1.5
My first ROS program
At this point, you should have your first ROS package created. . . but now you need to do something with it! Let’s do our first ROS program!
Example 1.6
1- Create in the src directory in my_package a python file that will be executed. For this exercise, just copy this simple python code simple.py. You can create it directly by RIGHT clicking on the IDE on the src directory of your package, selecting New File, and writing the name of the file on the box that will appear.
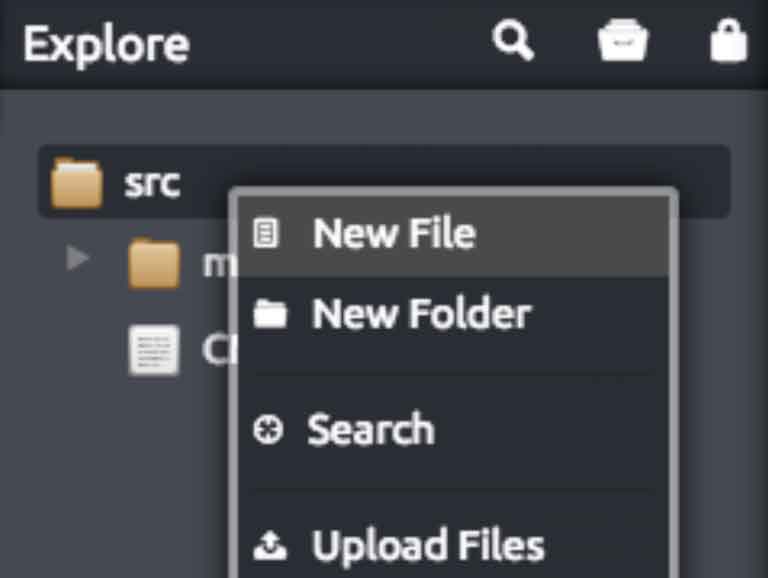
New File Creation
A new Tab should have appeared on the IDE with empty content. Then, copy the content of simple.py into the new file. Finally, press Ctrl-S to save your file with the changes. The Tab in the IDE will go from Green to no color (see pictures below).
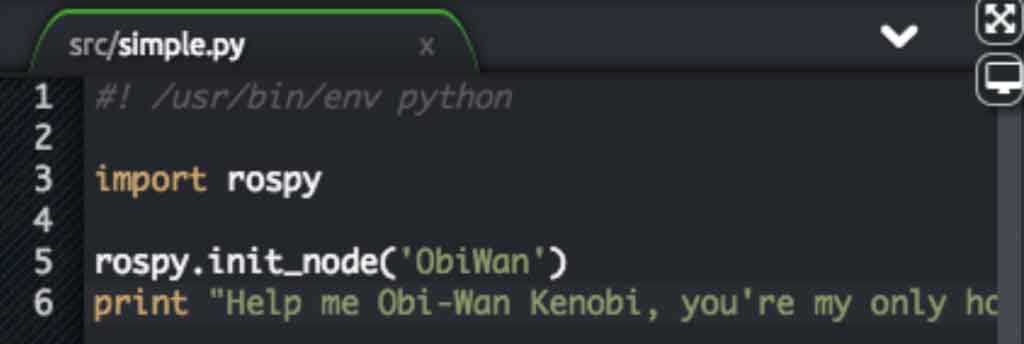
Unsaved
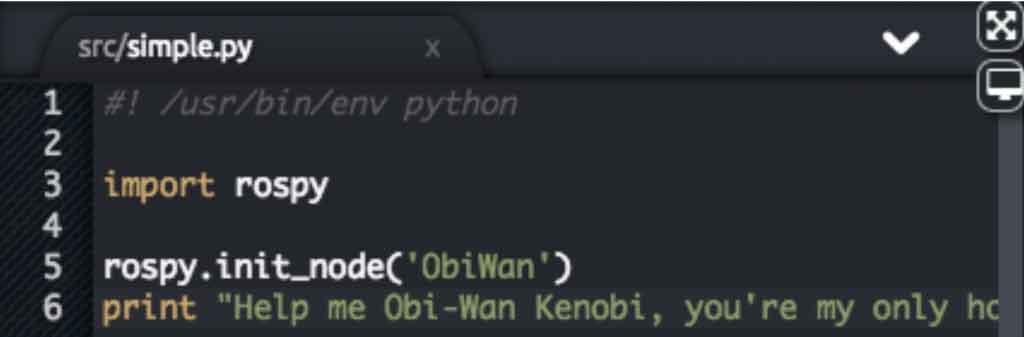
Saved
2- Create a launch directory inside the package named my_package {Example 1.4}.
Execute in a Shell:
roscd my_package
mkdir launch
You can also create it through the IDE.
3- Create a new launch file inside the launch directory.
Execute in a shell:
touch launch/my_package_launch_file.launch
4- Fill this launch file as we’ve previously seen in this course.
HINT: You can copy from the turtlebot_teleop package, the keyboard_teleop.launch file and modify it. If you do so, remove the param and remap tags and leave only the node tag, because you don’t need those parameters.
The final launch should be something similar to this my_package_launch_file.launch
5- Finally, execute the roslaunch command in the WebShell in order to launch your program.
Execute in a Shell
roslaunch my_package my_package_launch_file.launch
End Example 1.6
Expected Result for Example 1.6
You should see Leia’s quote among the output of the roslaunch command.
WebShell #1 Output:
user catkin_ws $ roslaunch my_package my_package_launch_file.launch
... logging to /home/user/.ros/log/d29014ac-911c-11e6-b306-02f9ff83faab/roslaunch-ip-172-31-30-5-28204.log
Checking log directory for disk usage. This may take awhile.
Press Ctrl-C to interrupt
Done checking log file disk usage. Usage is <1GB.

started roslaunch server http://ip-172-31-30-5:40504/

SUMMARY
========

PARAMETERS
 * /rosdistro: indigo
 * /rosversion: 1.11.20

NODES
  /
    ObiWan (my_package/simple.py)

ROS_MASTER_URI=http://localhost:11311

core service [/rosout] found
process[ObiWan-1]: started with pid [28228]
Help me Obi-Wan Kenobi, you're my only hope
[ObiWan-1] process has finished cleanly
log file: /home/user/.ros/log/d29014ac-911c-11e6-b306-02f9ff83faab/ObiWan-1*.log
all processes on machine have died, roslaunch will exit
shutting down processing monitor...
... shutting down processing monitor complete
Sometimes ROS won’t detect a new package when you have just created it, so you won’t be able to do a roslaunch. In this case, you can force ROS to do a refresh of its package list with the command:
rospack profile
Python Program {1.1a-py}: simple.py
#! /usr/bin/env python

import rospy

rospy.init_node('ObiWan')
print "Help me Obi-Wan Kenobi, you're my only hope"
You may be wondering what this whole code means, right? Well, let’s explain it line by line:
#! /usr/bin/env python
# This line will ensure the interpreter used is the first one on your environment's $PATH. Every Python file needs
# to start with this line at the top.

import rospy # Import the rospy, which is a Python library for ROS.

rospy.init_node('ObiWan') # Initiate a node called ObiWan

print "Help me Obi-Wan Kenobi, you're my only hope" # A simple Python print
NOTE: If you create your Python file from the shell, it may happen that it’s created without execution permissions. If this happens, ROS won’t be able to find it. If this is your case, you can give execution permissions to the file by typing the next command: chmod +x name_of_the_file.py
END Python Program {1.1-py}: simple.py
Launch File {1.1-l}: my_package_launch_file.launch
You should have something similar to this in your my_package_launch_file.launch:
Note: Keep in mind that in the example below, the Python file in the attribute type is named simple.py. So, if you have named your Python file with a different name, this will be different.
<launch>
    <!-- My Package launch file -->
    <node pkg="my_package" type="simple.py" name="ObiWan"  output="screen">
    </node>
</launch>
END Launch File {1.1-l}: my_package_launch_file.launch
ROS Nodes
You’ve initiated a node in the previous code but. . . what’s a node? ROS nodes are basically programs made in ROS. The ROS command to see what nodes are actually running on a computer is:
rosnode list
Example 1.7
Type this command in a new shell and look for the node you’ve just initiated (ObiWan).
Execute in a Shell #1
rosnode list
You can’t find it? I know you can’t. That’s because the node is killed when the Python program ends. Let’s change that.
Update your Python file simple.py with the following code:
Python Program {1.1b-py}: simple_loop.py
#! /usr/bin/env python

import rospy

rospy.init_node("ObiWan")
rate = rospy.Rate(2)               # We create a Rate object of 2Hz
while not rospy.is_shutdown():     # Endless loop until Ctrl + C
   print "Help me Obi-Wan Kenobi, you're my only hope"
   rate.sleep()                    # We sleep the needed time to maintain the Rate fixed above

# This program creates an endless loop that repeats itself 2 times per second (2Hz) until somebody presses Ctrl + C
# in the Shell
END Python Program {1.1b-py}: simple_loop.py
Launch your program again using the roslaunch command.
roslaunch my_package my_package_launch_file.launch
Now try again in another Shell:
rosnode list
Can you now see your node?
user ~ $ rosnode list
/ObiWan
/cmd_vel_mux
/gazebo
/mobile_base_nodelet_manager
/robot_state_publisher
/rosout
In order to see information about our node, we can use the next command:
rosnode info /ObiWan
This command will show us information about all the connections that our Node has.
Execute in WebShell #2:
rosnode info /ObiWan
WebShell #2 Output:
user ~ $ rosnode info /ObiWan
--------------------------------------------------------------------------------
Node [/ObiWan]
Publications:
 * /rosout [rosgraph_msgs/Log]

Subscriptions:
 * /clock [rosgraph_msgs/Clock]

Services:
 * /ObiWan/set_logger_level
 * /ObiWan/get_loggers


contacting node http://ip-172-31-30-5:58680/ ...
Pid: 1215
Connections:
 * topic: /rosout
    * to: /rosout
    * direction: outbound
    * transport: TCPROS
 * topic: /clock
    * to: /gazebo (http://ip-172-31-30-5:46415/)
    * direction: inbound
    * transport: TCPROS
For now, don’t worry about the output of the command. You will understand more while going through the next chapters.
END Example 1.7
Compile a package
When you create a package, you will usually need to compile it in order to make it work. The command used by ROS to compile is the next one:
catkin_make
This command will compile your whole src directory, and it needs to be issued in your catkin_ws directory in order to work. This is MANDATORY. If you try to compile from another directory, it won’t work.
Example 1.8
Go to your catkin_ws directory and compile your source folder. You can do this by typing:
roscd; cd ..
catkin_make
Sometimes (for example, in large projects) you will not want to compile all of your packages, but just the one(s) where you’ve made changes. You can do this with the following command:
catkin_make --only-pkg-with-deps <package_name>
This command will only compile the packages specified and its dependencies.
Try to compile your package named my_package with this command:
catkin_make --only-pkg-with-deps my_package
END Example 1.8
Parameter Server
A Parameter Server is a dictionary that ROS uses to store parameters. These parameters can be used by nodes at runtime and are normally used for static data, such as configuration parameters.
To get a list of these parameters, you can type:
rosparam list
To get a value of a particular parameter, you can type:
rosparam get <parameter_name>
And to set a value to a parameter, you can type:
rosparam set <parameter_name> <value>
Example 1.9
To get the value of the ‘/camera/imager_rate’ parameter, and change it to ‘4.0,’ you will have to do the following:
rosparam get /camera/imager_rate
rosparam set /camera/imager_rate 4.0
rosparam get /camera/imager_rate
END Example 1.9
You can create and delete new parameters for your own use, but do not worry about this right now. You will learn more about this in more advanced ROS tutorials.
Roscore
In order to have all of this working, we need to have a roscore running. The roscore is the main process that manages all of the ROS system. You always need to have a roscore running in order to work with ROS.
The command that launches a roscore is:
roscore
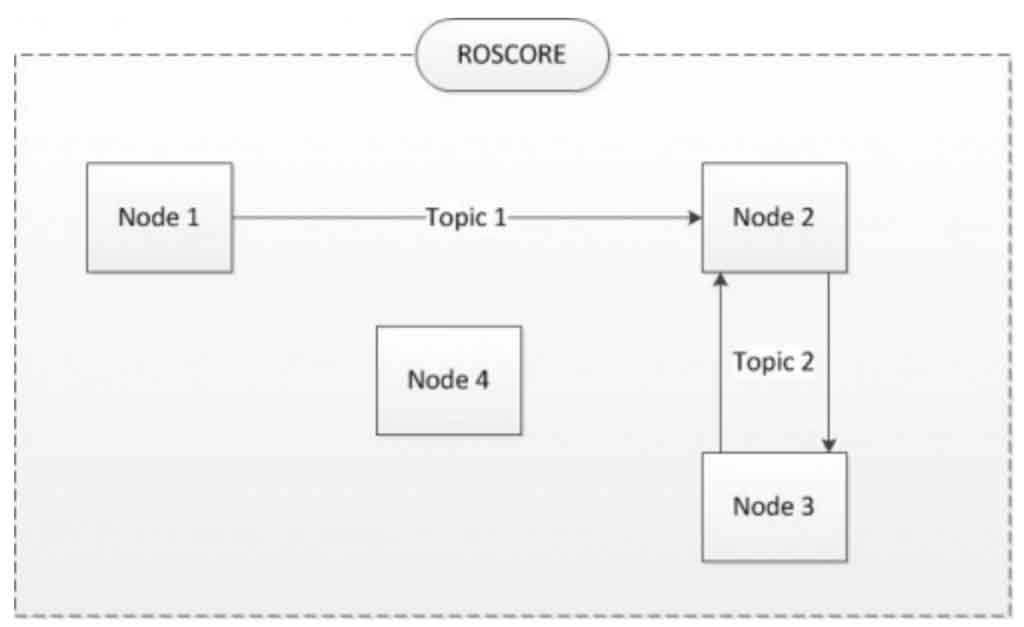
Fig.1.2 – ROS Core Diagram
NOTE: At the platform you are using for this course, when you enter a course it automatically launches a roscore for you, so you don’t need to launch one.
Environment Variables
ROS uses a set of Linux system environment variables in order to work properly. You can check these variables by typing:
export | grep ROS
NOTE 1: Depending on your computer, it could happen that you can’t type the | symbol directly in your webshell. If that’s the case, just copy/paste the command by RIGHT-CLICKING on the WebShell and select Paste from Browser. This feature will allow you to write anything on your WebShell, no matter what your computer configuration is.
user ~ $ export | grep ROS
declare -x ROSLISP_PACKAGE_DIRECTORIES=”/home/user/catkin_ws/devel/share/common-lisp” declare -x ROS_DISTRO=”indigo” declare -x ROS_ETC_DIR=”/opt/ros/indigo/etc/ros” declare -x ROS_MASTER_URI=”http://localhost:11311″ declare -x ROS_PACKAGE_PATH=”/home/user/catkin_ws/src:/opt/ros/indigo/share:/opt/ros/indigo/stacks” declare -x ROS_ROOT=”/opt/ros/indigo/share/ros”
The most important variables are the ROS_MASTER_URI and the ROS_PACKAGE_PATH.
ROS_MASTER_URI -> Contains the url where the ROS Core is being executed. Usually, your own computer (localhost).
ROS_PACKAGE_PATH -> Contains the paths in your Hard Drive where ROS has packages in it.
NOTE 2: At the platform, you are using for this course, we have created an alias to display the environment variables of ROS.This alias is rosenv. By typing this on your shell, you’ll get a list of ROS environment variables. It is important that you know that this is not an official ROS command, so you can only use it while working on this platform.
So now…what is ROS?
ROS is basically the framework that allows us to do all that we showed along this chapter. It provides the background to manage all these processes and communications between them. . . and much, much more!! In this ROS tutorial, you’ve just scratched the surface of ROS, the basic concepts. ROS is an extremely powerful tool. If you dive into our courses you’ll learn much more about ROS and you’ll find yourself able to do almost anything with your robots!
Learn more about ROS Basics:


wow… u r amazing.
it’s very encouraging as i’m a totally new in ROS.
from all i have read most, i can place my bet on ROS for doing my simple wheeled robot.
but so far as i see, you always use off the shelf robot (such as turtle bot).
can i build my own robot? like i use BLDC controller using RS232 to talk to my PC for controlling my 2 BLDC motors?
attaching some basic sensors like that cheap intel R200 and also… cheap lidar?
how should i put those 2 sensors? lidar at the bottom to scan the floor and R200 in the middle of the height for scanning 3D SLAM?
both are slam sensors and sure i only imagine these 2 are best strategy but i’m not sure how to deal with ROS. or should i go only with 1 sensor instead like intel R200 only?
well, that’s very basic. or a bit more advance then ROS introduction but still far away from the topic of controlling robot using ROS.
i hope i can find those basic things from you 🙂