

Adding a click to Tweet quote box, link, or button to your WordPress posts and pages is one of the quickest and easiest ways to get your content shared on Twitter. Encouraging your WordPress audience to share your website’s best quotes will help you will reach a wider audience and increase your Twitter fan base. So let’s find out how to do so on your WordPress website.
In this article, we will consider three actionable ‘click to tweet’ options that you can setup on your WordPress website. Firstly we will discuss how to add tweetable quote boxes to your posts and pages. Secondly, we will run through how to insert a click to tweet links within your content. And lastly, we will look at how to display a click to tweet buttons on your site. Ready to get started?
How to Add a Tweetable Quote Box to Your WordPress Content
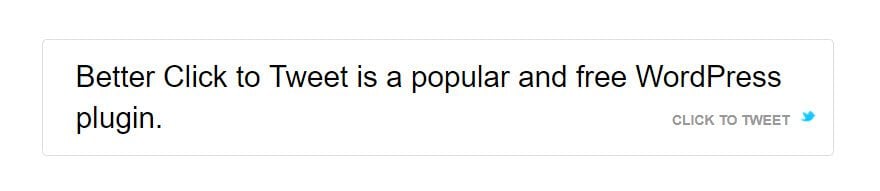 If you are looking to add tweetable quote boxes to your WordPress pages and posts then Better Click to Tweet is a great option. Better Click to Tweet is a popular and free WordPress plugin that uses a shortcode to turn highlighted quotes into tweetable links. It gives you control over the URLs displayed and, if you are confident with CSS, Better Click to Tweet is also fully customizable. So let’s find out how to get started with this plugin…
Installing Better Click to Tweet
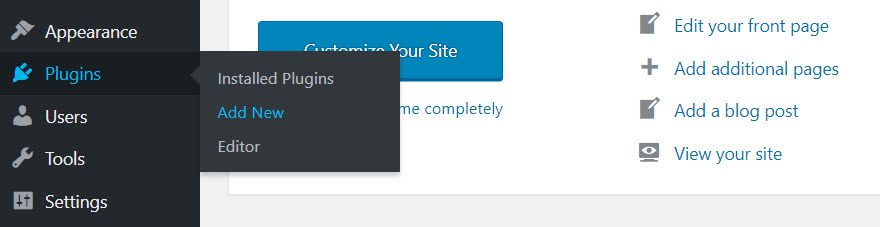
To install Better Click to Tweet, log in as Admin on your WordPress website. Select ‘Plugins > Add New’ from the dashboard menu.
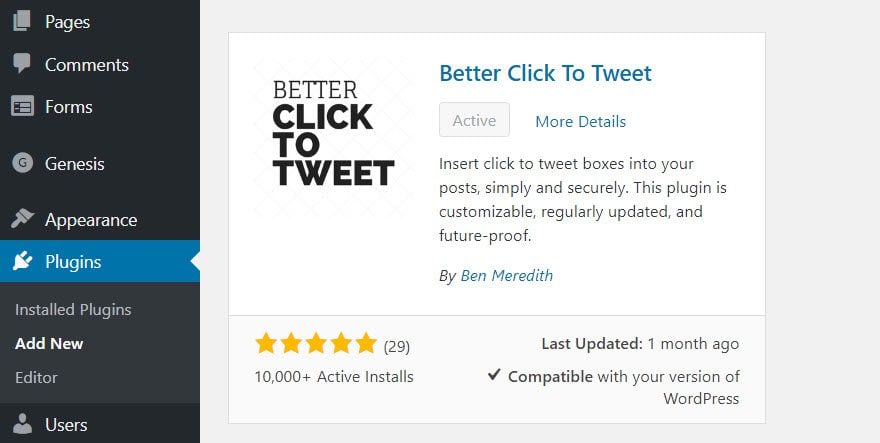
Search ‘Better Click to Tweet’, and when the plugin is displayed click on ‘Install Now > Activate’. You will now find the plugin in your WordPress menu.
Setting Up Better Click to Tweet
Once you have installed Better Click to Tweet, there are a couple of very quick setup steps to complete. Select ‘Better Click to Tweet’ from your WordPress menu. Here you will find the plugins settings as well as instructions on how to use the shortcode to turn text into tweetable quote boxes.
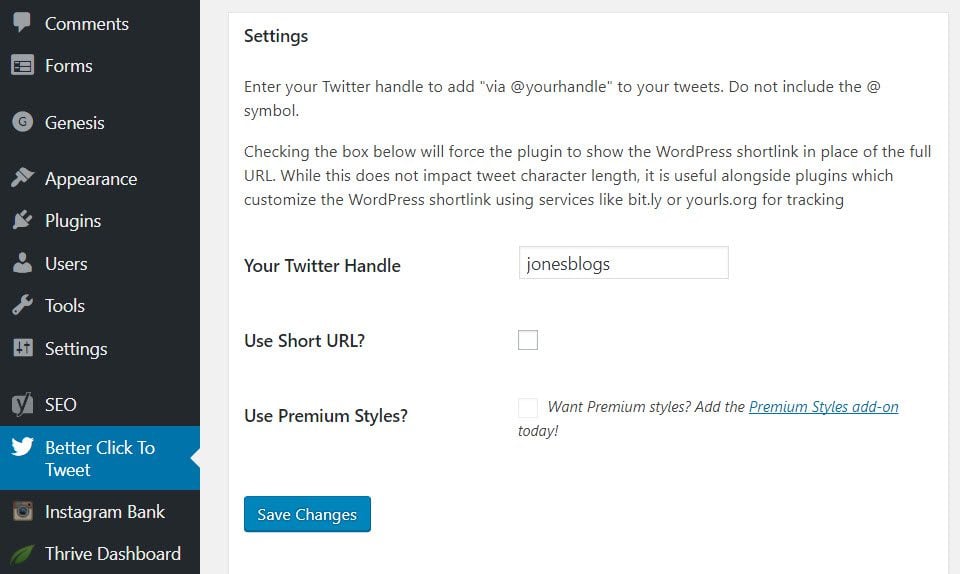
Scroll down the page to ‘Settings’. Firstly, you can add your Twitter Handle. This enables you to add ‘@jonesblogs’ (replace with what you will) to your tweetable quotes. You can also choose to use shortened URLs, a useful option that works alongside solutions like Bitly that customize WordPress shortlinks.
Lastly, you can choose to purchase the Premium Styles Add-on. This gives you the ability to restyle your tweetable boxes in a few quick clicks. A good option for those who want attractive tweetable quote boxes but possess no coding knowledge.
Once you have altered the settings to suit your site’s needs, select ‘Save Changes’. You are now ready to add tweetable quotes to your content.
Adding Tweetable Quote Boxes to Your Posts and Pages
Better Click to Tweet uses a shortcode to turn content into tweetable quotes, making it an extremely quick and easy process. Open the page or post where you would like to add tweetable quotes. Click within the content, where you would like to add the tweetable text box. Then click on the ‘Better Click to Tweet Shortcode Generator’, which is located at the top of the editor.

In the shortcode generator pop-up, add the text you want to make tweetable. If you have added your Twitter handle in the settings, your Twitter username will already be added. However, you can add or change the Twitter username at this stage, or turn off ‘via’ altogether. Then select ‘OK’. If you prefer to work in the text editor, simply add the shortcode [bctt tweet=”Add your quote here.”].
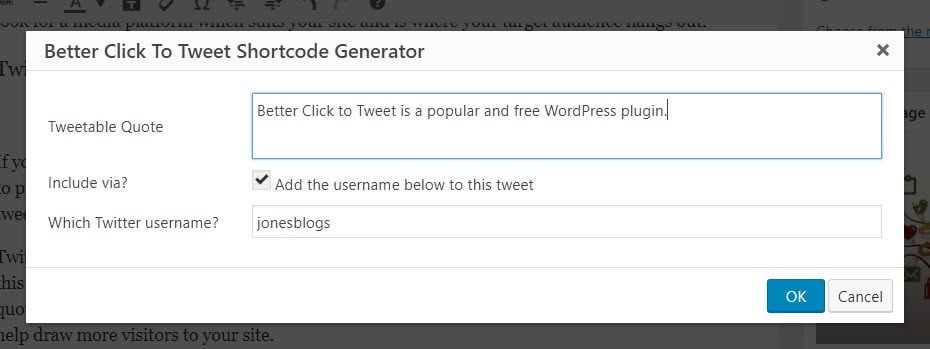
Your tweetable quote box should now be ready to go. Preview your post and check that when you click on the text it can be tweeted, and that it links back to your post as well as to your Twitter handle.
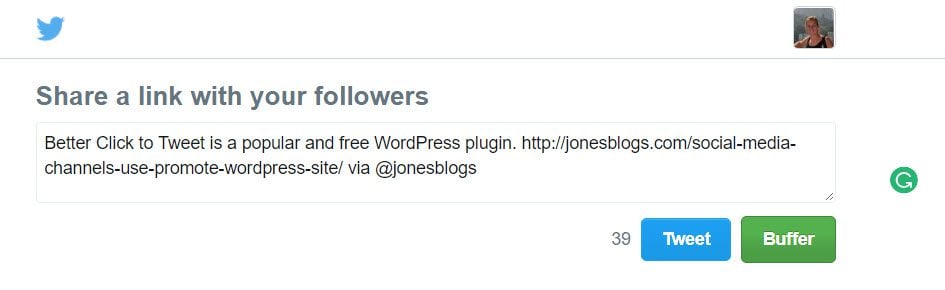 As you can see, Better Click to Tweet is an extremely easy option if you are looking to create tweetable boxes for your readers. However, it is not the only option for those wanting to create shareable Twitter content. So let’s now look at how to add a tweetable link to your WordPress content
How to Add Tweetable Links to Your Website
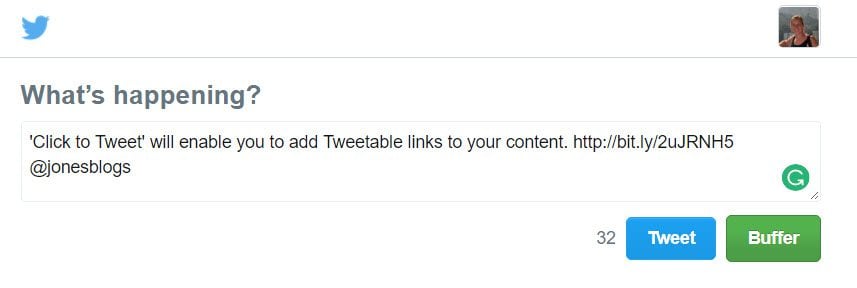
‘Click to Tweet’ is an online free and premium solution that will enable you to add Tweetable links to your content.
Generating Links with Click to Tweet
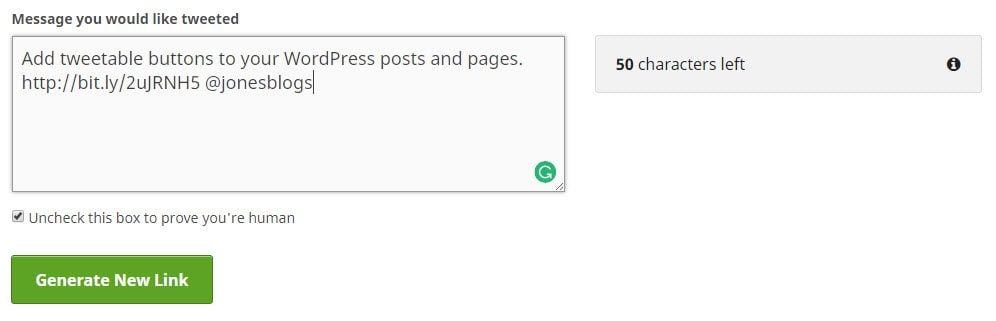
To get started open the Click to Tweet website. If you choose to sign in with Twitter you can create up to five free trackable tweets a day before having to upgrade to a premium plan.
However, to keep it free and simple, just select ‘Basic Link’ from the menu. Here you can craft the message you would like Tweeted in the message generator.
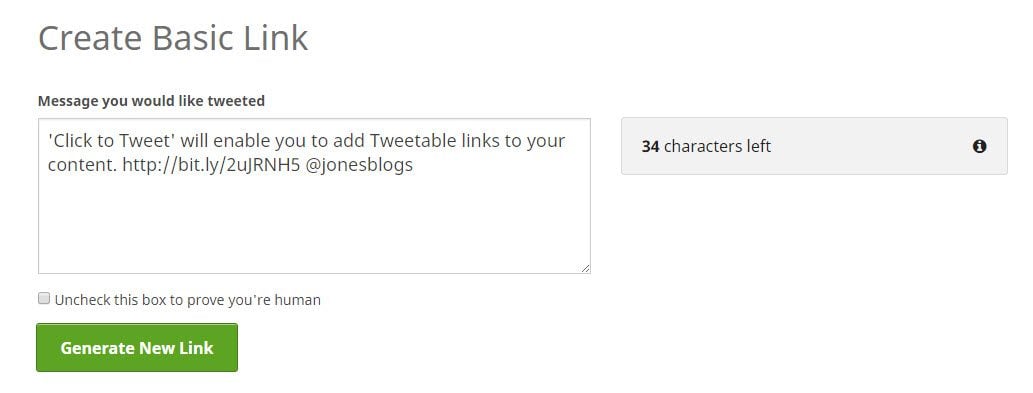
If your URL is particularly long and you are short on characters, use Bitly to shorten your URL. Once finished click ‘Generate New Link’, and then copy the link Click to Tweet creates for you.
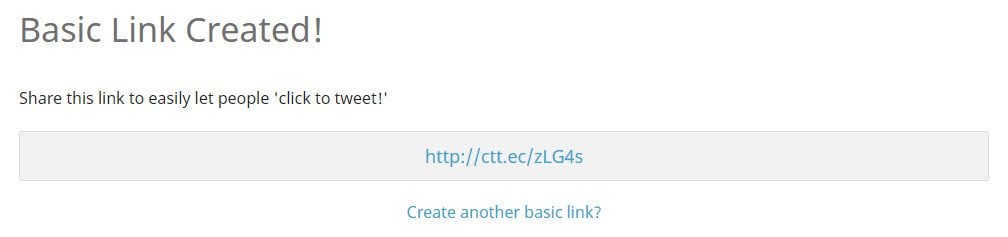
Adding Generated Links as Hyperlinks
Your generated tweetable link can now be added to your WordPress website. Open the page or post you want to add the link to. Highlight the sentence or quote and add the link as a hyperlink.
Your tweetable link should now be embedded in your content. Once your page or post is published, visitors can click on the link share your Tweet.
 How to Add Click to Tweet Buttons to Your WordPress Posts and Pages
Another way to utilize Click to Tweet is to use it to add tweetable buttons to your WordPress posts and pages. To do so, first, you need to create a click to tweet button.

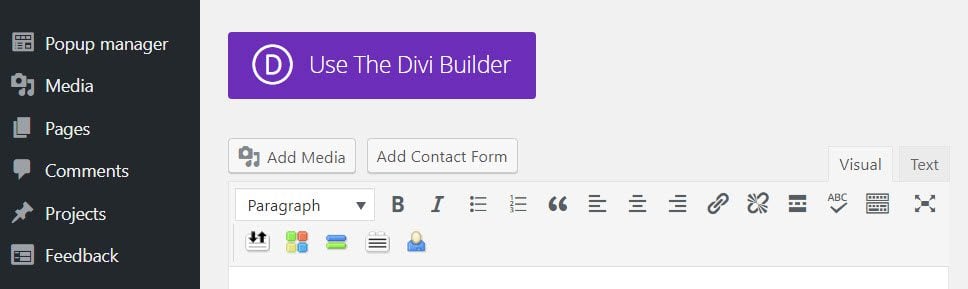
Creating buttons is extremely easy with our own Divi Builder. This WordPress builder comes included as part of the Divi theme, or can be bought separately as a stand alone plugin. After purchase, either install The Divi Builder or the Divi Theme, according to the Elegant Themes documentation.
Once The Divi Builder is up and running, you can use it to create beautiful click to tweet buttons. To do so, select the WordPress post or page where you want to add a button. At the top of the editor, select the buttons ‘Use the Divi Builder > Use Visual Builder’.
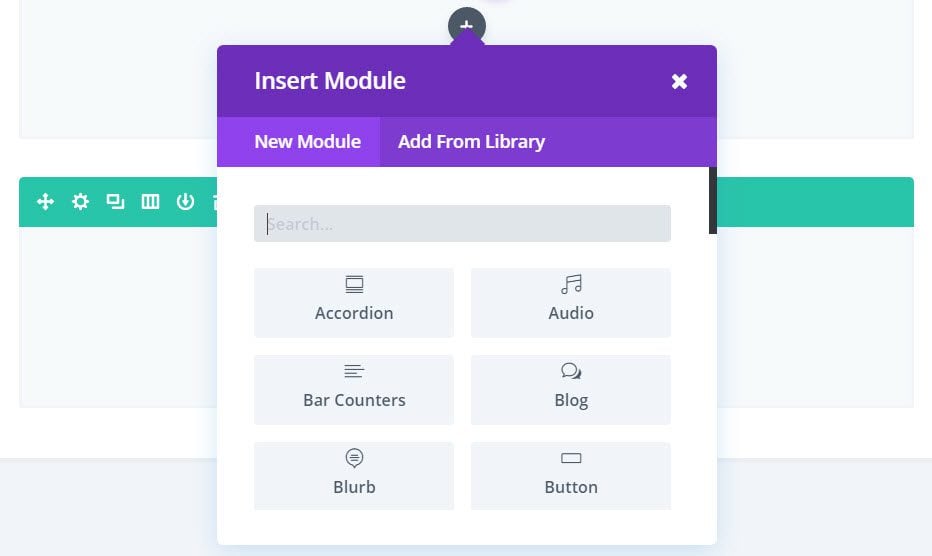
The first step is to add a row to your new page. Then, within the new row created, click on the gray cross. Select the ‘Button’ module from the ‘Insert Module’ pop-up.
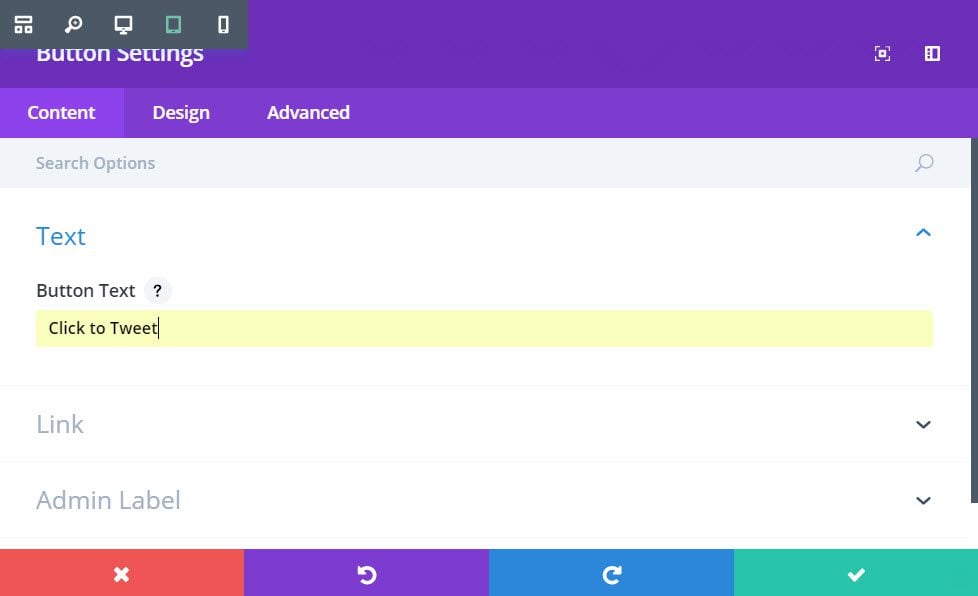
In the ‘Button Settings’, give your button a title (ie Click to Tweet). Then alter the design and settings as you see fit.
Adding a Generated Link
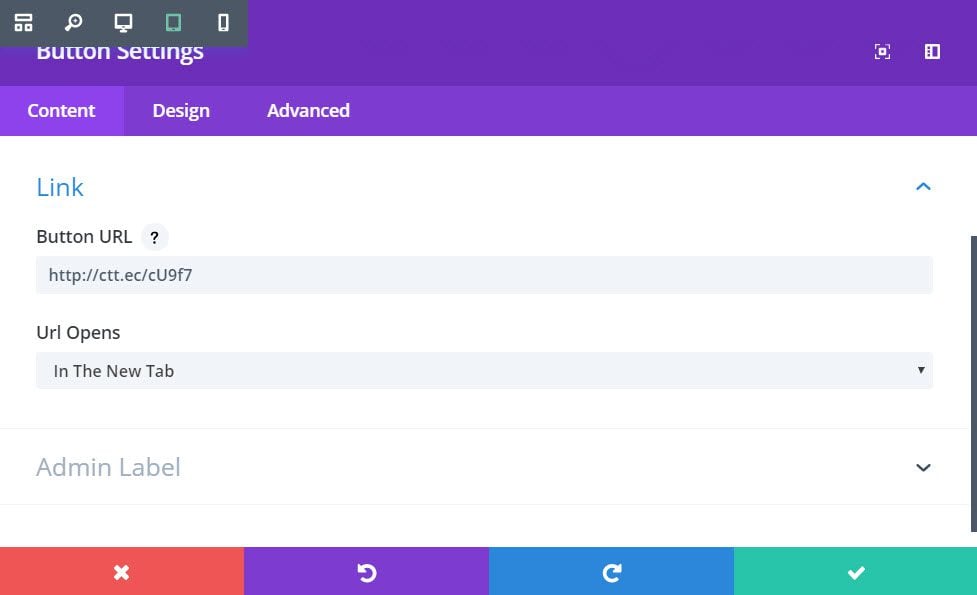
Switch to the Click to Tweet website. Then create a Tweet and generate and copy the link.
Navigate back to your WordPress website and within the ‘Button Settings’ paste the generated link into the ‘Button URL’ box. Then save the changes.
Buttons should be positioned under or next to the quote or sentence you want your readers to Tweet, so move your button’s location accordingly.

Now check that your button works, and provides your audience with a tweetable link.
Final Thoughts
The type of click to tweet option you choose for each piece of content will vary. Using a selection of tweetable quote boxes, links and buttons will keep your posts and pages fresh and help appeal to a range of visitors.
When adding click to tweets to your WordPress website, always choose your best quotes that will immediately appeal to your audience. By making these stand out sentences easy to Tweet, your Twitter shares should greatly increase.
What is your experience with getting your WordPress website content shared on Twitter? Please let us know in the comment section below…
Featured Image by Andora / shutterstock.com


What a fantastic blog! All very relevant content, very good!
I find this a common complaint: I don’t know what the final product looks like. There is no example in this tutorial.
In a perfect world, THAT (what I’m about to create) should be shown FIRST. THEN I can understand what I’m creating. IMHO
Hi Randy, Thanks for your comment. If you take another look at the article I think you will find that what you are asking for is actually present. Under each main paragraph title, and before the ‘how to’ explanation, an image of ‘what you are about to create’ is displayed. Hope that helps?
Hello Megane,
Thank you for this very interesting article.
Question, to carry out the same operation on other social networks need other plugins? If yes, which ones ?
Thanks in advance
Very nice post. I won’t mind to have this placed on my posts. Thanks for sharing!
Thanks for your comment James, glad you found the article helpful.