Develop a Snipcart Powered Website Locally Using ngrok
After running Snipcart for nearly two years, we've received many different types of requests. But the following one, though, has been sitting firmly in the top 5 of our recurring requests:
Can you guys allow me to test Snipcart locally?
It is kind of hard to test locally with Snipcart. This is mostly due to the fact we crawl back every transaction before an order is completed. In short, Snipcart will make an HTTP request to the data-item-url value to ensure the integrity of the order.
So the other day, while I was sipping on my second espresso of the morning, I told a young developer on our team about this. His name is Yan; he's a 20-year-old genius who knows many, many things about many, many programming issues. He instantly replied:
Why don't you use ngrok?
A sound advice: using ngrok, developers can make local apps and websites available online rapidly and securely. It's an application that allows you to easily expose a specific port of your local computer without having to configure the firewalls, port forwarding, etc. For collaboration and demonstration, this can be very useful. So, a few other espressos later that same day, this post was ready to go.
Today I will show you how to use this neat little tool with our beloved Snipcart.
Installing ngrok
Installing ngrok is super easy: it might be available through package managers like Homebrew or Chocolatey. If you are not using one of those, you can get it on https://ngrok.com/download. It works on Linux, Windows or OS X.
After downloading it, make sure ngrok is available in your PATH.
Running the application
Close your eyes and imagine your application is running on http://localhost:8080. Open your eyes now. The only thing you need to do is:
<!-- lang: sh -->

ngrok 8080
ngrok will then do its magic and start a proxy for you. You should see something like this on your terminal:


ngrok will automatically give you an URL accessible outside of your local network.
Configuring Snipcart with ngrok
As soon as ngrok starts, you'll get a generated URL. You can setup custom sub domains if you have an account on their website, but I will let you go through their documentation.
You will need to add the generated domain in the allowed domains of your Snipcart account. To do so, log into your dashboard, go to Settings > General and in the Allowed domains & subdomains section click on Manage domains.
You will then be able to add it into Snipcart.

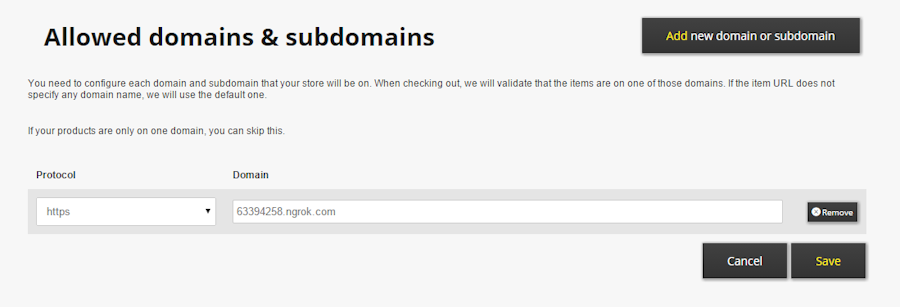
Use the ngrok URL to define your products
The last step is to use this URL when you define your Snipcart products. Here's a quick example:
<!-- lang: html -->

<button class="snipcart-add-item"
  data-item-id="1"
  data-item-name="Ngrok demo"
  data-item-price="20.00"
  data-item-url="https://63394258.ngrok.com/products/1">Buy now</button>
Then, Snipcart will be able to reach your local application when completing an order, and you will be able to test everything locally. Ta-dah!
Conclusion
ngrok really makes it easy to expose your local web server to the outside world. Using it, you'll be able to ease the pain of working and testing locally with Snipcart (and any other services that need to communicate with your application).
For this post, we focused on the pricing validation part of the process. However, this can also be very useful when using our Webhooks feature. Our webhooks basically allow you to tell Snipcart to notify your application through HTTP requests when specific events happen, like a new order, for instance.
Again, quick shoutout to Yan for pointing out this tool.
Psst: if you want to test your production frontends, try Cypress.io.
Feel free to let us know your thoughts on ngrok or any local development-related issue in the comments. If you think the post was valuable, go ahead and share it on Twitter!


