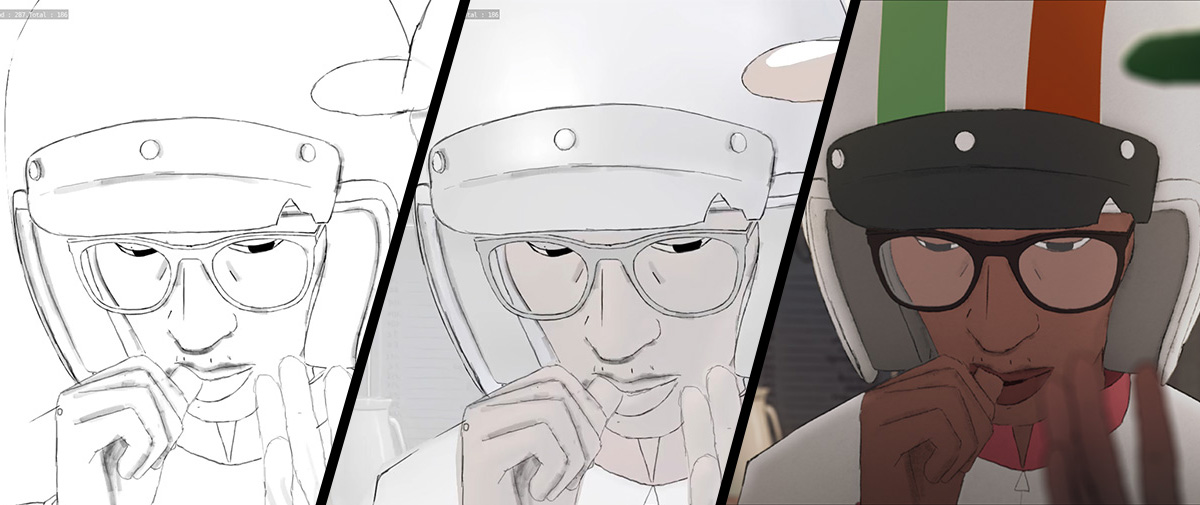
the film was animated in 3d, then given a 2d look, using the free open-source software.
Jérémy Clapin’s I Lost My Body (J’ai perdu mon corps) is about a solitary hand trying to reconnect with its owner. It won the Audience Award/Première and Cristal prizes at Annecy this year, and for good reason. It’s an intoxicating journey as you follow both the story of the hand and the person it belongs to.
I Lost My Body looks 2D-animated, but it was in fact firstly made in 3D with the open-source software Blender. Then, Blender’s drawing and 2D animation tool Grease Pencil was used over the top of the CG animation to provide a distinctive look to the film. Doing it this way also allowed a real sense of camera movement that is harder to achieve in purely 2D drawn animation.
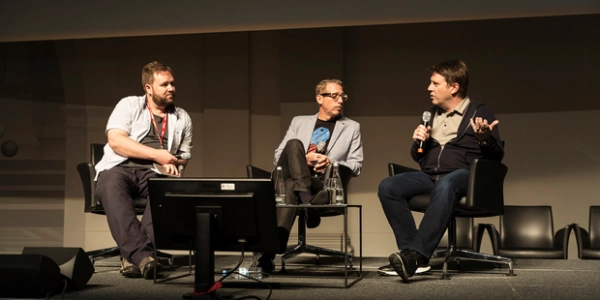
I was able to talk to Clapin directly about his decision to use Blender on the feature film, and about the specific challenges of bringing a hand to life.
Choosing Blender
Jérémy Clapin (director): I had used Blender for Palmipédarium, my last short. On my short films, I used to work with Jean-François Sarazin, who did all the technical aspects of the films. Originally we were using 3ds Max, then we were using Blender for Palmipédarium. It was the only software that allowed us to make projections of textures without having to do texture mapping, and be able to ‘animate’ the texture in an efficient and easy way.
When we decided to do I Lost My Body in Blender, it was really a significant decision, because I didn’t think we’d be able to do it there. I was really looking for something more conventional like 3ds Max mixed with TVPaint and other software, but not Blender.


What happened was, I was playing with Blender. I discovered the Grease Pencil tools. I had fun using them and really started to believe that it was the perfect thing for my project because now I had, in the same software, the ability to make it look 2D, but then to animate my character in CG and to have something really tangible that you can use for camera movement, as in, have interesting movement like in live-action, which is something you can’t really do in 2D animation.
What Blender allowed us to do
The overall approach was to model all the elements, even backgrounds. All the characters were animated in CG. So, you can say that there is actually a version of the film that exists only in CG.

Then, we added an artistic look to the animation. Grease Pencil allows you to draw an animated drawing with layers linked to an object. It’s like assisted rotoscoping – you’re not drawing all the poses of your character but, by parenting your layer, it can match and can fit to the other picture, to the other frame.
And when it doesn’t fit anymore, when you want to change the expression, you just put another drawing into this layer and all these are connected to the CG. It really accelerates the process of drawing. Without Blender, I don’t think I would have been able to get this quality of picture.
The production workflow
We knew that we needed to work with different parts of France because we would receive different funding from different regions. We decided to split it in the most friendly way possible. We decided to do the layout process at Xilam’s studios in Paris.
The layout was then sent to Gao Shan on the French island of Réunion, where they completed the CG animation. Then that came back to Xilam in Lyon. Here the 2D animation team adjusted things for the final look, adding organic things, expressions, etc. Then all the animation and the backgrounds was sent to Paris for final compositing.

Animating a hand
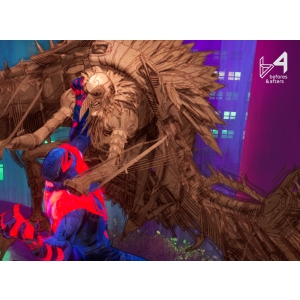
I know that films already exist with a hand, like The Addams Family. But I didn’t want to see a several hand. I wanted to see a new animal, a new character, new behavior – something new coming to life. I had to be careful to not be ‘scary’ with the way the hand walked, i.e. not too much like a spider or the facehugger from Alien. It was really a challenge to also not be too funny, or cute. I wanted something natural, even though it’s not natural to see a hand walking.
At the beginning of the film, we see the birth of the hand. And we show how the hand has to deal with a missing body. Because we see the birth of the hand, it’s like seeing it come to life. The audience is really involved and needs the hand to succeed!
I wanted to allow the hand to have new kinds of positions or unexpected positions. So the hand is able to get on its knees, even if it’s not possible in reality – you can see that in the film when the hand is turning the head to the swan. Even when I say ‘the hand is turning its head,’ it’s crazy to say that! But it’s really what it looks like on the hand.
Also when the hand is going to sit down on the window sill after just escaping from the laboratory, it’s like the hand is resting on the window in a sitting position. Remember, this is despite a hand not being capable of sitting, but we had to make it look like that. It’s like the hand is is trying to find it place in the world and developing its own movement vocabulary.

I was looking for the shape and the graphic of the hand to be clear and believable. Most of time on the viewport I would ask the team to limit the information – say with very flat color – to check if it looked ok. Is it ugly? Do I understand which finger I’m looking at?
So doing this in CG helped the hand to exist. With CG we could see the real shape and volume. If we had done it in 2D without CG behind it, it would have been really hard to draw that hand. Because we have the CG, we have more liberty because we can trust the volume, and we can sometimes bring a little bit of information coming from the CG to make the shape more clear.
Here’s how you can learn VFX in a real studio production environment
The hardest shots
The toughest shots were when the background is more organic, like when the hand is falling into the water, for example. It’s a lot of compositing. When you’re working on the backgrounds for shots like that, all these departments are a bit disconnected. And when you take all these separate elements – animation, background – and then get into compositing, it’s as if nothing is really integrated, and you have to find a solution.
But then in compositing, you can hide things with color, with shadow, with depth of field – there’s many ways to focus the look of the viewer. But at the beginning, everything is at an equal level and you have to build this focus. So under the water, we had to give it some treatment to make it feel underwater. It was not so obvious at first when we composited the animation with the background that it was underwater, so we needed to add this.
Another shot was when the hand catches the umbrella, and starts to jump over the street where all those cars are driving. It was a heavy moving background. I also wanted the scene to convey that feeling of being a bit lost, like the hand. Because the shots were fast, we needed to limit the information there so it was readable. So it was about how to remove information.
The final result
I always prefer to direct CG animation than 2D animation. The 2D animation process for me is too hard and too long. I don’t like the way you have to be careful to ‘respect’ the model or to have clean lines. I don’t like this. It’s not directing for me anymore. I want to focus on directing. So I loved the way we could animate the character in 3D but then keep it looking simple – well, it was kind of like low-polygons, not too CG looking. I wanted to make a part of the work in CG and the last part into 2D. Blender allowed me to do this in the same software because of Grease Pencil.


A really great job.
This was quite informative article, a big Thanks to the one who put this altogether.
I am inspired to learn more about blender. Thanks a lot.