It is surprising how many needlewomen fight shy of working in a frame, not realising perhaps that in tackling certain stitches, such as satin-stitch, and with certain types of work, such as appliqué and canvas work, the task is simplified and a good result much more easily obtained if the embroidery is done not in the hand but stretched in a frame. It may be that they grudge the time spent in fixing the material into the frame, but with a little practice this is neither a difficult nor a lengthy job, and the results certainly make it well worth while.
The frames consist of two wooden lathe and two wooden rollers to which webbing is attached, and they can be bought in a great variety of sizes, some of the largest being supplied with a stand. A size that is large enough for most of us costs about three shillings, is light in weight, and can be rested on a table or against a chair. Both hands should be used, the left one passing the needle through to the back and the right band underneath the frame being ready to pass it again to the front.
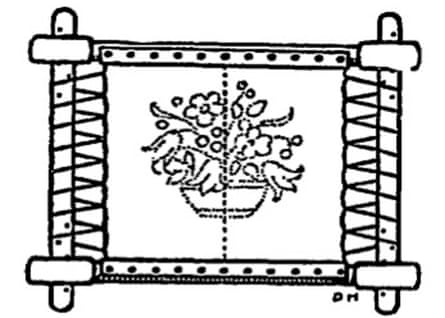
The width of the embroidery is determined by the length of the wooden rollers, as a glance at the illustration shows, but the length of the material is not restricted, as any surplus may be wound round both top and bottom rollers. It is advisable to protect this material from creasing by placing a piece of flannel or layers of tissue paper upon it before rolling it round the wood.

Unless the material is accurately stretched, more harm than good results. First make a narrow hem down the sides of the material – some people work this hem over a piece of string to give additional strength to the edge, – then turn down the top and bottom of the material once and run a thread down the centre. Having marked the exact middle of the webbing on both rollers, begin the oversewing of the material to the webbing, starting at the middle and working outwards to right and left. Next insert the side pieces through the slots and peg them as tightly as possible. Then with a large needle threaded with twine lace up the edges over the sides of the frame, as shown. It is a wise thing to lace up a portion first on one side of the frame then on the other, to ensure an even tension.
Sometimes the piece of material to be embroidered is far too small to be affixed in the frame in this way. In such a case stretch a piece of linen or calico in the manner described, running a thread not only down the centre but also horizontally through the centre. Next run a thread down and across the material to be embroidered in similar fashion and lay this piece on the calico so that the lines of running stitches coincide. Tack firmly in place, stretching as you sew, and stitch down the edges closely. Turn the frame over and cut away the portion of calico under the other material, leaving a margin of at least half an inch all round.
Various stitches, such as button-hole stitch, which entails picking up a bit of material with the needle, are not suitable for working in a frame, but in case of a close design carried out in satin stitch or Bokhara couching one is immensely helped in the working and assured of a crisp, unpuckered result at the end.

Comments (…)
Sign in or create your Guardian account to join the discussion