
Integrating Logic Apps and Azure Monitor
In this post, App Dev Manager Jason Venema walks us through a practical example using Logic Apps and Azure Monitor to track down who created a Virtual Machine.
Have you ever needed to quickly find out who created a specific virtual machine in one of your Azure subscriptions? If it hasn’t happened yet, it probably will someday. Maybe your Cloud Ops team received an alert that the VM was low on disk space, or maybe it was flagged as being non-compliant. If that happens, you would probably want to contact the person who created the VM so you could inform them of the problem.
“No problem,” you think to yourself. “I’ll just check the Azure Portal. It’s probably on the VM overview blade.”
“Hmm… I don’t see it there. It must be in the properties blade.”

Not there, either. What about PowerShell, you ask? Let me save you the trouble: It’s not there, either.
Alright, that’s a little unexpected, but no worries! You can always go to the Azure Activity Logs. They contain logs for pretty much everything that happens in the Azure portal.

Sure enough, there it is. The problem is that the Activity logs, in addition to being somewhat slow and unwieldy to search through when you have a large number of subscriptions and users, only store events for the past 90 days. If your VM was created more than 90 days ago, you’re out of luck – unless you happen to ship your Activity logs to blob storage, in which case you have an even more unwieldy search experience ahead of you.
There has to be a better way! The good news is that, with a little bit of effort on our part, there is. In this post, I’ll show you how to easily store the creation timestamp and email address of the creator of a VM as tags on the VM itself. My solution leverages Azure Monitor alerts and Logic Apps to create a no-code solution that can be easily extended to record and trigger actions for other important lifecycle events on your Azure resources.
Step 1: Create an Activity Log alert using Azure Monitor
Have you heard of Azure Monitor? It provides base-level metrics and diagnostic logs for nearly every service in Azure. It is also the place you go to find the Azure Activity Logs. Best of all, it’s free!
We’re going to use Azure Monitor to quickly set up an alert that calls a Webhook, but other actions are available including email and SMS. Remember earlier when I said that VM creation and modification events are recorded in the Activity Logs? We’re going to use those events as the trigger for calling a Webhook.
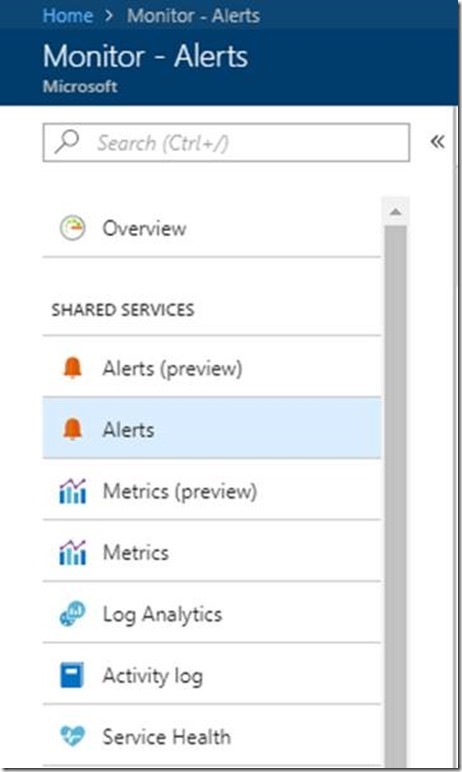
The first step is to head over to Azure Monitor in the management portal and click on Alerts in the menu.
Click the Add activity log alert button. This opens a dialog where you can fill in the details for the alert you want to create.
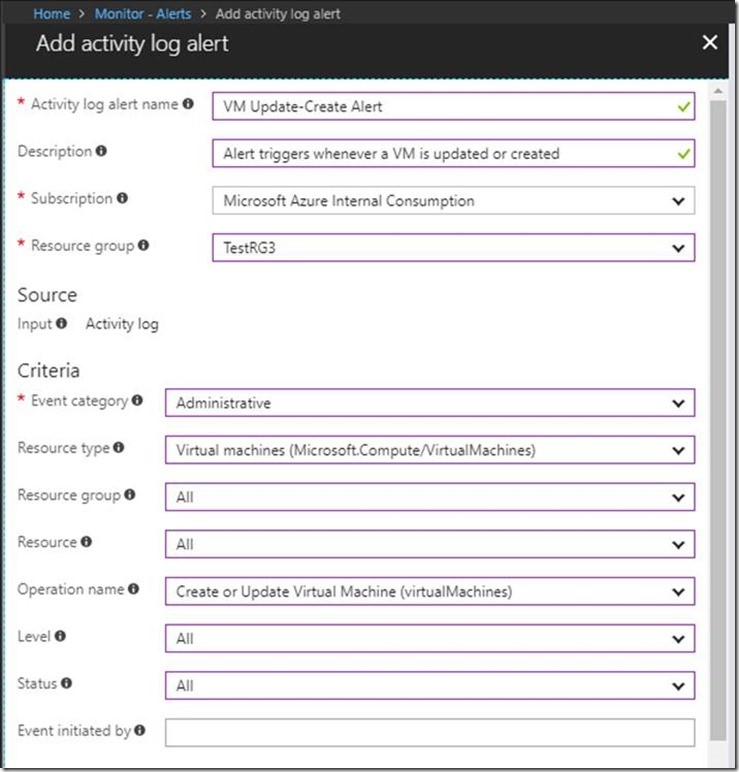
The top set of fields are all for the alert itself. For example, “Resource Group” is the resource group that the alert should be placed in (not the resource group containing the resource you’re alerting on). Fill in the fields using values similar to those in the screenshot. The “Event Category” should be “Administrative” because that’s the category that Create and Modify events fall under. For the operation name, choose “Create or Update Virtual Machine (virtualMachines)” so you will only trigger alerts when a VM is created or updated.
Now we need to configure an action to take when the alert is triggered. For this, we’ll create an action group. We’ll be calling a webhook endpoint for our solution, but other options include sending an email or SMS. Select an Action Type of “Webhook” and edit the details. For now, we’ll leave the URL blank, but we’ll come back to this part later after we create our Logic App. Save the alert and we’re ready to move on to the next step.

Step 2: Create the Logic App
Logic Apps are amazing. You can create workflows that respond to any of the numerous built-in triggers, with a vast array of out-of-the-box actions. We’re going to create a Logic App that responds to our Activity Log alert webhook that we just created.
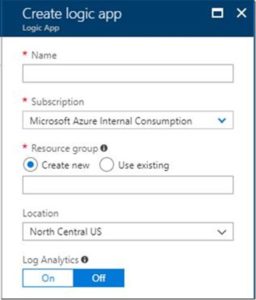
First, navigate to the Logic Apps service in the Azure management portal (it might easier to open a new tab, so you can easily come back to your Activity Log alert later). Click the “Add” button to create a new Logic App. This part is pretty straightforward, and all you really need to provide is the name and location for the app.
After that’s done, you will see the overview blade for your Logic App. Click the Edit button in the toolbar to begin editing the app. This is where we’ll add the triggers and actions. The first trigger we want to add is the “When an HTTP request is received” trigger, which will kick off the app when our activity log alert fires. The webhook uses a POST request to send a message body in JSON, and we need to paste the schema of that message into our action. Logic Apps will generate the schema for you if you click the “Use sample payload to generate schema” button and paste in a sample JSON payload. For our Activity Log alert, you can get a sample payload by adding an additional Webhook to the alert and pointing it to a service like RequestBin. Once you have the sample payload, paste it into the Logic App and click OK.

Here’s a simplified version of the JSON payload that the activity log alert sends, with some of the non-relevant fields removed. For the purposes of tagging our VM, we are most interested in the highlighted fields:
{
   "schemaId": "Microsoft.Insights/activityLogs",
   "data": {
      "status": "Activated",
      "context": {
         "activityLog": {
            "channels": "Operation",
            "caller": email_address@microsoft.com,
            "eventSource": "Administrative",
            "eventTimestamp": "2018-01-23T15:03:53.121842+00:00",
            "operationName": "Microsoft.Compute/virtualMachines/write",
            "resourceId": "/subscriptions/a763e64b-7e94-4c23-9479-30a6e258a7a3/resourcegroups/TestRG3/providers/Microsoft.Compute/virtualMachines/jvwebvm09",
            "resourceGroupName": "TestRG3",
            "resourceProviderName": "Microsoft.Compute",
            "status": "Accepted",
            "subStatus": "Created",
            "subscriptionId": "a763e64b-7e94-4c23-9479-30a6e258a7a3",
            "resourceType": "Microsoft.Compute/virtualMachines"
         }
      }
   }
}
At this point, we need to grab the HTTP POST URL from the top of the trigger dialog and paste it into our Activity Log Webhook (hopefully you still have that open in another browser tab). You can copy the URL from the top of the HTTP request action dialog. This is what allows our alert to kick off the Logic App when a new VM is created or update.
Now our Logic App will trigger every time a new VM is created or updated, but it won’t actually do anything until we add some actions. First, though, let’s add a condition to make sure that the event was actually for a VM create – we don’t care about VM updates, but the alert will trigger for both creates and updates. To differentiate, we’ll look at the value of the subStatus field in the JSON payload. Logic Apps makes it easy to examine the value of a field from a previous step using the Dynamic Content selector.
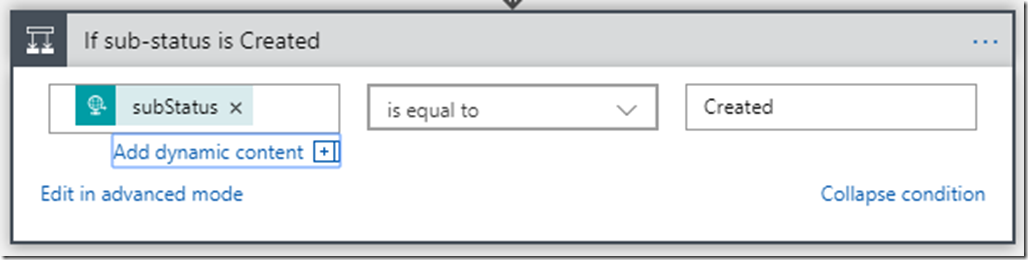
Now the app will only perform an action if our subStatus is equal to the string literal “Created”. If it is, then we want to take a few actions. We’ll add the following 4 actions that are based on the Azure Resource Manager connector to our “If true” block in order to apply the tag to the new VM:

When all 4 of these actions have been added, the “If True” block of our condition should look like this (Note that I renamed my actions to the titles you see in the title bars, to make them easier to tell apart when I was debugging later):
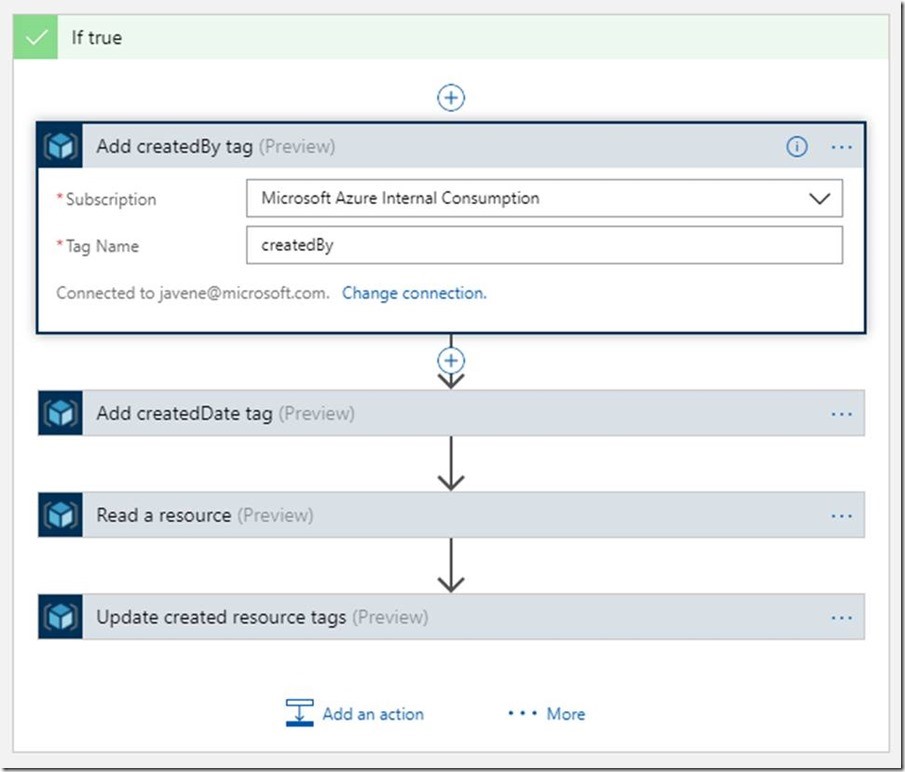
The “Add createdBy tag” and “Add createdDate tag” actions are straightforward to configure. Let’s look at the “Read a resource” action.

There are a few more fields to fill in here, but they can all be filled easily using Dynamic Content from previous steps. Specifically, the “resourceGroupName” and “resourceProviderName” values both come from the JSON payload that was received in the HTTP request trigger. The “x-ms-api-version” value is a string literal that represents the latest API version.
The tricky part was getting the Short Resource Id. This required some string parsing, since the JSON provides the “resourceId” but not “Short Resource Id”. A “Short Resource ID” is basically just the last 2 forward-slash-delimited values in the “resourceId”. See the highlighted section below.
"resourceId": "/subscriptions/a763e64b-7e94-4c23-9479-30a6e258a7a3/resourcegroups/TestRG3/providers/Microsoft.Compute/virtualMachines/jvwebvm09"
Thankfully, Logic Apps have several built-in string parsing functions and I managed to work out just the bit I needed using the following (somewhat complicated) expression:

substring(triggerBody()?['data']?['context']?['activityLog']?['resourceId'],indexOf(triggerBody()?['data']?['context']?['activityLog']?['resourceId'],'virtualMachines/'),sub(length(triggerBody()?['data']?['context']?['activityLog']?['resourceId']),add(96,length(triggerBody()?['data']?['context']?['activityLog']?['resourceGroupName']))))
I know I said it was no-code, and I stand by that. The Expression editor in the Logic App designer made this pretty easy to write.
You might be wondering why we need the “Read a resource” action at all, since we already have a lot of data from the alert JSON payload. The whole purpose of adding this action is to get the location (Azure region) of the newly created VM, which we need in the next action.
In the next and final action, we are going to update the “createdBy” and “createdDate” tags.
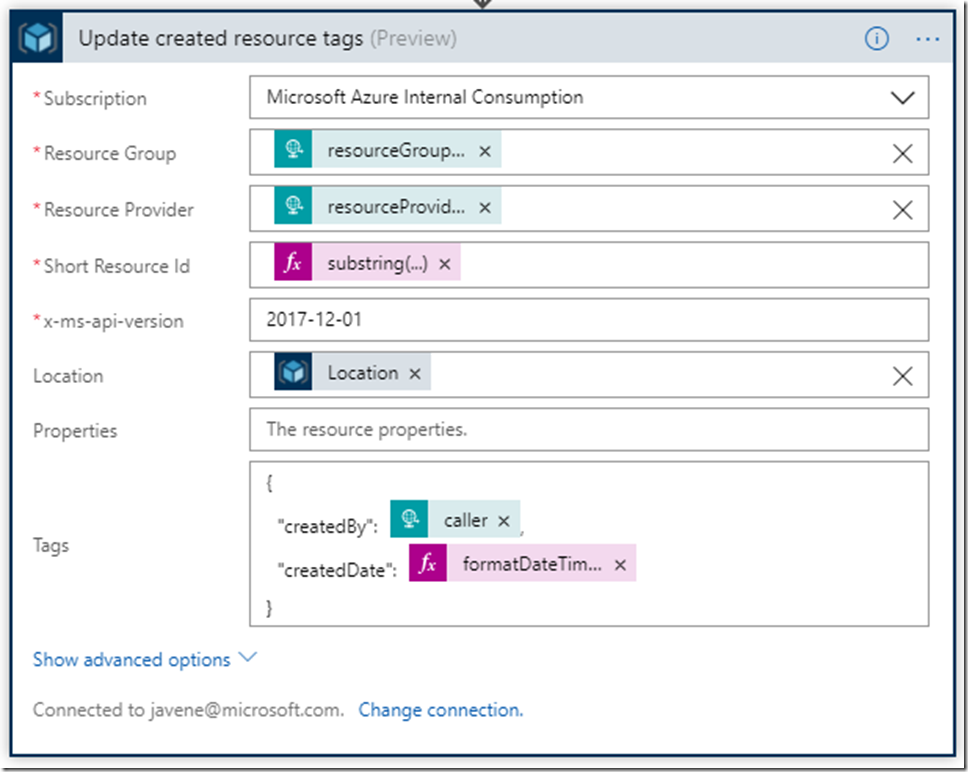
The properties for this action are similar to the previous action (including the complicated “Short Resource Id” expression). The difference is that this action includes a required “Location” field, which we can populate from the previous action’s output.
We also need to set the names and values of the tags we want to set on the VM. These are specified with a bit of JSON in the “Tags” field. We can use the value of the “caller” field from the Activity Log alert JSON payload for the “createdBy” tag, and the value of the “eventTimestamp” field for the “createdDate” field. I decided to format my “createdDate” field using the expression below so it’s a little easier to read in the tag.
formatDateTime(triggerBody()?['data']?['context']?['activityLog']?['eventTimestamp'],'g')
Completed Logic App
The completed Logic App should look like this:

Click the “Save” button and now we are ready to test it out. Navigate to the Virtual Machine blade in Azure and create a new VM – you can configure the VM however you like. Once the creation is complete, the overview blade for your Logic App should show a few successful runs in the “Runs History” pane.

If you happen to see any errors in this pane, you can click on them to see the raw inputs and output of each step in your Logic App, along with error messages. The debugging experience is seriously fantastic.
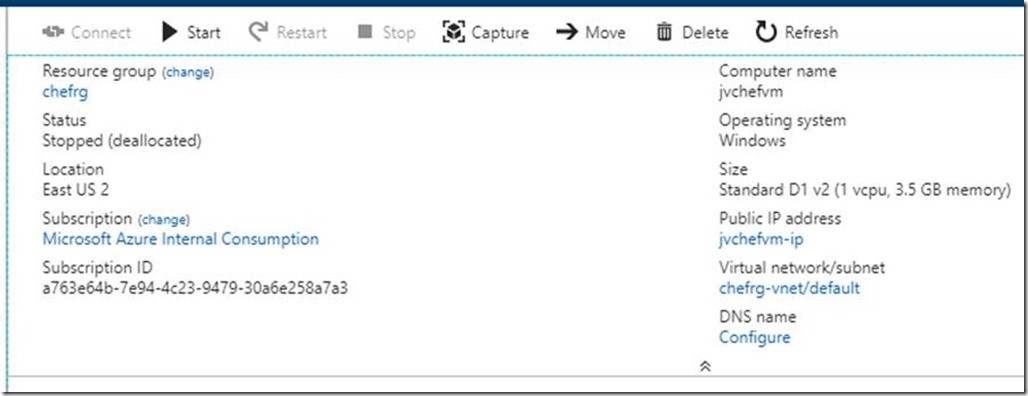
Assuming your runs were a success, let’s check the tags for our new VM.

Success! You will never have to wonder who created a VM (and when) again.
This example may have been simplistic, but the principles apply to more complex scenarios, as well. You can probably imagine several other ways to leverage both Azure Activity Log alerts and Logic Apps to create simple no-code solutions in Azure.
Premier Support for Developers provides strategic technology guidance, critical support coverage, and a range of essential services to help teams optimize development lifecycles and improve software quality. Contact your Application Development Manager (ADM) or email us to learn more about what we can do for you.
 Light
Light Dark
Dark
0 comments