Part 2: Voice-First Experiences for Kids
July 8, 2021

Contents
Kids are more than capable of using a touch screen or holding a device in their hands. However, they may struggle to do both at the same time. Holding a device steady, pressing a button, and concentrating on an answer may be too big of an ask for them.
Reading at a desk is very different from engaging with an AR experience, where they may, quite literally, have their hands full using a camera.
As the product developer, your role is to design voice-experiences that accommodate their unique needs, language, and unpredictable behavior.
From working closely with our clients, SoapBox’s Head of UX Declan Moore and Senior Software Engineer Ronan Tumelty see these voice-driven experiences come to life on a first-hand basis and as a result, have developed a valuable range of best practices.
In Part 1 of our Beginner’s Guide, Declan and Ronan looked at the use of visual cues to support voice interactions.
Here, in Part 2, they explain all of the considerations to be made behind the scenes to support a child’s voice experience. They pose two key questions — “How does the system know when to start listening?” and “How long does the system listen for?” — and walk through approaches for capturing audio to successfully hear your users during a voice experience.
An overview
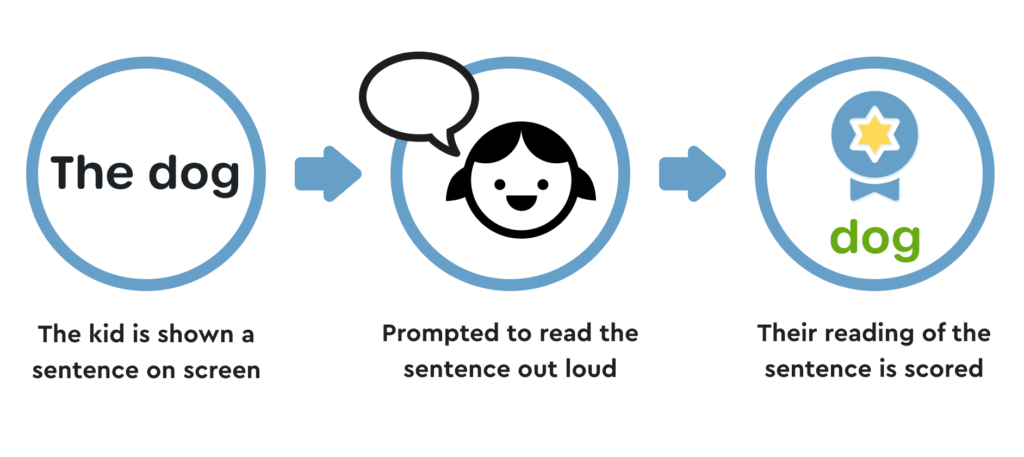
In Part 1, we went through an experience where a kid read aloud and the app reacted. But behind the scenes, there were other things happening to support the experience.
Let’s take a look at an example interaction.
The overall flow for a voice interaction can be broken down into these four steps:

Fundamentally, our goal is to capture a piece of audio and analyze it. We must also ensure the audio is correct and that we capture it as efficiently as possible.
To do this, we must answer two key questions:
- How does the system know when to start listening?
- How long does the system listen for? (i.e., When do we stop listening?)
Let’s look at these one by one.
How does the system know when to start listening?
There are three core triggers you can use to start listening:
- Event-Driven Trigger: An event or pre-determined setting will trigger the device (e.g., the end of an audio prompt, the start of a new puzzle, an elapsed timer).
- Tactile Trigger: Pressing a button (physical or digital) or toggling a control (e.g., a microphone icon). This gives additional control to the kid and has the benefit of being explicit. If the kid triggers the “talk” feature, we can assume they wish to interact.
- Voice Trigger: The two main voice triggers are:
Wakeword: The user will utter a phrase that will prompt the device to begin listening for speech (e.g., “Hey, Siri”). Often referred to as wakewords, these are often seen in experiences where there is minimal or no UI.
Voice Activity Detection (VAD): Also referred to as voice detection, it is the detection of the presence or absence of speech. Implementing VAD allows the system to make choices based on whether a kid is speaking or not.
While these are the most common forms of triggers, this is not an exhaustive list. Technologies such as gesture recognition (e.g., waving at a toy) and user/facial recognition can be used alongside voice to create exciting and personalized multimodal experiences.
In our example from Part 1, the kid is prompted to read a sentence.
In this case, the listening start trigger is Event-Driven.
How long does the system listen for?
Another way of asking this is “When do we stop listening?”
There are two approaches to this.
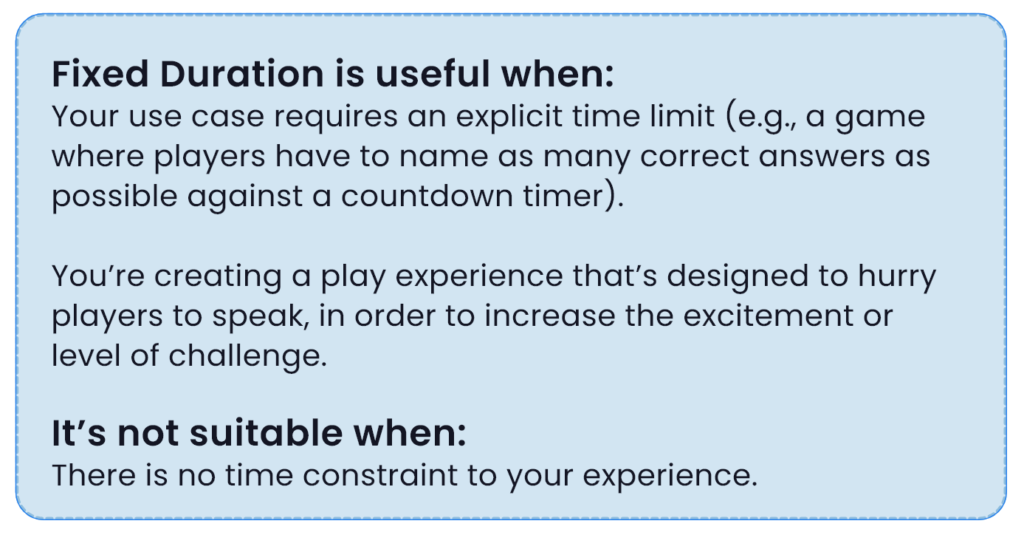
1. Fixed Duration: listen for a fixed amount of time
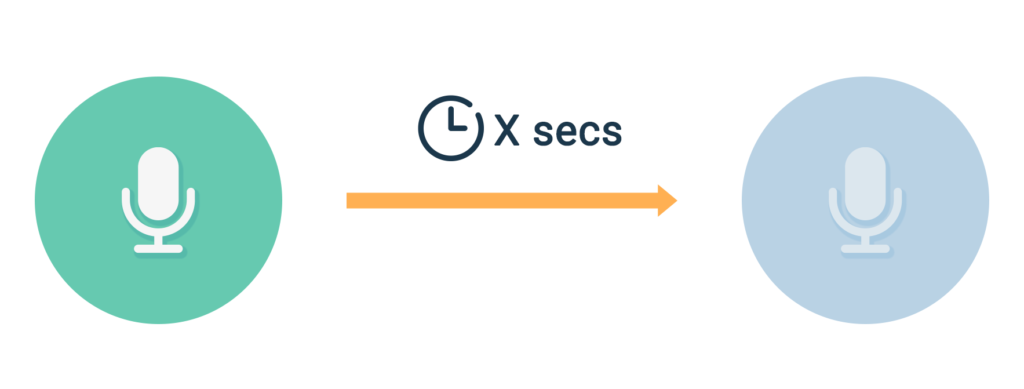
This straightforward approach gives the kid a window in which to respond. It has the advantage of being clear when they can and can’t talk. It also gives us a definitive answer to “When do we stop listening?”
As it’s a fixed duration, the listening window will always be that long, regardless of the duration of the user’s speech.
As a basic interaction, this can work for many use cases. There are, however, potential issues to the fixed duration approach.
It can be perceived as slow
If we ask a yes/no question like “Do you want to play?” this would happen:
App: “Do you want to Play?”
Kid: “Yep”
Wait a second
Wait a second
Wait a second
Listening ends
App: “Great! Let’s play.”
Though this experience works, it may be perceived as being slow or unresponsive.
It offers very little flexibility
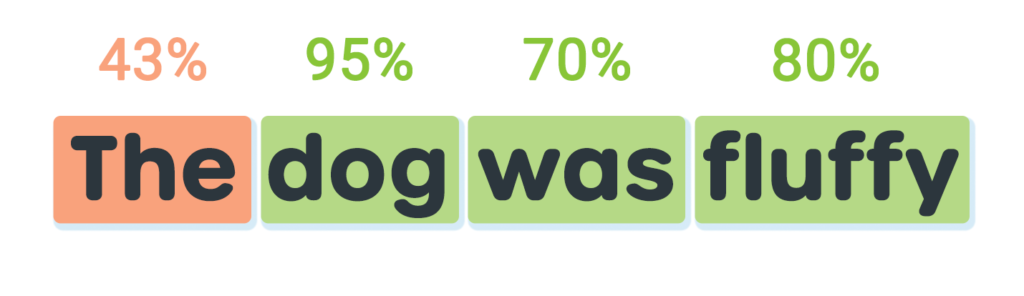
Let’s say the kid takes three seconds to read “The dog was fluffy.” If the fixed duration is four seconds, that should give us one second extra, right?
In reality, a kid may read silently first to decode an unfamiliar word or steady themselves before reading aloud, so we may miss the end of the sentence if the kid does not start to speak when expected and run the risk of missing the end of their speech.
Unless an experience intends to impart a sense of urgency, using a fixed recording duration may not be the best choice. A voice system should always accommodate the user, not expect them to change their behavior to accommodate it.
Now, let’s look at option 2.
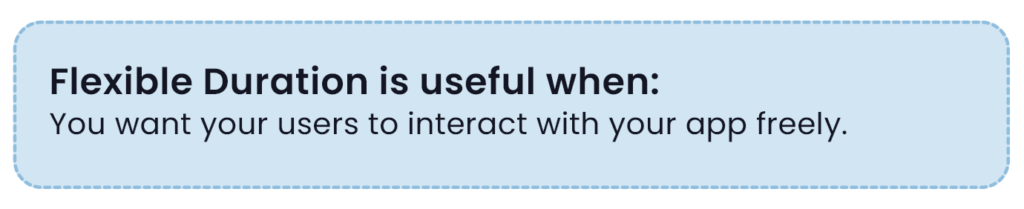
2. Flexible/Variable Duration
This approach to answering “How long does the system listen for?” requires us to design with flexibility.
Flexibility in any experience is valuable; with speech, it becomes critical.
As a reminder, we want to:
- Afford the kid some flexibility to start speaking.
- Ensure we listen for as long as they are speaking.
- Provide meaningful feedback to them as soon as possible.
Voice Activity Detection (VAD)
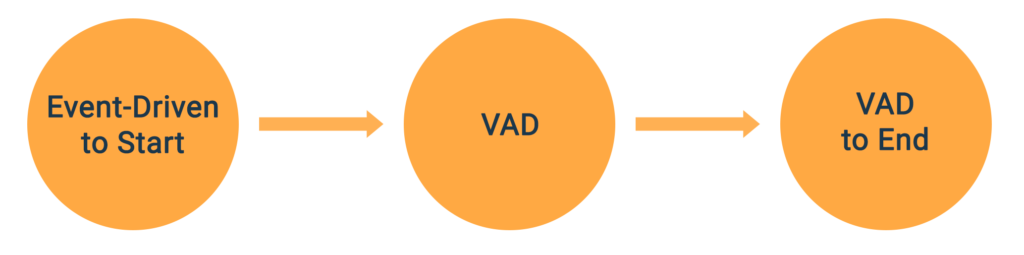
A great approach is to use voice detection, often referred to as Voice Activity Detection (VAD). Let’s go through a flexible listening flow with VAD step by step.

Experience Starts
We play the instructional prompt voice over (VO) and the interaction starts.
Voice Detection Check
At this point we begin continuously checking for voice activity.
Voice Not Detected
If no voice is detected within an expected window, we trigger Timeout A.
In this example, if the kid says nothing, we revert back and re-prompt them.
Voice Detected
If at any point in the expected window following the Instructional Prompt we do hear voice activity, we move to the second stage of the flow.
We are still continuously listening for voice, but now we are waiting for the speech to end. Once we stop hearing the kid’s voice, we start Timeout B. If this timeout elapses without further speech being detected, we end the interaction and analyse/score the audio. However if speech is detected again, we determine that the user is still speaking and continue to listen.
Why 2 Timeouts?
Timeout A and B serve different roles, and are likely to have different optimal values. These will vary based on your target audience, content, and intended experience.
For example, the above flow in our app would have a much more lenient Timeout A than an app targeted at more seasoned readers. Similarly, an app that expects single-word or short-sentence replies would likely have a shorter Timeout B than one expecting the user to read long passages.
Determining the timeout windows for your product can be done through user testing and observation of how your audience interacts with your activities and content.
The pros & cons of triggers
The trigger types outlined earlier are all valid tools for a voice experience designer to use. Each has their own strengths and weaknesses that make them more suitable in certain situations.
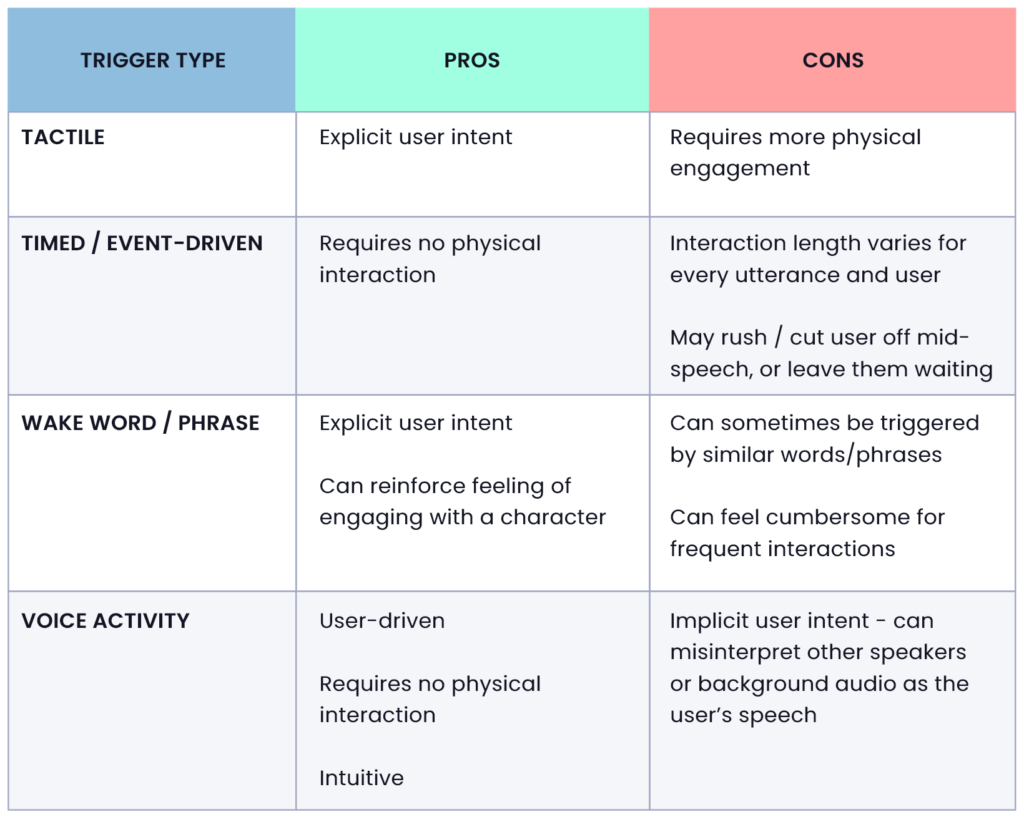
By using a combination of these trigger types for the start and end of your voice interaction, you can create more compelling experiences for your users.
Deciding on the best approach for you
Different solutions may work better for different activities, and it’s possible you may have multiple solutions with a single product or suite of experiences.
We always encourage clients to adhere to best practices but also to test with users as much as possible before deciding which approach works best for their product and audience.
For the reading app example in Part 1, we used an Event-Driven trigger to signal when to begin listening and VAD to determine when to stop.
The result was a primarily “hands off” experience with minimal physical interaction from the user which meant that the kid could concentrate on one thing – getting the sentence correct.
Now let’s look at an alternative that uses Tactile triggers for both the start and end of the interaction.
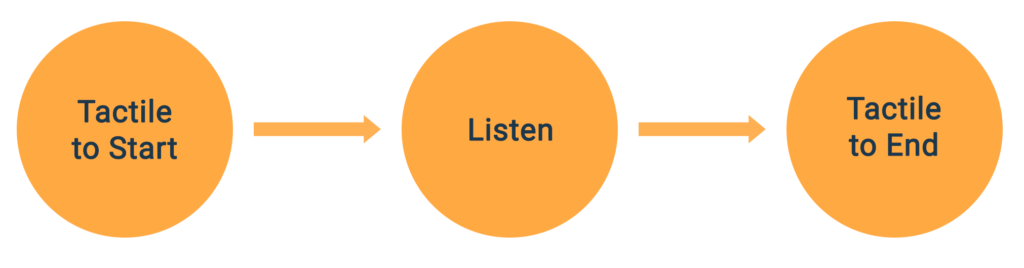
By choosing to use Tactile triggers, we want the kid to physically interact with the device, either via a physical button on a toy or a digital GUI button. Tactile inputs, when used in conjunction with in-game objects, can reinforce the player’s sense of connection.
For example, in your experience, the player could be communicating via a walkie-talkie or radio, and a button press could echo how those devices work in the real world. If you’re using more than one button, each could be used to activate different machines or address different characters within a scene. Used like this, you can help the user connect with the experience and enhance their immersion .
Physical interaction may also be preferable if your app or toy has a lot of audio output, such as background music. The use of a tactile trigger over a voice-driven one allows you to reduce the volume of your audio to allow for a clearer recording.
Within this approach, there are more choices to make.
Option A
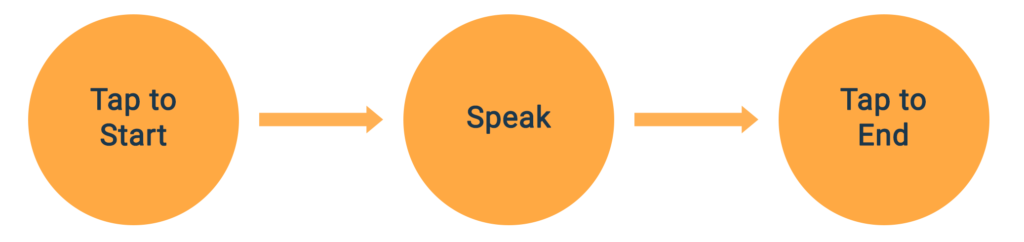
Option B
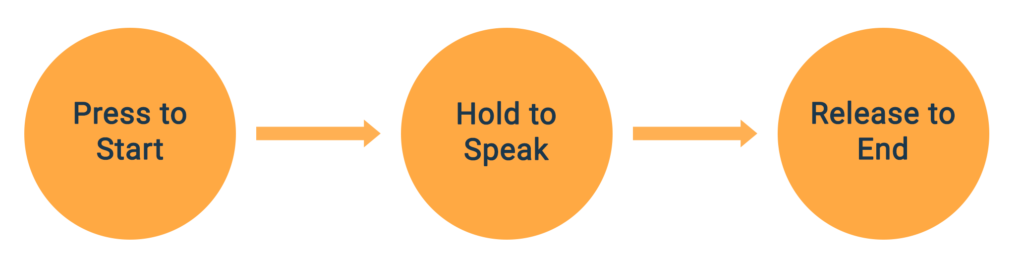
In Option A, the kid can tap a button to start and then tap again. In Option B, the listening is determined by the duration the button is held.
Neither approach is “better”. It is a case of deciding which feels the most natural for what you’re trying to help the kid achieve.
Choosing a suitable solution
It can be difficult to decide what type of trigger best fits your intended experience – this is influenced by factors such as age, manual dexterity, and reading ability, to name a few. We have provided some suggestions below that can help you build the most engaging experience for your users.
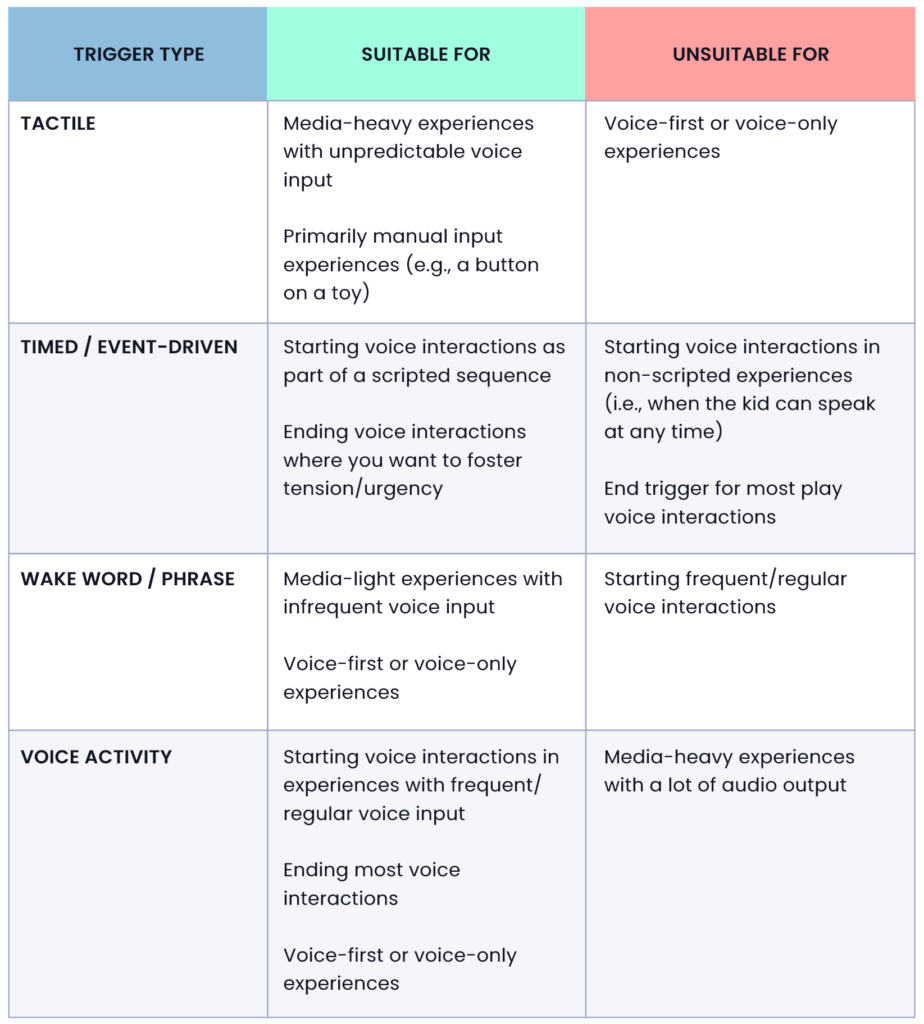
These are just rules of thumb. Experimenting with these trigger types and validating them with your users is the best way to realize your vision.
What’s next? How to score the kid’s reading
Once the system is finished listening, we send the audio to the SoapBox API for scoring. The API provides a score for each word, as well as a score for the sentence as a whole.
In Part 3, we will take a closer look at scoring. We’ll explore how the data points provided by SoapBox can be used to support experiences and how that data can feed into gamification and progress mechanics.
Get in touch
Voice experiences for kids are as varied as the approaches we take to tackling them. At SoapBox, we may be experts when it comes to speech recognition for kids, but we’re still at the beginning of an exciting journey of experimentation when it comes to voice-first experiences for kids, and we’d love to keep learning as we help you with yours.
All feedback, questions, and suggestions for future topics in this Beginner’s Guide series are welcome. Watch this space for news of Part 3 and in the meantime, if you have questions, just get in touch: Hello@SoapBoxLabs.com.