

With each passing year, selling on Facebook and Instagram gets more effective and more popular. Ecwid
That’s why we’ve made it easy for all merchants, including free Ecwid users, to get started with the Facebook pixel absolutely free. Ecwid powers 50,000 Facebook stores. Our merchants report additional revenues of 15% after selling their products on Facebook.
You might be wondering: “Why is Facebook Pixel important?” Big companies have their tech departments to bridge the technology gap between their products and these social platforms. Without Ecwid, small and
Our developers have hidden all the tough coding behind a friendly user interface so you can install the Facebook pixel in your Ecwid control panel in under one minute, with no technical skill whatsoever.
Implementing the Facebook pixel in your marketing today lays a solid foundation for social marketing and advertising success in the future. Understand that, among the many advantages it delivers (discussed below), the Facebook pixel can prevent you from spending more money on ads than you earn from them.
To take advantage of this opportunity, please read the following article.
What is the Facebook Pixel?
If you’re not a marketer, you might be confused: “What is the meaning of pixels?” Let us clarify that for you.
The Facebook pixel is a piece of code that tracks your store visitors and their behavior — and gives you a lot of data:
- It measures conversions so that you know exactly how your ads are performing
- It records visitors that left without making a purchase so you can follow up with ads later
- It can help you advertise to people similar to your existing customers.
If you want to advertise on Facebook and rest assured your ads are effective, this integration is for you. You can install and use the full power of the Facebook pixel in your Ecwid store without touching any code.
FAQ: the Facebook pixel explained
Now that you know what the Facebook pixel is, you might have more questions. Let’s answer them!
Does the Facebook pixel collect personal data?
The Facebook pixel identifies anonymous visitors on the website but Facebook doesn’t reveal any personal information about the users that they collect through the pixel. So, the Facebook Pixel doesn’t collect personal data like a user’s name, address, or financial information.
Is the Facebook Pixel a cookie? What’s the difference between a cookie and a pixel?
Cookies and pixels are different things. Pixels records information to be sent to the server and cookies store that information on the browser for later use.
Is pixel tracking legal?
If you are using Facebook Pixel, you are liable to comply with General Data Protection Regulation. Under the GDPR, a company can legally process a person’s data if it complies with the regulation. To comply with GDPR, follow these steps.
Does the Facebook Pixel work with Instagram?
Yes, Facebook and Instagram run on the same ads platform. If your business profiles are connected, your Facebook Pixel will work for Instagram.
Do I need multiple Facebook pixels?
Even though it’s possible to create several Facebook pixels, you only need one Facebook pixel for your store.
Can I use the same Facebook pixel on multiple websites?
Yes, you can install the same Facebook Pixel on multiple websites.
Can I use Facebook pixel without a website?
To function properly, the Facebook pixel needs to be installed on a website. Luckily, with Ecwid
How Can I Use the Facebook Pixel?
The Facebook pixel can track various actions that happen in your Ecwid store. So, what data does the Facebook pixel collect? It’ll “know” when your visitors:
- View products and categories
- Search products
- Add items to the shopping cart
- Enter the checkout flow
- Start the checkout
- Complete the checkout.
But how does the Facebook pixel work? This data allow you to achieve the following:
Retarget your store visitors
Many people don’t buy during their first visit to the store. With the Facebook pixel, you can create Custom Audiences to follow up on those customers with your ads on Facebook, Instagram, and Audience Network. This is called retargeting.
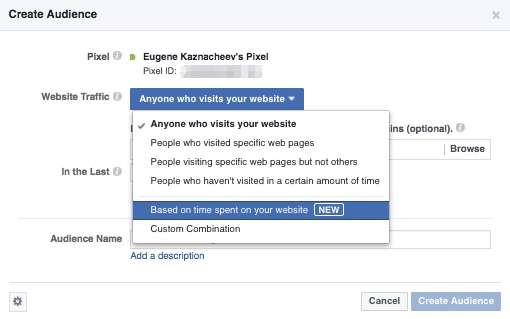
Since the Facebook pixel tracks different sorts of events in your store, you can group people by their actions. Here are some cases:
- People who visited your specific product pages, for example, those who viewed your new arrivals
- People who appeared in your store but haven’t been there for a while
- People who spend a lot of time browsing in your store but hesitate to make a purchase.
Custom combinations are also available: you can mix the rules for pages, types of devices, and the number of visits.
The remarkable thing is that in all cases, you’ll advertise to people who have already shown an interest in your store. That means they are more likely to buy from you.
After clicking the “Create Audience” button, it’ll start collecting automatically. You won’t need to restart or renew it. Assign your ads to these audiences right away or refer to them later.
Measure your results
What exactly happens as a result of your ad? The Facebook pixel makes it clear. It tracks conversions, so you can calculate the ROI (Return on Investment) of your Facebook advertising campaigns. It prevents you from spending more money on ads than you earn from them.
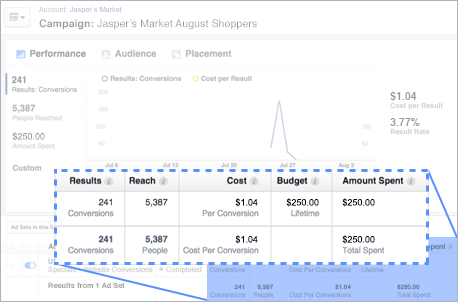
Results measured easily with the Facebook pixel data
It’s not only purchases that you can track with the Facebook pixel.
The Ecwid integration with the Facebook pixel saves you from all the code work. Without it, you would copy a line of code for each separate event and install it in your store code.
Now you can easily get your Facebook pixel installed, and it will support the majority Standard Events automatically:
- ViewContent: the Facebook pixel will trigger this when visitors view product or category pages.
- Search: this event shows when people use your search box to find products.
- AddToCart: learn when visitors add products to the shopping cart without finishing the purchase.
- InitiateCheckout: this event detects people who click “Checkout”.
- AddPaymentInfo: learn when people are halfway through their checkout.
- Purchase: know when visitors turn into buyers.
Get more conversions
Every Facebook ad campaign needs to have an objective. That is how Facebook optimizes the bids and ad delivery.
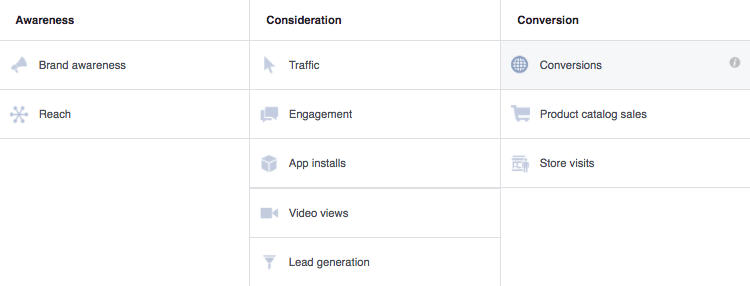
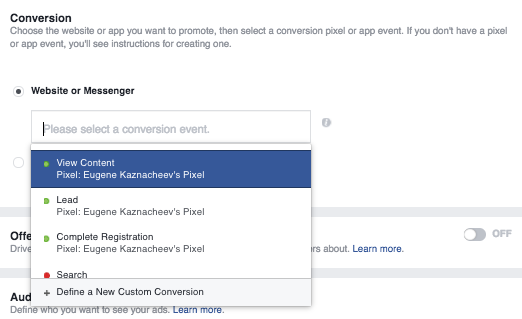
The pixel allows you to set conversions as an objective
Installing the Facebook pixel in your Ecwid store allows you to set conversions as your objective. That way your bid will be optimized to get your more conversions, and you’ll be able to see the results in your Ad Manager.
It’s possible to select different conversion events (identical to your Standard Events range) to achieve specific goals. If you want to know how many purchases your ad generated, stick to “Purchase” here.
How to Add the Facebook Pixel to Your Ecwid Store
Now that you get the idea of what the pixel is, you might have other questions: “Is Facebook pixel free? How do I find my Facebook pixel? ” Let’s answer them!
The Facebook pixel integration is now available on all Ecwid plans, including free.
The installation of Facebook pixel is easy for everyone, regardless of technical skills. To set up the Facebook pixel, you just need to generate your Facebook pixel ID and add it to your Control Panel. Here’s how to do that:
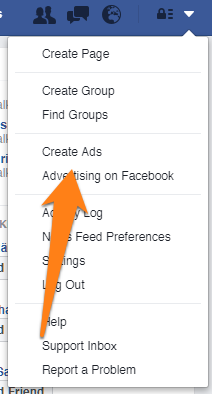
- In your Facebook profile, click the
drop-down menu on the right. Choose “Create Ads” (if you’ve never logged into Facebook Ads before) or “Manage Ads” (if you’ve used Facebook Ads before). - You’ll then find yourself in the Ad Manager. Click the
drop-down menu and select “Pixels”.

- On the next screen, click the green button “Create a Pixеl”.

- Click “Use an Integration or Tag Manager”.

- Select Ecwid from the list of official Facebook integrated partners.

- Follow further instructions.

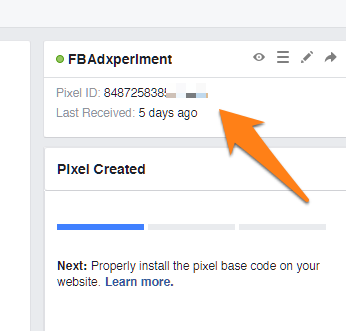
Then check if your Facebook pixel is working. Navigate to your store to get the pixel triggered. Then go back to your Ad Manager → Pixels and check your pixel’s status. The green light means it’s active. It might take up to twenty minutes to activate your Facebook pixel.
What’s Next
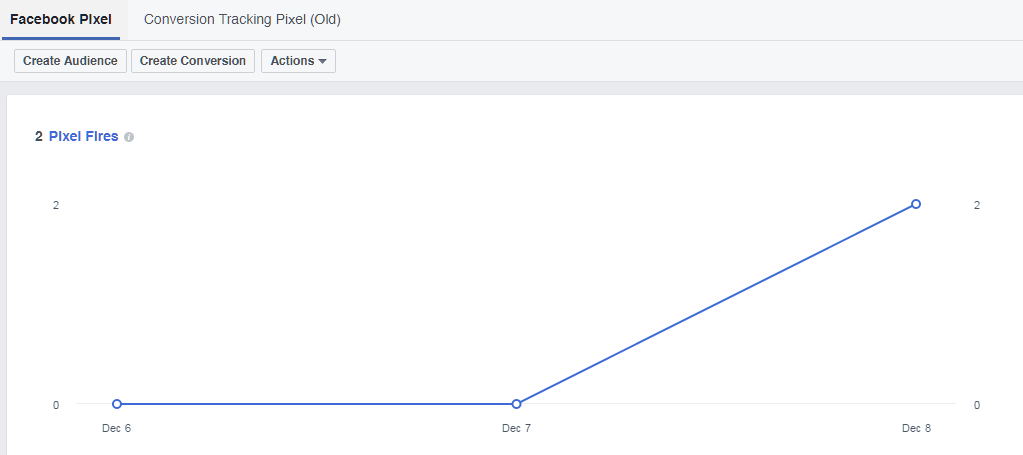
All your Facebook pixel activity will be displayed in your Ad Manager. There you’ll see the graph showing how many times the pixel was triggered. Below you’ll see the tabs with the stats for the Facebook pixel events.
As soon as your Facebook pixel has gathered some data, you’ll be able to use it in all gears. Here is a
Facebook Pixel Strategies to Run More Targeted Ads
Here are four actionable strategies you can use right now to better target your advertising using your Facebook pixel.
Strategy 1: Retargeting and Abandoned Cart Recovery
This one’s a
As we already mentioned above, retargeting is a type of campaign that tracks and serves ads to the specific customers who’ve visited your store. There are plenty of great reasons to run retargeting campaigns, but one of the best reasons is
Retargeting is even more important if you’re paying a third party (Google, Bing, Facebook, etc.) to drive traffic to your site. You’ll want to recover as much of that cost as possible through converted sales to ensure a profitable online store.
Abandoned cart ads are a special type of retargeting campaign used to target shoppers who’ve visited your store and added products to their carts but didn’t finish the checkout process. Your pixel records the exact products a shopper left in their cart and reminds them about those products using
The best part about retargeting ads is that they can be fully automated without any extra fees or management in your Control Panel. But if you don’t want the easy button, we’ll still show you how to manage the campaigns yourself as well.
What you need for retargeting:
- The Facebook pixel — to track store visitors and pages they browse.
- Facebook product catalog — to advertise your products on Facebook.
How to launch a retargeting campaign to your store visitors:
- Create your Facebook Business page for your Facebook Ad account.
- Connect your Ecwid Store to Facebook.
- Export your Ecwid product catalog to Facebook. Follow these instructions if you have a Venture or
higher-tier plan and want to do this automatically. Or do it manually. After that’s done, you’ll see your catalog in Catalog manager:
- Install the Facebook pixel. In just a couple of clicks, your pixel will start tracking your website visitors. (Note: It could take up to 20 minutes for your pixel to activate before it begins tracking.)
- Go to your Ad Manager → Pixels and check your pixel’s status. The green light means it’s active. You’ll see a graph of the triggered events:

- Associate your pixel with your Facebook product catalog in the Catalog Manager (you can also do this while creating an ad).
- Create your ads. You can start creating ads as soon as you’ve installed the pixel. Click on Create Ad:

Or go to your Facebook Business page and click on Create Ad:

- Choose Catalog sales as your marketing objective:

- Сreate an advertising campaign.
While following the instructions for creating an ad, you need to pay close attention to the block Audience to use the pixel:
- Make sure you click Associate Pixel or App With your Catalog:

- Then identify your target audience by selecting the option “Retarget products to people who visited your website or app.” The pixel will help with that.

This is what your ad will look like:
![]()
To make your ads even more effective, create a discount coupon and add it to your ad copy.
![]()
Strategy 2: Get More Repeat Customers
Loyal customers are the backbone of your business. Because they already know and trust your brand enough to transact with you, they’ll be much easier to sell to in the future. So it’s crucial you invest in keeping them active.
Increasing your base of loyal and regularly transacting customers is important, especially if you sell seasonal products, your sales have dropped, or your budget is low. To leverage this group with your pixel, create an audience of people who’ve made a purchase recently and target them with a new collection.
First, follow steps
To create an audience of your existing customers:
- Go to your Audiences.
- Click on Create a Custom Audience:

- Choose Website Traffic:

- Choose your pixel and select the event Purchase. Specify the time frame (from 30 to 180 days). You can target your ads at people who have bought a certain product, e.g. shoes. However, when you’re first starting out, it might be easier to target a broader audience.

- When you finish creating your audience, follow these instructions to create an ad. During ad set creation, select the audience you just created to reach them with your new ads:

Strategy 3: Strengthen Your Brand Following
People who are already interacting with your business on your website would also make great Facebook followers. You’ll need them to build a strong social media presence, which is important for brand recognition. Beyond that, people who already like your products will be more interested in your news and new collections, which means more sales for you (woot woot).
Use a Custom Audience of your website visitors or a customer list to promote your Facebook Page with ads. Just make sure you exclude people who’ve already liked your Page to avoid serving ads to existing Facebook fans.
To build a strong social media presence, make a video about your products and advertise it to your site’s visitors. People look at videos five times longer than static Facebook content. It helps to feature your product in action while you deliver your message. Check out this Sephora video ad that compels you to subscribe as you watch.
Note: You should use a supported file format and make sure your video meets Facebook video requirements to deliver your ad successfully.
To create a video ad:
- Follow these instructions.
- To use your pixel, pay attention to the block Audience: choose Create New and click Custom Audience.

- Select Website Traffic:

- Choose All Website Visitors, set the time frame, and give your audience a name. Click Create Audience:

- Choose “Create an ad using the audience”:

Then continue creating your video ad.
This is what your video ad will look like:
![]()
Strategy 4: Create Lookalike Audiences
If you’re ready to expand your business, Facebook can help you find people similar to your existing customers. Using your existing ads, you can target “Lookalike” audiences, who are similar to the shoppers who’ve shown interest in or purchased your products. This highly targeted pixel strategy can help you narrow your market and use your ad dollars even more effectively.
To create a Lookalike Audience:
- Go to your Audiences.
- Click Create a Lookalike Audience:

- Choose your pixel as a source:

- Choose the country/countries where you’d like to find a similar set of people. Use the slider to choose your desired audience. Then click Create Audience:

Note: It can take anywhere from 6 to 24 hours for your Lookalike Audience to be created.
Learn More About Facebook Pixel
If you’d like to learn more about using Facebook pixel for advertising, check out the following podcast: Easy Facebook and Google Remarketing. This is an episode on using automated advertising tools so that tracking data with Facebook pixel is put to good use.
Now that you’ve learned how to use Facebook pixel audiences, you’re ready to get the most out of your Facebook ads. If you need help building and advertising your store, don’t forget about the Ecwid Help Center.


