

Capture One Tips for Creating a better Default Image
If you’ve been following my blog for some time, you’ll know that I’m a regular Capture One user. I don’t generally use it as my main image processing software, but I probably use it for maybe 30- 40% of the work that I do. While I’ve talked about it a lot on this blog before, much of that has been in the context of using Capture One for Fuji X-Trans images, but I actually use it with many other cameras too. With that in mind, today I wanted to give you some tips that aren’t camera specific, and cover ways to improve the default way Capture One interprets RAW images.
Introduction
If you’re trying Capture One for the first time, or you are still new to it, you may find certain things frustrating or difficult to grasp at first, especially if you’re coming over from Lightroom. The interface is quite different, and it may take some time to get used to it. Once you do, there are still some things that my trip you up at first, and this is because of how Capture One has its defaults set for most cameras.
I have used many different cameras with the software, and I have found that the results that you get out of the box will vary greatly depending on the camera model. This comes down to the way a few specific things are set by default, and this may affect your perception of how good the software is. If you don’t like how it’s set and you’re trying it for the first time you may be put off, but try and stick with it. Capture One is actually highly customisable and has a very robust system for setting your own defaults. So, in this article I’m going to look at two areas specifically, and give you some tips on how to tweak the defaults and get results that you may find more appealing.
It should be noted that a lot of this is down to my own personal opinion and is subjective. You may well like the defaults and if so, then, this article probably isn’t for you. (You may still find some useful tips here, however)
The two areas that I’m going too cover are Sharpening / Noise Reduction and the Colour / Tonal Profiling of cameras.
Sharpness and Noise Reduction
Capture One has a lot of ways to sharpen images, and the system can be a bit daunting at first. In the latest version (10.1) there are actually three different places where you can control sharpening, and within that there are some possibly confusing parameters. On top of that there are additional settings that can also affect how sharp your image appears.
The software recently introduced what they call three phase sharpening. This consists of “diffraction compensation”, the normal sharpening settings, and “output sharpening”. There are also addition settings that can affect the perception of how sharp your image is, and these include structure, lens correction and noise reduction. For the purposes of this post, I’m not going to discuss diffraction correction or output sharpening. I would generally leave diffraction reduction off, unless you have a specific use for it, and output sharpening is a detailed topic that I will cover at another point. (As a quick primer for output sharpening - If you’re just outputting onto the web, Capture One’s scaling actually does a pretty good job even with output sharpening off, but if you do want to use output sharpening, be careful to keep the settings too low as it can quickly lead to over-sharpening.)
The main sharpening settings are found in the Details tab, which looks like a little magnifying glass. Here you will find controls for sharpening and noise reduction as well as things like grain and spot removal. The sharpening settings and noise reduction settings both work in tandem to control the sharpness and noise levels of your image, and you should consider them both in tandem when adjusting.
Capture One uses different settings by default for different cameras, however in my opinion, they are almost universally too high. I find that the settings chosen for defaults for most cameras are not what I would use, and in my opinion, do not do justice to what the engine is capable of.
In my opinion, sharpening settings are often too high, and so are the noise reduction settings. Luminance noise reduction seems to be set to 50 by default for most cameras, even at low iso. This seems totally unnecessary, and seems to cause some degradation of the image. I suspect that the sharpening settings default to a high value, partly to compensate for this. The sharpening settings also default to a threshold of 1 for most cameras. The engine seems to use a hard threshold, which means there is no falloff, and so when you use a threshold value (which is so as not to sharpen inherent nose in an image), it can result in a degree of artifacting. If that all seems like technobabble to you, what it means is that the settings can sometimes result in an image that looks overly “digital”. It has the same effect that you find in many cameras Jpeg engines, or even in smartphones, as it’s using similar techniques.
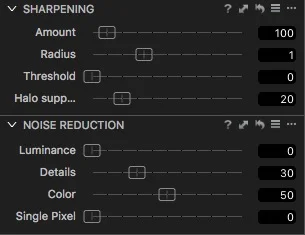
You can improve the way images look by doing two things initially. Turning luminance noise reduction down or off, and turning the threshold down or off, will result in a more natural looking image in my opinion. This will of course vary depending on the image, and you may still need higher values depending on the ISO of the image.
For higher ISO image with more noise, using higher values will be necessary to avoid sharpening the noise of the image, however a little noise may be preferable visually to the texture and artifacts created by the noise reduction settings in combination with high sharpening values and a hard threshold. If you don’t understand any of this don’t worry about it and just keep reading!
You should also consider turning the sharpening Amount down. If you’re coming form Lightroom, you may find the image surprisingly sharp to begin with, or even over-sharp. I think that Capture One is doing some sharpening at the raw-decoding stage, because even if you turn sharpening off completely, it’s still sharper than what the same image would be in Lightroom with sharpening turned off (Lightroom does no pre-sharpening). In fact I find that in some cases, depending on the camera used, you can turn sharpening off altogether and still get a perfectly fine and natural looking image.
The halo reduction slider is also very useful in creating a more natural looking image. Turning it up will reduce the edge sharpening halos you sometimes get, and reduces the look of over-sharpning.
I have created some settings that I use regularly, and I have included these below as presets you can download. Installing presets into Capture One can be a little tricky, and I have included a quick set of instructions with the download, however you may need to google it if you have trouble.
The presets are labelled for Sony and Nikon, but this is just the names I used when creating the,. You can use them for Canon, Olympus or any other camera maker. I do have special presets for Fuji users, and they are included with my Capture One Fuji guide.
Note, I can't offer support with these, so if you have trouble figuring out how to install them, there are lots of tutorials out there you can follow.
Image Profiles
When you decode an image from a RAW file, in any software, or even in-camera, part of what gives it the look that you expect from the camera that you shot with, is the way the camera is profiled. This is actually an important part of the conversion process. When you convert the RAW data to an RGB image there are two things that are applied, and they are: a tone curve and a colour profile. The tone curve controls the brightness levels across an image, and the colour profile control the colour response. Some people think that the colours and look of an image are entirely down to the sensor, but that’s actually only part of it. A lot of it is also done in software, either on the cameras processor, or afterwards in the RAW converter. That is partly why you can get such differences between software converters.
As with sharpening, I have found that the way cameras are profiled in Capture One may not be optimal. The results also seem to vary considerably from camera to camera. Obviously, again, a lot of this is subjective, but in my opinion, older cameras seem to be less pleasingly profiled than newer ones. Again, this may lead new users to thinking the software sin’t very good, but as with sharpening, the profiling of the image is highly customisable, and you can actually do a lot to change the defaults.
The Issues
I’ve done a lot of analysis on images trying to figure out what exactly is going on and what can be done to improve it, and in my opinion what follows is what I consider to be the issues. For a start, I consider the in-camera jpegs to be the reference when it comes to colour, as this is what the manufacturer intended, but in this analysis, I’m just using that as a guide for what I think is wrong. Again, these vary a lot form camera to camera, but as a general rule, this is what I think are the main problems with the default:
- Black levels are to high.
- Shadows are often over-saturated
- some colours are either oversaturated or undersaturated.
Before I get to offering some solutions, let me just point out the locations where you can change some of these things. In particular, if you haven’t come across it before, or paid much attention to it, the Base characteristics panel in the Colour Tab controls the tone curve and the colour profile.
Base Characteristics
The base characteristics tab lets you set the colour profile and select the tone curve for the selected image. The software uses an ICC profile for its colour profile, and contains a profile for most cameras. Unlike Lightroom though, it doesn’t contain profiles for individual picture modes. If your camera has several styles or picture modes, such as “Standard”, “Vivid” and so on, Capture One generally doesn’t have individual colour profiles for these picture modes. Instead it usually just has one. How accurate this is, or how close to ideal this is depends on the camera. As I mentioned earlier, newer cameras tend to be a bit more accurate, while older models tend to have some issues, but that’s not an absolute rule.
One of the great things about Capture One is that you can select any ICC profile here. It doesn’t have to be specifically for your camera. You can also add your own. I’ll get into that a bit more in a minute
The base characteristics panel also lets you select from a preset set of tone curves under the curve pop-up menu. This usually contain a set of five options but some cameras may only have one. The normal items that should be in this menu are:
- Auto: Sets the curve automatically
- Linear response: Effectively, this means no curve is applied.
- Film Standard: The normal response curve, this is usually the default
- Film High Contrast: Similar to the normal version, but slightly more contrasty.
- Film Extra Shadow: This is effectively a lower contrast curve, with the shadows pushed slightly.
Creating a better set of defaults.
As I’ve already pointed out, the defaults in some cases may not be particularly pleasing, but there are a number of ways you can go about fixing these, and creating your own defaults.
Black levels and Curves
The simplest thing to do is to change the black levels and adjust the curves. One of the things that I’ve noticed is that the black levels are set up in most images by default (again, depending on the camera). This means that the blacks in your image may be too bright, or even grey. You can see this by space on the left hand side of the histogram.
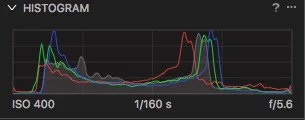
black levels too high - note the left side of the histogram
There are a number of ways to fix this. Sometimes, simply setting the tone curve in the base characteristics panel to “Film Extra Contrast” will be enough. Other times you may have to actually set the black levels lower. You can do this be either using the levels tool, or the three way colour corrector. I have a tutorial on how to do this here. One of the things you might try to do is to bring in a RAW and Jpeg pair, and then use the Jpeg as a reference while you tweak the levels and curves to get it similar. You can then save these as defaults for the individual panels.
Oversaturated Shadows and incorrect colours
Another issue that I often find is that sometimes the shadow parts of an image may appear oversaturated. It’s hard to describe this, but sometimes the darker pats of an image just look wrong. Almost like they’re luminous. This is because normally, the darker parts of the image are slightly less saturated, the closer you get to black, but some of the colour profiles in Capture One seem to have compensated for this and made the shadow areas more saturated in response. the result can look a little weird. Again, this seems to affect older cameras more than newer ones. There are a couple of ways to address this.
The simplest is to try a different colour profile. As I mentioned earlier, Capture One can actually use any profile from any camera. Unlike Lightroom you aren’t stuck with the one for your specific make and model of camera. So, for example, if you’re shooting with a Sony A7 you could try the profile from a Canon 5D. This can sometimes result in a better looking image. There are also places where you can download ICC profiles for Capture One, although you may have to do a bit of trawling of forums to find third party profiles.
I’ve pointed out in the past how to get some profiles for Fuji cameras that match the film simulation modes. I have a tutorial on it here. Well, you can actually use these with any camera too. It won’t give you exactly the same results, and won’t magically give your camera the “Fuji” look, but I’ve found that in some cases, the results are more pleasing than the default for a specific camera.
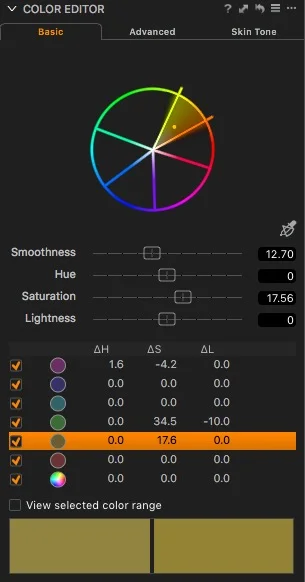
You can also create your own version of a colour profile for your camera. You do this by tweaking individual colours within the Colour Editor panel in the Colours tab. You can add as many tweaks as you want, and then when you’ve modified the colours the way you want, you can save this as an ICC profile.
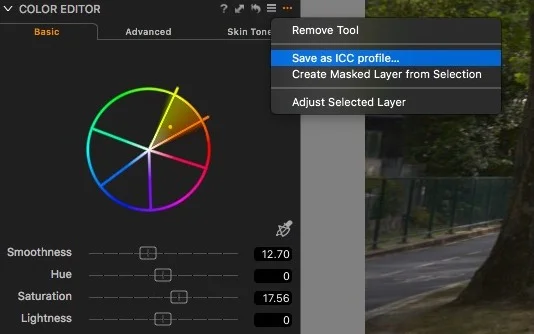
To do this here’s what to do:
- Go to the colour editor in the Colour tab and make the changes that you want to make to the image.
- From the pop-up menu on the side of the Colour Editor interface, choose “Save as ICC Profile”.
- Give it a name and save the profile. This will now show up under the ICC Profile pop-up men in the base characteristics tab.
Another somewhat complicated trick is to use a combination of the Luma and RGB curves to trick the software into desaturating the image. Because the RGB curve affects colour contrast, but the Luma curves don’t, by creating a low contrast curve on one, and the opposite contrast s-curve on the other, you can create a desaturated shadows effect. This is a little tricky to get right though, but experiment with these options and see what works for you.
Bonus Tip: Lens Corrections Panel
One other thing that may be a bit confusing at first is the way Capture One applies lens corrections. With the exception of cameras that have the lens correction information baked into the metadata and don’t use profiles, (Fuji cameras for example), Capture One has lens profiles for many first and third partly lenses. In many cases, for whatever reason, even when the lens profile is automatically applied, the amount of correction may be set to zero. This is often the case for Light Falloff, which controls the vignette reduction.
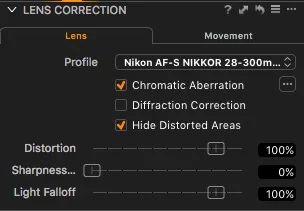
To fix this simply go to the panel, and set the value for Light Falloff to 100%. Sometimes this may over-correct and so you may need to set it back to a more reasonable level. Unfortunately, this is one of the few panels in Capture One that can’t be set as a default, but you can save them as presets or as part of a style.
Another option in this panel that’s often overlooked, is the sharpness falloff slider. This is very interesting, because it allows you to compensate for lenses that may be soft at the edges. This is baked into the lens profiles, and it applies a greater amount of sharpening to the areas defined by the profile that need it. It’s not a magic bullet, and won’t fix really soft lenses, but it is interesting and it can be helpful depending on the lens. As always, give it a try on your own images to see the results.
Is it worth it?
This may all seem like too much effort, but the thing is, once you gave gotten it right you can save your settings as defaults, and then you don’t have to worry about it again. Many of the individual panels inside of Capture One allow you to set defaults. So once you have the settings to your liking, simply save these as new defaults, and then they’ll be applied to images on import from now on.
You can also save various settings as either presets and styles and apply these on import. By creating your own settings and your own defaults, you can have Capture One behave much more to your own tastes, and it will benefit you in the long run.
Help Support the Blog
I’m now on Patreon. If you like what I do here and find the information useful, then you can help by supporting me on Patreon. As well as helping keep this blog going with even more useful news, tips, tutorials and more, members also get special Patreon only perks. Stop by and check it out.
If you like this post then you can see more of my work on Instagram, Twitter and Facebook. I also have a YouTube channel that you might like. You should also check out my other Photography Project: The Streets of Dublin. If you want to get regular updates, and notices of occasional special offers, and discounts from my store, then please sign up for the Newsletter.
You can also show support by buying something from my from my Digital Download Store where I have Lightroom Presets, and e-books available for download. If you're a Fuji X-Trans shooter and Lightroom user, check out my guide to post processing X-Trans files in Lightroom. I also have a guides for processing X-Trans files in Capture One and Iridient Developer. For Sony Alpha shooters I have a new guide with tips on how to get the best from processing your A6000 Images in Lightroom.


