
A Step-by-Step Google Ads Tutorial To Create Your First Campaign
We have created hundreds of high ROI Google Ads search campaigns. This step-by-step guide shows you how we do it. No prior experience necessary.

Google is the first place everyone goes to search for the products and services they need. If your business isn’t showing on Google, you’re going to struggle to get customers.
As a result, advertising on Google is a necessity for businesses large and small, yet Google Ads is complex and confusing. It is very easy to advertise on Google and get zero results.
Follow this guide from start to finish and you will have a good Google search campaign setup, even if you have zero experience.
Who This Guide Is For
This guide is for people who have limited to no experience in setting up Ads campaigns.
If you’re a small business owner looking to start PPC advertising, this guide is for you.
If you’re a marketer with limited PPC experience, this guide is for you.
If you’re a solopreneur, this guide is for you.
If you’re an aspiring PPC marketer looking to start helping people with search campaigns, this guide is for you.
Who This Guide Is NOT For
This guide is not for experienced PPC marketers. This guide covers the foundations of building a search campaign. This guide does not cover intermediate or advanced tactics. This guide is not designed to cover every single feature of a search campaign but to help less experienced practitioners setup a strong initial search campaign.
Using This Guide
The guide is broken into 10 chapters, which you will find in the table of contents below.
Following this guide and setting up your search campaign from start to finish will take between 4-7 hours.
I recommend you work through this guide in 5 sittings
- Chapter 1 & 2: 1.5 hours to complete
- Chapter 3&4: 1.5 hour to complete
- Chapter 5: 1 hour to complete
- Chapter 6 & 7: 2 hours to complete
- Chapter 8-10: 1 hour to complete
This guide is linear, so you should not skip chapters. If there are sections that are optional or unnecessary, they will be labeled.
If you follow this guide from start to finish, you will have a properly setup and well running search campaign in Google Ads.
Chapter 1: Intro To Ads
Time: 5 Minutes
Chapter 1 is focused entirely on basic information and history about Google Ads, and how it works at a basic level. It is valuable to understand the framework within which we are working.
I want to explain a little bit about Ads–formerly known as AdWords–to start. If you’re not interested in learning a bit of the basic information about the program and how it works, you can click here<insert anchor to example company subhead> to jump down to the beginning of the guide. I think it’s valuable to understand a bit about how a system works before using it, but it is not vital to getting your campaign up and running.
What is Ads?
Google Ads is the largest advertising network in the world. In 2019 Google took almost 42% of global internet advertising spend and this advertising represents the bulk of revenue for Google. Over 80% of Google’s revenue comes from advertising.
How Does Ads Work?
Google Ads differs from most forms of advertising in that it targets people based on query instead of demographic. So instead of showing your ads to affluent homeowners between the ages of 40 and 65 (that’s a demographic target) you are showing your ads to people who search for “bathroom remodeling company near me.”
Most advertising is demographic based. Television advertising is demographic based. So is almost all print advertising. Facebook is demographic based.
Only online search advertising is query based, which makes it extremely powerful. The only traditional type of advertising that was similar to query-based search was Yellowpages, where someone would be looking for the service you offered.
NB: Google also offers advertising that is demographic based as well; however, search ads represent the vast majority of Google’s ad revenue and are the most important component of the platform.
Why Should You Use Ads?
Now that you know how it works, the question becomes, “why should I use it?” The “how it works” is the main reason why you should use it. Query-based advertising allows you to show your ad to people who are looking for what you do.
The ability to serve ads to people who are looking for your products or services is extremely powerful. If someone searches for “moving company NYC” you can be certain that they’re looking to hire a moving company in NYC. If you happen to be a moving company in NYC, that’s a query you want to show up for.
Using Google Ads allows you to show up only for the queries that are most relevant to your business.
Our Example Company: Acme NYC Movers
This guide breaks down all the different elements that go into creating your first Google Ads search campaign. Understanding how all of this works can be a challenge, so for this guide I will be using a fictional company as an example.
The fictional company is a moving company based here in New York City called Acme NYC Movers. It’s a local moving company that does almost all of its business in the city, and it’s looking to expand and grow its customer base and book more moves.
Chapter 2: Planning Your Ads Campaign
Time to Complete: 2 Hours
In this chapter we go over how to come up with your break even value for conversions in Google Ads, walk through the keyword research process, and explain how to determine an adequate budget for your campaign.
Now that we’ve covered some background information on the platform itself, we’re going to get into the first step to creating your successful search campaign: planning and research!
It is extremely important to do adequate planning and research. Online advertising is complex, and if you don’t do planning and research first, the likelihood of having a successful campaign is low.
You wouldn’t build a house without blueprints. You shouldn’t build your Ads campaign without blueprints either.
Choosing Your Goals
The first step in planning is deciding what goal you want to build your campaign around. What action do you want the person who clicks on your ad to take?
If you don’t know what action you want your visitor to take, you can’t build a campaign designed to get them to take that action.
If you’re not sure about what goal is most relevant to your business, an easy way to do that is to ask yourself:
“What do I want the visitor to do next?”
Examples could be:
- Lawyers: “I want them to call me and ask for a free consultation.”
- Online shoe store: “I want them to buy a pair of shoes.”
- Retail Store: “I want them to come visit my store.”
- Digital marketing agency: “I want them to fill out a contact form.”
There are a number of common goal types for businesses, and I’ll describe them briefly below.
Generating Leads
Lead generation is one of the most common goals, and it is the goal that I feel search campaigns perform best at. This is the primary goal for service businesses from accountants to zither teachers and everything in between. If you’re looking for someone to call your company or fill out an online form, you’re looking for leads.
Online Sales
Online sales are the other most common goal for Ads campaigns. Basically, if you have any sort of e-commerce functionality, this is going to be the goal for you. While Ads campaigns do work well for generating sales, I don’t consider it to be an A+ as I do for lead generation but more in the B+ range. Still excellent, but not as great as lead generation.
In-Store Visits
This goal is reserved for select types of businesses and is not super common. It’s great for retailers and retail-focused searches. This can include everything from sporting good stores to restaurants. One challenge with in-store visits is the difficulty in accurately measuring results.
App Downloads & Others
There are numerous other goals, but they are far less common than the previous three. And some can be lumped into one of the previously mentioned options. For example, there are many similarities between lead generation and free trial signups, but they’re not exactly the same.
Once you’ve decided what your primary goal is, you can move to the next phases of the process, but knowing what you want to achieve is an important early step in the process.
Determining Your Budget
Running Google Ads costs money. Sometimes it costs a lot of money, so having an adequate budget is vital. There’s no shame in not having the money to get started with Ads, but it’s better to not do it at all than to do it with an insufficient budget.
My general recommendation is that you need to be able to afford at least 100 clicks per month. So if the average cost per click is $20, you need to have a minimum budget of $2,000 per month, but more is definitely better.
In the keyword research section below, you’ll be able to determine what your average click costs will look like.
Finding Your Breakeven
This is a common point of confusion when we are looking to start work with a new client. They don’t know where their breakeven is for customer acquisition cost (CAC). This is based on your average customer lifetime value (LTV).
I won’t go into great detail about calculating customer LTV, as there are plenty of great resources and guides out there on how to do it.
At the most basic, it is your profit per transaction times the average number of transactions per customer.
So for Acme, we make an average of $300 per move and our customers move an average of 1.5 times with us. $300 x 1.5 = $450 for our customer LTV. This means we can spend up to $450 on each customer and we will break even.
Finding your breakeven CAC allows you to find the dividing line between profitable and unprofitable advertising.
NB: In calculating your breakeven, you’re going to have to make some assumptions. Always be conservative. You would rather your breakeven calculation to be too high than too low.
If it’s too high, you’ll have marginally profitable advertising that you will stop (or work to improve) because you think it is marginally unprofitable.
If it’s too low, you’ll have advertising that is losing you money that you think is profitable, and you’ll keep doing it, or worse, spend even more money on it.
Backing into Your Value per Conversion
Unfortunately, we need to do a little more math in order to find our breakeven cost per conversion, which is the metric we will need in Google Ads. Because even though we make $450 per customer in our example, we don’t convert 100% of our leads into customers.
So in order to find the value of a conversion in Google Ads, we need to do one more bit of math.
LTV x Close Rate = Lead Value
So for our Acme example, our LTV is $450 and let’s say we have a 20% close rate on leads. So for our lead value we have
$450 (LTV) x 0.20 (Close Rate) = $90
So the value of a lead for Acme is $90. So we want to be acquiring our leads in Google Ads for $90 or less. Preferably a lot less.
Write your lead value down. We will need it later.
Keyword Research
Good keyword research can be a shortcut to profitable advertising, so it is vital that you do it. While there are a number of paid tools out there that can help with keyword research like SEMRush and SpyFu, you can do keyword research with free tools as well, including Google’s own Keyword Planner, which you will find within your Google Ads account.
Brainstorming Keywords
Before starting with one of the tools, however, I like to start with a pen and paper. You probably know what people are already searching for when they’re looking for businesses like yours.
For Acme Movers, this is going to include phrases like:
- NYC movers
- Brooklyn moving company
- Brooklyn movers
- Movers near me
- Manhattan movers
- Local movers
You will want to compile a list of 10-20 phrases that potential customers will use to find your business.
Using Google’s Keyword Planner
After compiling your list of keywords, in the brainstorming phase, we’re going to want to go and add those words to Google’s Keyword Planner.
Let’s click on “get search volume and forecasts” and add our keywords that we brainstormed and proceed.
Keywords
We will end up in the keywords tab of the Keyword Planner. Here you’ll find information about volume, average click cost, and some estimated projections that Google has based on their own data.
In my experience, the raw data here is inaccurate. It is a good place to start, and volume data is helpful; however, data on average CPC, for example, is often not close.

I know, for example, that the average CPC for NYC moving terms is in the $12-$20 range, and that a bid below $3 would not ever be on the first page of the results.
We can get the data here more accurate by making adjustments to a number of different settings, which we will want to do.
Location
Most advertisers are not serving ads at the national level, which is the default location option. Setting your location to the area in which you are going to be advertising provides a couple benefits.
- It gives you more accurate data about volume
- It gives you more accurate data about click costs
For our example company, we’re going to set the location to New York City. I go into further detail on setting the right location for your campaign later in this guide.
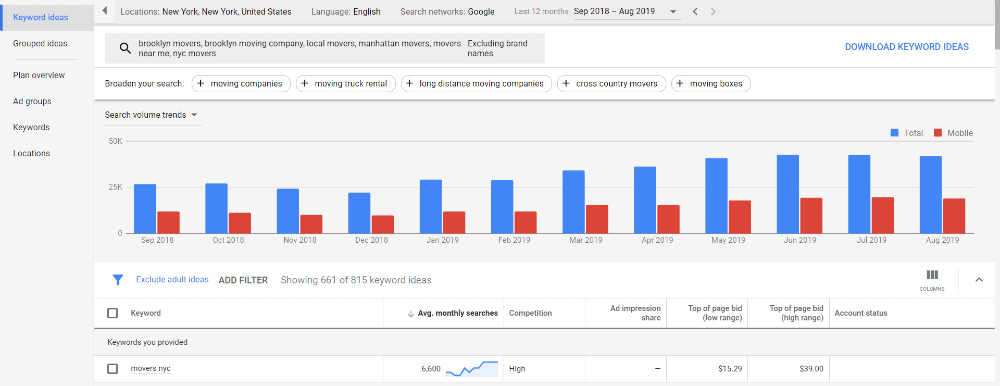
Plan Overview
The plan overview section will give us a very rough idea of how the campaign might perform based on the keywords and location we’ve selected.
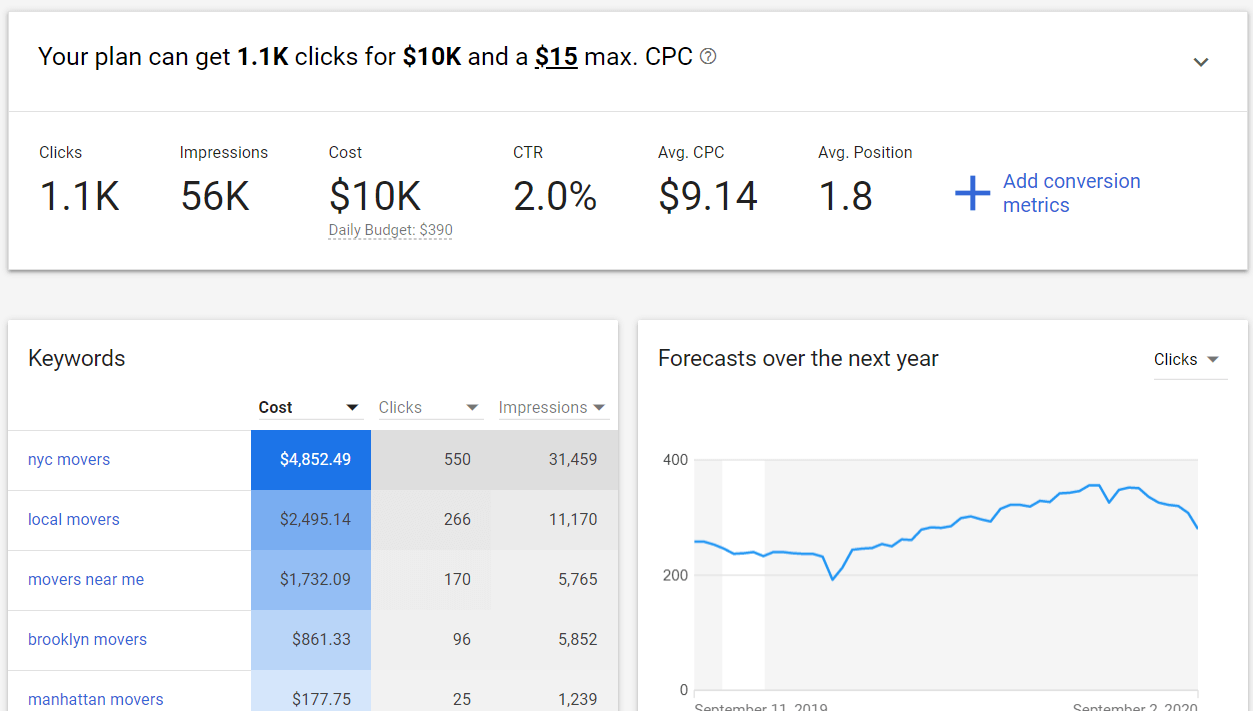
We are able to add some additional data for conversion metrics to get an idea of how much money we will make from the campaign. In this instance, you will want to set the conversion value to the number that you came up with in the breakeven section of this guide. In our example case, this is $100.
To set the conversion rate, you can do a number of things. I know from historical data in the example submarket that a 20% conversion rate is conservative, so I will use that.
If you have accurate conversion rate data in Google Analytics, or your website platform, you can use that conversion rate. You can also look for industry average conversion rates and use that as well.
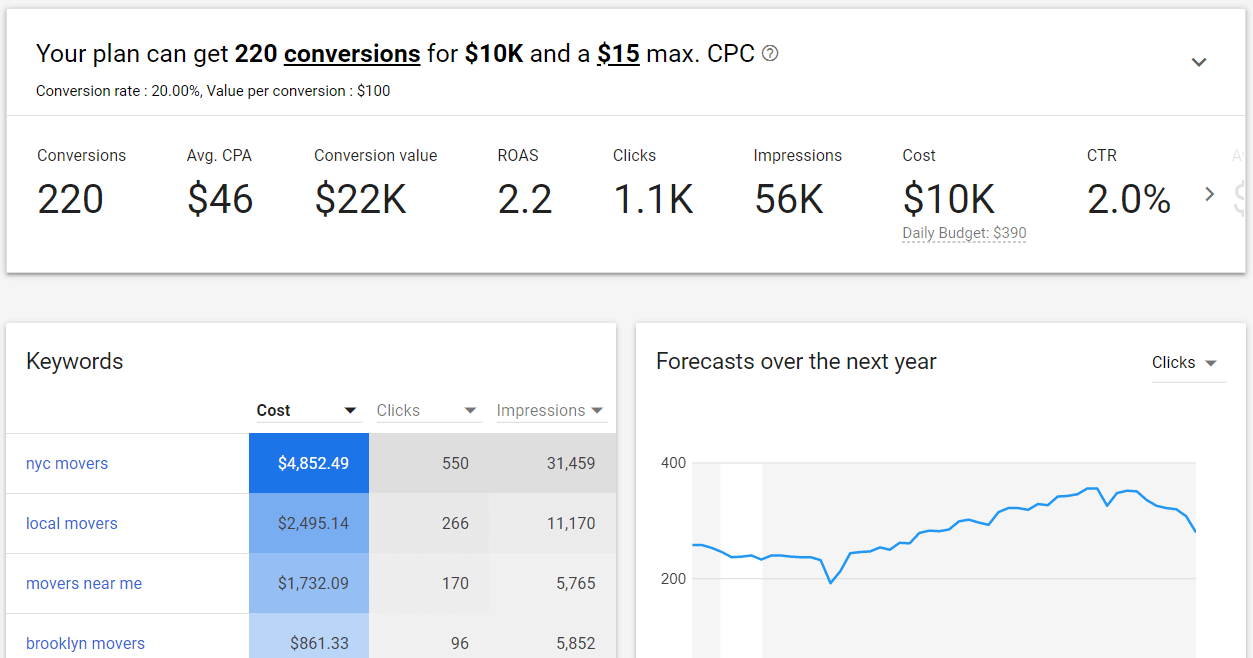
Based on the conversion rate and conversion value data, Google will provide projections on what it anticipates the campaign performance to be, including your return on ad spend, and cost per conversion.
It is important to remember that this is just an estimate. You should not expect to have this be the performance. It should only be used as an early projection for what might happen. The real data will come when you start running your campaign.
Refining Your Keyword List
Depending on the keywords you identified during your brainstorming and put into the keyword planner, you hopefully have enough search volume to run your campaign. If there is not enough search volume as estimated by the keyword planner, you need to expand your keyword list.
You can do this by going to the “Keyword Ideas” tab in the Keyword Planner and adding your brainstormed list of keywords. This will generate a broader list of keywords along with search volumes and estimate click costs.
You can go through the list of ideas and add the ones that you think make the most sense to your plan, which will modify your previous list of keywords.
Just repeat the process of adding relevant keywords until you’re happy with the projected volume and then download the keyword plan.
To do this simply return to the “keyword” tab and download your keyword plan.
With our keyword list finalized, we’re ready to begin work on creating our first campaign.

Chapter 3: Creating Your First Search Campaign
Time to Complete: 45 Minutes
In this chapter we will setup the campaign framework. This includes choosing the right campaign type, location targeting, setting bids and budgets, and ad scheduling among others.
We’re at the most exciting point in the process! All of the planning and preparation work is finished, and you’re ready to create your first Ads campaign.
The first step to creating your first campaign is to actually create the campaign. In your Ads account, you will find the option to create your new campaign, so let’s go ahead and do that.
Campaign Goals
The first thing you see after creating a new campaign is a list of campaign goals. The options that are listed are:
- Sales
- Leads
- Website traffic
- Product and brand consideration
- Brand awareness and reach
- App promotion
- Local store visits and promotions
- Create a campaign without a goal’s guidance
We went through determining your goal earlier in this guide, so you know what your business goal is for the campaign. If you were creating this campaign without the help of this guide, you would want to select that as your goal, but since you’re following along with this guide, you should choose “create a campaign without goals guidance.” You’re getting all the guidance you need right here.

Campaign Types
This will take us to the next step which is choosing our campaign type. You might be surprised to see that Google offers 6 different campaign options. This guide is all about creating your first search campaign, so we are going to choose that. I’m going to explain a bit about each campaign type below, but if you want to skip these explanations and go right to the next step, click here.
Search
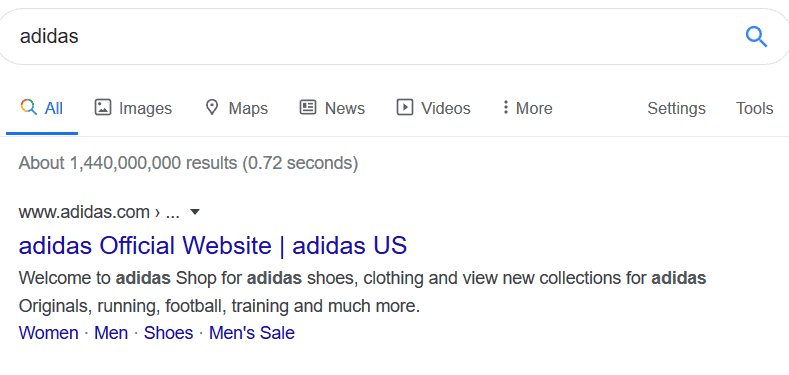
Search is the most popular campaign type. Search ads are the advertisements that you see any time you go to Google and search for something. They’re the ads that appear right at the top of the page.
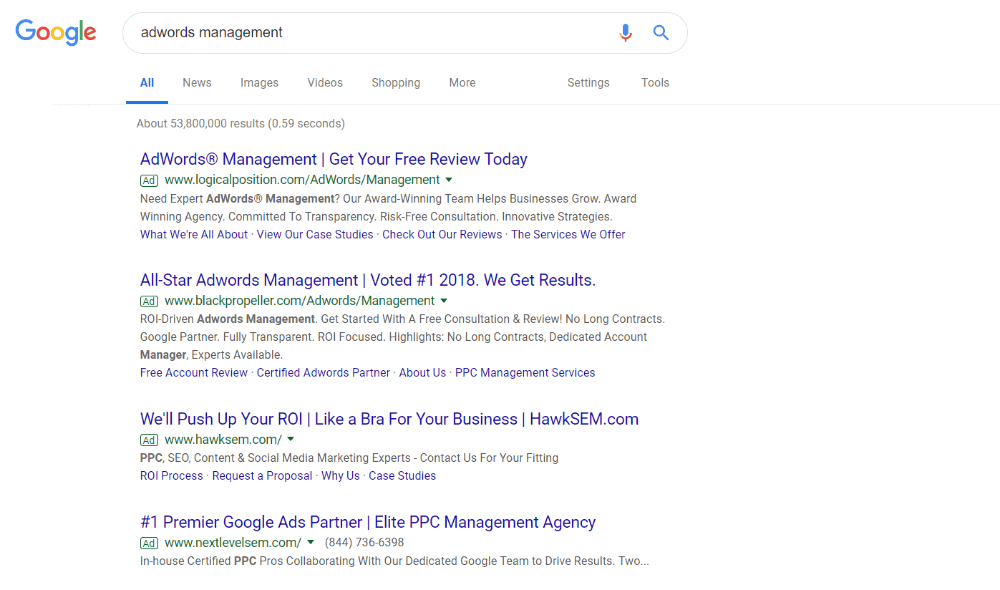
Note: For some searches for local services (like plumbers) you may see additional ads at the top. Those are not search ads but are local service ads. That’s a different program which you can learn more about here.
As we discussed previously, the power of search ads is that they are query based. You get to show your ads against what people are looking for. This allows you to show ads when people are looking for exactly what you do! So for Acme, if someone is looking for “Movers NYC” we will be able to show our ad to them. Which is perfect, because Acme is the best moving company in NYC!
You only pay for search ads when someone clicks on them, so people seeing your ad but not clicking on it (what we call an impression in the ad industry) is free.
Display
Display ads are another common campaign type. And no matter who you are, you’re definitely familiar with display ads. They’re on virtually every website, and they’re the reason you’re probably running an ad blocking plugin.
Display ads are a powerful way to increase your brand or product awareness with your target audience. You can target specific websites, specific demographics, and many other types of audiences. Display ads are not query based.
Arguably the most powerful use for display campaigns is remarketing. That is, targeting ads to an audience of people who have already visited your website. Remarketing ads are those annoying ads that follow you around the internet. If not done properly they can be very annoying, but they are also quite effective when done well.
Shopping
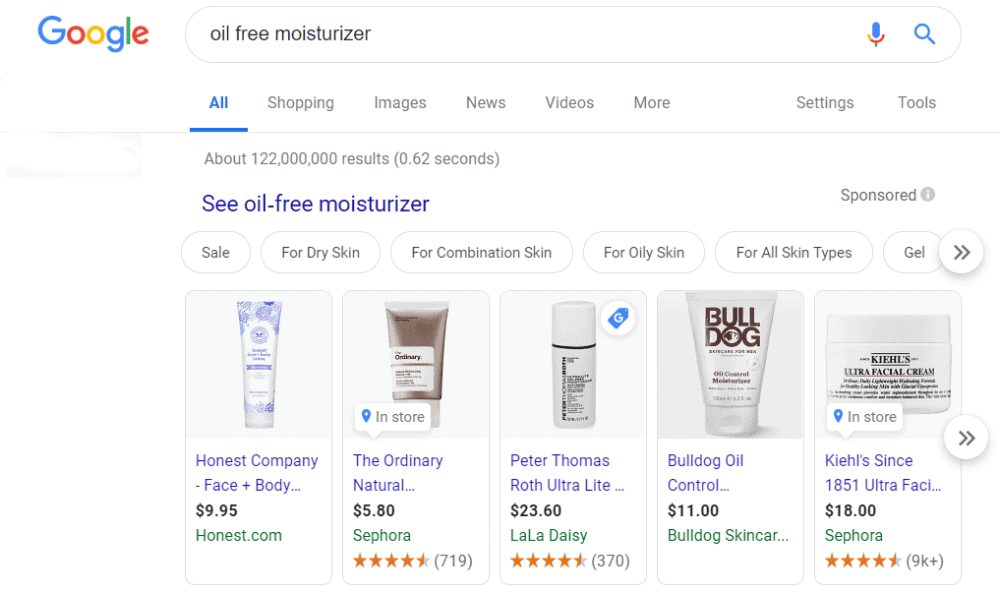
Next up we have shopping ads. Shopping ads have quickly grown to be one of the best ways for e-commerce companies to sell products. Shopping ads show up in search results for queries about purchasing products. Let’s say you’re looking to buy new golf clubs, and you search “buy TaylorMade m6 driver”, you’re going to see shopping ads.

Shopping ads not only let you show your ads for specific product queries, but you can also show up for more general queries as well. For example the query “Oil free moisturizer” will show a number of different shopping ads.
Video
Video campaigns are an increasingly popular campaign type. These campaigns show primarily on YouTube, but can also serve on a broader network of websites as well.
If you watch any YouTube videos you’re familiar with these ads as any ad that runs preroll or in another area of YouTube is going to be one of these video ads.
These ads are great for raising brand awareness and top of the funnel goals.
App
App campaigns have been around for a while, but they’re not a campaign type that we have a great deal of experience with. App campaigns are designed specifically for the promotion of an iOS or Android app.
These ads can serve across Google’s network including on search, inside mobile apps, and on the display network as well.
Smart
Smart campaigns are a new campaign type from Google that take automation to a completely new level. With smart campaigns, you simply choose what goal you want to achieve, like phone calls, choose the area you want your business to advertise, and create an ad. Google will choose where to show the ad, how much to pay, and everything else.
I’m not a fan of smart campaigns as they deprive advertisers of too much data and there is absolutely no control. I suspect that smart campaigns or campaigns with more smart features will become the norm in the future.
General Settings
We’ve chosen to create our search campaign with no guidance, and we’ve reached the next step in the process. The generically-named general settings. These general settings control a lot of important, high-level settings for your campaign, and they can make or break the success of your campaign. Let’s take them one at a time.
Campaign Name
The name of the campaign has no impact on anything. It is only for your own reference. There are many opinions about naming conventions for campaigns, and a lot of it depends on the size of your account and the number of campaigns you have.
I recommend having a relatively descriptive name that covers what the campaign is targeting from a service standpoint, and also where. So for Acme, I’m going to call it “Moving Company + Local NYC”
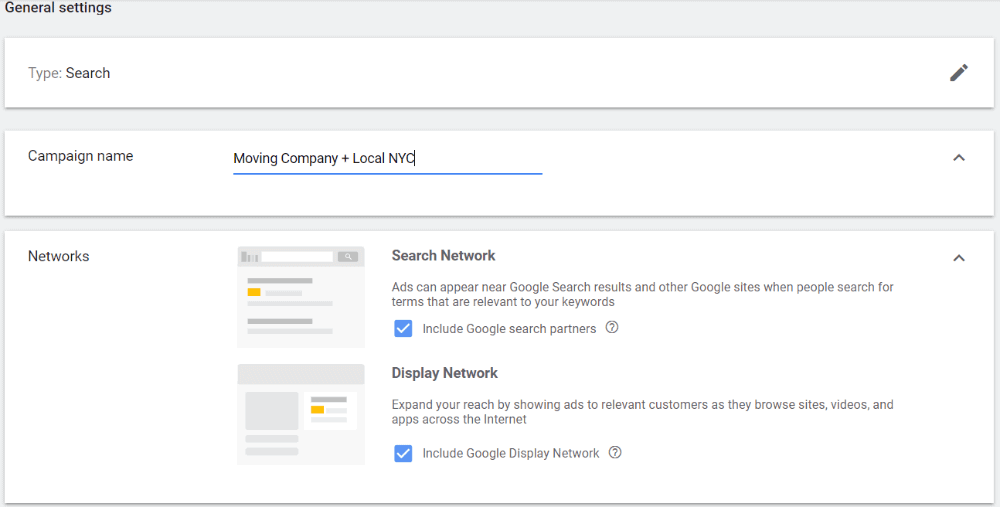
Networks
You would think that since you’re choosing a search campaign your ads would only show up on Google searches. That is NOT the default option. Google also puts checkmarks next to two separate options initially as well: Google Search Partners and Google Display Network.
Google Search Partners
Search partners is an undisclosed list of different websites that are not Google where your ads can show against searches. This includes websites like Youtube and others that use Google’s search algorithm as the search function on their website. So if someone is searching for an NYC moving company on a search partner website, our ad can show in their search results.
The quality of search partner traffic is, in my experience, terrible. I do not recommend serving your ads on search partners, so you should uncheck the box.
Google Display Network
You’ll notice that Display was another type of campaign option that we skipped in the first step, and it’s showing up again here. Display is not search, so why is Google including this as an option in a search campaign?
Money. Google has a ton of display inventory, and most advertisers avoid display ads because they are usually less effective than search ads. So in order to maximize their revenue, Google tries to sneak display ads into your search campaigns too.
You should uncheck this box too. You’ll notice that Google implores you to “Don’t miss the opportunity to reach more people across 3 million sites and apps.” It’s not an opportunity; it’s a waste of money. Take a pass. Uncheck the box.
More Settings
These settings are more advanced and they are settings that you are likely not going to need. We’re going to skip these.
Targeting & Audiences
Next up we’ve got targeting and audiences. This is where we’re going to narrow who we want to target. Our primary targeting is keyword searches, but we also want to target audiences as well. Acme only provides moving services in and around New York City, so we do not want to targeting search queries in Berlin, for example.
Locations
Location is generally the most important targeting option. If you’re reading this guide, it is likely that your customer base isn’t global. They’re probably not national either. If you’re making your campaign in the United States, your default options are:
- All countries and territories
- United States & Canada
- United States
- Custom
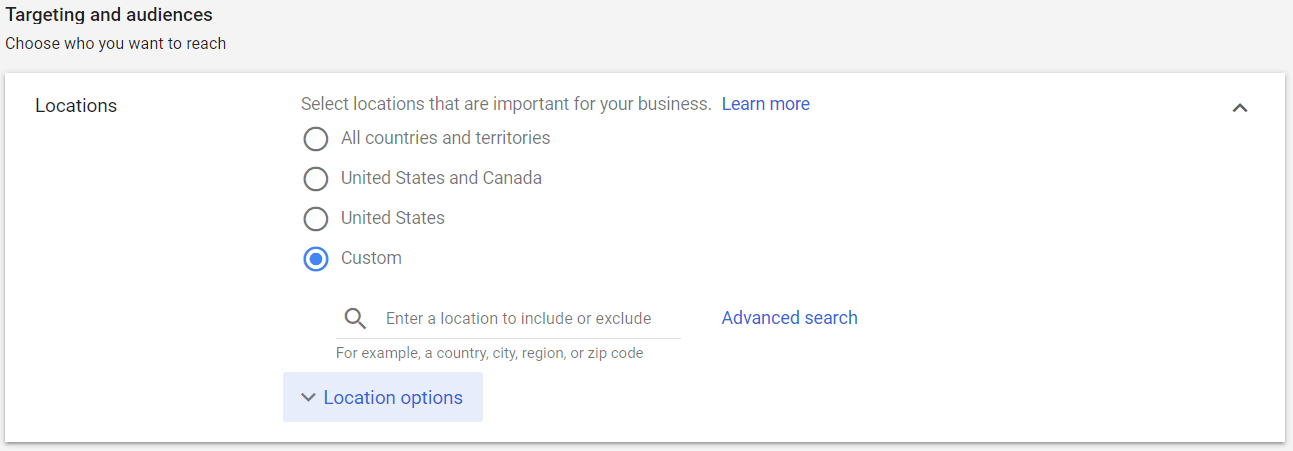
I do not recommend any of the first three options. Even if you can get customers all around the US or the world, they’re probably not your ideal customers. And the goal here is to create a campaign that is profitable, so we want to target a narrower audience.
We want custom.
Custom Locations
You know where your customers are most likely to be. We do have a couple ways to target them here though, so go ahead and click “advanced search”
This new screen gives us two primary options: Location and Radius.
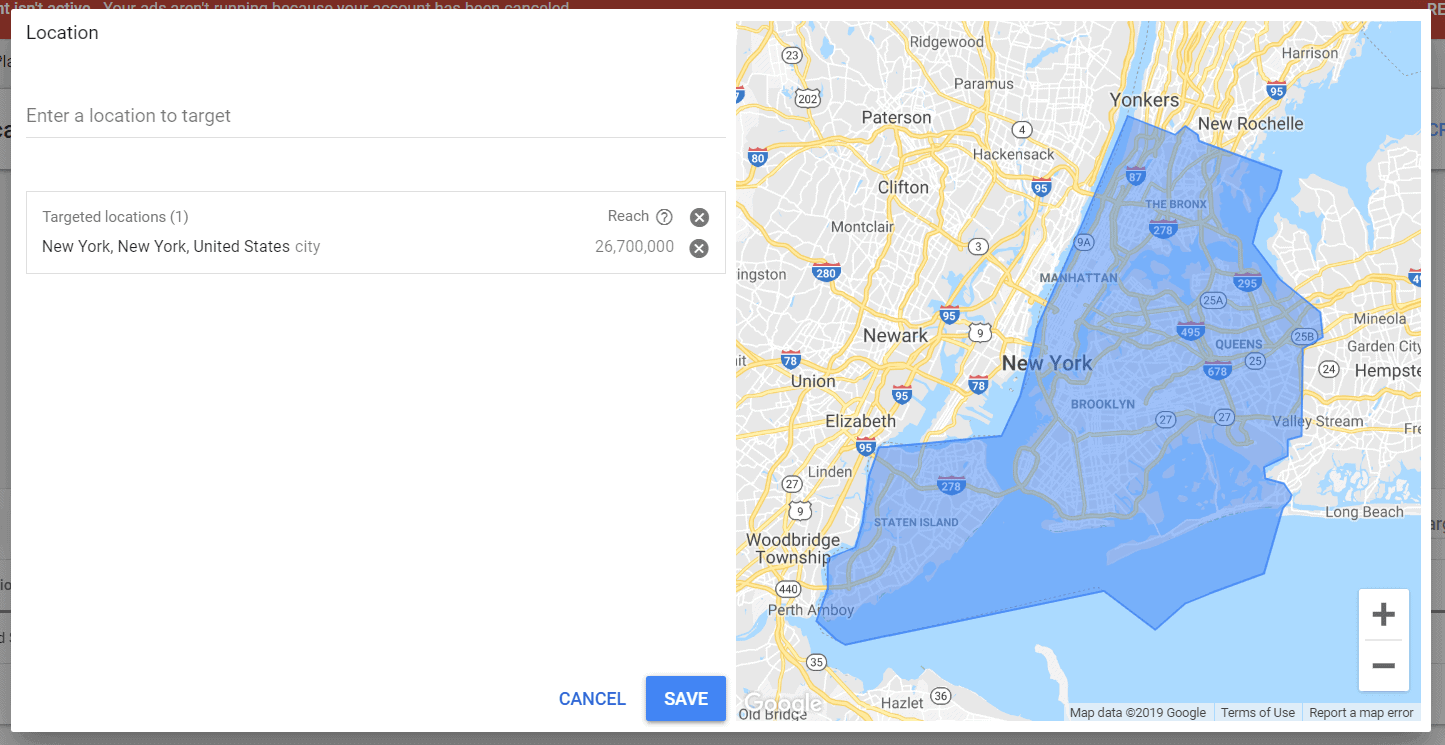
Location
This is the more common option of the two, and it will let you choose from a lot of different location options. Here are some of the location options that you have access to in the United States:
- City
- County
- State
- Country
- Zip code
- Congressional District
- Neighborhood (in some cities)
- Nielsen Designated Market Area
Each one of these is pretty self explanatory, and from the previous work you’ve done, you know which of these is most applicable to your business. Google will also show a reach number, which is the number of people who are “in or interested in” the targeted location. For our example company, we’re operating in New York City, so we’re going to choose NYC.
Radius
The other option is radius targeting. Radius targeting will reach all people within a specified radius of a specified location. This is a great option for retail stores, restaurants, and service businesses, if you’re most likely to get customers within a certain radius of your location. You can target a radius between 1 and 500 miles.
You can set the location either by searching for the name of the place, your street address, or coordinates
If you want to learn more, I’ve written in greater detail about Ads location targeting.
Location Options
Below your location selection, you’ll also see location options. If we expand location options you’ll see three different options:
- people in, or who show interested in, your targeted locations
- people in or regularly in your targeted locations
- people searching for your targeted locations
The first option encompasses the second two, and it is the default option. This is fine, but I recommend changing it in some cases.
People in or regularly in your targeted locations
This is quite simply, people who are located in this location. Their IP address places them inside your location. They are physically located within the location you want to target.
I recommend using this option if you’re only looking to target people who live in the location you want to target.
People searching for your targeted locations
These are people who are not in your location but are searching about your location. For example, let’s say you’re on vacation in Canada, but you live in New York City. You need to schedule an appointment with a plumber when you get back home, so you search “plumber nyc”. You’re not in NYC, but because you’re searching for it, Google will consider you within the targeting location if you choose this option or the default option.
This is a great option if you’re looking to target tourists and travelers.
Languages
This is the language that you want to be targeting. For the majority of people reading this guide, that’s going to be English, and Google will default to the local language of the country in which you’re setting up your campaign.
What about people who speak two languages? Google can detect this as well. So even if someone is searching from a device that has a language set to a different language, if Google knows that person speaks the language you want to target based on their query history, your ads will still show.
Audiences
Using audiences is an advanced tactic for search campaigns, so we are going to skip it. Audiences provides the ability to further narrow your targeting.
Budget & Bidding
Next up we’re going to be working on budgets and bidding. This is where you control how much you want to spend and how you want to spend it. There are some important things to know when dealing with your budget and bids.
Budget
Under budget it says “enter the average you want to spend each day” and it is important to know that this is not the actual cap on a single day of ad spend. Google calculates budget based on a monthly calculation.
Google takes what you enter in this field and multiplies it by 30.4 to get your monthly total. On any given day you can spend up to 200% of your daily budget, but you will never go over your monthly total.
Example: Your daily budget is $100. This means Google won’t spend more than $3,040 in the month but you can have days where you spend up to $200.
Bidding
Choosing your bidding strategy and setting your bid is going to be a bit more work than setting your budget, but it is much more important! Much has been written about bidding strategies, and if you would like to learn a ton about bidding strategies, I recommend giving this a read. For now, let’s keep it simple.
Ads Bidding Strategy
It’s time to choose our bidding strategy or, as Google calls it, “what do you want to focus on?”. If you click on the dropdown, you will see four options that you can select: Conversions, Conversion Value, Impression Share and Clicks. These are the primary, automated bidding strategy that Google offers.
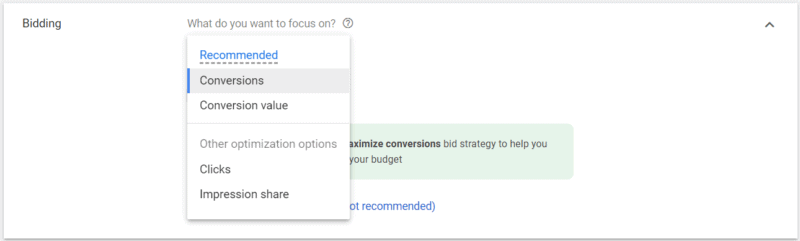
Conversions
Choosing the conversions bidding strategy is what Google suggests when you want to maximize the amount of conversions you get for your ad budget. When choosing this option, Google will have complete control over what you pay per click and it will use it’s algorithms to determine what to bid for which click in an attempt to maximize the number of conversions you get.
This strategy can be a good one if you have enough data to support it. Because this strategy relies on historical conversion data, it works best with established campaigns that are generating lots of conversions. Because we are starting with a fresh campaign, we don’t want to use this strategy.
Conversion Value
The next bidding strategy that Google offers is what is known as Conversion Value. With this automated strategy, Google attempts to get you the maximum conversion value possible based on your daily budget. This is similar to optimizing for conversions in many cases, but it can differ considerably when you are tracking multiple conversions with different conversion values.
As with maximizing conversions, this gives Google complete control over your cost per click. It also requires a large volume of historical conversion data in order to be effective, so it is not a good strategy to utilize.
Impression Share
This allows you to target a percentage of the queries for your keywords for your ad to show up. For example, let’s say “NYC Movers” gets 300 searches per day. If I choose this bidding option and choose 100%, that means I want to try to get my ad to show up 300 times a day: every time someone searches NYC Movers.
This is a good strategy for branded search campaigns which you can read about at the link, but it’s not the one I would choose for a regular search campaign.
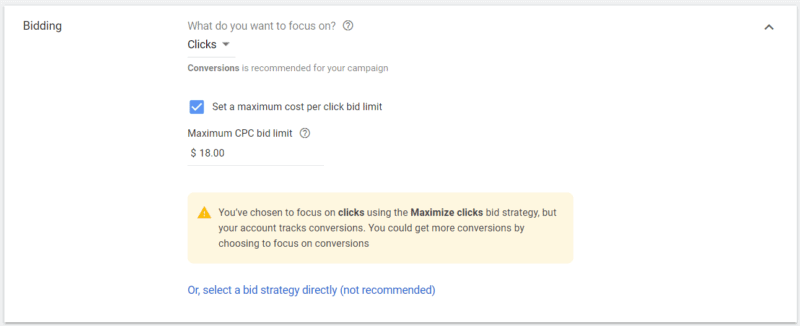
Clicks
This is what we want. This goal is telling Google you want to get as many clicks on your ad as possible for the keywords you’ve selected. This is a good starting point for your campaign. Clicks allow us to gather data to use to optimize going forwards.
Maximum CPC Bid Limit
Google says this is optional.
THIS IS NOT OPTIONAL!
All of that emphasis is warranted. You absolutely 100% must have a bid limit. Without a bid limit, you could end up paying 10x what the average price is for a query because the magic behind Google’s system decides the click is worth that much. This doesn’t happen all the time, but there is nothing worse than seeing a click that you normally pay $20 for cost $200. It is sad times.

Choosing a Max CPC
So you’re setting a max CPC. Great! How much should it be? This is going to be based on the click costs that we uncovered in our keyword research section. I would recommend setting a max CPC of about 30% above the range of CPCs you uncovered in your research.
We can adjust these further over time from within the campaign, but this is a good place to start.
Ad Schedule
If you click on the “show more settings” link, you’ll see the ability to set an ad schedule. This controls when your ads are eligible to be served to searchers on Google.
I always recommend that businesses set their ad schedule to their business hours to start. You want your ads to show when people can either call you or visit you. You can set them to whatever you like, but I find business hours to be the safest bet.
I have also found in my decade of Ads experience that late-night ads are ineffective in almost every case.
Acme is only open Monday through Friday from 7am to 6pm, so we’re going to set that as our ad schedule.
Ad Rotation
Ad rotation controls which ads within your ad groups show. It is a best practice to have 2 different ads in each ad group, and this controls how Google decides to rotate those ads.

As you can see, there are 4 different options, though you can only select two: Optimize and Do Not Optimize.
You should select Optimize.
Optimize basically means that Google will use its intelligent software to decide which ads it should show at which time. It will show your “best performing” ad much more often than the ones that are performing worse.
Do not optimize means that the ads are going to rotate relatively evenly even if one of your ads performs better than the others. There are instances where this makes sense, but this is a more advanced tactic, so we will skip it.
Ad Extensions (Assets)
Ad extensions (now referred to in-platform as “assets”) are extremely important. But I don’t like dealing with ad extensions at this point in the process, so we are going to ignore this for now. Don’t worry, we’re going to get to these later.
We’re ready to move on to the next screen, so let’s click “save and continue”.
Set Up Ad Groups
As with the ad extensions before, I do not like setting up my ad groups from this stage of the campaign. So we’re just going to click the Save and Continue button, and we’ll tackle the ad groups later.
Create Ads
You can’t run a campaign without ads! But, we’re going to also skip this for now. I’ll explain why I’m skipping all three of these elements in a couple sections.
In order to skip this, we need to cancel the initial ad they’re giving us. So go ahead and click the cancel next to “done” not the one next to save and continue.
Confirmation – Almost Running
Here you’ll see all of the settings that we chose in the previous steps of campaign creation. Take a look at them and confirm that they’re how you want them.
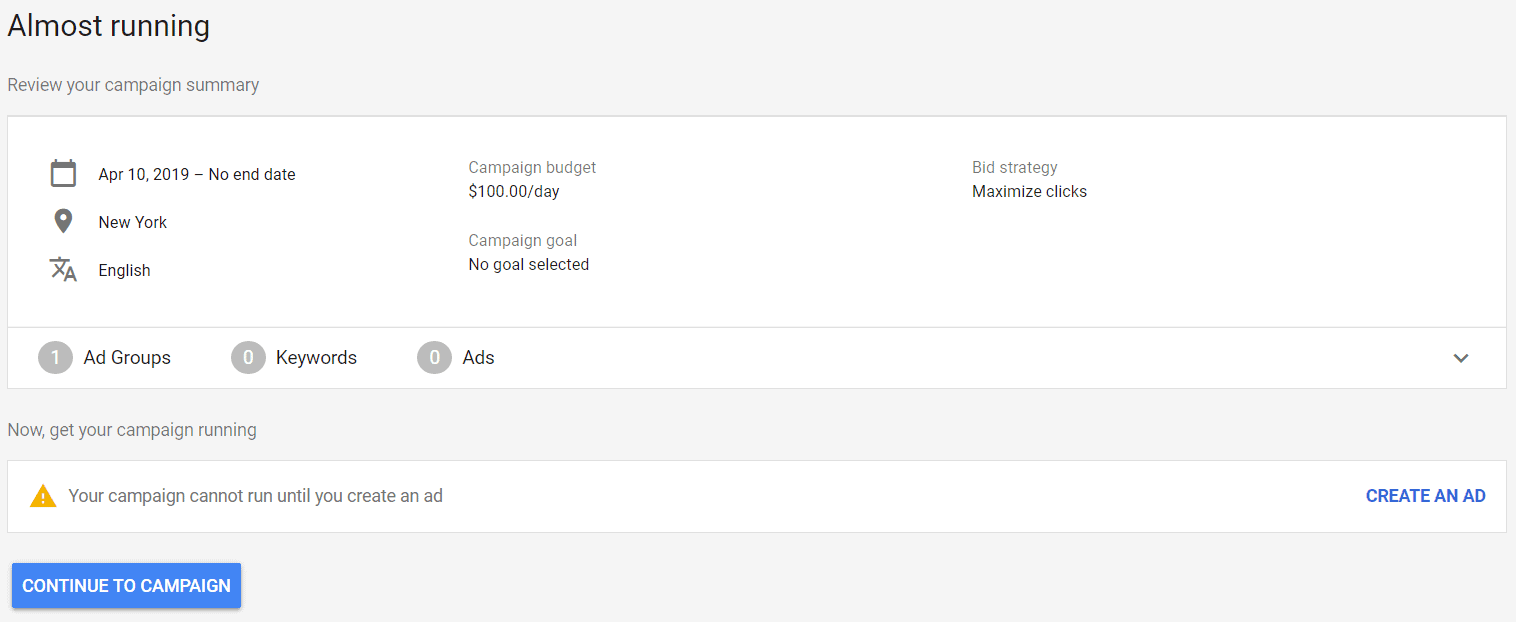
Note: You can change these settings later as well if you want, so don’t worry that you will be locked into these forever. You won’t be.
You will also notice that Google is warning you about not having an ad written. We can continue to ignore that.
Go ahead and click Continue to Campaign.
Campaign Step 1 Success!

Woohoo! Congratulations on making it through the first part of creating your first campaign. We now have a campaign setup that has all of the top level settings ready to go.
This is a great place to take a break and come back later.
Why I Skipped Ad Extensions, Ad Groups & Ad Creation
You’ll notice that I skipped some of the most important parts of getting your campaign up and running, and I did it for a few reasons.
I think it puts too much work into the initial setup
When you’re working your way through campaign creation, doing all of the work for setting up ad extensions, ad groups, and ads right up front means you might spend 4+ hours doing all of this work in one sitting. I believe it is better to break it up.
I think it is confusing and can make people afraid to lose work
When you go to leave the setup process, you get prompts warning you that you will lose work if you leave the setup process prematurely.
While each step does get saved, it feels like you’re still in the setup process and feels like you will lose all your work unless you complete everything. I would be worried too. So saving the steps for later eliminates this concern.
Chapter 4: Creating Ad Groups
Time to Complete: 45 minutes
In this chapter we will walk through the process of creating ad groups, how to group your keywords for ad groups, keyword match types, and finding and adding negative keywords.
The next step in the process is setting up our ad groups. Ad groups are the most important building blocks for a successful campaign. This is where you group your keywords and your ads, and good ad group structure is often the difference between a profitable campaign and an unprofitable one.
Keyword Grouping
The most important role for ad groups is it is where you group your keywords. You want to keep your keywords very closely related within ad groups.
The more specific the targeting the more relevant the ad copy can be to the query and the higher your quality square and the better your performance.
Typically, you want to keep ad groups to a handful of keywords. No more than 5 or 6 closely related keywords.
Here’s a set of keywords that is NOT how you want it:
- Brooklyn movers
- Manhattan moving company
- Movers in queens
- Mover NYC
Why is this a bad way to group keywords? Because these queries are all a little different. While Brooklyn, Queens, and Manhattan are all NYC boroughs, they are distinct locations. If I’m looking for a mover in Brooklyn, I don’t care about Manhattan. (sorry Manhattanites!)
You want your ad copy to focus on Brooklyn and you want your landing page to focus on Brooklyn. So a better ad group would be:
- Brooklyn movers
- Move in Brooklyn
- Moving company Brooklyn
All of these keywords are targeting a specific service (moving) in a specific location (Brooklyn) and are extremely closely related. This is a great ad group!
You want to group your keywords like this. Individual service offering is a great breakdown or, if you are in a big area, individual service offering + location.
Keyword Match Types
You might think that adding keywords is just a matter of adding the phrases into closely matched groups, and that is what phrases will trigger your ads, but that is not the way keywords work in Google Ads. Your ads can show for many other queries than just the ones you include in your keywords. What queries your ads show for is based on both your keywords AND the match types of those keywords. Google provides 3 different keyword match types:
- Broad match
- Phrase match
- Exact match
Each of these match types allow your ads to show for a varying range of queries from the widest range of queries (broad match) to the narrowest range of queries (exact match).
Broad Match
Broad match is the most general match type available. It means that your ad will show for an extremely wide range of queries, including queries that might only be somewhat related to your keyword and your offering. Here’s an example of just how broad this match type can be:
Keyword: brooklyn movers
Search term: 432 bleecker st brooklyn bed bug

That is an actual search term where one of our ads served and was clicked on based on the keyword Brooklyn movers. That click cost $24! It’s not even remotely related, which is a reason why I don’t recommend using broad match. It’s too broad, and you get lots of worthless clicks.
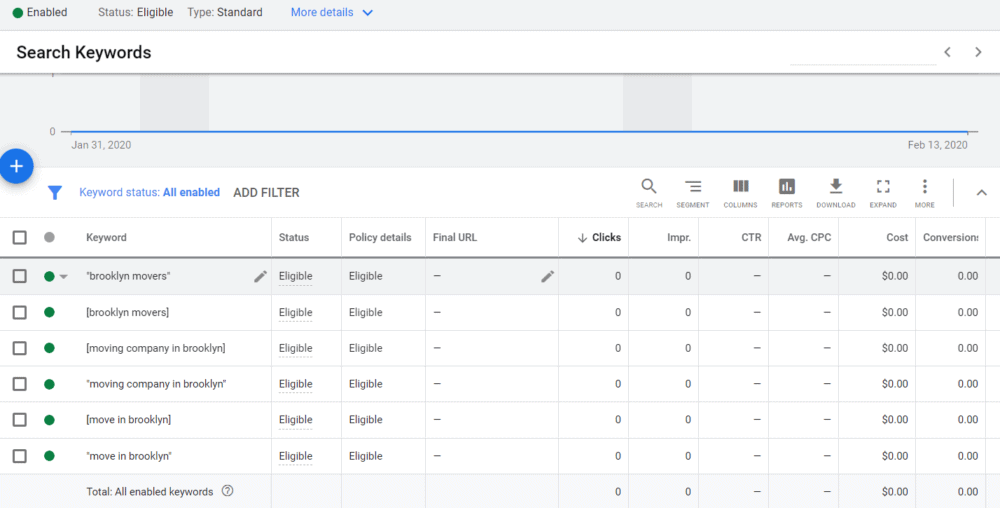
Phrase Match
Phrase match is the next match type, and one that we use frequently. With phrase match, a query must contain the keyword phrase in the order that it is found in the keyword. Phrase match keywords are designated by putting the keyword in quotes. For the keywords above, it would look like this:
“Brooklyn movers”
“Move in Brooklyn”
“Moving company Brooklyn”
So for “Brooklyn movers” a person searching for “affordable Brooklyn movers” would trigger your ad to show but “Brooklyn based movers” would not.
We’ve written more about phrase match in Google Ads if you want to read about it in more detail.
Phrase match is a powerful match type that allows you to target more narrowly while still getting some of the highly targeted long-tail queries that contain your keyword.
Exact Match
Exact match is the narrowest targeting type. With exact match, the query must exactly match the keyword as it is written. It is not case sensitive. In recent years, Google has started to broaden out exact match from what is has been traditionally exactly matching and nothing else to include “close variants.” To make exact match keywords, you place the keywords in brackets. For our examples it would look like this:
[Brooklyn movers]
[Move in Brooklyn]
[Moving company Brooklyn]
So for the exact match keyword [Brooklyn movers] your ads would only show for queries that are exactly “Brooklyn movers” and not something like “affordable Brooklyn movers” or “Brooklyn movers for apartment” or searches along those lines.
Exact match keywords are the most targeted you can get, and will often be the highest ROI and highest relevance keywords in an account. They will also be the lowest volume. We use exact match keywords regularly.
Choosing the Right Match Type
With all these different match types to choose from, how do you choose the match types that are right for you?
The first thing you should do is avoid using generic broad match. As shown above, broad match results in highly irrelevant queries and wasted budget.
Next, you should consider your budget and the keyword volume that we found while conducting our keyword research. If the volume is low, and you’re concerned that you won’t get enough clicks on your ads, you will want to focus on broad match modified.
If, on the other hand, there is lots of volume and you are concerned about exhausting your budget quickly, you are better off focusing on phrase match and exact match instead.
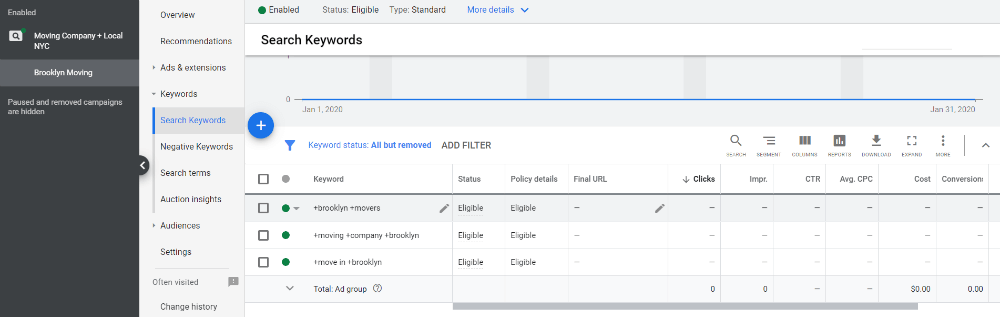
It is important to note that you are not limited to any one match type. You can have the same keyword in the same ad group with different match types. For example, an ad group that looks like this is perfectly fine!
+Brooklyn +movers
“Brooklyn movers”
[Brooklyn movers]
So feel free to mix and match the match types in your ad groups.
For Acme Movers, because these keywords have tons of volume and we have a relatively small budget, we’re going to focus on phrase match and exact match types. So one of our ad groups would look like this:
Negative Keywords
Next up on the process are negative keywords. Negative keywords are keywords you do not want to show up for. For example, if I have the phrase match keyword “Brooklyn mover” my ad will serve when someone searches “free Brooklyn mover.” We don’t offer free moving, so we don’t want our ad to show for this.
This is where negative keywords come in. Negative keywords tell Google that if any of those words or phrases are present in a query that otherwise matches your keywords, you do not want your ad to show.
This lets you narrow your targeting and avoid spending money on wasted clicks. And reducing waste is the key to high performing and profitable Google Ads campaigns.
Coming up with Negative Keywords
Now it’s time to come up with negative keywords. There are many strategies to come up with negative keywords. There are many lists online that contain common negative keywords, and you can take a look at them to get ideas. I don’t recommend using one, as they may not be relevant to your business.
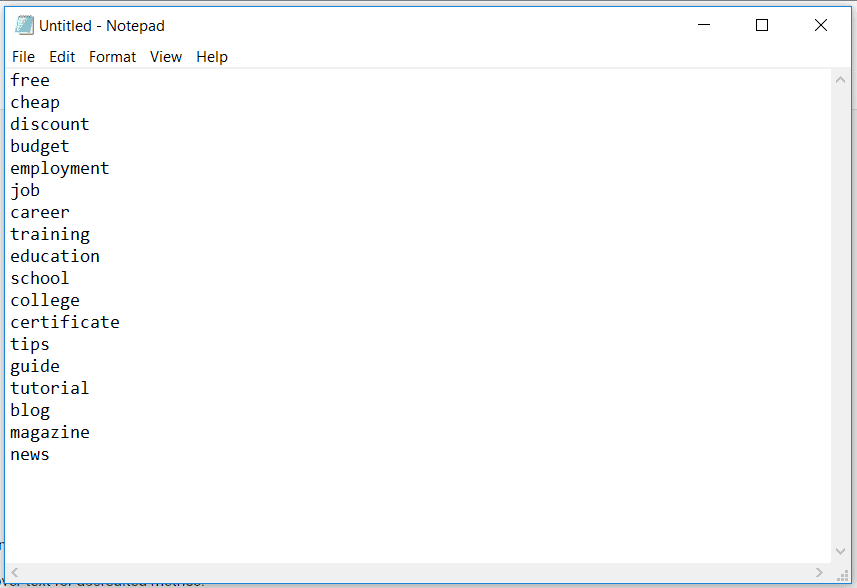
I like to initially brainstorm with a plain text editor and think of keywords that I NEVER want to show up for. Categories for these might include:
Price (free, cheap, discount, etc)
Employment & Education (employment, job, training, school, career, etc)
Instructional (tips, guide, how-to, tutorial, etc)
Informational (blog, magazine, news, etc)
You will never have an exhaustive negative keyword list and that’s fine. You will keep adding to it over time to continuously improve your campaign’s performance.
Adding Negative Keywords
Now that we’ve brainstormed our initial list of negative keywords and typed them up, we want to add them to our campaign. There are a couple of ways to add negative keywords: you can add them directly to the ad group or campaign, or you can add them to or create a list.
Negative Keyword Lists
Back in the day, we didn’t have negative keyword lists. This meant that you had pages and pages of negative keywords in the negative keywords section of your account. Today, you can put negative keywords into lists to help keep them organized. You can also apply these lists to multiple campaigns, and then you only need to update the list to update the negative keywords in all of the campaigns. Google actually has a great explainer on negative keyword lists.
So what we’re going to do with our general negative keywords that we don’t want to rank for is we’re going to add them to a negative keyword list, let’s call it “General Negative Keywords”
Single Keyword Additions
You can also add negative keywords the old fashioned way by adding them one at a time. This allows you to have more granular control over your negative keywords. For example, you only want to add a specific negative keyword to one ad group, you would do that without adding it to a list.
Negative keywords can be added at both the campaign level and the ad group level.
Negative Keyword Match Types
Negative keywords act just like regular keywords in that you can also use the different match types; however, they function in an inverse way. If you use an exact match negative keyword, your ad will only NOT show when that exact query takes place.
Over time you will continue to add more negative keywords to your campaigns and ad groups, which will continue to improve the performance of your campaign.
Chapter 5: Writing Effective Ads
Time to Complete: 1 hour
In this chapter we will cover the components for text ads, how to write effective ad copy, and general ad strategy.
Now that we’ve made it through setting up ad groups and negative keywords, we’re on to the next part: writing ads!
Writing effective ads is the part of our setup that is going to take the most time. It’s also the part that is most art and least science. Writing ads can be an intimidating process, but with a little prep and experience, you’ll be a copywriting expert in no time.
Ad Types
When you’re creating a search campaign, you have three different ad types you can choose from: text ads, responsive search ads, and call-only ads.
Call Only Ads
Call-only ads are, like the name implies, for phone calls only. If the only action you want people to be able to take is to call, call-only ads are a good option. In my opinion, the importance of call-only ads and call-only campaigns has declined in recent years with call extensions on standard text ads and the rise of local service ads, so I’m not going to focus on them here. If you’d like to learn more about call only ads, Wordstream has a great blog post about them.
Responsive Search Ads
Responsive search ads are a new ad type that Google has introduced in the last couple of years. Responsive Search Ads are basically machine learning text ads.
With responsive search ads, you can write up to 15 headlines and 4 different descriptions, and Google decides which headlines and descriptions to show in which order.
From all of our own internal testing, and from data I have seen from other Ad agencies, the results for responsive search ads to date are not great. In most instances responsive ads underperform expanded text ads. Google does not seem to have this figured out yet. They seem to perform especially poorly when there is limited search volume.
Text Ads
Text ads are the bread and butter of Google Ads. While they have changed over the years in terms of character length and the number of headlines and descriptions, they are still the headline + description format they’ve been from the start. These are the ads that we will be working with in building out our campaign.
The current text ad structure is commonly known as the “expanded text ad” as in the past few years it has replaced a smaller text ad format. Expanded text ads are now the default structure, so they’re not “expanded” anymore, but the name has stuck.
Ad Copy Brainstorming
Doing some brainstorming before writing is going to help you write effective ads more quickly. The entire point of advertising is to convince potential customers why they should choose your business instead of a competitor.
I recommend sitting down with a pen and paper and writing down descriptive words for why a customer should choose your business. Here are a few examples:
Reliable
Trusted
Affordable
Award-winning
Experienced
Licensed
Eco-friendly
After you come up with a list of 5-10 (or more) descriptive words, you should also come up with some additional benefits. What are the benefits of your business? What makes you special? These can be expanded versions of the descriptive words above, but there will be others.
Once you’ve made these lists, it is going to be much easier for you to write good ads. Spending time coming up with these terms will be helpful in your other marketing and advertising efforts too, so you should save these somewhere handy.
Now, let’s talk about the basics of the ads we are going to be working with.
Text Ad Basics
Since text ads are what we’re going to be working with, it is important to break down the elements of a text ad.
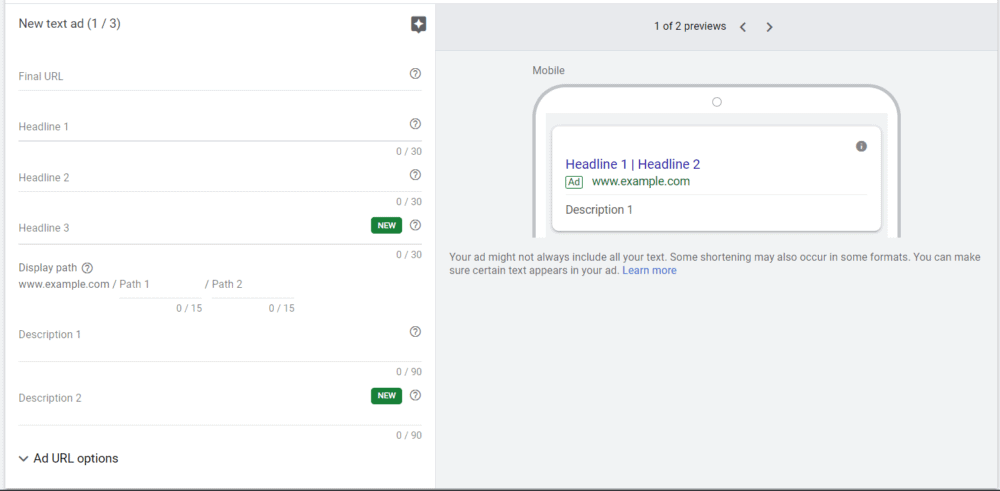
Final URL
The first item you will see is the final URL. This is the page on your website you want your visitor to land on. This is the full url including HTTPS. If you’re not running your site on HTTPS, you need to fix that right away.
Headlines 1-3
Google gives you 3 headlines of 30 characters each, including spaces. Headline 3 is optional, but Google encourages you to use it.
Display Path
Display path gives you the ability to control what the URL under your ad looks like without changing the actual page that people visit. This allows you to put keywords or other information in the URL path which can help improve clickthrough rates.
Descriptions 1-2
Google also gives you 2 description fields of up to 90 characters, including spaces. The second description is optional. Google can choose to show the first description, the second description, or some combination of both.
Ad URL Options
The ad URL options here are useful in more advanced situations and are not necessary to explore when building your first campaign.
Now that we’ve gone over the basic structure of text ads, we’re going to review some best practices for writing ads.
Ad Writing Best Practices
Good ads are an art as much as they are a science. And while best practices are good guidelines for writing high-performing ads, there are exceptions to every rule. Good ad copy takes practice, testing, and luck.
Because you have a tight character limit, you might think that writing ads is a fast and easy process. It is not. It takes a lot of time and work. The limitations make it more challenging.
Headline Writing
The headline is the most prominent component of your ad, and you get up to three 30 character headlines, including spaces. 90 total characters to get your potential customers to read your ad description and click through to your website.
The first rule about writing headlines is to use title case. Title case is where you capitalize the first letter of almost all the words with some exceptions. You can learn the nuances of title case here or use their title case converter. You can also just capitalize every word if you don’t want to worry about the small nuances.
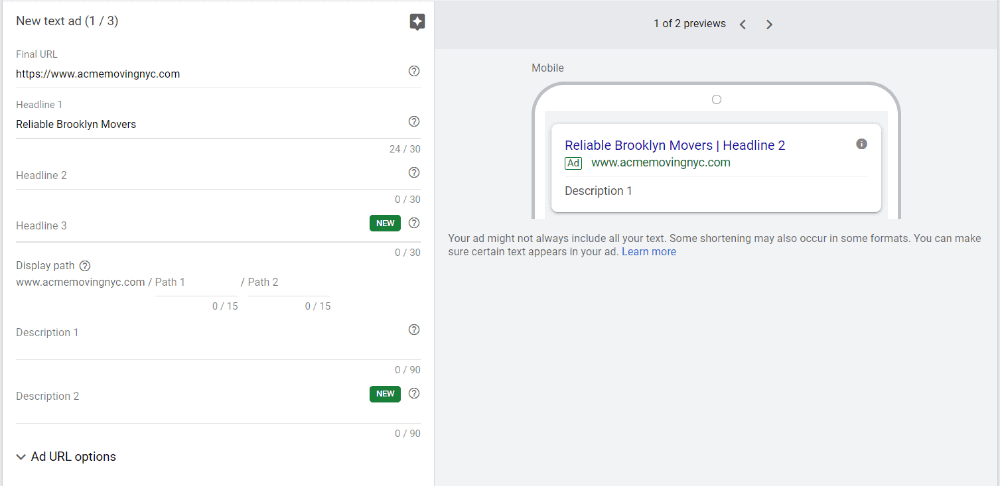
Your first headline is the most important. There is no guarantee how/if your other headlines will show. They can be truncated, split across lines, or not show at all. For your first headline, you generally want it to be closely related to the query. If you can get your keyword phrase in the headline, even better. You want to let the person searching know that you are the right choice for their query.
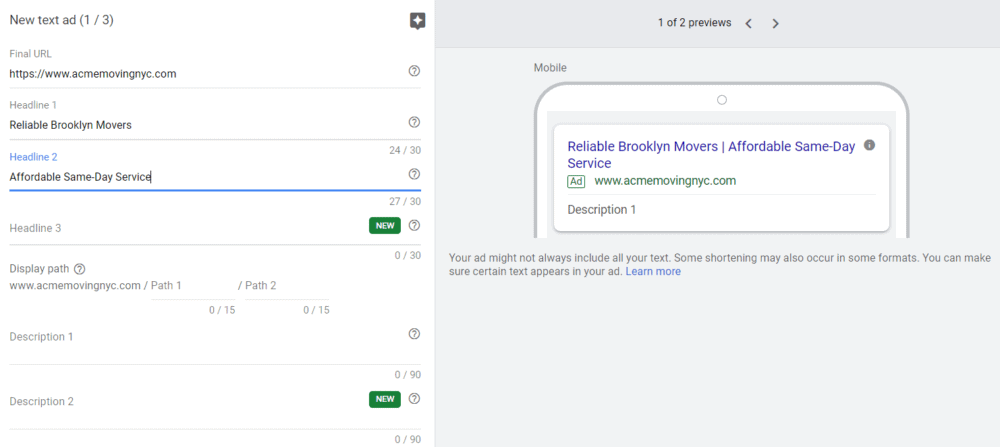
So for someone searching for “Brooklyn Movers” you want to try to match that in your first headline. Luckily for us, “Brooklyn Movers” fits easily, so we can get that into our first headline.
Depending on the length of the phrases you’re targeting, you’ll probably have some extra room. This is where you get to add some of the descriptive words that you brainstormed earlier.
We pride ourselves on being reliable at Acme Moving, so let’s go with that. “Reliable Brooklyn Movers” is perfect!
Next is the second headline. We’ve gotten the primary keyword phrase out of the way, so I like to look at features and benefits for the second headline.
One strategy is to string together a few of those descriptive words we came up with before. So you could say “Affordable & Eco-Friendly” for example.
You can also use one of those longer benefits I mentioned. So Acme provides same-day service, which is a good benefit. “Same-Day Service” is only 16 characters, so we still have room for more! I think “Affordable Same-Day Service” sounds great and it fits.
Google has also added the option to have a third headline. The third headline is currently optional. It doesn’t always show, so what should we do with it? There are a few things we can do.
- We can choose not to use it. The data is still out on whether the third headline provides any benefit, and we don’t know how frequently it is shown
- We can add another benefit.
- We can add a call to action like “Get A Free Quote”
I don’t think there’s a wrong answer to what to do with the third headline. Google encourages you to add it, but you don’t have to if you don’t want to.
Now that you’ve written your headlines, it’s time to write your descriptions.
Writing Ad Descriptions
Ad descriptions reinforce your message from the headlines and expand on why they should choose your business.
There is conflicting evidence for whether you should use title case or sentence case for your descriptions. Historically, using title case has been the best practice; however, there is new data showing sentence case might be better.
I think you can use either one, so use the one you’re most comfortable with.
Writing descriptions is less rules-based than writing headlines, but there is one element you must include: a call to action. Somewhere in your description, you need a call to action. Examples include:
- Buy Now
- Shop Now
- Get A Free Quote
- Book Today
An important thing to note when adding CTAs is that they need to be “strong.” This means they need to be specific
Never use “click here” as a CTA.
Beyond adding a CTA, the rules for writing a good description are basically limited. You can get creative. You can evoke emotion. You can focus purely on additional benefits. You can focus on solving a problem. You can focus on features. Here’s an amazing post on in-depth ad copy strategy from Unbounce.
When writing your description, you should revisit your brainstorming lists. You can use these in your ad descriptions.
Writing your description takes some experimentation. 90 characters is very limited, especially when you include a CTA. So take your time and play around with it.
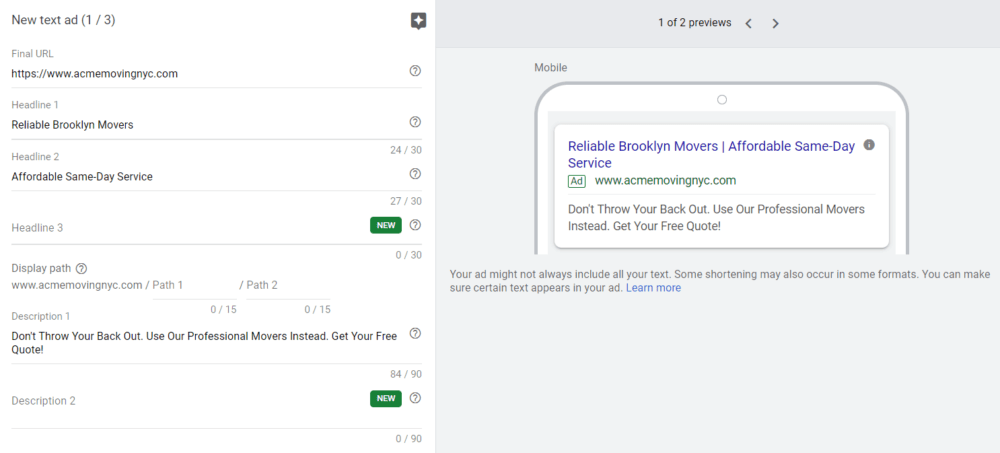
I decided to go playful on this ad for Acme, and here’s the description: “Don’t Throw Your Back Out. Use Our Professional Movers Instead. Get Your Free Quote!”
That’s 84 characters.
And just like the 3rd headline, the second description is also optional. There is a surprising lack of good data regarding the importance and value of the second description. While I would recommend writing a second description, if you had a lot of difficulty writing your first description, you can skip it.
Finishing Your Ad
So you’ve written your headlines and your description(s) but there’s a little bit more you have to do before you can launch your ads. You need to add your final URL and, if you want, you need to add URL path information.
Final URL
The final URL is the landing page you want to use for your ad. Just add the full URL (including HTTPS) that you want to have your visitors land on.
Display Path
The display path gives you the ability to add keywords to how the URL displays while not changing the page the visitor reaches. For Acme, we already have movers in our domain, so for this ad, I’ll go with /Brooklyn/FreeQuote
With all of that done, it’s time to save your ad. If you chose to skip either headline 3 or description 2, you will get a warning about it, but you can save anyway.
Now it’s time to repeat the process two more times. Google recommends having 3 ads in each ad group. You should have 2 at the very least, and each ad should be very different in terms of the ad copy.
Chapter 6: Utilizing Ad Extensions
Time to Complete: 1 hour
This chapter is all about ad extensions. The types of ad extensions Google offers, how they work, and how to set up the ones you need to setup.
Google also gives you the ability to increase the amount of information your ads show with Ad Extensions. Ad Extensions can prove to be extremely beneficial, and are something that we–and Google–recommend you use.
Introduction to Ad Extensions
Ad extensions let you expand the amount of information your ad shows in a structured way. It does not cost any money to include ad extensions, and ad extensions will often improve the performance of your ad by improving click through rates and conversion rates.
Google currently provides 10 different types of ad extensions to choose from. They are
- Sitelink extensions
- Callout extensions
- Structured snippet extensions
- Call extensions
- Lead form extensions
- Location extensions
- Affiliate location extensions
- Price extensions
- App extensions
- Promotion extensions
Not all of these extension types will be relevant to your business, and some are more important than others. In general, it is a best practice to use as many extensions as it makes sense for your business to use, and I’ll be discussing the most common ones in detail below.
Choosing Ad Extensions
The first step when we are looking to create ad extensions is to choose the ones that are most relevant. Not every extension is going to be relevant to every business, some are more common than others. Below I’m going to break down the extensions into three categories: Must use, common, and niche.
Must Use Extensions
These extensions are the most common, and should be used in almost every situation. There are very few situations where you don’t want to use these extensions. You want to setup and use these extensions. These extensions are:
- Sitelink Extensions
- Callout Extensions
- Structured Snippet Extensions
Common Extensions
While these extensions are not applicable to every business, they are applicable to many businesses, and are common enough that we will want to discuss them. These extensions are:
- Location Extensions
- Call Extensions
- Lead Form Extensions
Niche Extensions
The rest of the extensions are less common or have very niche applications. They’re very useful for businesses that can utilize them; however, they are uncommon, so we’re not going to address them in this beginner’s guide. These extensions are:
- Affiliate Location Extensions
- App Extensions
- Price Extensions
- Promotion Extensions
For the sake of this guide, we’ll be going through the process of creating the 5 must use and common extensions. If your business would benefit from utilizing the niche extensions and you need some help, send us a quick email.
Sitelink Extensions
Sitelink extensions let you add extra links to different pages on your website underneath your ad. For sitelinks to show you must have a minimum of 2 sitelinks regardless of device.
The number of sitelinks that show and how they show will vary depending on device and what Google wants to do. Up to 6 sitelinks can show on desktops and up to 8 sitelinks on either mobile devices or tablets.
Sitelink extensions are one of the most common ad extensions, and one that I recommend almost all advertisers use.
Creating Sitelink Extensions
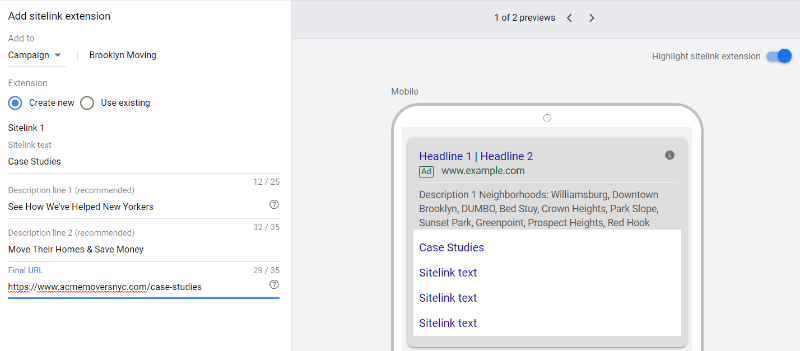
Let’s go ahead and start creating some sitelink extensions. From the ads & extensions section, click on extensions, click on the plus sign, and select sitelink extension. That process should look like this:

As you can see, we have a number of different elements in order to create our site extensions. The first option we have is where the sitelinks show up and we have three choices: account, campaign, and ad group.
- Account: the sitelink extension will show on all the campaigns you create. This can be used for general sitelinks like free quote pages. I don’t generally recommend account-wide sitelinks, as they are not often relevant to the query.
- Campaign: These sitelinks will only show for ads within this individual campaign. This is typically where I will put a lot of sitelink extensions, especially with campaign structures that target an individual service. Use this for sitelinks that go into further details about the product or service you’re offering, subcategories of products or services, etc.
- Ad Group: These show only within the ad group. This is the tightest level of targeting you can get and unless you have highly differentiated ad groups, it is probably unnecessary to get this granular.
Sitelink Text
This is the primary text of the sitelink. You’re given up to 25 characters, including spaces, for your sitelink text. It is what the user will click on when they want to visit the sitelink. For the sitelink text, you generally want to make it both descriptive and short, as it can get truncated.
Sitelink Descriptions 1 &2
If sitelinks are starting to feel like ads themselves, you’re not wrong. You are given up to 35 characters for each description. These descriptions for the sitelink will show occasionally, and while they are not required; they are recommended. I would strongly recommend that you use them as well. One reason that I recommend you take the opportunity to write your own descriptions is that if you choose not to, Google can create its own descriptions for you algorithmically. And those descriptions can be awful. By writing your own, you will avoid the possibility of Google generating gibberish descriptions for you.
You will want to write descriptions in title case as you are doing with other ad elements. In general, I don’t think you need to light the world on fire with your descriptions. Describe what the page is and encourage the person to click.
Final URL
This should be the complete link (including the HTTPS) for the page that you are linking to. Really nothing special here.
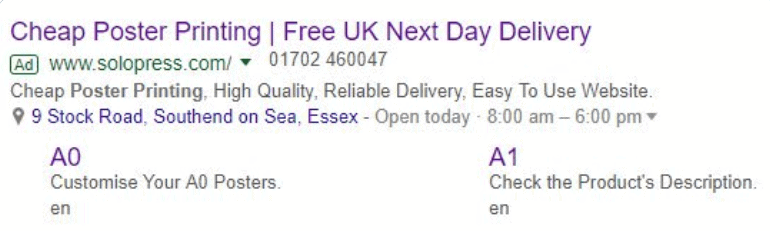
Below is an example of a completed sitelink.
Call Extensions
Call extensions expand your ad by including a phone number, so people can call your business directly from your ad. This is particularly powerful for mobile searches, as searchers can click on the phone number and call your business directly from the search results.
Creating Call Extensions
So let’s create a call extension. We’re going to go to the extensions section just as we did when creating site link extensions, but now we’re going to choose the call extension option, which takes us to a page like this.
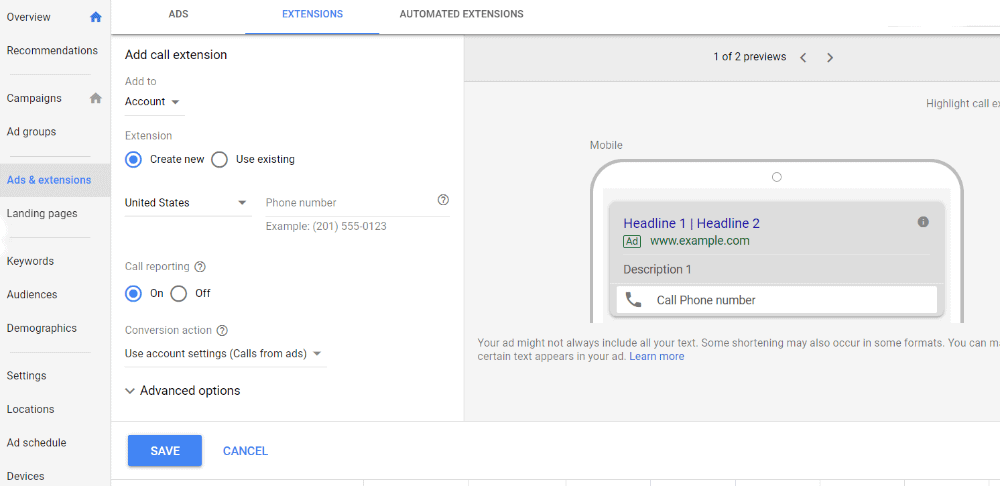
Our initial call extensions setup page
As with the Sitelink extensions, we can choose what level we want to add the call extension to. In the majority of cases, I recommend we add the call extension at the account level.
We are creating a new extension, so we are going to want to keep “Create New” checked as our option.
Next, we want to add the phone number we want to ring when someone calls from the ad. This should be your primary business phone number or the phone number to your sales department.
Call Reporting
We want to ensure we are tracking the calls, so we want call reporting to be turned on. That’s the default, so we’re just going to leave this as it is.
Conversion Action
We also want to be tracking these as conversions. I go into some details later about setting up our own call from ads conversion, but you can also choose to have Google create the conversion action for you. I prefer to set it up myself, but it’s totally fine if you want to use the default option and have Google create it for you. If you want to let Google do it, just leave the default option selected, which is “Use account settings (calls from Ads).”
Advanced Settings
We’ve been working a lot with default settings, but here is where we want to make some changes.
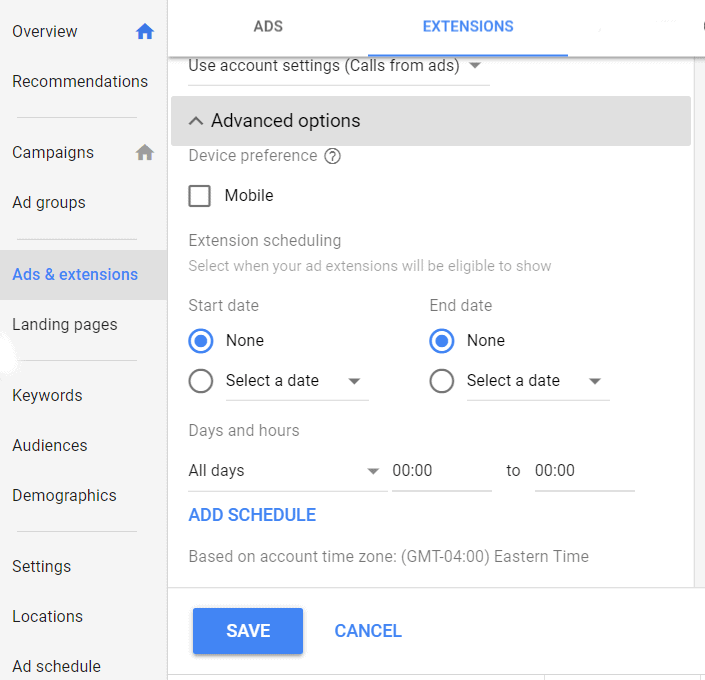
We don’t need to worry about selecting Mobile for device preference. This is going to show on Mobile and Desktop anyway, so this is unnecessary.
We need to setup extension scheduling.
Extension scheduling controls what times of day they show or whether you want to have a start date and an end date. Start dates and end dates are helpful for short-term extensions like holiday promotions, but they’re not relevant to our call extensions.
We want days and hours. This controls when during the week your call extensions show. The default is set to all day every day.
You want to set this schedule to when your business is open. You don’t want people to call when you’re closed, unless you have a 24/7 call answering service.
If you’re open Monday-Friday 9 to 5, you should set your schedule to that. That’s pictured in the Screenshot below.

You can set the schedule to whatever you like, have it set differently for different days, etc. When you’re finished, go ahead and click save. You’ll now have your call extension setup.
Callout extensions
Callout extensions are another extension type that is a must use. These extensions are used to call attention to important concepts or offers that you provide as a business. Callout extensions are bullet points that make your business and offering different or unique.
With callout extensions, you are limited to a maximum of 25 characters, including spaces, so keep things tight.
Callout Extension Basics & Best Practices
The most important key to remember with callout extensions is that they should be short and highlight unique or important advantages for your business. Ideally, callout extensions will be in the range of 12-15 characters. One or two words is ideal. Some examples of callout extensions include:
- 24/7 service
- Free shipping
- Money back guarantee
- Price matching
- Same day service
When thinking about your callout extensions, you want to ask yourself “what key selling points would I put on a business card or one sheet advertisement?” If you have other marketing collateral with bullet points already on them, you can use them for inspiration.
Google allows you to add up to 20 callout extensions, and you can show up to 10 callout extensions beneath your ad. Callout extensions appear as bullets beneath your ad.

Structured Snippet Extensions
Structured snippets provide another way for you to make your ad larger and provide additional relevant information to the searcher. This extension shows below your ad with a header and then a list of different values that you’ve added.

Structured snippets offer less flexibility than other extensions, but if you can use them, you should. In order to determine if structured snippet extensions make sense, we need to look at the header options. You must choose one of the header options and cannot create your own. Google currently offers 13 different header options:
- Amenities
- Brands
- Courses
- Degree programs
- Destinations
- Featured hotels
- Insurance coverage
- Models
- Neighborhoods
- Service catalog
- Shows
- Styles
- Types
Here is Google’s guidance on using the various header options:
“It’s important to make sure your header and values match, as a mismatch is the most likely reason your snippets will be disapproved. You might think of values as examples of their corresponding headers. For example, “Costa Rica” is a destination, “WiFi” is an amenity, and “Downtown” is a neighborhood. Values for the Style header should be variations of a fairly specific category, like sandals or high heels, while values for the Type header can be variations of broader categories, like light fixtures or shoes.”
Types is rather generic, so most advertisers should be able to take advantage of one or more of the structured snippet extensions that are offered.
Creating Structured Snippets
The first thing you’ll notice when creating structured snippets is the same selection on whether to apply the extension to the account, campaign, or ad group. The level at which you will want to add these varies, but in most instances you will want to work at either the campaign or ad group level.
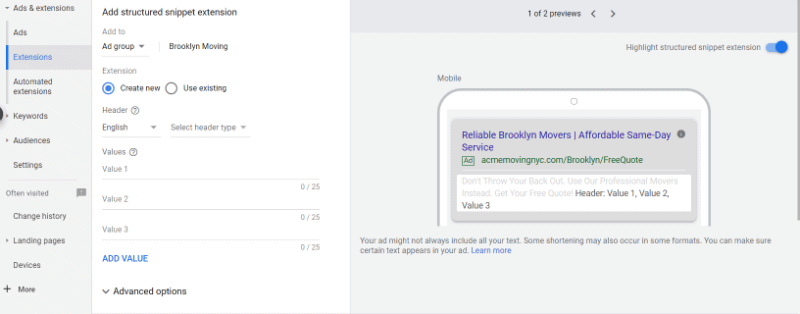
For our example moving company, we’re going to build at the ad group level. You may want to do it at the campaign level.
Choosing Your Header
After choosing ad group as the level we’re adding it to, we need to choose a header. This is going to vary depending on your business and your campaign or ad group. If you’re a boutique retailer looking to get people into your store, you might want to choose brands. If you’re a local service business, maybe you want to choose neighborhoods and list the neighborhoods you serve.
For our moving business, we’re working on our Brooklyn ad group, so I’m going to choose neighborhoods. There’s lots of neighborhoods in Brooklyn, and we want people to know we work where they are.
Adding Structured Snippet Values
Now, it is time to add the values to our structured snippet extension. You can include up to 10 different values, and you must include at least 3. And while Google gives you up to 25 characters, it is better to keep these values shorter when possible. This will make it work better on mobile devices.
Because we’re limited to 10 entries, you might have more options you want to include than you have room for. In these instances, I will include the most important 10. If it’s brands, I’d include the ones that you sell the most product of or are most in demand. For neighborhoods, choose the neighborhoods with the largest populations or where you do the most work.
For my example, I’ve gone ahead and added the 10 neighborhoods I want to feature.

Structured Snippet Advanced Options
There are also a number of advanced options for structured snippets. These options are not relevant in the vast majority of cases, and since we’re keeping this guide simple, we can skip these.
So let’s confirm our structured snippet extension and we’re good to go.
Lead Form Extensions
This is a brand new ad extension that allows you to collect basic lead information directly from your ad. Because this extension is still in beta, settings are still changing, and there is limited data on how effective it is.
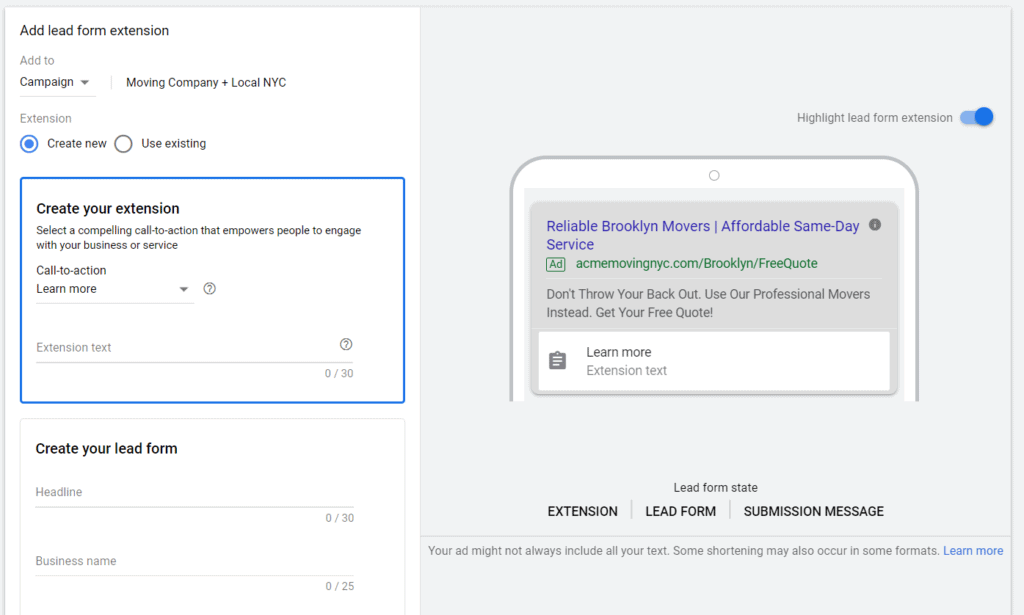
Lead form extensions are only available for mobile, and Google created them because lead conversions on mobile devices are typically lower than they are on desktops.
They simplify the lead collection process because everything takes place on Google; however, they do have a number of limitations. These limitations include:
- Limited field options
- Minimal design control
- Limited CTA options
- No personalization
- Low text limits
We have done some testing with lead form extensions and we find that their limitations make them not worth running currently. We have found lead quality in particular to be quite poor.
If lead extensions are available for your account, and you’re interested in exploring using them, this is a good guide on them.
Finishing up Ad Extensions
Now that you’ve created the ad extensions you need for your campaign and/or ad groups, we’re really close to launching our campaign. There’s only one more thing we need to setup before we can get our campaign up and running!
Chapter 7: Conversion Setup
Time to complete: 1 hour
Conversions, conversions, conversions. This chapter is all about conversions, how to import them from Analytics, what types of conversions you should track, and important conversion settings.
One of the biggest advantages of online advertising is the fact that you can know how it performs. If you put an ad in a newspaper, you don’t know how many people see it and act because of it. Even if it has a coupon code, you are still likely to have gaps in your data. With online advertising, you can significantly narrow those gaps.
If you’re not going to setup conversion tracking you shouldn’t waste money on online advertising.
While the guide up to this point has not required any technical skill, setting up conversions usually does. I will detail some of the steps involved and link to some great resources for setting up conversions; however, I strongly recommend hiring a professional to install your tracking pixels.
The process for installation varies based on what platform your website is built on. For a professional, installing tracking pixels is going to be quite easy. The cost to setup your conversion tracking should be between $200 and $700, and it is worth every penny.
If you already have Google Analytics setup on your website, you can setup some conversions on your own.
Let’s explore our conversion options.
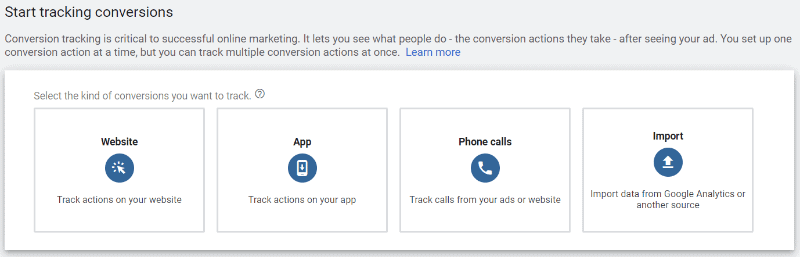
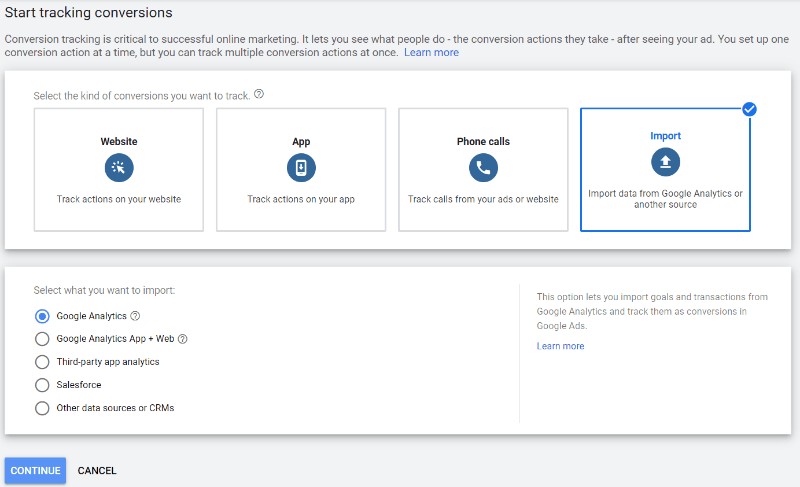
Conversion Options
Google gives us 4 different conversion options: website, app, phone calls, and import. For the sake of this guide, we’re going to ignore the app option. There’s a high likelihood if you’re reading this you’re not an app-based business.
Import Conversions
It may be fourth on their list, but it’s first in our hearts. Importing conversions is going to be the easiest option, and it’s likely the only one that doesn’t require any pixel installation. If you have Google Analytics setup, this is the choice for you.
We’re going to choose Analytics, and click continue. On this next page you’ll notice that there’s nothing to import, and that’s because we haven’t yet linked our Analytics account to our Ads account. Let’s go ahead and do that.
After clicking on “linked accounts” you’ll see all of the analytics properties within your analytics account. Choose the Analytics Property that is associated with your website.
Note: If you get a notice at the top that says auto-tagging is not enabled, you need to enable it. Click on that button and you’ll be good to go.

After you click “link” under actions you’ll get a pop-up like the one below. Go ahead and check turn on “link” and “import metrics” and save.
Our account is now linked, and you should have information on each of the columns, which looks like this.
In the goals column, if that number is zero, we’re going to need to setup a conversion in Google Analytics. If that number is anything other than zero, you can skip this next section by clicking here.
Setting up an Analytics Goal
I could write an entire 10,000 word column about setting up Analytics goals. And if you’re looking to track anything other than a form submission like an ecommerce sale, I strongly recommend you hire someone to setup your conversions. I am going to go through setting up a basic lead submission conversion. For more in-depth information on setting up Analytics conversions, here’s a great guide.
Setting up a basic form submission in Analytics
Here we’re going to quickly setup a conversion on Analytics for a website lead.
Note: if your website form does not lead to a thank you page, this will not work. You’ll need some technical help to setup the conversion.
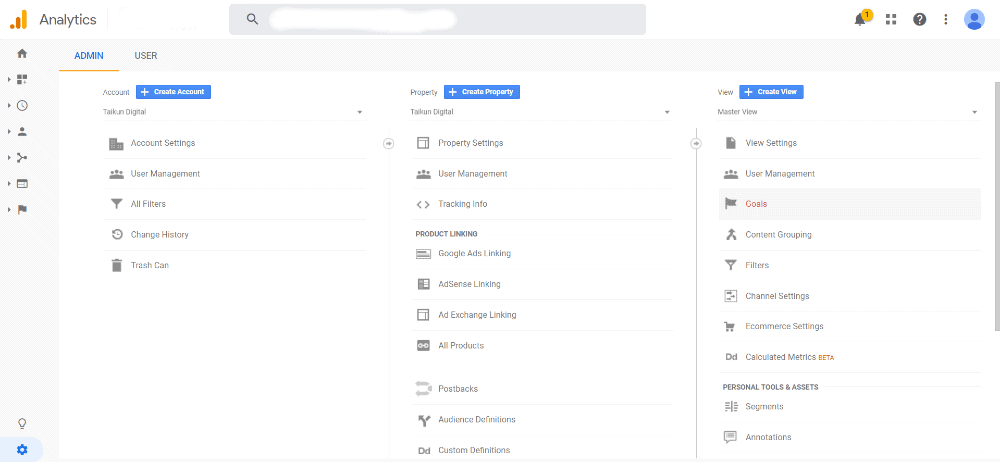
The first thing we need to do to setup a conversion is to go to Google Analytics and go to the admin section. You can get there by clicking the gear in the lower left hand section of Analytics.
Next, we will go to the “Goals” section, which is what conversions are called in Analytics. You can see that on the top right.
Go ahead and click on the New Goal button, and you’ll be presented with 3 top level options. Template, Smart Goal, and Custom. Smart Goal will likely be greyed out.
We want Custom. So go ahead and choose custom and click next.
Goal Name
This can be anything you want it to be, though I usually keep it simple. Something along the lines of “Website Form Submission.”
Goal Slot ID
This setting is not likely to be important to you, so you can leave it as whatever it defaults to here.
Goal Type
This IS important. You’re presented with a bunch of different goal types.
- Destination
- Duration
- Pages/screens per session
- Events

Because we’re just here to setup the form submission conversion, I’m only going to go over the Destination option, which is the one we will be choosing. So go ahead and select destination and press continue.
Goal Details
After selecting Destination, we’re presented with some additional settings that we need to fill out. The first and most important is setting the destination that counts as the conversion.
This is going to be the page that people are directed to after they fill out your form.
Note: If you don’t know what your thank you page URL is, you can fill out your website form yourself and get your thank you page that way.
With your thank you page URL handy, you need to add that in the destination section. You ONLY want to include the part of the URL that comes after your .com. So that will look like /thank-you/ or something along those lines. And you want the leading / as well.
You also want to change the destination to “Begins With” from the drop down choices. This will make sure that you’re including all the conversions that reach the thank you page. Equal To can miss conversions for many reasons.
You will want to turn on Value and set the value to what you have determined a lead to be worth earlier in this process.
You can leave Funnel off.
Finally, you will want to verify this goal. If you’ve received a form submission in the last 7 days, this verification will show information that is greater than 0%. Everything will look like the screenshot below.
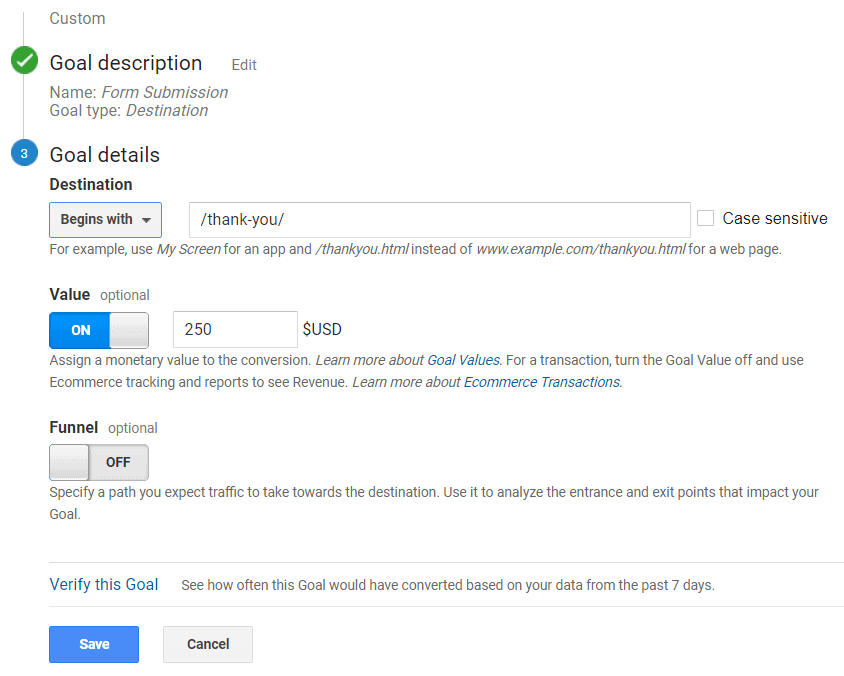
Go ahead and click save.
Finishing the Analytics Import
Now that we’ve linked
Now that we’ve linked our Analytics and Ads account together, we need to go back and actually import our conversions from Analytics.
To do this we need to go back to the conversions screen, add a new conversion, and go through the conversion import process again.
You’ve now got your form submissions being tracked in Google Analytics!
Website Conversions
This option uses the Google Ads tag to track conversions instead of Analytics. For many companies, I do not recommend using the Ads tracking pixel instead of Analytics. You can track almost every conversion in Analytics that you can in Ads, and you get tons of additional data with Analytics as well. So import those goals from Analytics!
Phone Call Conversion Setup
Depending on your business, you probably also want to track phone calls in addition to actions on your website. If a phone call is a lead, you want to make sure you’re tracking them as well. This will give you a fuller picture of your conversions.
When you select Phone Calls, you’re presented with three options:
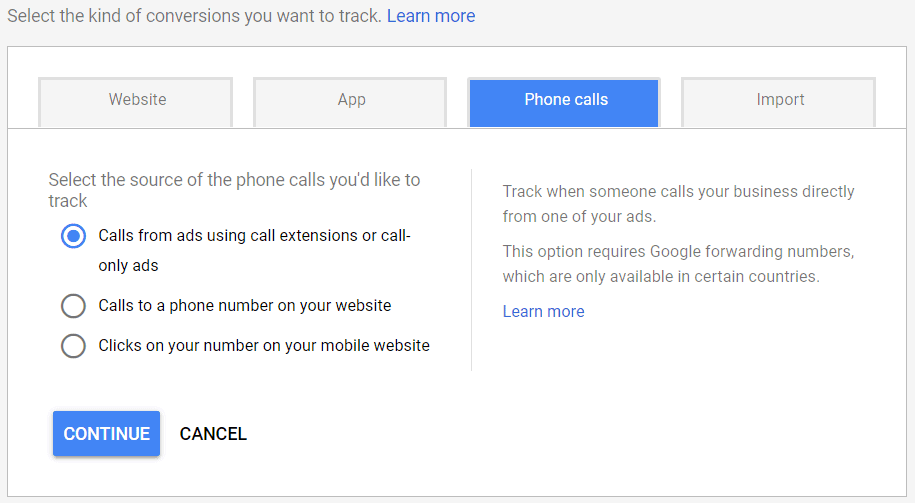
Calls from ads using call extensions or call-only ads
If phone calls are a conversion for you, you will want to make sure that you have this conversion setup. This will let you track conversions that come from your call extensions on your ads and, if you want to run a call-only campaign, it will allow you to track those as well. This is very easy to setup, all you need to do is give it a name and go through the settings. This does not require any pixel installation at all. I discuss the conversion settings in detail below.
One setting specific to call conversions is Call Length. This is the minimum length the phone call needs to be before it counts as a conversion. The default is 60 seconds. You need to determine what length makes sense for your business. You want to make sure you’re not including things like wrong numbers, but you also don’t want to make it so long that you’re not including lots of real calls from potential customers.
Leaving it at the default 60 seconds is fine if you’re not sure where you should put it.
I typically name this conversion something along the lines of “Google Calls.” Once you’re done with naming it and the settings, simply confirm the creation and you’re good to go!
Calls to a phone number on your website
You are also going to want to track calls from your website. Many people will click on your ad and get to your website and then decide they want to call. If you do not have website call tracking setup, you won’t know where those calls came from. That’s where this conversion comes in.
I always give this conversion a name like “Calls from Website” and I use the same settings that I used for the call extension conversion.
Once you fill out the settings, click create and continue. This next page presents you with a few options on installing the call tracking on your website.
Note: Installing call tracking on your website is challenging and technical and you should pay someone to do it unless you have website development experience.
There are two basic ways to install the call tracking: directly adding the code or using Google Tag Manager. Tag Manager is preferable because you should be using Tag Manager already and it makes it easier to setup, but you can also install it directly.
Select Google Tag Manager as the option. I would then copy and paste all the text on this page into a text file and save that file, so you can send that to the person you are paying to install the tag.
Click next and then click done.
You’ll now see a couple of your conversions on the conversions page, with some additional details about the conversions. The website call conversions will say “unverified” under tracking status. After you setup your call tracking on your website, that unverified notification will switch to “no recent conversions.” If your pixel still says unverified a day after you setup the tracking on your website, that means it was not done properly.

If you want to try and install your website tracking yourself which I do not recommend here is Google’s official guide on setting it up.
Conversion Settings
The conversion settings area is where we get to control important details about how our conversions are categorized, what they’re worth, how they’re counted, and how credit is assigned to various clicks in the conversion process. Making sure your conversion settings are setup correctly is vital to ensure that you are correctly measuring the value of your conversions.
In this section we’re going to go over setting up your conversion settings to ensure you get the most accurate data possible.
Category
Google gives you the option of 5 different categories to choose from when creating your conversions. Most of the options are self explanatory, and these categories are primarily used for data segmentation. With that said, you want to make sure that your conversions are categorized properly.
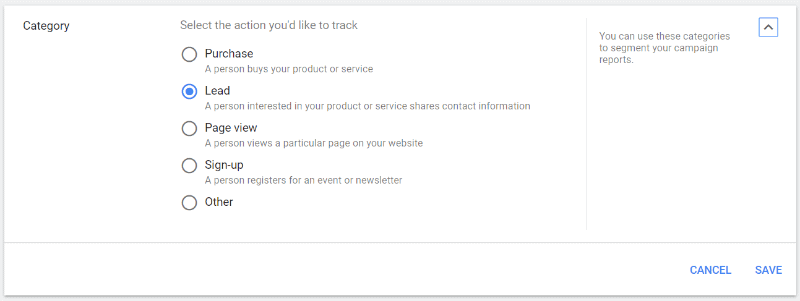
Purchase
This is self explanatory. If someone is buying something through your website, you will want to count that conversion as a purchase.
Lead
Leads are also self explanatory. If anyone is looking for a free quote or an estimate or a proposal or is submitting their information to get contacted back, that’s a lead. Phone call conversions should also be treated as leads.
Page View
This conversion is triggered when a person visits a specific page on your website. This is a less common conversion action and is used for intermediary conversions.
Sign-up
This is a commonly used conversion action for intermediary conversions. Very common for situations like when someone signs up for your email newsletter.
Other
A final catch-all for conversions that don’t fall into any of the other categories. Things like app downloads, requesting directions to your store, and anything else that doesn’t fit into the other sections.
In most instances, you will either be selecting purchase or lead. For our moving company example, we’ll be using the lead option.
Value
Value is how much your conversion is worth. You’re presented with three different options
Use the same value for each conversion
Remember when I told you to write down the number for lead value earlier in this guide? We want to enter that here. You want to set your conversion value to the lead value we identified. Don’t remember? Click here to go back to that section of the guide. This is the option that you should choose if you’re getting leads.
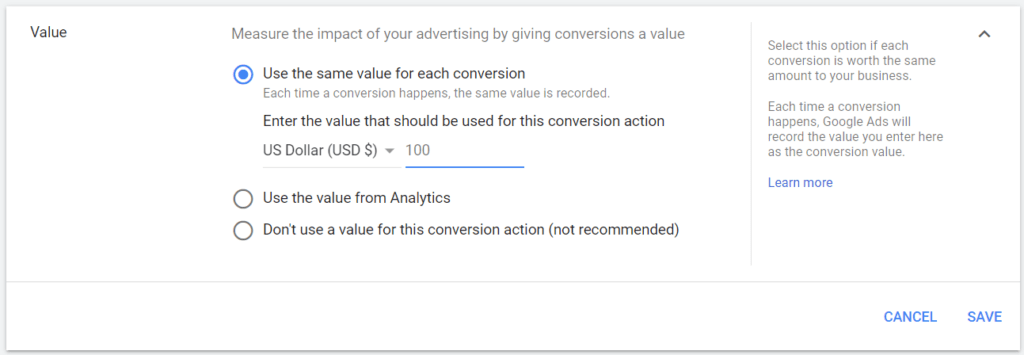
Use a different value for each conversion
This is typically used for ecommerce businesses. If you’re selling different products, you will want the conversion value to reflect the actual sales price. This requires more advanced pixel setup. You’ll want to hire someone to do this setup.
Don’t use a conversion value for this action
This is not recommended. Every conversion has some value (even if it is small) and if a conversion has literally no value, you probably don’t want to be tracking it.
Count
This section controls how you are counting your conversions. The two options are “Every” and “One”
Google’s comments on which one you should use are good.
Every is “recommended for purchases because every purchase is valuable.”
One is “recommended for leads, sign-ups, and other conversions because only the first interaction is valuable.”
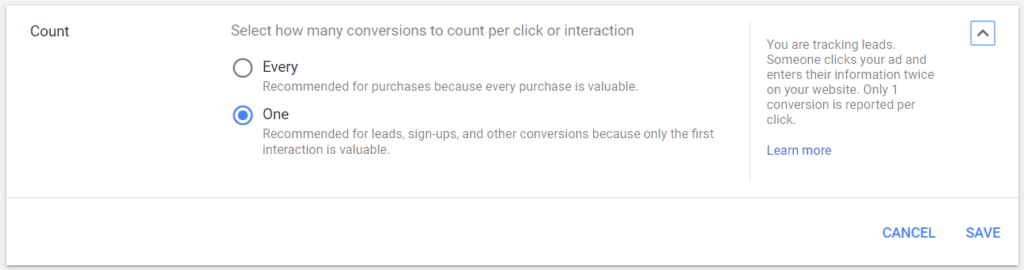
Here’s how one works, and why it makes sense. If a person clicks on your ad and then fills out your form twice, you only want to count one of those. After all, they’re likely only interested in using your service that one time. People fill out forms multiple times for many reasons like forgetting some information, not being sure the form submission went through, or even forgetting they submitted one and coming back at another time to submit it again. You don’t want those to count as extra money, because they aren’t worth anything.
Conversion Window
The conversion window represents how long your ad will get credit for a conversion after it gets clicked. For example, if your window is set to 14 days and a visitor clicks on your ad, comes back to your site 10 days later and converts, the ad will get credit for that conversion.
The default conversion window is 30 days, and I recommend leaving this as is. Making changes to this is not a setting you need to tweak early on.
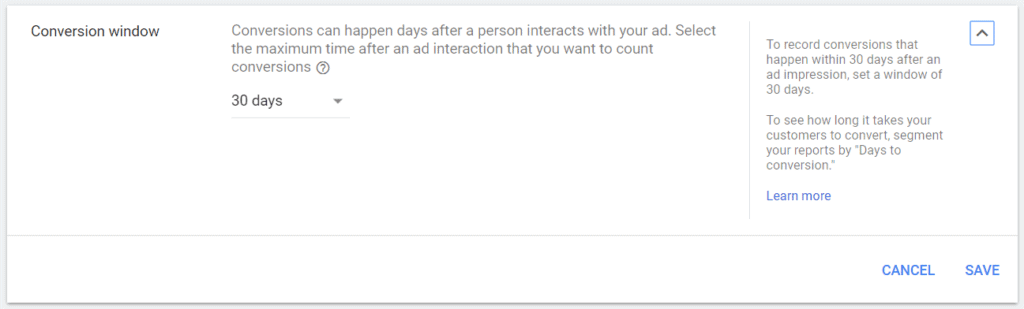
View-through Conversion Window
This applies to non-search ads. A view through conversion is when someone sees your ad but doesn’t interact with it and then converts on your website anyway. It gives credit to ad impressions. The default is one day, and I recommend leaving this as the default. This will not be relevant for search campaigns.
Count in Conversions
You want to make sure this box is checked. By including this conversion in your conversions, it counts towards your conversion data in the rest of Ads, so you can optimize based on this conversion. It counts towards conversion value, cost per conversion, conversion rate, etc.
There are some situations where you do not want to include a conversion in the conversions column, but these are less common. Some instances where you might not want to include it are: if it is an intermediary conversion that doesn’t have value on its own or if it’s a duplicate conversion where you are testing the measurement accuracy (if you have an imported conversion from analytics and are making sure that the same Ads conversion has the same #).
Conversion Attribution Model
This is the most important setting on this page. Choosing the best conversion attribution model can have a big impact on how accurate your campaign performance data is.
Not every conversion happens after just 1 click. For many businesses, up to half of their conversions will take more than one click to convert.
For example, a visitor first reaches your website by clicking on a Google search ad. They don’t convert and leave your site. Later, they do a Google search for your business, click on your organic result, and convert. Which click should get credit for that conversion? Both should get some credit, and by choosing the right attribution model, you will be able to assign credit to each.
The conversion model you choose will determine which clicks get the credit on your visitor’s journey to conversion and how much credit they will get.
To give you an idea of the different click journeys to conversion that exist, here is a screenshot from one client account of just the 15 most common conversion journeys for the past month.

As you can see the two most common are single clicks, but there are many others that have multiple clicks! This client has 39 unique conversion journeys in the 30 day period shown above. In the prior six months it is 135 unique conversion paths.
Let’s take a look at the six different attribution models and compare them to find which one will work best for you.
Data Driven
You won’t be able to use the data-driven model. In order for this model to be available, you’ll need 15,000 clicks and 600 conversions in a 30 day window. That’s a huge amount of data. And you have to maintain that level of conversion data to keep using it.
Last Click
The last click model is the default model, and it gives 100% of the credit to the final click before the conversion. So with this model, someone who clicks on your ads 50 times, only that 50th click would get credit for the conversion. The first 49 clicks would get no credit.
I dislike last click attribution for many reasons and view it as quite flawed because it ignores those 49 previous clicks. It robs us of important data about the rest of the conversion journey. In our previous example of the paid search visitor coming back through your organic search result, only the organic search would get credit.
I do not recommend using this model.
Position Based
Of all the models we can use outside of Data Driven, this is the one I use most and recommend people use as their default attribution model.
The position based model gives 40% of the conversion credit to the first click, 40% of the conversion credit to the last click, and it evenly distributes the last 20% between all the other clicks.
This model gives all clicks some credit for the conversion, but it gives the majority to the first click and the last click. If you think about it, this makes sense.
The first click represents the first time the visitor reaches your website, and it is the ad/keyword that got this visitor interested enough in your business to visit your site. That’s important! Without that first click, they would have never visited you and there would be no conversion at all.
The last click represents the final step in the journey and what directly led to their conversion. That is also an important click in the process, as it is the ad/keyword that finally led them to convert.
All the rest of the clicks that happen in the middle share the rest of the value. These intermediate clicks are generally not as important as the first or the last.
You should use the position based attribution model.
Linear
The linear model is similar to the position based model in that all the clicks get some credit. It differs in that each click along the conversion journey gets the equal amount of credit. If the journey involved 3 clicks, each would get 33.33%, for 4 each would get 25%, etc.
Linear is a decent model, but I do not like it as much as position based.
I think linear underestimates the value of the first click, and I would recommend using position based instead.
First Click
The first click model gives all of the conversion credit to the very first click. It focuses purely on the click that initially got your visitor interested enough to visit your website. If a person were to click on your ads 50 times, only that first click would get credit and the final 49 would not.
I like this model better than last click, because it is focused on what is driving visitors to your site initially.
But the lack of credit to any of the additional clicks leaves out data that I think is important.
Time Decay
The final attribution model we can select is time decay. This model gives greater weight to later clicks. So if you had a 3 click conversion journey, the first click would be worth 20% the second would be worth 30% and the last click would be worth 50%.
This is another model that is weighted towards the end of the conversion journey, though not as aggressively as last click. It is a conservative model in that it gives very little credit to what is initially bringing people to your business in the first place.
In my experience, I find the early clicks in the conversion journey to be very important, so this is another model that I am not a big fan of.
So with all of the different attribution models reviewed, let’s go ahead and select the position based model.
Finishing Up with Conversions
With all of the settings chosen, you can save your conversion. You will likely want to have a few different conversions, depending on your business. In most instances, you will want to have phone call conversions for both your website and your ads, and you’ll have at least one other type of conversion as well, either a form submission or purchase.
Verifying Conversions
When you’re back to your list of conversions, you’ll see a column that shows the tracking status of your conversions. There are a number of statuses that you can see.
Unverified
This means that Google has not been able to verify that the tracking is setup. It does take Google a few hours to verify that the tag is implemented on the website. If you see this status for a day or longer, it likely means that you did not setup your tracking pixel correctly.
No Recent Conversions
This means that the tracking pixel has been confirmed to be on the site, but that the system has not recorded any conversions in the last 7 days. With a new setup, this is the status you are likely to see.
Recording Conversions
This is the status we want to be seeing when your campaigns are running. This means that the tracking is active and that Google is recording conversions. This is where you want to be.
Tag Inactive
This is a status that can show up after your conversion has been working, but when Google no longer sees the tag. This is usually a result of changes to your website where the pixel either got uninstalled or otherwise broken. This is not a status that you’ll see right when you start your campaign, but it is an indication that there’s an issue.
You should likely see no recent conversions. If that’s what you’re seeing it means you’re all setup and ready to go.
Chapter 8: Reviewing Your Campaign
Time to complete: 1 hour
This chapter is all about reviewing your campaign to make sure that nothing has slipped through the cracks and double checking everything prior to launch.
We’re almost ready to pull the trigger! Reviewing your campaign is the final step before we turn the campaign on and start watching those customers roll in. We want to give the campaign a quick review to make sure that everything is ready to go.
Reviewing Your Campaign Settings
The first thing to review is our overall campaign settings. Issues at the campaign settings level can result in the most expensive mistakes. Accidentally set your daily budget to $10,000 instead of $100? That can be catastrophic.
Networks
You want to make sure that this setting is for the search network and that search partners and the display network are both disabled.
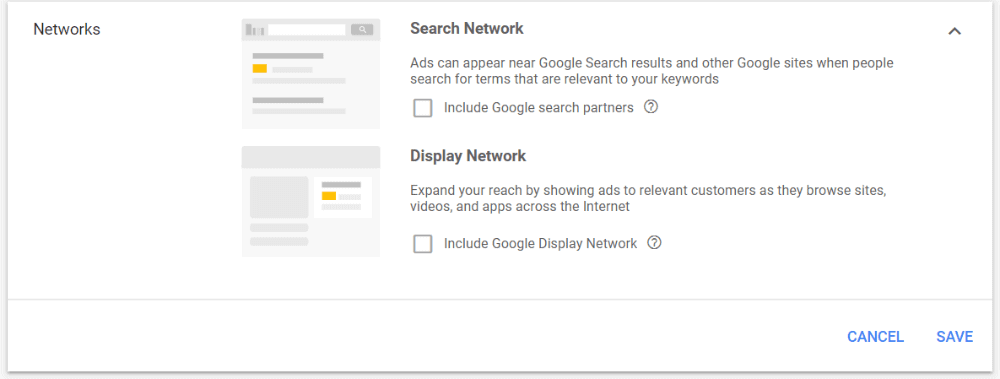
Locations
You want to ensure that the location the campaign is targeting is the area you want to be advertising. Make sure this is not nationally or globally unless you’re absolutely certain that is where you want to be advertising!
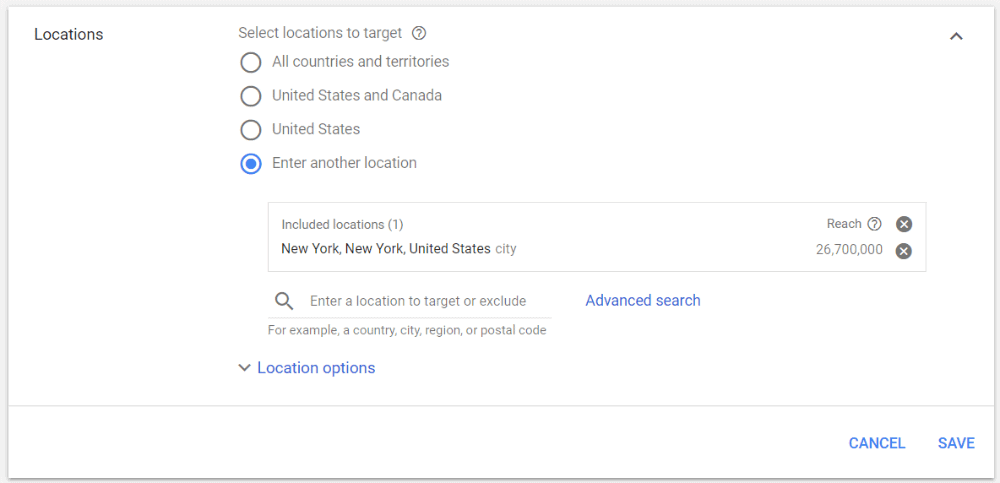
Budget
Confirm that your daily budget is where you want it to be. Making a careless mistake in the budget section is the worst case scenario, so you want to be absolutely certain this is correct.
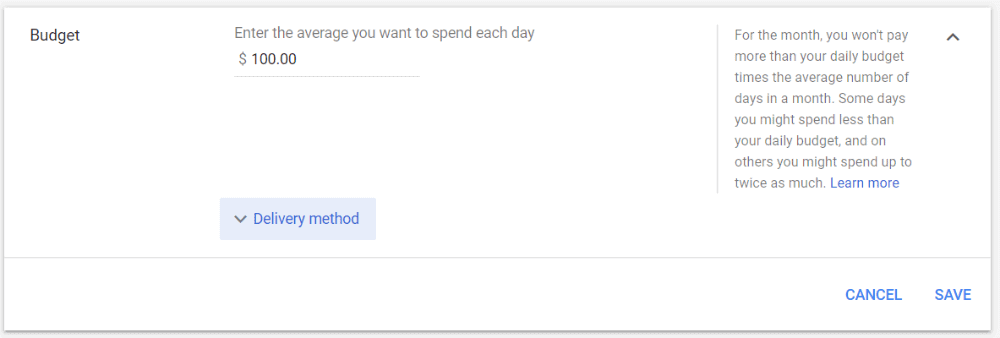
Bidding
The second most important element behind budget is your bidding. You want to make sure you’re doing maximize clicks, and you want to make sure that your max CPC is set. Paying $100 for a click because Google thinks it is worth that much because you didn’t set a max CPC is never a happy experience.
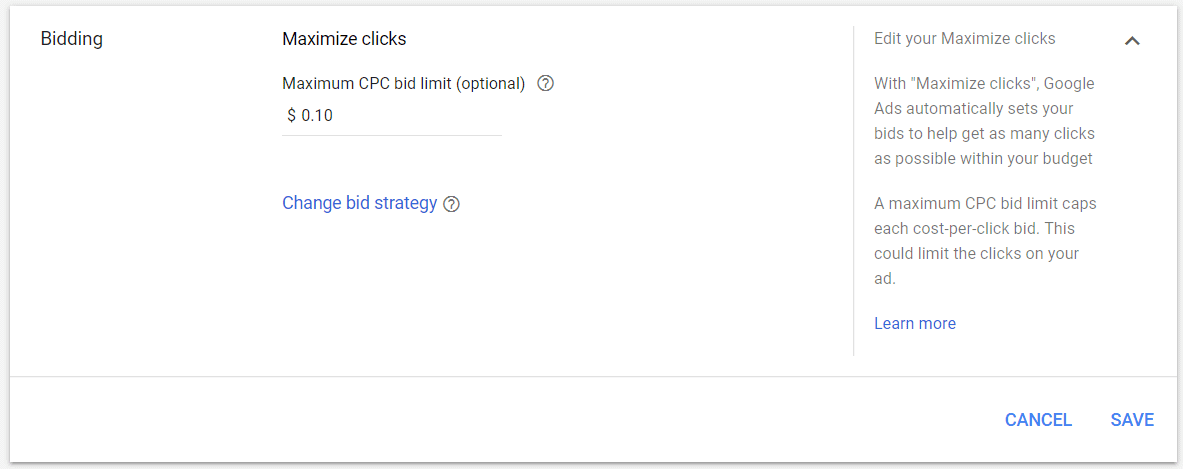
Reviewing Your Ad Groups
Next up to review are your ad groups. You’ll want to go through each ad group and review each of the elements I go through here for all of them.
Keywords
Are all of your keywords the ideal match type for your campaign? Are all the keywords very similar in intent and meaning? Do you only have a handful of keywords in the ad group? Great!
Negative Keywords
Make sure that your campaign wide negative keywords are showing, plus any additional negative keywords that you want to have for the individual ad groups.
Ads
Make sure you have at least two responsive search ads. Make sure they’re relevant to the keywords in the ad group. You also will want to confirm that the landing page your ads are linking to is the correct landing page.
Extensions
Do you see the different extensions you’ve setup for the campaign or ad group here in the extensions tab? You want to make sure the right extensions are showing. This includes all the extensions you want to have like:
- Call extension
- Sitelink extensions
- Structured snippet extensions
- Callout extensions
Are any extensions missing?
Reviewing Your Conversions
The final thing we need to review are the conversions you have setup. We cannot fully diagnose conversion problems until the campaign is up and running, but we can ensure that most of the possible setup mistakes have been avoided.
Chapter 9: Launching Your Campaign
The time to launch your first Google Ads search campaign is here. Congratulations! It’s a big step to take in growing your business, and the process is intimidating.
We’ve reviewed all of the settings that needed to be reviewed, and the final thing we need to do is to set the campaign to active. So change that setting from paused to enabled.
Success!

Your campaign is finally up and running.
Chapter 10: Finishing Up
After launching your campaign, you’ll want to check back regularly in your account to see how it is doing. This is particularly important early on, as you want to make sure that you didn’t miss anything in your account review process and to diagnose any problems quickly.
You want to make sure that the campaign is getting enough clicks and that it is also generating conversions.
Creating and launching a campaign is just the start. There is lots of optimization work that you should be doing after launch, but that is content for another guide.
I hope you’ve found this guide helpful in creating and launching your first Google Ads search campaign. If you’ve followed this guide and have questions about the process, please get in touch either via email or in the comments below!
If this all sounds too intimidating for you to setup or your campaign has not been performing like you want it to, we can help with that as well. Just request a free consultation.
Related Articles

- PPC
A Winning Google Ads Setup For DTC Brands
Most ecommerce brands view Google as an afterthought behind Meta. They think that Google is not a strong acquisition channel for…

- Social Ads
- PPC
How Meta & Google Complement Each Other
Learn how Google & Meta Ads work synergistically to complete the buyer's journey.

- PPC
Google is Robbing You… and You Can’t Stop Them
If you’re advertising on Google, they’re reaching their hand into your pocket and jamming money into theirs.
How can we help you grow?


