Adding text to a SharePoint site page using Power Automate (aka. Microsoft Flow) can be a great way to automate a manual process, like bulk importing data, or if you want a consistent site page design.
I had a scenario where a user who had 500+ rows of data in Excel and each row needed to be a site page with columns of data needing to be arranged in specific places on the SharePoint page for consistent user experience. Carrying out a task like this manually is not something I’d like to think about.
For this solution, you can use Microsoft Forms, SharePoint Lists, Excel, basically anything that can connect to and be read by Power Automate (Microsoft Flow). I am going to use a SharePoint List in my example.
The process is simple.
- Create a list.
- Create a page template.
- Create a flow to take items from the list and create a page based off the page template with the list column data inserted into the page.
Step 1: Create the List
Create a SharePoint list and add columns. We’ll get flow to read these columns later.

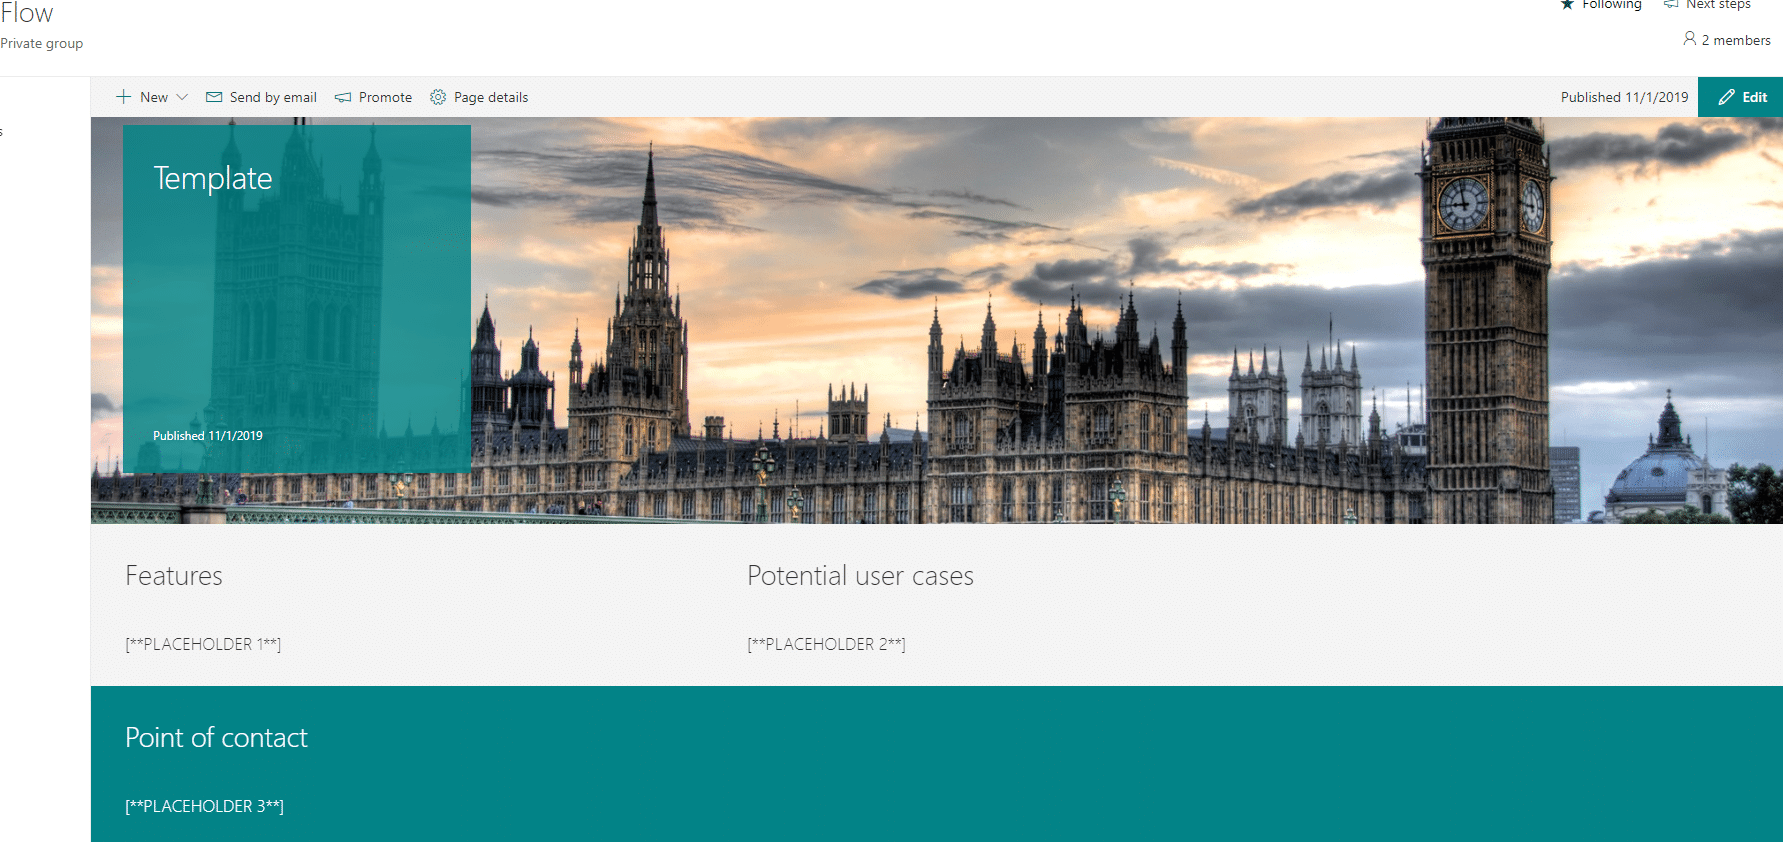
Step2: Create the Template
Now a page template needs creating. Create a new page in your SharePoint site and modify it how you want it to look.
In the example below, I have 3 text web parts that I am using for Headings, these will not change. I also have 3 text web parts where the list column data will be automatically inserted into. These are marked with [**PLACEHOLDER**] for easy identification later.
Step 3: Find the SavePage Url
When you edit a SharePoint page and click to publish it (or save it as draft) a request is sent in the background. This request is actually the body of the SharePoint page being transmitted to the server. We need to get this as we need to replace the [**PLACEHOLDER**] text with dynamic content in Flow before we publish our new pages.
- Go to the template page you created
- Press F12 to bring up developer tool
- Click on the network tab
- Click to edit the page and publish it straight after
- A save page action will appear
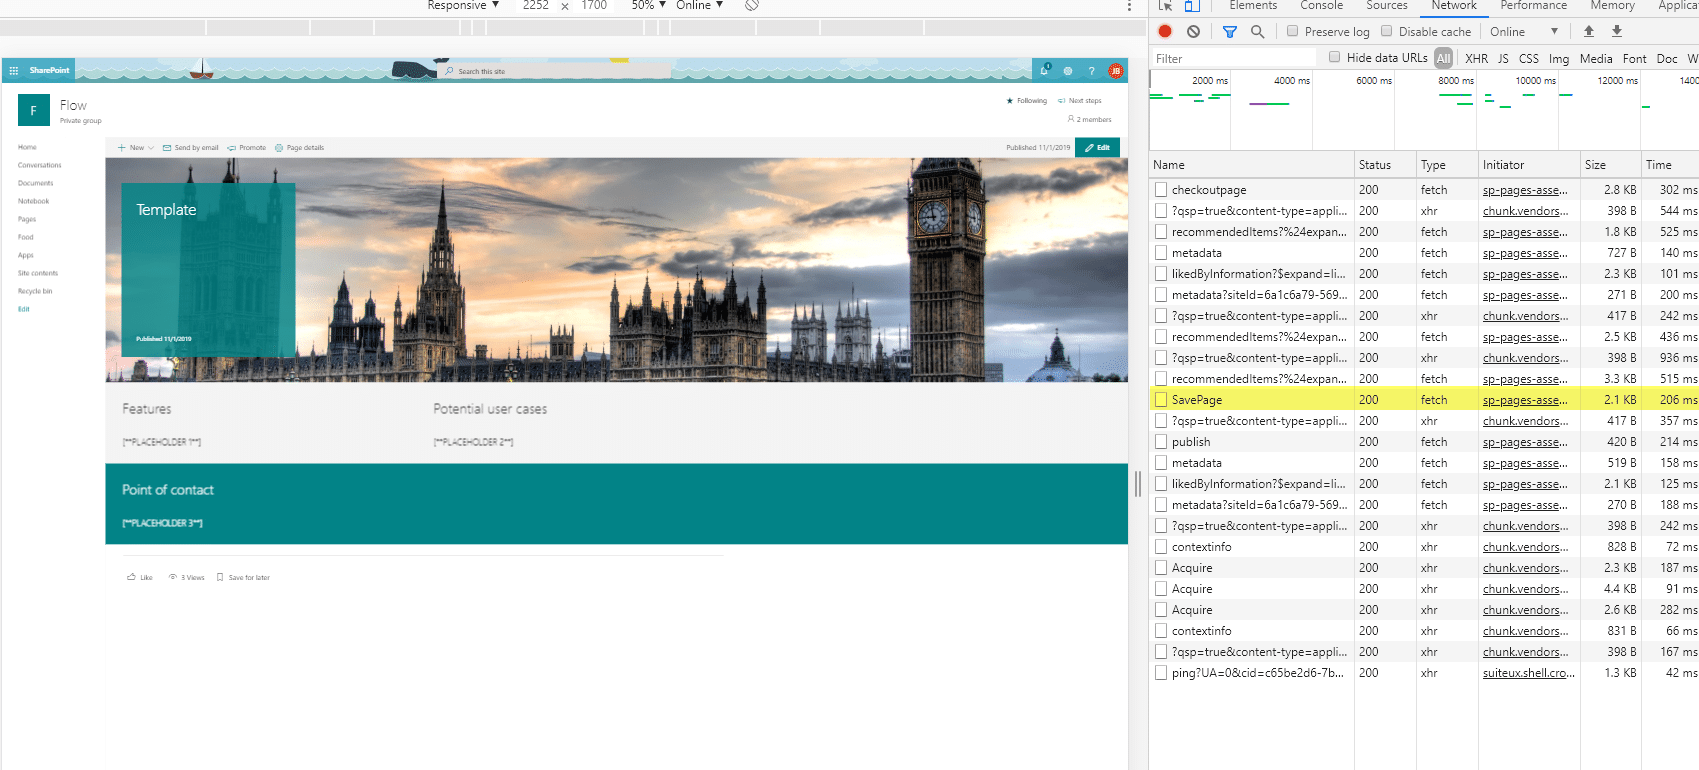
- Click on save page.
- Ensure Headers are selected
- Find ‘request payload’
- Click view source to copy this text

Tip: ensure you click show more at the bottom of the request payload text before copying to get the full text.

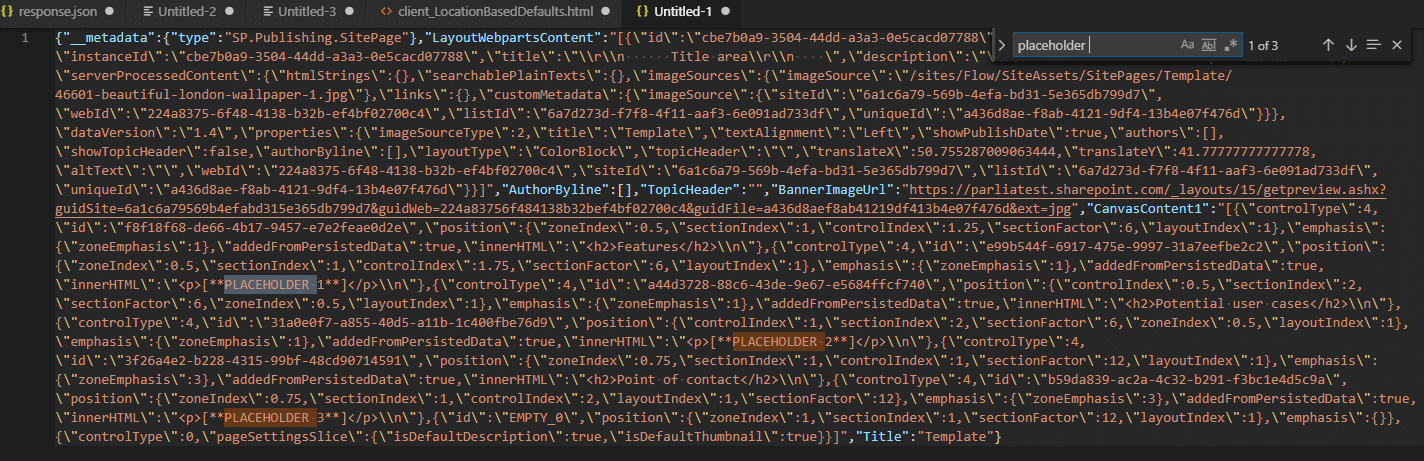
Viewing the text in Visual studio code it’s easy to find the placeholder text that we’ll replace later with dynamic content in Microsoft Flow.
Step 4: Create the Flow
Create an automated flow that is triggered when an item is created in a SharePoint list.

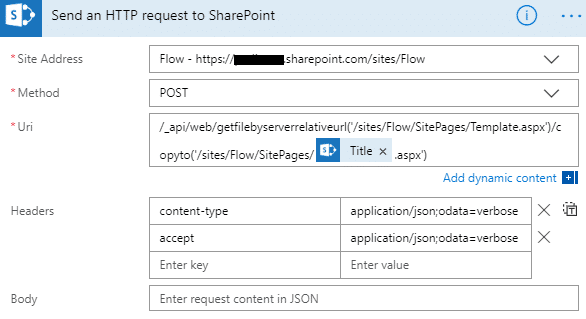
The first step is to copy the site page template, this can be done using ‘Send HTTP request to SharePoint’.
The CopyTo REST endpoint will copy the page.
I am using the title of the list item to be the title of my new page using dynamic content in the URI field.
/_api/web/getfilebyserverrelativeurl(‘/sites/Flow/SitePages/Template.aspx’)/copyto(‘/sites/Flow/SitePages/@{triggerBody()?[‘Title’]}.aspx’)
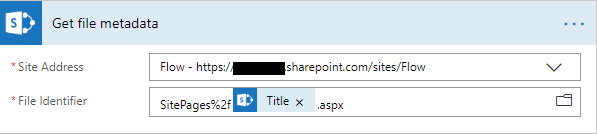
The ID of the new page that was just copied is needed so we can check the page out, update it with the content from the list, then check it back in.
To get the ID use ‘Get file metadata’ Flow action. The file identifier needs to be manually typed. The / needs to be encoded for Flow to recognise the URL a forward slash “/” = %2f
SitePages%2f/@{triggerBody()?[‘Title’]}.aspx
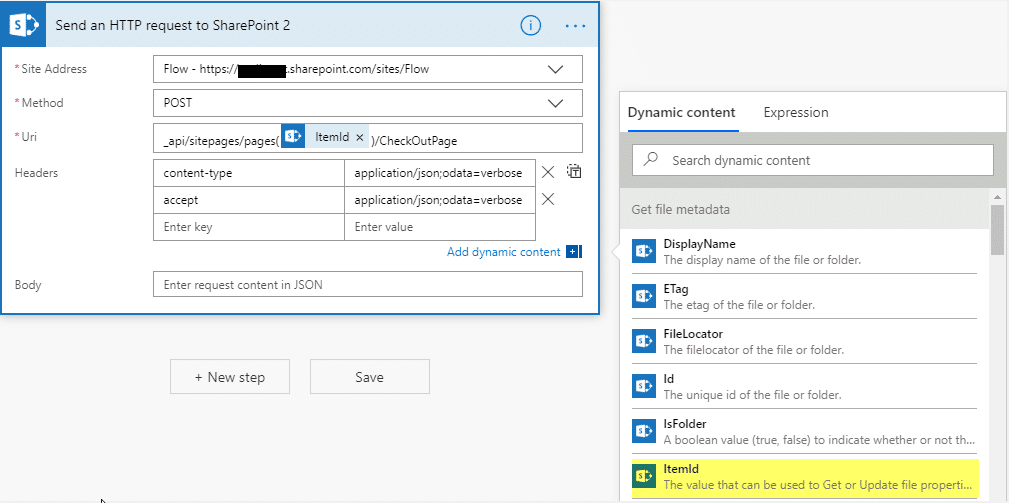
Now we have the ID we are going to get check the page out using another ‘Send HTTP request to SharePoint’ flow action.
Using the ‘Itemid’ from the Get file metadata action the URL
_api/sitepages/pages(@{body(‘Get_file_metadata’)?[‘ItemId’]})/CheckOutPage
Now the page is checked out, it is time to save the page with the SharePoint list data using the request header that was copied earlier.
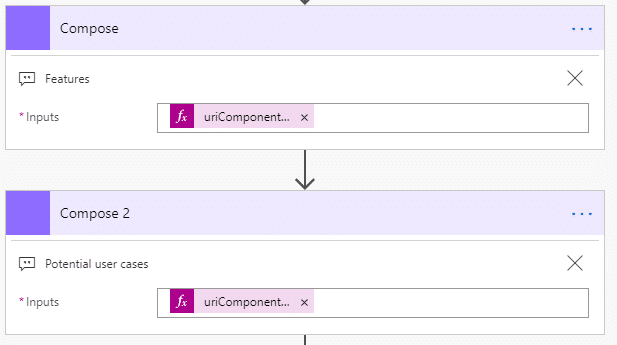
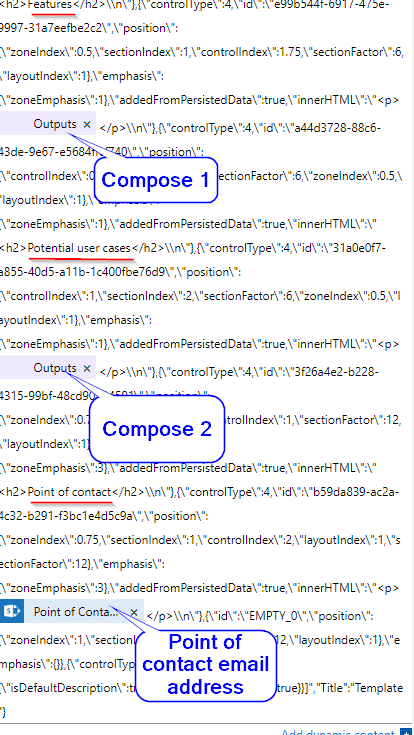
If a SharePoint column is a multiline text field, there may be line breaks in the text, JSON does not handle line breaks so we must use an expression to convert any line breaks in the text to </br>, (which is a line break in HTML format so JSON understands it). If you don’t do this, the flow will break if there are any line breaks in multiline text column.
For each SharePoint list column that is a multiline text column compose actions need creating with the following expression.
Compose 1:
uriComponentToString(replace(uriComponent(triggerBody()?[‘Features’]), ‘%0A’, ‘</br>’))
Compose 2:
uriComponentToString(replace(uriComponent(triggerBody()?[‘Potentialusercases’]), ‘%0A’, ‘</br>’))
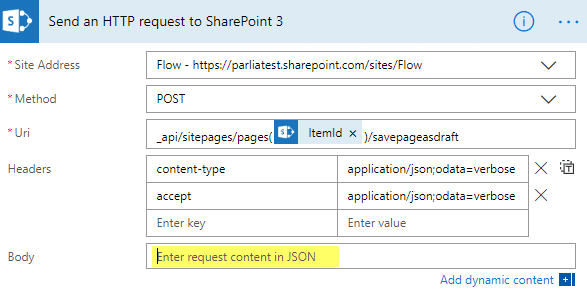
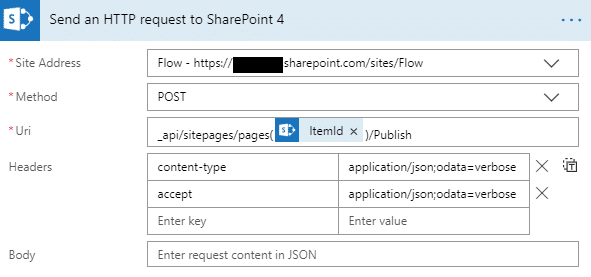
By creating a third HTTP request to SharePoint, we can save the page as a draft using the following endpoint.
_api/sitepages/pages(@{body(‘Get_file_metadata’)?[‘ItemId’]})/savepageasdraft
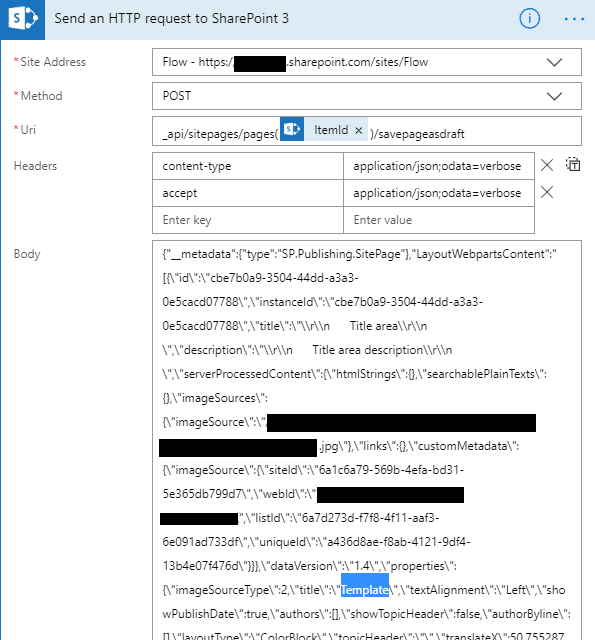
This is the part where we add the response body that we got earlier to the body of the HTTP request.
Paste the response into the body. Find and replace the static placeholder text to dynamic content of your list items.
Each placeholder will be inside a <p> HTML element. Looking at the JSON can come across as slightly daunting if it is the first time you have seen it however there is a pattern to it.
First change the title of the page, or it is always going to be “Template”
| Before | After |
 |
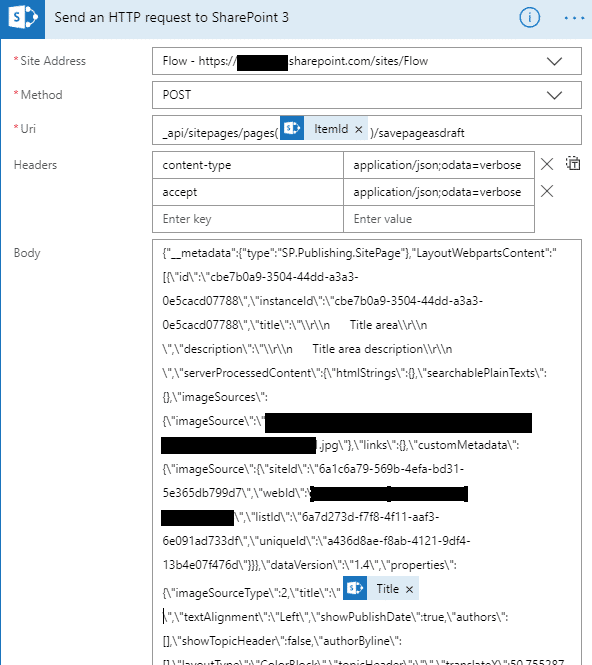 |
Now change the text fields to the dynamic content.
| Before | After |
 |
 |
Finally, the page needs to be published so users can view it. You don’t have to add this step if you want to review the page manually before publishing or even place an approval stage in before this step.
Let’s test. Save the flow and now add an entry to the SharePoint list:

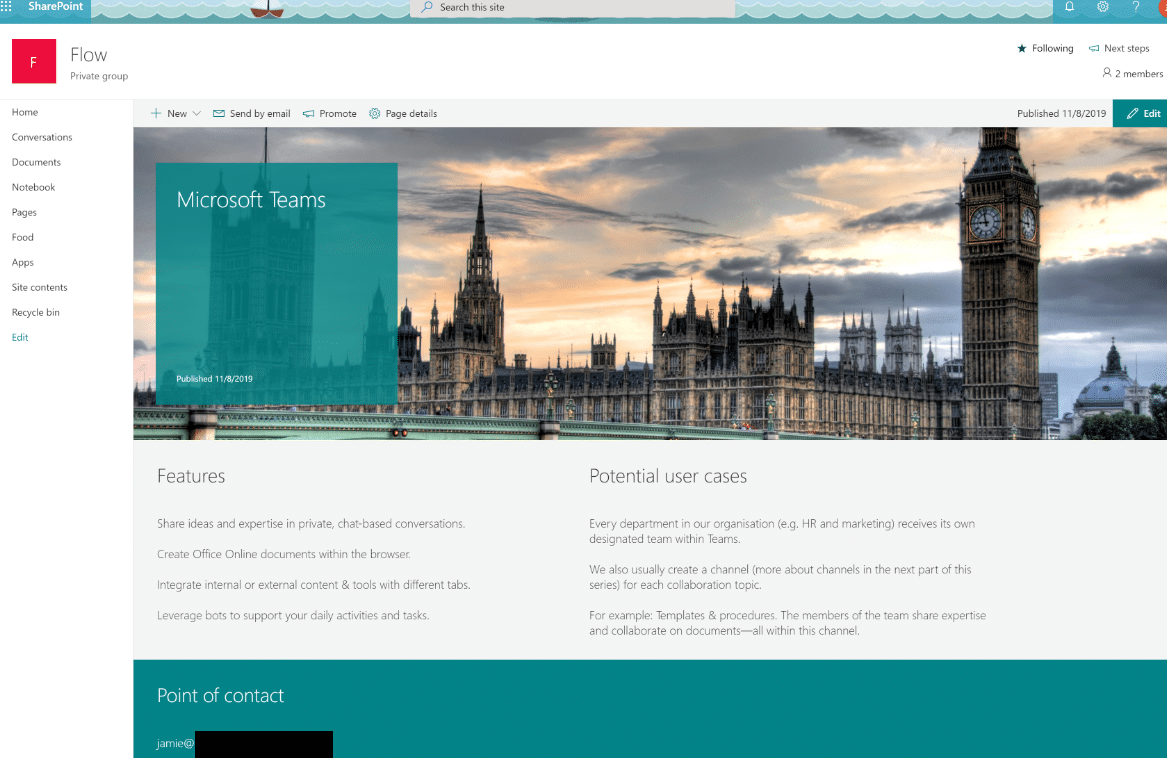
If it’s worked, a new page will be created in site pages:
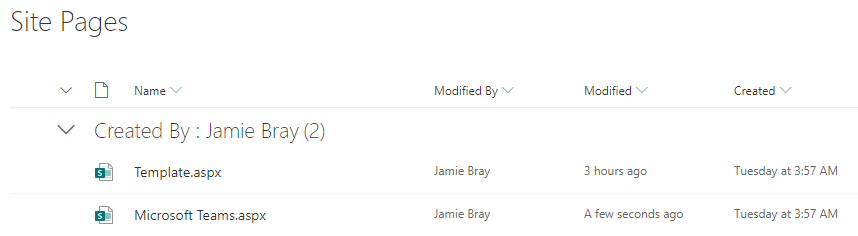
We now have a new page, created just by adding a SharePoint list entry.