


How to build a retro arcade with Lakka
The Raspberry Pi is a nifty single-board computer (SBC) capable of a smattering of projects from smart home automation applications to a do-it-yourself (DIY) home theatre PC. My first ever Raspberry Pi project, completed on a Raspberry Pi 2, was a retro game console with RetroPie. Since then, my collection of Raspberry Pi boards and Raspberry Pi alternatives for that matter has evolved. Likewise, my retro gaming set up has expanded. While I still use RetroPie, I tend to switch between RetroPie, Recalbox, Batocera, and Lakka. Each of these retro gaming operating system (OS) options offers its own benefits. Lakka is a fantastic retro gaming distribution that boasts features such as out-of-the-box gamepad support and tons of customization options for power users. Learn all about how to install Lakka on the Raspberry Pi 4!
What is Lakka?
Lakka is a Linux-based distro based on RetroArch. It's similar to RetroPie, Recalbox, and Batocera in that Lakka runs RetroArch. However, while Batocera, Recalbox, and RetroPie utilize the EmulationStation frontend, Lakka instead uses a user interface (UI) similar to the PlayStation 3's XrossMediaBar (XMB). In some ways, Lakka is far more user-friendly than alternative retro gaming OSes. For instance, most controllers should function completely fine out-of-the-box, no button mapping required. Games are super easy to add, and it's simple enough to install loads of emulators.
However, Lakka can be a bit intimidating for new users. That's mostly because of its vast library of options for custom shaders and settings to tweak. Still, Lakka is an awesome, lightweight Linux-based RetroArch gaming distro that transforms tons of devices into capable emulation consoles. Aside from the Raspberry Pi, Lakka runs on x64 and x86 PCs, the WeTek Play 2, ASUS Tinker Board, and RockPro64. Lakka boots into what looks like stock RetroArch, but includes cores already downloaded.
What is the Raspberry Pi?
The Raspberry Pi is far from the only single-board computer available. However, Raspberry Pi devices continue to dominate the SBC space. Because of spectacular hardware and software support, a thriving community, and loads of accessories, from cases to add-on boards, the Raspberry Pi remains arguably the most popular maker board available.
There are several flavors of the Raspberry Pi. Its latest iteration, the Raspberry Pi 4, boasts a Broadcom BCM2711 quad-core Cortex-A72 ARM v8 64-bit system-on-a-chip (SoC) clocked at 1.5GHz. The fourth-generation Raspberry Pi comes outfitted with 1GB, 2GB, or 4GB of LPDDR4-2400 SDRAM. There's 2.4GHz and 5GHz IEEE 802.11ac Wi-Fi and Bluetooth 5.0 BLE along with Gigabit Ethernet for a range of wired and wireless networking options.
Raspberry Pi 4 specs:
- Broadcom BCM2711, Quad-core Cortex-A72 (ARM v8) 64-bit SoC @ 1.5GHz
- 1GB, 2GB, 4GB, or 8GB LPDDR4-2400 SDRAM (depending on model)
- 2.4 GHz and 5.0 GHz IEEE 802.11ac wireless, Bluetooth 5.0, BLE
- Gigabit Ethernet
- 2 USB 3.0 ports; 2 USB 2.0 ports
- Raspberry Pi standard 40 pin GPIO header (fully backwards compatible with previous boards)
- 2 × micro-HDMI ports (up to 4kp60 supported)
- 2-lane MIPI DSI display port
- 2-lane MIPI CSI camera port
- 4-pole stereo audio and composite video port
- H.265 (4kp60 decode), H264 (1080p60 decode, 1080p30 encode) OpenGL ES 3.0 graphics
- Micro-SD card slot for loading operating system and data storage
- 5V DC via USB-C connector (minimum 3A*)
- 5V DC via GPIO header (minimum 3A*)
- Power over Ethernet (PoE) enabled (requires separate PoE HAT)
- Operating temperature: 0 – 50 degrees C ambient
How to Install Lakka on the Raspberry Pi
If you're wondering how to install Lakka on the Raspberry Pi 4, you're in luck. It's incredibly easy. You'll need a Raspberry Pi 4, compatible USB-C power supply, and Lakka Raspberry Pi 4 image. Plus, you'll need a case, peripherals such as a keyboard, mouse, and gamepad. Additionally, you'll need a microSD card for mounting your image, image mounting software like Etcher, and decompression software such as 7Zip. If you plan to run your ROMs on your microSD card, I'd highly suggest snagging a high-capacity microSD card such as a 32GB, 64GB or higher one. The best option is using a flash drive for ROM storage for a portable solution.
What you'll need to run Lakka on the Raspberry Pi 4:
- Raspberry Pi 4
- Compatible USB-C power supply
- microSD card
- Raspberry Pi 4 case
- Peripherals (keyboard, mouse, controller)
- Flash drive for ROM storage (optional, recommended)
- Image mounting software such as Etcher
- Decompression software (i.e. 7Zip)
- Raspberry Pi 4 Lakka image
Total cost: $35+ USD. A Raspberry Pi 4 with 1GB of RAM retails for $35. You can grab a kit, which I recommend, for about $50. Since RAM won't impact Raspberry Pi 4 emulation, you don't need to spring for the 2GB, 4GB, or 8GB Raspberry Pi unless you plan to use your Raspberry Pi for a Linux desktop as well. In that case, you'll greatly benefit from the extra RAM.
Installing Lakka on the Raspberry Pi 4
First up, go ahead and download the appropriate Lakka Raspberry Pi 4 image from the official Lakka website. Depending on which Raspberry Pi 4 image you downloaded, it'll be a .tar or .gz file. Either way, you may need to extract the Lakka image using a program such as 7Zip.
If you opt for the TAR file it's a NOOBs installation. As such, you'll need to decompress the TAR file and drag the contents of the resulting folder to the root of your microSD card. However, if you're using the GZ file, you'll need to mount that to a microSD card using Etcher. When image flashing finishes or you copied the necessary files to the root of your microSD card, go ahead and pop your microSD card into your Raspberry Pi 4.
Initial Lakka Raspberry Pi 4 Set Up - The First Boot
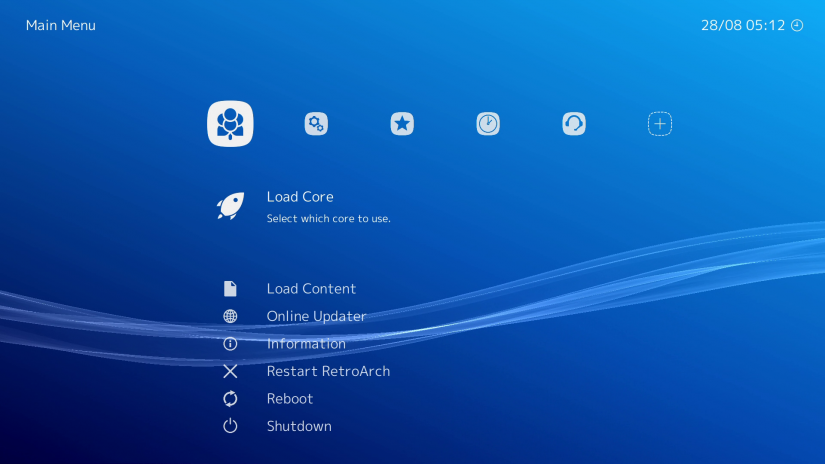 After inserting your microSD card into your Raspberry Pi 4, you'll need to wait a moment for Lakka to finish booting. When Lakka set up has completed initializing, you're ready to begin using your Lakka Raspberry Pi retro gaming console.
As a first step, it's best to get connected to the internet. If you're using a hardwired, simply plug in your Ethernet cable. For Wi-Fi, head to Settings > Wi-Fi and find your wireless network. Then, input your password.
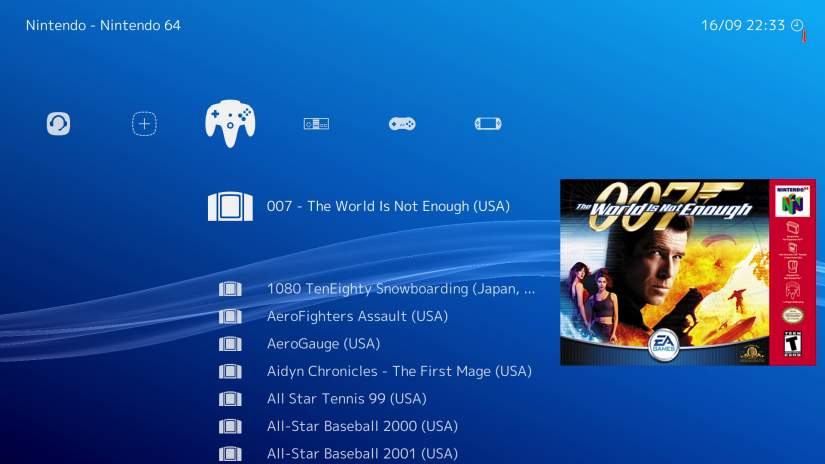
Since cores come pre-installed, you don't even need to install them. Instead, you can simply add your games and begin playing. To play a game in Lakka, you can either load specific ROMs with Load Content and search for specific ROMs. Alternately, head to Scan Directory and pick either an external drive or internally stored games. Find the folder of ROMs you want to import, and choose Scan This Directory. I actually used a 256GB flash drive loaded with my RetroPie mount folder.
You might want to add box art for your games. For Lakka box art, head under Main Menu > Online Updater > On-demand Thumbnail Downloads, you'll be able to toggle this setting on.
Adding ROMs to Lakka
 If you’re adding ROMs over the network, you’ll need to use an Ethernet connection or configure your Wi-Fi settings. Then, look under Settings > Services and toggle on SSH Enable or Samba Enable. With SSH and/or Sama on, look in your file browser under the Network tab. You should see an icon called Lakka. Click on that to open it, and you’ll see a folder called ROMs. Drop your ROMs here.
Alternatively, you may store your ROMs on a flash drive. I prefer this method as it allows me to keep my operating system and ROMs separate. Then, if something happens to my installation, my ROMs are self-contained and can be easily used with a fresh install.
For this method, make sure your USB stick is formatted as NTFS, FAT, or ext2/3/4. Then, load up your ROMs and plug the flash drive into your Lakka machine. Your partition is mounted automatically, and a folder /storage/roms/ created on the drive. ROMs then appear in the Lakka menu.
Hands-on with Lakka on the Raspberry Pi 4
 Unsurprisingly, Lakka runs extremely well on the Raspberry Pi 4. The Pi 4's upgraded specs really shine, especially for emulation. I ran SNES classic Yoshi's Island. Sure, Yoshi's Island runs like a champ on the Pi 3 and Pi 3 B+, but with occasional stuttering audio. I experienced none of this on the Pi 4.
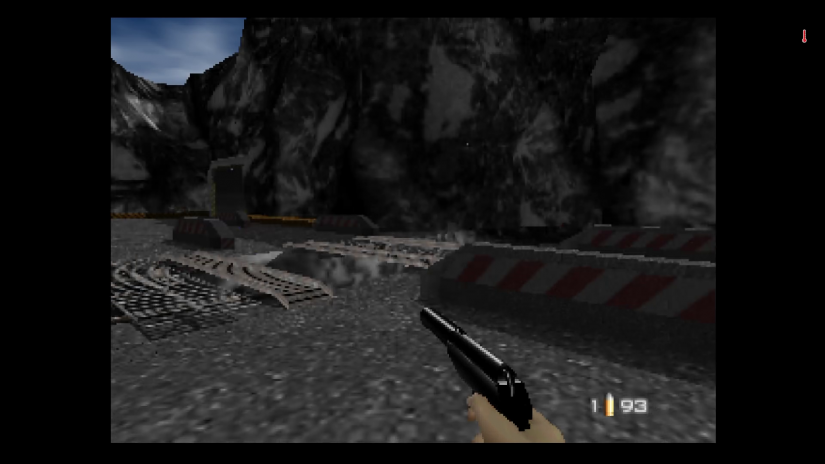
Nintendo 64 ROMs will vary. Testing out Goldeneye 64, there were moments of playability with some pretty bad stuttering. Similarly, Raspberry Pi 4 PSP performance under PPSSPP is hit or miss. Interestingly, From Russia With Love at times ran better on the Pi 4 than Goldeneye 64. Still, PSP emulation on the Raspberry Pi 4 is highly contingent on the specific game.
Should You Use Lakka on the Raspberry Pi 4?
Overall, Lakka is a fantastic retro gaming operating system. It's polished, and poised to only improve as Lakka moves out of its Alpha. Likewise, once emulators for the Raspberry Pi 4 improve, Raspberry Pi 4 emulation should continue to get better. As someone that's a bit anal about box art, I appreciated the ability to download box art. Plus, I appreciated that cores were already downloaded. Thus, you can eschew the step of downloading cores and jump right into gaming. Unfortunately, there's no Kodi media center for home theatre PC (HTPC) purposes like you'll find on RetroPie, Batocera, and Recalbox, although you can always dual boot or simply swap microSD cards if you need to use your Pi for an HTPC.
What are you using for retro gaming?

Moe Long is an editor, writer, and tech buff with a particular appreciation for Linux, Raspberry Pis, and retro gaming. Writing online since 2013, Moe has bylines at MakeUseOf, TechBeacon, DZone, SmartHomeBeginner, DEV.to, DVD Netflix, and Electropages. You can read his writings on film and pop culture at Cup of Moe, check out his tech reviews, guides, and tutorials at Tech Up Your Life, and hear his thoughts on movies on the Celluloid Fiends podcast. Aside from writing and editing, Moe has an online course, the Beginner's Guide to Affiliate Blogging From Scratch. When he's not hammering away at his keyboard, he enjoys running, reading, watching cinema, listening to vinyl, and playing with his dog Sebastian.


Leave your feedback...