Tips And Tricks For Soundminer V6 PRO And PLUS

11 even more simple tips for Soundminer V6 PRO and HD Plus - if you know them

The following 11 tips for the Soundminer software are aimed at both experienced users and beginners. As you are about to find out, these tips are even more simple than the original 10 tips for Soundminer...that is, if you know them!

Some of the tips are aimed exclusively at Soundminer V6 PRO users on Mac platforms. To balance things out, I promise to compile some tips for HD Plus users as well. Watch this space...

Send us your ideas, and we'll have a look at them. Feel free to post on Facebook (or other social media). We are a social medium as well and like to share our knowledge too!

List Of Content

1. VST Tail Size to render over-long effects

Soundminer is a great sound design tool that can be used for all sorts of shenanigans. For example, you can use the REC switch in the player to record all the manipulations to the knobs and switches and the VST menu. During transfers, all settings are rendered; this means that the sound with all the effects is created as a new sound file.

But what if we want to record, for example, a reverb that extends beyond the sample length? Traditionally, the transfer process would render the new audio file in the selected length because it doesn't realise you want to extend an effect.

That's where the VST Tail Size value comes into play: it allows you to enter the additional length of the sample (e.g. to add reverb).

1.1 Setting up VST Tail Size in Soundminer V6 PRO

Soundminer Tail Size - Render Effects with a tail size length

  1. Open Preferences (⌘[COMMA]) and select the Transfers tab
  2. Define a Tail Size value in seconds in the Plugin Tail Size field
  3. Done

1.2 Setting up VST Tail Size in Soundminer V4.5 Pro

Soundminer Tail Size - Render Effects with a tail size length
Soundminer Manual: Render Reverb Effects With a Tail Size Length

  1. Open Soundminer V4.5 Pro Preferences (⌘[COMMA]) and select the Transfers tab
  2. Enter Tail Size value in seconds
  3. Done

1.2 Setting up VST Tail Size in Soundminer HD Plus

HD Plus currently has a fixed Tail Size of 1 second. However, this will be changed shortly, so that it can be adjusted manually.

2. Adding a picture to a sound file

Adding an image to your audio files with Soundminer
Image: Soundminer Manual - Adding an image to your audio files with Soundminer

What could be better than to impress your friends with a unique logo or a great selfie shot on the sound file?? There are many ways of doing it, but here are three of them:

2.1 Add picture via Drag and Drop (HD Plus and Soundminer V6 PRO)

  1. Select the tracks in the browser window
  2. Drag and drop picture (jpeg format) from the finder to the browser
  3. Done.
  4. Use the command Embed Metadata (pop-up window, right mouse click) to save the picture permanently with the audio file. It will be displayed with the file, even if copied.

2.2 Assign Artwort to Selection

The command Assign Artwork to Selection does exactly the same with Soundminer V6 PRO as Assign Artwork does with HD Plus. Soundminer will ask you for the picture and you can then attach it to the selected tracks.

Don't forget to embed, though: Embed Selected Records (pop-up window, right mouse click), or Embed Selected in HD Plus (also pop-up window, right mouse click).

2.3 Assign Artwork from Clipboard (Soundminer V6 PRO only)

Just as the name says, this command makes Soundminer V6 PRO add a picture from the clipboard to the files. First, however, you need to have a picture in the clipboard. Clipboard is a cache that allows you to save pictures from the internet via CMND C. You can then use the Assign Artwork from Clipboard command (pop-up window, right mouse click) to add the picture to the selected data files.

Please note that, unfortunately, you cannot select a picture in the Finder and copy it with CMND C. The OS is a bit too simple for this--it will only copy the file name into the cache. A real bummer, but we can't change it.

3. Create a Script (Soundminer V6 PRO only)

Soundminer V6 PRO gives users the option to create external Scripts for routine processes. Scripts are created upon request and for a fee (which depends on the workload).

Attempting to create Scripts without the necessary know-how is asking for trouble...so make sure to get in touch with us here and we'll do our best to help you out with your Script and/or your ideas.

3.1 Creating a simple Script to fill out metadata fields automatically

This is how to create a very simple script to fill out metadata fields that always contain the same information. You can download a sample Script at the bottom of the page.

3.2 Creating Scripts like a pro -- here's how!

Scripts are a bit like physics: rather confusing and unyielding. If you make a mistake, you will probably regret it for a long time. So make sure to follow these instructions!

3.3 Text Editor

  1. Download a solid Text Editor if you don't have one already. We recommend the freeware TextWrangler from Barebones (Mac only). This software is used to create Scripts and will show you source texts and code tags in a variety of colours, which makes scripting a lot easier.
  2. Download the sample Script and open it in your Text Editor. It should roughly look like this:
  3. List one command per line for your data field. The space between the quotation marks contains the text that we want to pack into the data field.
    changedMetadata.[DATENFELD] = "TEXT"
  4. This is what it will look like for several field. We selected the fields Designer, Manufacturer, Notes, Publisher, TrackYear and URL.
  5. Installing the Script
    As soon as the Script is finished, you can save it with the ending [My Script].lua in the Soundminer system folder
    [YOUR USER]/library/application support/soundminer/Scripts

    Create a Folder called Scripts if there is no Scriptfolder in the /library/application support/soundminer/ folder!
  6. Using the Script
    This is what it's all about! Let's see how this thing actually works! First, though, you have to exit Soundminer and restart it.
    Select the tracks in the Browser (use CMND A to select them all) that need to work with the Script and right-click to select Process Metadata Script/[My Script]. If the Script was created successfully, Soundminer V6 PRO will now use it.
  7. Please note that the Script will now overwrite existing metadata in the data fields with values from the Script!

Troubleshooting

  • If there is an error in the Script, your Script will not be displayed in the Script menu
  • IfSoundminer V6 PRO crashes as soon as you have installed your Script, you have probably made a more serious mistake. Remove the Script from the folder to restart Soundminer
  • Check your Script and make sure that text is between quotation marks: "Text"

4 Intelligent Transfers - Save space with the intelligent transfer (Soundminer V6 PRO only)

Soundminer Intelligent Transfers Transfer - Reference previously sent sound material rather than sending it again
Soundminer Manual: Soundminer Intelligent Transfers Transfer - Reference previously sent sound material rather than sending it again

Intelligent Transfers is a clever software aimed at equally clever users.

As soon as Intelligent Transfers is switched on, Soundminer V6 PRO checks if the audio file has been transferred before. If this has been the case, Soundminer V6 PRO will send a clip onto the timeline that indicates the previously transferred file. No new audio material is actually transferred, only the previously used one. Cool, no?

If the material is not yet in your edit system's audio folder, it will get transferred normally.

In a nutshell, Intelligent Transfers prevents the same clip from being listed several times in the audio folder (which would be a waste of storage space),

This is particularly useful with bigger projects and can result in considerably smaller sessions. Although we have terabytes worth of storage nowadays, smaller amounts of data are still massively beneficial: smaller sessions can be exported quicker, take less time to transfer and use less storage in the archive. Make no mistake: Intelligent Transfers is the way to go.

You switch on Intelligent Transfers in Soundminer V4.5 Pro in the main window, see the pic above. In Soundminer V6 PRO, you can switch on and off Intelligent Transfers in the Preference Window. Open the preference window with (⌘[KOMMA]), go to the Transfers tab and click on Intelligent Transfers.

4.1 Intelligent Transfers - Supported Edit Systems

Your edit system has to support the Spot to Timeline function. Intelligent Transfers is compatible with the following systems:

  • Pro Tools
  • Pyramix
  • Nuendo
  • Reaper

4.2 Intelligent Transfers Best Practice Tips

If you know that you will be re-using various bits and pieces from an audio file (e.g. footsteps from a step sequence), we recommend that you transfer the entire audio file.

You can now select individual clips from the file (e.g. steps, birds, etc) rather comfortably in Soundminer V6 PRO.

When transferring individual bits and pieces, they will now be automatically added to the timeline as clips.

4.3 Clips with handles thanks to Intelligent Transfers

It keeps getting better: your clips will automatically come with handles. Don't know what handles are? Read this first.

Depending on the audio bit's location in the audio file, the clip will come with handles. This means it can be extended at both ends, as the clip references the entire audio file which is generally much longer. If the audio bit is transferred as a new audio file, its length will be fixed and it will no longer reference the original file.

5 Händel vs Handles - An Explanation

5 Händel vs Handles - An Explanation
Picture: G.F. Handel, Source: Balthasar Denner, Wikipedia

Händel is a famous Baroque composer...not to be confused with handles. The latter simply means that extra sound material is available at both the beginning and end of a clip. In other words, you can 'extend' the clip in both directions--as long as there is enough material, of course.

If you edit in Pro Tools, clips are generated automatically. These reference the entire file, i.e. they are merely address points that tell the edit system where the clip begins and ends.

If your clip begins at the very beginning of an audio file, you cannot extend it any more via handles. There is simply no material available at the start of the file. The same can be true of a clip's ending.

When transferring an excerpt with Soundminer V6 PRO or HD Plus, Soundminer creates a new audio file with the exact length of your selected area. This newly created clip cannot be extended again, as it is an independent audio file that no lo longer references the original.

This means you cannot extend the clip after the fact...unless you activate handles in the transfer. Soundminer now adds additional audio material (i.e. handles) to the beginning and end of your selected clip that is about to be transferred (if enough material is available).

You can define the length of the handles yourself. This is how it is done:

5.1 Transferring Clips with Handles:

  1. Set the length of the handles in Soundminer V6 PRO
    Preferences / Transfer - Handle Size
  2. Set the length of the handles in Soundminer V4.5 Pro
    Preferences / Transfer - Handle Size
  3. Set the length of the handles in Soundminer HD Plus
    Preferences (Gear Symbol), Handle Size

The values are in seconds.

6 Display Metadata in Finder

Ever since Soundminer V4.5 Pro version 214 metadata has been written to be displayed in the Finder. When you select an audio file and press CMND I, you will see metadata info like title, genre, created by etc. (see picture) in the 'More Information' tab.

Display Soundminer Metadata in the Finder Window

6.1 No Metadata displayed in the Finder

If no metadata is displayed in the Finder info window, your computer system is either having a laugh or the metadata was created before version 214. In the case of the latter, you simply need to embed the sounds with an Soundminer V4.5 Pro version higher than 214 or Soundminer V6 PRO.

The info will then be updated and displayed in the Finder info window.

But how do you know which Soundminer V6 PRO version you have? Please scroll down a bit to see the answer...

7 Which Soundminer version am I actually using?

Which version of Soundminer am I using? The title bar will tell you...

Good question, but the answer is rather simple: you will find this information in the title bar.

The designation Soundminer v4.5Pro - v4.5v279 means the following: Soundminer version 4.5 with the release 279. Or version 279, if you will.

Same with Soundminer V6 PRO: It will say something like: Soundminer v5Pro - 5.0v398.

If you are hooked up to the internet, Soundminer will inform you when a new version becomes available. Should you be working in a protected environment without internet connection (e.g. prison, sound studio), you should occasionally check for updates and download them manually.

8 Network Application of Soundminer Server

Centralize your sound and music archive - Manage user, sounds and permissions with Soundminer Server

Soundminer can be used in a network with a centralised server administration. As soon as several people need access to the audio material, we recommend that you get Soundminer Server. Soundminer Server allows central access to audio material and databases. It can be run by an administrator and allows all clients to access updated data at all times from the centralised database.

8.1 Rights Administration with Soundminer Server

As soon as several users are logged into a network, the need for rights administration arises. To prevent chaos, these rights can either be granted or revoked.

Soundminer V6 PRO comes with an option to create user groups for specific databases. These user groups are granted rights to specific databases. Unless a database is actually connected to a user group, it will not be visible for any group.

8.2 Admins and Group Admins

Creating and administrating users and user groups is done through the Soundminer Server
Create and manage user groups in audio networks - simple and easy with Soundminer.

For larger networks it is beneficial to set up a group administrator for a user group. The administrator will maintain the database, make changes, import new sounds and/or remove sounds.

Creating and administrating users and user groups is done through the Soundminer Server and Soundminer V6 PRO.

8.3 Soundminer Server and HD Plus

Soundminer HD Plus for Windows and Mac can easily be used to access the central server databases in a Soundminer network. The Musicminer web interface can also access the Soundminer databases, allowing you to store all sounds and music in a central hub.

9.1 Database Backup with Soundminer V6 PRO

You will need to backup a database occasionally. This is recommended if you're changing metadata and would like to make the changes across all files. Such an operation can quickly result in chaos. The easiest way to save a database is by backing up the four database files. For this, you have to access the [YOUR USER]/library/application support/soundminer/ folder and copy the four connected database files.

Important: if something goes wrong and you would like to move back the database, make sure to close Soundminer before playing around with the files.

Option 2: in case you embedded all the metadata (as recommended), you can also load the metadata from the audio files with a Rescan (right mouse click).

9.2 Database Backup with HD Plus

This is also possible with HD Plus, of course, but the databases are hidden somewhere else:[YOUR USER]/library/application support/soundminer/

Windows is a bit more complicated because it hides away the folder. This should not concern us, however, as we do not need to memorise where the folder is hidden.

Simply use the command Reveal Support Folder in the Soundminer menu of HD Plus (Windows and Mac) and Soundminer will show you the Support Folder.

10 Modify Search Index

In order for databases to work efficiently, so-called indexes are created. These indexes work like the table of contents in a phone book and enable the database to access data very quickly.

Now, you're probably asking yourself why you should know all this boring stuff...

Well, it is actually important to know that Soundminer uses the database system mySQL in the background in order to run your search inquiries. But more about this later -- including searching for files in Soundminer (these are also handled by mySQL, with the efficient help of the indexes).

It is, however, important to know that mySQL will list search results according to the table indexes. If data is included in table columns but not indexed, the columns will not be included in a search.

You might think this is stupid...surely there must be a better way to handle this?

Turns out the reason for this is simple: speed. With so much data and such large databases, each field would need to be searched, which would take forever. Not necessarily an efficient way of working -- hence indexes.

There is, however, a catch to all this: indexes are limited; mySQL only has 16 fields (maximum) per database available for indexing.

This is not too bad, however, as these 16 fields can be adjusted.

So if a description from a metadata field does not pop up among the search results, it is probably because the field is not indexed. In which case we can simply adjust the index.

10.1 Search Index Adjustment

  1. Adjusting the search index with Soundminer V6 PRO
    All metadata fields of the current database are displayed with Database/Modify Search Index. The checked fields are indexed and will hence be searched during a full text search. Check the fields you need, but remember that there are no more than 16 available. 
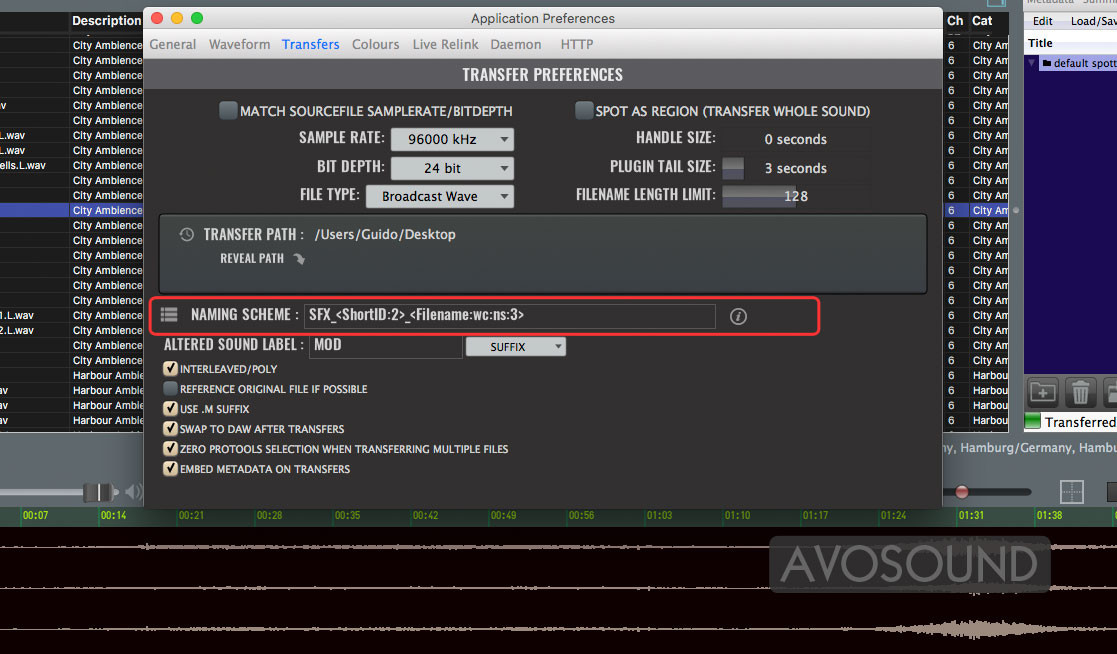
Pressing Save creates a new index, which can take a while depending on the size of the database. Also, please be patient and don't force the process -- else the whole databank could be jeopardised!
  2. Adjust search index with HD Plus
    All metadata fields of the current database are displayed under Database/Change FullText Index. You have a choice of 16 fields max. Select the fields you want to search and click ok.

PLEASE BE PATIENT while Soundminer creates a new index...don't stress your machine! Soundminer will search all your data, which can take quite a while depending on the size of the database. So take a break, go for a pint or have a coffee...

If you now enter a text search in the Soundminer tool bar (FYI: this is a full text search, but more on that later) you should get results with the text in question.

mySQL Indexes - Important

  • Indexes are created per database - because databases can feature different metadata fields
  • Creating indexes can take some time. Please be patient and don't stress your computer (!) until the index has been created. If the process is interrupted, the database might become corrupted...and by corrupted we mean completely unusable!

11 Smarter Transfers with the File Naming Scheme

Soundminer allows you to change the file name of audio material during transfer. This includes a prefixed text, a single character or a complete transfer — Soundminer will create a new filename according to the metadata fields.

But why bother?

Because it is an extremely useful tool that keeps even the most chaotic session clearly arranged - particularly when editing sound for film. For example, if you add 'SFX_' to the transfers, all transferred files will be added to the project folders and audio lists with the SFX_ prefix. Files will now be named as follows:

  • SFX_Kick.wav
  • SFX_Kick_in_the_Face.wav
  • SFX_Hook_to_the_Chin.wav
  • SFX_Blow_below_the_Belt.wav

Pro Tools Session With the alphabetical Pro Tools clip list: Use the Soundminer File Naming Scheme to add or prepend text to your transfer files!
Image: Pro Tools Session With the alphabetical Pro Tools clip list: Use the Soundminer File Naming Scheme to add or prepend text to your transfer files!

This is enormously helpful and keeps the audio folders for big sessions with thousands of files and clips neatly arranged.

When you are combing those audio folders for material, you immediately recognise that all files that begin with the prefix SFX_ are your own. If you have an assistant, for example, you can also allocate the prefix SFX_ are your own. If you have an assistant, for example, you can also allocate the prefix SFX_Assist to him/her, so that you'll always recognise the tracks.

11.1 Generating filenames logically with the Soundminer File Naming Scheme

If this tip is news to you and gets you all excited about the numerous possibilities it offers, please do not stop reading yet! Take a seat instead, as things are about to become even more interesting.

What if you could generate the filename of a transfer logically? Well, this great feature actually exists and it's called File Naming Scheme - for Soundminer V6 PRO and HD Plus.

Although the setup for Soundminer V6 PRO is identical, I'll quickly explain both. First up is Soundminer V6 PRO.

Explaining the File Naming Scheme

File Naming in Soundminer is a bit more comprehensive than just adding text prefixes. With a structure you can create a filename based on the metadata fields. After all, we have a lot of information in the fields for a reason, so why not use it?

<ShortID:2>_<Filename:wc:ns:3>_<Source:1>

Will transform the following metadata fields...

ShortIDFilenameSource
WTRWater-Splash-Loud-01.wavAvosound
AMBBerlin-City-Ambience-03.wavAvosound

...into these new filenames:

  • WTR_Water-Splash-Loud-01_Avosound.wav
  • AMB_Berlin-City-Ambience-03_Avosound.wav

The principle of the File Naming Scheme is the same for Soundminer V6 PRO as for Soundminer HD Plus, but the setup is slightly different. You will find the instructions for HD Plus below.

11.2 File Naming Scheme setup for Soundminer V6 PRO

The Soundminer Preference Window with the File Naming Scheme section
Soundminer Image: The Soundminer Preference Window with the File Naming Scheme section

You will find the File Naming Scheme in: Preferences / Transfers / File Naming Scheme

Metadata fields must be written in open brackets: <DATENFELD> The name of the data field has to be an exact match. You will find the correct diction of the metadata fields in the title bar of the Soundminer browser or, alternatively, in the 'Edit Metadata' pop-up window (CMND I).

Data Field Quantifier:

The number after the colon indicates the data field quantifier.

<DATAFIELD:1>_<DATAFIELD:2>

What is it for, you ask?

If the generated file name is longer than the maximum number of characters allowed by the operating system, Soundminer will automatically remove the data field with the highest number. Windows and Mac both allow a maximum of 256 characters.

File Naming Scheme examples with quantified fields

<ShortID:2>_<Filename:3> -> AMB_MyFileWithFileName.wav

<ShortID:2>_<Description:3> -> AMB_My File With This Great Description.wav

<ShortID:1>_<Category:2>_<Filename:3> -> WTR_Water_MyWaterFile.wav

11.3 File Naming Scheme Text Options

The File Naming Scheme also includes a few spelling features. The following explains how to add text options to the metadata field:

<Filename:wc:ns:3>

The following options are available:

  • ns: no space: remove all spaces: Fox in Socks = FoxinSocks
  • Nv: no vowels: remove all vowels, Fox in Socks = Fx in scks
  • Ss: substitute spaces: replace spaces with '_', Fox in Socks = Fox_in_Socks
  • Ac: all caps: capitalise all characters, Fox in Socks = FOX IN SOCKS
  • Wc: word caps: capitalise all words, FoX iN sOcKs = Fox In Socks

11.4 File Naming Scheme: How to use invariable text

If you want to add a text tag, your initials, or any other invariable element to your transfers:

REC_<DATENFELD>

This will generate something similar to:

REC_MeinDatenfeld.wav

Pro Tools Clip List sorts audio files alphabetically

11.5 Saving File Naming Scheme

Soundminer File Naming Scheme - Store Schemes

Schemes can be saved so you don't always have to type in a new one. However, this is only possible in Soundminer V6 PRO.

11.6 Setting up File Naming Schemes for Soundminer HD Plus

11.6 Setting up File Naming Schemes for Soundminer HD Plus

In Soundminer HD Plus this is also done via the Preferences menu. Click on the gear wheel icon or open the Preferences menu with ⌘[COMMA].

NEW:

Since Soundminer HD Plus version 306, the File Naming Scheme is applied on the same way as in Soundminer V6 PRO. Please see the points above:

<ShortID:2>_<Filename:3> -> AMB_MyFileWithFileName.wav

<ShortID:2>_<Description:3> -> AMB_My File With This Great Description.wav

<ShortID:1>_<Category:2>_<Filename:3> -> WTR_Water_MyWaterFile.wav