

Ubuntu is a Debian-based Linux operating system, which is one of the most popular desktop Linux distributions to date. With its first release in October 2004, Ubuntu predictably releases updated versions every six months.
To install SSL certificate on Ubuntu server, first, you need to download the primary, intermediate and root certificate files, which you will receive via email from your Certificate Authority (CA). After downloading these certificate files, you need to generate a Certificate Signing Request (CSR), which can be easily done by using our CSR Tool.

Steps to install / Enable SSL certificate on Ubuntu using Apache
Step 1: Copy the Certificate Files
To get started, copy the primary (yourdomain.crt) and intermediate certificate (abcCA.crt) files into your Ubuntu server directory where you intend to store all your certificate and key files.
Step 2: Edit Apache .config File
(1) Normally, you can find Ubuntu’s Apache configuration file for your SSL site in/etc/apache2/sites-enabled/your_site_name
(2) But, if you don’t find that .config file in the ‘sites-enabled’ folder, you need to run the command sudo a2ensite your_site_name.
(3) After locating the file, open it using any text editor
Note: To access your website with both secured HTTPS and non-secured HTTP, you must need two separate files on your …/sites-enabled/ folder. One file will be for port 80 and the other for port 443.
(4) To make your site accessible only with a secure protocol, you need to configure the Virtual Host block.
Step 3: Configuration of Virtual Host block
Your ‘Virtual Host’ block will look similar to the following image:
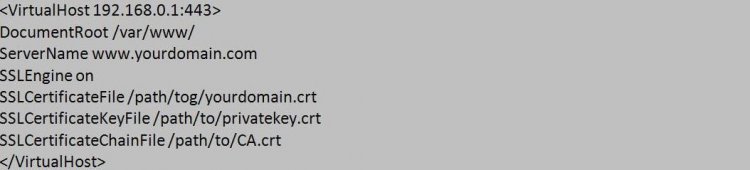
(1) In virtual host block, you need to configure an SSL certificate file, key file and chain file.
(2) Now, adjust the following file names as per your SSL certificate and make the changes accordingly:
(i) SSLCertificateFile: Your certificate file (yourdomain.crt)
(ii) SSLCertificateKeyFile: Your key file(generated during CSR-creation)
(iii) SSLCertificateChainFile: The intermediate certificate file (CA.crt)
Note: Try using SSLCACertificateFile instead, if the SSLCertificateFile directive doesn’t work.
Save the data once you are done editing the VirtualHostblock.
Step 4: Test your Apache .Config File and Restart
Once you save the .config file, it is necessary to test that file for any errors by running the following command:
apachectlConfigtest
If your .config file works well, the final step is to restart your Apache server using these commands:
apachectl stop
apachectl start
With this step, your SSL certificate is successfully installed on your Ubuntu Server and your domain is now live with HTTPS:// security.
Please click here, to check, if your certificate is installed properly or not.
(I) If the SSL is installed properly, you will able to see your certificate details.
(II) If it is not installed properly, we would recommend going back to Step 1 and retracing everything.
Important Resource
- Apache Support Center – https://httpd.apache.org/docs/2.2/ssl/
- Ubuntu Web Support – https://ubuntu.com/support
- How to Install an SSL Certificate on Red Hat Linux Apache Server
- How to Install SSL Certificate on Cisco Secure Access Control Server (ACS)
- A Step-by-Step Guide on How to Install an SSL certificate on H-Sphere
- Detailed steps on how to install an SSL certificate on Lotus Domino
- Step-by-Step SSL Installation Guide for F5 Big-IP
- How to install an SSL certificate on OS X Lion 10.7 server
Buy EV SSL Certificates and Save 51%
Authenticate your company with an EV Certificate. Get Extended Validation SSL Certificate for as low as prices from trusted SSL brands.
Buy Cheap EV SSL Certificates at $69.85 and Save 51%
Related Posts
- Install SSL on different Certificate Authority
- Install SSL Certificate on NGINX HTTP Server
- Install SSL Certificate on Android
- How to Install an SSL Certificate on Red Hat Linux Apache Server


