
tl;dr
Want to take the fast track and skip the detailed tutorial below? Install Docker for your OS, clone this repo, add your Laravel app files to the src directory, and from the root project directory you just cloned run:
docker-compose build && docker-compose up -d.
A Brief Intro
Before we get started, it should be known that this article isn’t a full-fledged tutorial into Docker or an explanation on the intricacies of the toolset. It’s more of a streamlined walk-through for getting a local development environment set up fast using Docker and docker-compose, as opposed to installing a LAMP stack directly on your machine. There’s a few caveats that come along with it, but the method below is what I’ve found works the best for me when developing Laravel apps.
For those who don’t know what Docker is, let’s enjoy a brief overview. According to opensource.com:
Docker is a tool designed to make it easier to create, deploy, and run applications by using containers. Containers allow a developer to package up an application with all of the parts it needs, such as libraries and other dependencies, and ship it all out as one package.
You can think of Docker as a watered-down VM.
Why is this helpful or useful? Well if you have multiple production servers running different versions of Linux, PHP, or any other web software, those variables can be replicated in your container and you can be guaranteed that the application will run precisely how it’s intended to on the production machine.
Fitting in more with the tone of this post, if you have multiple Laravel projects spanning different versions on your local machine, you can have a specific Docker configuration for each app without having to implement something like a PHP version switcher and modify your actual machine’s config. You’re even able to access both projects at the same time, with each container running isolated from the other.
Sound exciting? Let’s dive in!
Installing Docker
For the duration of this article, screenshots and references will be related to MacOS users. However, installation and usage instructions should be very similar (if not almost exact) on Windows.
First, grab the installer: https://docs.docker.com/docker-for-mac/install/.
Run through the typical application installation process, opening the app after it’s completed. You’ll be asked to authorize Docker via your system password the first time you open it, after which you’ll see the little whale icon appearing in your top status bar.
Project Structure
The following is a structure I’ve been using for my Laravel + Docker projects. You don’t have to follow this explicitly, although the rest of this article will assume your project is set up with the same layout.
my-project.com/
├── nginx/
│   └── default.conf
├── src/
│   └── (Laravel app files)
├── docker-compose.yml
└── Dockerfile
In the next couple of parts I’ll be going over what each of these files do, but for now just create them as blank placeholders using the layout above. Additionally, add in (or create) your entire Laravel app’s files under the src/ directory.
Creating Our Stack
A great rule of thumb when using Docker is that each container should provide a single service. Since we’re creating a typical LEMP stack, that means we’ll need one for our web server (Nginx), PHP, and MySQL. While theoretically we could create individual containers for each of these services and then attempt to link them together, Docker has a beautiful built-in tool for this called docker-compose.
What we do is define the services that will be used, and at runtime Docker provisions each one as a container and wraps them all in a virtual network. This means that each service will be accessible from every container.
To get started, open up the docker-compose.yml file and add the following to the top of it:

Some quick explanations for what we just added:
- Version: 3, the newest and most recommended version of the docker-compose engine
- Networks: We’re just using one network, laravel, which we’re not adding any options to besides the name
- Services: Where we’ll specify the images that’ll make up our stack
Adding Nginx
Directly under the services heading that we specified at the bottom of the docker-compose.yml file above, you’ll add in the following:

What we’re doing in the above is telling Docker that we want a container called nginx, built from the nginx:stable-alpine image (whose full source you can see here). We’re using alpine linux as the base OS because of its light and responsive footprint.
Next we’re naming the container nginx and exposing its :80 port as :8080 on our local machine. This port number is what we’ll eventually use to access our site, and you can adjust it to any non-reserved port number that you like.
For the web server’s volumes, we’re adding in the two following:
- Our local /src folder is bound to the container’s /var/www path. Not unlike a symlink, anything we modify in /src will be available to the server under /var/www immediately.
- The /nginx/default.conf file we created is linked to the /etc/nginx/conf.d/default.conf container file, and will give us the ability to modify the nginx web server on our local machine.
You could specify any number of directories or files under this heading to symlink them from your local machine to the nginx container.
By adding both php and mysql (services we’ll create next) under the depends_on item, we’re telling Docker that on initialization the php and mysql containers need to be running before nginx does. Additionally, if we tried to spin up just the nginx container, it would also boot up both of those dependent containers.
Lastly, we’re specifying that this container is explicitly under the laravel network we created at the beginning of our docker-compose.yml file.
Adding MySQL
The next service we’re adding to our docker-compose.yml file is MySQL. This one is relatively straight-forward.

Initially we’re specifying the image and container name, as well as setting some miscellaneous settings that I feel have helped maintain MySQL’s stability in the container.
The default MySQL port of :3306 is the one we’re exposing to our local machine, and then using the environment object we can set a few variables used during initialization to modify the database created. Since we’re configuring Docker for a Laravel app, I’m using the default database name/username/password found in the typical Laravel .env file.
Just like with nginx, we’re attaching this service to the laravel network.
✨ Simple!
Adding PHP
Unlike Nginx and MySQL, adding our PHP container is going to take a different, and slightly more complicated path. With the previous two services we were able to directly reference an image to build our container off of, however because of a dependency that Laravel requires we’re going to actually be building our own image off of a local Dockerfile.
Before we get to that part, add the following as the next (and last) service to our docker-compose.yml file.

You can already spot the difference, we’re replacing the image heading we used before with a build one. Under it, we’re specifying the context as the current project directory and the dockerfile as Dockerfile (which we’ve already created earlier).
Like with our nginx container we’re specifying the same volume for the root directory, then exposing port :9000 for the container and setting the network to laravel.
Now that we have that service added, it’s time to add the following to our Dockerfile:
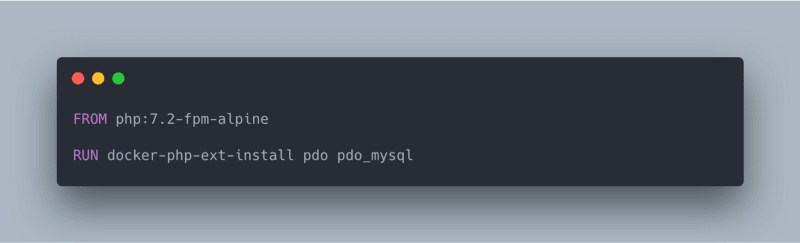
Yep, that’s it.
All we’re doing here is:
- Specifying that we want our php container to be built from the
7.2-fpm-alpinePHP image. - Installing the
pdoandpdo_mysqlPHP extensions that Laravel’s ORM uses with its database methods.
The docker-php-ext-install command is built-in (and not well documented) in Docker. You can pass through any PHP extension and it will handle the installation and configuration within our newly-created container.
Configuring nginx
Remember our /nginx/default.conf file that we created? Open it up and add the following:

There honestly isn’t much to discuss here, as it’s mostly a boilerplate nginx configuration used with most basic Laravel apps. Note that the root path was set to the public folder of our /var/www nginx directory that we linked our Laravel app to.
Starting Docker
We have all of our individual pieces in order, now it’s finally time to assemble our Docker network! Open up a terminal window and navigate to the root directory of this project. Since one of our containers (php) is using a Dockerfile as its image, and this is the first time we’re spinning up these containers, the first thing we need to do is run the build command to generate the image data:
docker-compose build
This will take a little while to finish up, and might seem like nothing’s happening for a while. Give it about 1–2 minutes and you should have seen Successfully built and Successfully tagged messages in your terminal. You can then proceed with actually starting up the containers using:
docker-compose up -d
Docker will create our laravel network and then create the three containers we’ve specified in the services section of our docker-compose.yml file. If you’re curious about the -d flag, it stands for detached and keeps the containers running after all of their commands have processed. Otherwise, Docker would stop them as soon as they’ve finished their initialization. Pretty pointless for a web server!
Configuring Laravel
Before we access our app for the first time, we need to make some small adjustments to our Laravel .env file. Specifically regarding the database connection and the app domain. Open up your project’s .env file in the src directory and modify the following lines:
-
DB_HOST=mysql- This name comes from the MySQL service we created in the docker-compose.yml file, and is used in the Docker network to reference the service from other containers. -
APP_URL=http://localhost:8080- Add in the port number you’ve exposed in our nginx container to keep this pointing at a resolvable address.
Accessing Your App
Assuming everything in the above step started successfully, we can now visit our container with the exposed port and see our app’s landing page!
In your browser, navigate to http://localhost:8080 where 8080 is the first port that you specified under the nginx service in your docker-compose.yml file.

💥 Boom! We have our Laravel app running in a Docker network!
Of course if you’ll probably also want to access your MySQL database using a tool like TablePlus, and getting connected to that is just as simple. All you’re going to do is use 127.0.0.1 as the host, along with the port you’ve exposed under the MySQL service in our docker-compose.yml file (which for this example we’ve kept as the default 3306).
Our username and password we’ve specified in the environment variables as MYSQL_USER and MYSQL_PASSWORD, homestead and secret respectively.

Note: If you’re planning on running multiple networks at once for different projects, you’ll have to specify different ports to expose on your local machine (e.g. 8080 for one, 8081 for another). Otherwise, you’ll be greeted with a port is already allocated error during the container initialization.
Running Commands
Laravel utilizes the command line fairly often for things like migrations, queues, and tests. Executing these on our Docker network is super easy using docker-compose’s exec command.
Instead of a VM where you ssh into the system and execute commands directly on the OS, Docker prefers that you pass commands through to the container(s) and then the output of those commands is echoed back to your terminal. For example, let’s run the default migrations that Laravel comes with by running the following command in our terminal at the project root:
docker-compose exec php php /var/www/artisan migrate
Let's break this down a little:
- docker-compose exec tells Docker that we want to execute a command on our container network.
- php the container name we want to execute the command on. Since we’re going to be executing a PHP command, it needs to be on the container PHP is running on.
- php /var/www/artisan migrate the actual name of the command we’re running. We’re using an absolute path to artisan that’s symlinked through our local volume at ./src and running a standard Laravel migration.

You should be presented with the migration output after running our command, and your database will now be populated with two tables!
Any number of commands can be run from our local terminal into the Docker containers of our choosing. Just be aware of the services installed and available in the container you want to execute the command on.
Hint: If you’re adamant about wanting to ssh directly into a container to execute commands, there is a pretty simple workaround. Running
docker-compose exec {container_name} /bin/sh will open up a persistent connection to the container specified in the {container_name} argument.
End of the Line
Well, there we have it! We’ve installed Docker, set up and configured a docker-compose file to create a LEMP stack of three containers wrapped in a single network, have exposed ports on that network that let us access our app and database, and have even run cli commands through docker-compose’s exec method.
Moving forward, if you want to bring down the containers and network, it’s as simple as navigating to your project’s root folder and running
docker-compose down. This will both bring down, and destroy, the containers and any associated non-volume data that was stored in them.
Docker has opened up a whole world of development possibilities for me when I’m juggling multiple projects spanning different Laravel versions. I can easily have one project running on a Docker network with a PHP container using 7.1, and if I wanted to see how my current project would perform in PHP 7.3 it’s as simple as changing a single character in my Dockerfile, re-building the container, and bringing the docker-compose network back up.
I won’t deny it, you’ll get no better local development performance than running your stack directly on your machine’s hardware. But the tradeoff of performance for versatility, ease of use, parallel environments, and customization, greatly outweighs that for me.
If you have any questions, comments, or want to chat more about
PHP and Laravel, don’t hesitate to reach out to me on Twitter! If you’re looking for a super simple error and log monitoring service specifically for Laravel apps, I’ve built Larahawk. It’s currently in private beta and launching soon for just $5/app/month.


Top comments (57)
Hi! I used your work as an inspiration for my Symfony 4 container, and it work perfectly. But php container (I think it's him) create a html folder inside of my /var/www folder, and I'm unable to understand why. Any clues?
Here is the link to my repo: github.com/guillotjulien/symfony4-...
Thanks :)
EDIT:
Just add
working_dir: /var/wwwto php service :)Hi! Thank you for great blog tutorials. It really helped me to get started. I have also watched you youtube video which took me here.
I am able to deploy container for laravel succesfully and now I want to install image GD library for PHP. I simply tried adding RUN docker-php-ext-install gd. But it didnot worked. Also, I want to upload large images 5 MB for which I need to make changes to NGINX config. I have tried modifying nginx.dockerfile but its now working. Can you please help me through it?
could you solve it?
Files generate in /src folder when execute artisan command inside php container is own by root,
example, running following command
will generate ExampleController.php on host machine and file is own by root.
Any idea how to avoid this?
I'm sorry if this is too late, but hopefully will help others, here's my workaround to solve the file owner issue, first you have to find-out whats your uid (normaly 1000):
id. The result will be something like:uid:gidin yourdocker-compose.ymlAlso, you even don not need Dockerfile for php container!
If you run:
you can see that php modules already exists:
my bad,
pdo_mysqldo not exists on this image, unfortunately you should write Dockerfile if you want database access :)Thank you for your good tutorial.Can you help me in this issue? I tried everything but no use. I am running on window 10 but linux containers.
Illuminate\Database\QueryException : SQLSTATE[HY000] [2002] Connection refused (SQL: select * from information_schema.tables where table_schema = default and table_name = migrations)
thepracticaldev.s3.amazonaws.com/i...
I don't know if you were able to solve this or not, but this is what worked for me:
In your .env file change this
for this
I guess it's because you need to specify the name of the container running the database server and in docker-compose.yml the name for the mysql service is
container_name: mysql.Edit: I see now that the article clearly states that the value for DB_HOST needs to be
mysql. For some reason my brain totally skipped that part...In your .env file for your Laravel application, what are your values for the database credentials?
I think I've got this set up, but it's slow on my Windows machine. When using WSL 2, Microsoft recommends you "store your files in the WSL file system", whatever that means, for performance reasons. I've played around with the volumes in docker-compose.yml, but I can't get it working. How would I do this? Thanks!
docs.microsoft.com/en-us/windows/w...
Hey Tim!
So essentially when it says "Store your files in the WSL file system" it means in the Linux partition that Windows creates when using WSL.
If you open up a Windows Terminal session in Bash, by default it should put you in a directory called like /mnt/c/Windows. Run
cd ~to get to the home directory in the WSL file system, and then from there you can use any directory under that one to create your Docker-ized application and it will run way faster.For instance, I have mine at
~/Sites/example.com. Let me know if that helps!So in your docker-compose.yml file, what do your volumes look like? I changed mine from
volumes:
- .src:/var/www/html
to
volumes:
- ~/site:/var/www/html
And now I get a 404 error, even thought there is an index.html file there.
To answer my own question, the answer is to run docker-compose inside wsl, not from the Windows prompt.
Dont know what i'm doing wrong but i typed in the files by hand and built the docker. On running the containers mysql and php run fine but nginx exits with the following log: Any ideas?
`
Please add composer to php container.
Adding composer container will be better solution :)
Hi Andrew,
Appreciate your tutorial. It is very good and clear to understand. I have tried both of your tutorial form youtube. They are ok.
But I am trying to install all php extensions recommended by laravel. BCMath, Ctype, Fileinfo, JSON, Mbstring, OpenSSL, PDO, Tokenizer, XML. Some of them can be install easily. But some aren't. I have faced various errors. Would you mind showing how to install them.
OK i cloned your repo installed a laravel app and ran the docker-compose command from the github repo. When I try to run a composer command using the container I run into this error
had to build all the containers
Hy Andrew, I have issues running this on windows please help
Creating mysql ... done
Creating php ... error
ERROR: for php Cannot create container for service php: b'Drive sharing failed for an unknown reason'
ERROR: for php Cannot create container for service php: b'Drive sharing failed for an unknown reason'
Encountered errors while bringing up the project.
You have to go on Settings and SHARE the driver you are trying to set up your project in it...
Thanks for good
docker-compose.ymlexample!But I'm curious about
SERVICE_TAGS: devandSERVICE_NAME: mysqlenv variables for mysql container, for what they are?Did you ever figure this out? I've noticed it outside of this tutorial as well, and am also curious.
nice one, I like the nginx implementation so easy, but exactly how and when do I use "composer install"? I can't work without installing the packages!!
Adding composer to Dockerfile to make it container specific.
Install Composer
RUN curl -sS getcomposer.org/installer | php -- --install-dir=/usr/local/bin --filename=composer
You should have composer in php container so that you can run composer commands via docker cli and install specific laravel version. Laravel 8 requires composer 2.
Hello friends, I follow all the tips step by step but I had the next problem, please can you help me:
$ docker-compose build
The Compose file '.\docker-compose.yml' is invalid because:
services.nginx.networks contains an invalid type, it should be an array, or an object
Hey David!
Check your spacing on that file. It should be indented appropriately, and possibly even have to use spaces instead of tabs. If you need to, you can compare it against the current docker-compose.yml file in the repository for that tutorial: github.com/aschmelyun/docker-compo...
Some comments may only be visible to logged-in visitors. Sign in to view all comments.