Heading out the door? Read this article on the new Outside+ app available now on iOS devices for members! Download the app.

Live Be Yoga ambassadors Jeremy Falk and Aris Seaberg are on a road trip across the country to share real talk with master teachers, explore innovative classes, and so much more—all to illuminate what’s in store for the future of yoga. Want more stories from Live Be Yoga? Follow the tour and get the latest stories @livebeyoga on Instagram and Facebook.
“I’m not _____ enough to do yoga.” We have all heard the comments from friends, family, or acquaintances who are too intimidated to step inside a yoga studio. But on the tour, we discovered a rich, growing community in Southern California that puts those fill-in-the-blank fears to rest.
Better Living Yoga in Aliso Viejo, CA, not only welcomes yogis of all ages and body types, but it is a place to build a sustainable yoga practice for life. Founder and owner David Webster was familiar with the all-too-common yoga studio model that marketed to a younger crowd. Through years of adapting his personal practice as he aged and the experiences he shared with his sister, who passed away at 58 from early-onset Alzheimer’s, David realized there was a need for a yoga studio that supports people in all stages of their lives.
Now, his studio abides by his favorite Patanjali quote: “If you can breathe, you can do yoga.”
“At Better Living Yoga, we use yoga to reverse and prevent chronic conditions, as well educate and empower people to heal themselves,” he told us.
David referenced a few staggering statistics which led to the design of his classes: About 50 percent of American adults have a chronic condition; about a third of the population deals with multiple chronic diseases. While he provides therapeutic practices to support those journeys, David believes that education and prevention are key to reducing these statistics in the first place.
See also 8 Yoga Poses for Stress Relief
Most of BLY’s classes focus on stress reduction through the down regulation of the nervous system. Adaptable practices offer tools that help students elicit their parasympathetic—rest, digest, and restore—responses in the body. By doing this, the nervous system returns to homeostasis so yogis can, as David says, “love life, feel better, and look younger and brighter.”
This studio’s mission is a breath of fresh air in modern yoga culture. People are consumed with trying to look younger and healthier. What if we just started by bringing awareness to the body? What if we nourished our bodies, minds, and hearts in the ways we need to as individuals? What if the practice of taking care of ourselves transitioned, as we do, through life?
Related online courses Restorative 101 with Jillian Pransky
“Stay moving! If you don’t move, you’re going to become immobile,” says David. “Even if you don’t live in Aliso Viejo, find a yoga studio that offers gentle and restorative classes.”
5 Sustainable Yoga Poses to Try at Home
We asked Cindy Shapiro, E-RYT 500, one of BLY’s lead teachers, to share pointers and modifications that make common poses safe and accessible to most students, even if they suffer from illness or injury. These supportive poses also help tap into the parasympathetic nervous system response to rejuvenate you—so you can relieve stress and enjoy your practice for the long haul.
Modified Utkatasana (Chair Pose)
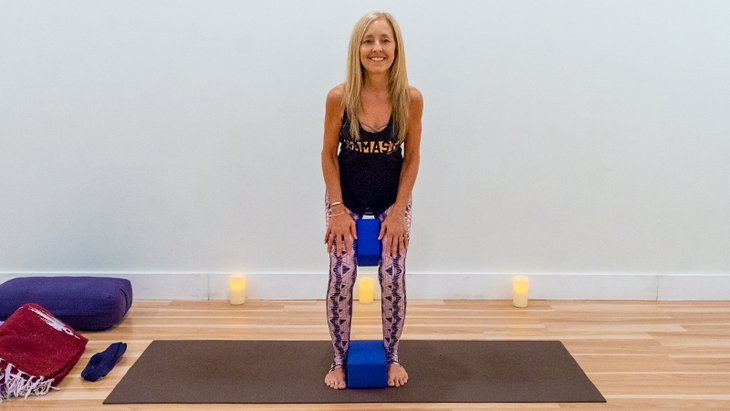
Props needed: 2 blocks
Stand on the mat with your feet hips-width apart. This can be more supportive for the hips and knees than the traditional cue of bringing your feet together. Place one block at widest distance between your feet, so that the middle of your big toes are just beyond the block. Place the other block between the thighs, and feel the outer thigh muscles moving back and around. Keep your spine tall and chin pulling back. Hug the ankles in, press firmly into the feet, and hug the blocks without squeezing them. Hold for 3-5 breaths.
To take the pose into a more brahmana (energizing) version, bend the knees and sit the hips back until your stopping point, as long as the chest is lifted tall. (See image.) Press your hands into the thighs, with elbows hugging toward the ribs so the collar bones expand and the heart shines through. Another option is to press the palms together in front of the heart in Anjali Mudra (Salutation Seal). After you feel stable, ground down into the heels and slightly lift the toes to keep your weight moving backward. Try to feel the Mula Bandha (Root Lock) lift away from the floor. Bring your awareness to your jaw and check if you are clenching and find your breath, which will keep the nervous system calm. Hold for 3-5 breaths. To come out of the pose, release Mula Bandha, slowly rise to standing, and remove the blocks.
More about the pose:
Blocks provide support, so you can more easily release the tailbone down and lengthen the low pack. Plus, the pose lengthens and strengthens the erector spinae muscles, which support healthy posture. This version of Chair also engages the adductors, quadriceps, and glutes, which are imperative for health and standard movements, like standing up after playing with your kids on the floor. Finally, contracting and releasing the the Mula Bandha aids in pelvic floor health as you age.
Bhujangasana (Cobra Pose) variation
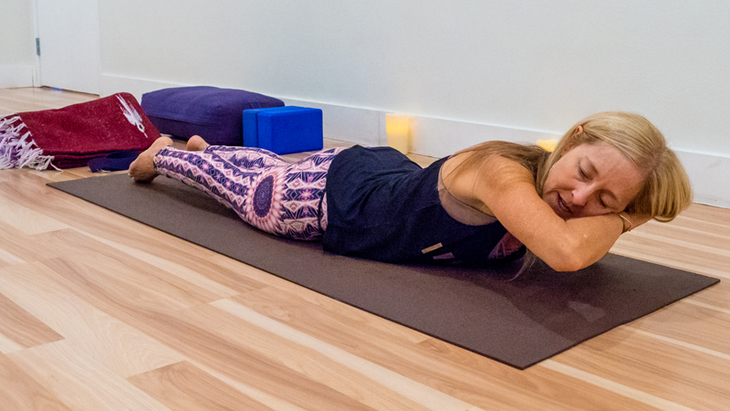
Start on your hands and knees with your wrists 2-to-3 inches in front of the shoulders. Engage your belly button in toward the spine to support the back, shift your weight forward so the shoulders come over the wrist, and then slowly lower onto the mat. Take your left arm and lengthen it along your side body, with the palm facing up. Turn your gaze toward your right shoulder, and bend your right arm underneath the left cheek. Lower your head and right arm to the mat with right palm on the Earth. Activate your legs by pressing the tops of the feet into the mat. Press the pubic bone into the mat to keep the tailbone long and feel supported and strong in your belly. As you inhale, use the right arm and right rhomboid (muscles between the shoulder blades) to lift the head and chest off of the floor. Keep pressing the back of the left hand down into the mat. As you exhale, lower down, and continue to press your toes into the mat as you relax your other muscles. Repeat 3 times on each side.
More about the pose:
This is a great variation because it strengthens the upper and mid back, as well as the erector spinae muscles. This somatic, intentional movement aids in rewiring the mind’s awareness and, in turn, the nervous system. It is considered Proprioceptive Neuromuscular Facilitation training, a contract-and-relax technique that releases muscle and myofascial tension. Also, this pose focuses on the upper back without rounding the shoulders forward, which further perpetuates “computer neck” (experts call it “forward head carriage”). Finally, the arm under the head supports the neck if traditional Cobra Pose is too straining.
See also Alison West’s 5 Simple Poses to Relieve Back Pain
Supported Setu Bandha Sarvangasana (Bridge Pose)
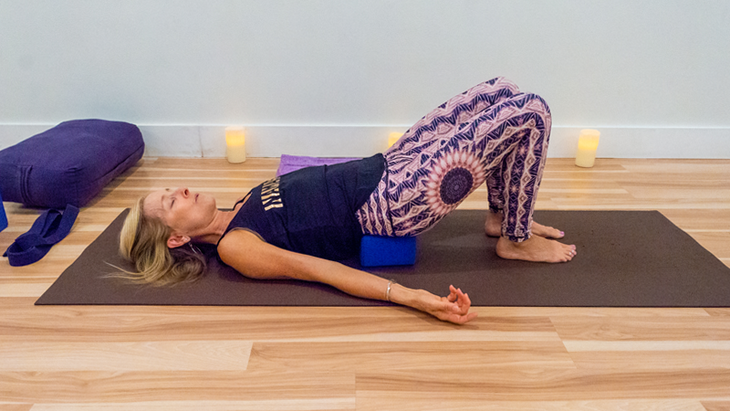
Props needed: 1 block, 1 blanket (optional)
Lie down on your mat. Bend your knees and place your feet on the mat directly under your knees, about hips-width apart. Find the four corners of your feet, and press the big toe, pinky toe, and heel into the mat. Note: If it is best for your hips to not rise too high above your heart, due to conditions like high blood pressure or glaucoma, stay here in Constructive Rest Position.
Otherwise, keeping your neck lengthened, press your feet firmly into the mat, and lift your hips. Feel the inner thighs engaging isometrically toward each other as the outer thighs wrap down and back, so the tailbone lengthens. Slide a block on low or medium height underneath your sacrum, and lower your hips on the block. Lower the arms by your sides; or place one hand on the heart, the other on the belly. This is a great place to practice the Jalandhara Bandha (Net-Bearer Lock), which contains energy in the torso and hip region. (Read more about that here.) Another option is to practice Durga Pranayama, or 3-part breath. Avoid overarching the neck by placing a folded blanket under the head to lengthen the cervical spine. Hold for 3-5 minutes.
More about the pose:
This pose is considered a more restorative option compared to the traditional version. It is believed that placing the hips above the heart, sends calming signals to the nervous system. With the hips supported by the block, the body can fully relax. Deepening the breath will further contribute to release of tension and stored stress in the body, which of course leads to a healthier you!
Supported Salamba Sarvangasana (Shoulderstand)
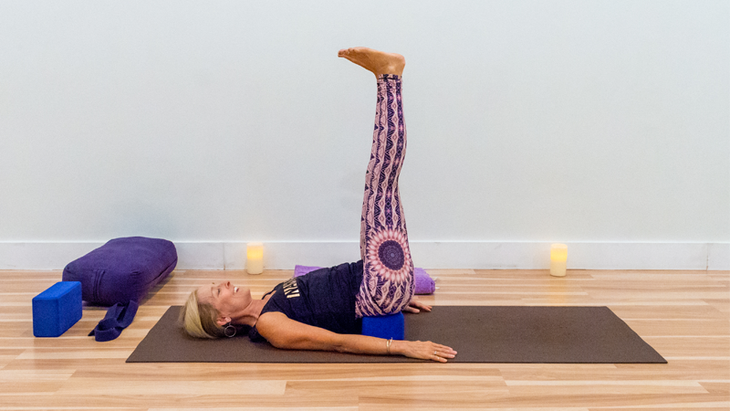
Props needed: 1 block
Note: Move into this pose only if you are able to do the last pose, Supported Bridge.
From Supported Bridge, keep resting your hips on the block and lift one foot off the floor at a time until your feet are floating. Allow the sacrum to spread evenly across the block, and keep the tailbone parallel to the block. If you’d like to go deeper into the inversion, extend the feet toward the ceiling until you find a comfortable stopping point. Your arms stay along the side body, with palms facing up or down. (This can also be done by simply laying flat on the mat, sans the block, and feet lifted toward the ceiling.) This is another great place to practice 3-Part Breath. Hold for 5 -10 breaths. To come out, gently bring your feet down to the floor, press them evenly into the mat, and lift the hips. Slide the block out, and lower your hips. Stay in Constructive Rest again for a couple of breaths.
More about the pose:
This version is a less strenuous modification that allows the nervous system to unwind. It’s a great variation for those with neck, back, elbow, or wrist pain. Lifting the legs still engages the core muscles, and can build strength for those with a weak core.
Supported Supta Baddha Konasana (Reclining Bound Angle Pose)
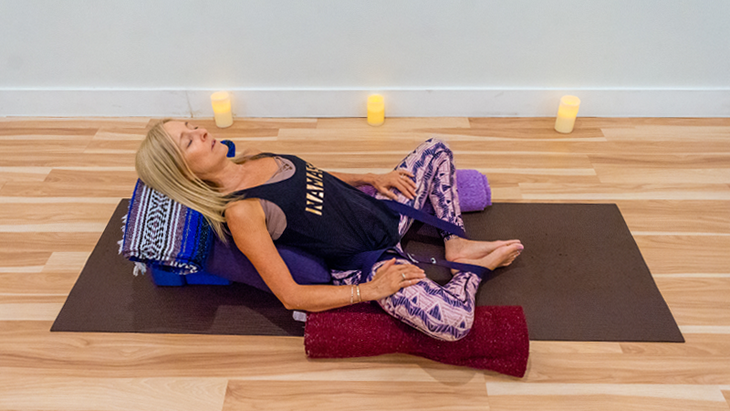
Props needed: 2 blocks, 3 blankets, 1 large bolster (or firm pillows), 1 strap with buckle
First, set up your props. Place a block on its medium height at the top of the mat and another on its lowest height below it. Lay the bolster lengthwise over the two blocks, and place a folded blanket at the top of the bolster. (This will all eventually support your spine and head.) Take 2 other blankets, folded into long cylinders, and place one on each side of the mat. Next, thread a big loop into your strap and secure it tightly. Step your feet into the center of the loop, on either side of the buckle, and place the opposite end on the sacrum. Hold the strap in place as you sit on the mat with your hips leaning against the bolster. Bring the soles of the feet together, and open the knees. Place the strap right over the inside of the ankles and thread it under your feet. Tighten the strap so it is secure around the sacrum, inside of the ankles, and outside of the feet. Slide the rolled blankets underneath the outside of your legs for support. Lower your spine onto the bolster, and adjust the blanket under your head as needed. Let the chin naturally soften, rest your palms on your thighs or out to the sides into a “T” position. Relax your shoulder blades, broaden your collar bones, allow your inner thighs to let go. Breathe deeply. Hold for 3-5 minutes.
More about the pose:
Cindy says that 65 percent of her students suffer from sciatica issues, while 35 percent deal with low back pain. This pose releases tightness in the piriformis (muscles that surround the sciatic nerve) and in the iliopsoas; it expands the chest and heart center. This rejuvenating and stress-relieving pose also shifts the nervous system back to homeostasis—and is a perfect way to end your practice or your day.
Related online course Join Yoga for Back Health: A 6-Week Clinic for Mobility, Strength, & Pain Relief
Namaste to Our Partner
As yoga teachers, we are often talking about the health of our feet—too often, they are neglected! Figs by Figueroa are the perfect compliment to a sustainable practice, since their goal is to keep your feet flexing and moving in the best way possible. As they say, “When your feet are happy, so is your sole!”