
Benefit from our fast encoding speeds and flexible API, while leveraging your own hardware or cloud infrastructure.
When we released Bitmovin Containerized Encoding a few months ago our goal was to enable our customers to benefit from our fast encoding speeds and flexible API, while at the same time being able to leverage your own existing infrastructure or cloud accounts. By being a managed solution that works through our Bitmovin API, we give you the flexibility to run your base workloads on your own infrastructure, while still being able to offload burst workloads to the cloud. This also adds redundancy to the encoding pipeline as we use a multi-cloud approach to encoding to be vendor agnostic and infinitely scalable.
This approach allows you to build robust and reliable encoding workflows that can cope with any load while avoiding the pitfalls of over-provisioning or under-provisioning resources in advance, while still giving customers full control over their infrastructure.
To deliver on this goal we decided to base our solution on the open-source container orchestrator Kubernetes that can run virtually anywhere on bare metal and is natively supported by many major cloud vendors like Google, Microsoft, RedHat or IBM.
This also enabled us to streamline the setup process so our customers can get up and running very quickly without requiring a lengthy systems integrations (besides a running Kubernetes cluster). Kubernetes enables us to manage all the compute resources required to run our high performance encoding engine on any hardware or cloud infrastructure.
To illustrate how simple the setup process is and also give you a general overview on how the solution works, we recorded a short (14 min) screencast that takes you through the general architecture of the Bitmovin Containerized Encoding, before showcasing the setup process from deploying the Agent in your Kubernetes cluster to actually running an encoding.
[bitmovin_player id=’20270′]
Video transcript
Daniel Hoelbling-Inzko
Welcome to our managed on-premise webcast by Bitmovin.
In this webcast I will show you how Bitmovin Managed On-Premise encoding works, give you a brief architectural overview of the solution and then we’ll get into a demo showing how to set this up.
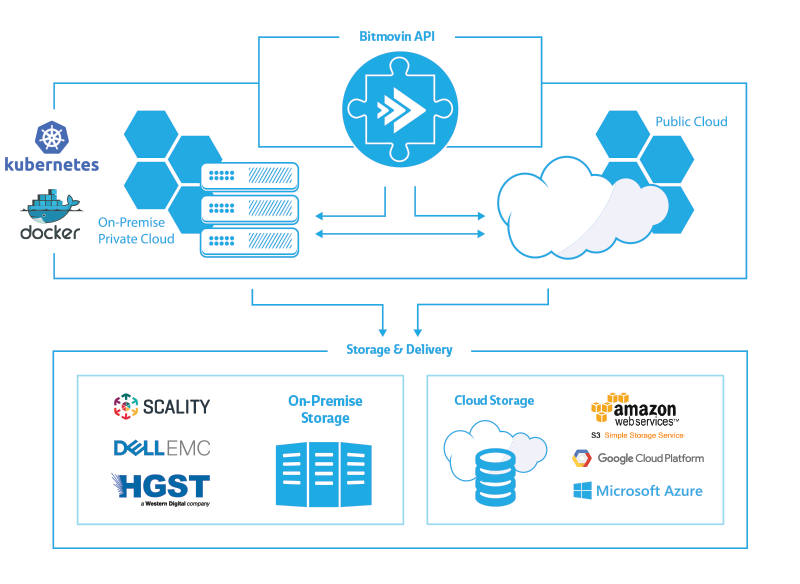
Managed On-Premise encoding is based on Kubernetes and Docker. Why? Mainly because Kubernetes is a solution built by Google and is a very mature container orchestration solution that can run on almost any hardware and you can set it up either in your own data center, utilizing your bare metal hardware, or you can buy hosted solutions from Google or Amazon, or a similar provider. Or you can just use your own private cloud credentials to set up a Kubernetes cluster and encode your video there.
This gives us the flexibility to span the private and public cloud as it is the same interface, which enables you to use your own hardware for either workloads that are secure and cannot be transferred to the cloud, perhaps for legal reasons, such as medical data for example, or your source files, which should never be exposed to the public internet. Then you can always shift excess tasks or tasks that are less critical, to the public cloud to encode them there.
In another scenario you could also leverage under-utilized hardware in your local system to save cloud costs and offload any excess tasks that might overload your infrastructure to the public cloud where capacity can be scaled indefinitely.
For storage and delivery we either support on-premise storage such as Dell EMC, Scality or HGST, which is either a software solution, or can be hardware based. Or you can output to public cloud storages such as Amazon S3, FTP, Google Cloud platform, and then from there to a CDN such as Cloudfront or Akamai for example.
How does it work?
First of all, the beauty of the solution is that you always communicate with the Bitmovin API. It is always the same unified API. For each job you can select which infrastructure you target, but the programming interface you would integrate into your application and workflow will always be the same. You can either use one of our open source API clients, such as our Golang client or Java client, or you can program against our public REST API which is documented on our website.
At first you will need to set up your Kubernetes cluster, so you go through your API and connect your new infrastructure there. You will get an infrastructure key and you will also download from the API a tarball which will setup Bitmovin in your data center.
We don’t need any setup on your side, we just need a working Kubernetes cluster. No need any routing or open ports or load balancing. Instead we will have a Bitmovin Agent running in your datacenter that will communicate with the Bitmovin API to look for jobs and open tasks to do. Once you start and encoding through the API, the Bitmovin Agent will pick up on that and spin up the encoders on your infrastructure and then the encoder will run, encode your content and output to wherever you need it to. Or once you don’t have hardware available you can switch the encoder infrastructure and it will go directly to our public cloud and run your encoding in the cloud.
Next we will get into the demo with Python client.
In this part I will show you a demonstration of how to set up your Kubernetes cluster with the Bitmovin API.
First we will go to our Google container engine. In this case I have already set up a Kubernetes cluster in GCE. This cluster’s size was 30 but you can use whatever size you’re comfortable with.
At first we will connect the cluster with our local kubectl command. I will copy the connection command here, go to the shell and run the command. Now it has set up my credentials and I can go into kubectl get pods and you can see the cluster is empty and completely new. And if we do “kubectl get nodes” we can see 30 nodes in the cluster.
Next up we will go to Github. In the Bitmovin API client for Python we have set up a CLI to do this, to connect the cluster, so just copy the installation command here and run the install of the client.
Once this is installed go to examples/encoding/infrastructure and we have a CLI client here, which is the create_infrastructure.py which we will now use to connect the cluster.
So let’s go into examples/encoding/infrastructure, and now let’s run python3 create_infrastructure.py.
As you can see, it asks for our API key, I have prepared this already, so I can use this one.
Now I give it a descriptive name, and it has created the encoding infrastructure on our Bitmovin API.
So what we get is the Infrastructure ID and this is used to reference the encoding region you want to select. So if you select through the API, as you would with a normal encoding in the cloud, you just go and select another cloud region, you select Kubernetes in this case and you specify this ID to schedule it on this cluster. You can have multiple Kubernetes clusters running, and schedule encoding to different clusters.
I will save this ID here so we can come back to it later.
Down here we get the curl command we can run, and this will download a TAR file, so let’s untar this here, and go into the folder. As you can see there is a README file here, a deploy script, two shell scripts and a few other things, but the beauty of the solution is that it is fairly transparent what is happening with your cluster. If you go into the Bitmovin Agent Deployment here, you will see that this is just a regular Kubernetes configuration file and it specifies which containers to pull and has also pre-setup all of your API keys and cluster IDs and which images to pull, and also sets up an image pullsecret to get the images from our private docker registry.
So let’s go ahead and run the deploy script. If we do kubectl get pods now you will see we have two services starting up. One is the Bitmovin Agent, this is the bastion host which communicates with our API and is also the sole entry point that is communicating with the internet. So if you just change the session affinity on the Bitmovin Agent you could schedule this to one host that has internet access while the rest of your cluster could be offline, or on host that has a throttled internet access.
The other pod that has started here is the Scality S3 server which we only use for MP4 content where we need to have a temporary output for the segments.
Now let’s go into the create_simple_encoding_kubernetes.py. We have set up an example here, which we will use to demo this. I have already set up the API here, and i have also configured the credentials in another file so we don’t expose our credentials here. But the important part here is the infrastructure ID, so i will go back and get the ID that we created earlier, and configure it here. As we can see here we configure the cloud region to be CLOUD_REGION Kubernetes and which encoder version to use.
So let’s save and run this: python3 create_simple_encoding_kubernetes.py
So this is going out the the normal Bitmovin API, as usual when you start an encoding through us. But it will also schedule our pods to the local cluster. So let’s open another window and do a kubectl get pods, and as you can see it is already starting up two new pods. One of them is the session manager which manages the encoding for you, and the other one is a temporary database we use for encoding.
As you see the encoding is enqueued while these new pods are starting up. And we’ll just do a quick watch here… one of the pods is already running…
Let’s go back to the examples:
If we were to start another encoding and we don’t want to use our on-premise encoding cluster then can just change the cloud region here, setup to encode in the cloud or another region, and the encoding will just start up on our infrastructure, which can be very handy if you have a cluster of a certain size that can only handle a limited number of encodings and you want to use the public cloud for excess encodings or encodings that don’t fit your cluster.
So let’s see where we are at here. So now the encoding manager has started and is downloading the input file.
As you can see here it has already started all of it’s instance managers, ie. the encoders, and it will encode the video.
Let’s do a watch kubectl to see the CPU usage ramping up across all the nodes. We can also go to the new portal to see how the encoding is doing. It’s already running, and as you can see, it has downloaded the file already, and now it starts to encode, and as the encoders start spinning up, the realtime factor is increasing and this encoding should be done in about 50 seconds. There it goes, already at 16 times realtime, and as you can see here, all of the nodes are getting CPU usage saturation but the encoding is already finished, so let’s go back to our example here and i can see that the script ran through, so now it is writing the manifest and there we are.
So now we get the MPD URL, copy that and test to see if it’s working. We paste it into the player test page here, and start it up.
And there it is.
As you can see, it encoded all of the renditions that we set up earlier, so this is 2.4 mbit, 1.2 mbit, 800 kbit and 400 kbit streams. And we can jump to any point here, and view the content in all it’s glory.
So, that’s all there is to it. If you are interested in a demo or have any questions about this, please feel free to reach out to us.
Thank you for watching.