

Introduction: Face Tracking Pan-Tilt Camera


A camera pan-and-tilt gimbal that is capable of tracking faces using computer vision and machine training so it can follow you around as you film or vlog. This way your face is always the centre of the action!
You can also train this gimbal to follow not only human faces but also objects, pets, food, or anything you can imagine by using different training data.
(Sorry for the potato quality of the MacBook camera)
Step 1: Support Me on Patreon
Consider supporting me in Patreon. I'd like to make better quality Instructables and more complex and interesting projects but most of these projects are quite costly and time consuming.
https://www.patreon.com/techmartian
Thank you for your support.
Step 2: Materials
(2) Servos
(1) Arduino Uno
(1) Jumper cables
3D print one
or buy one http://www.ebay.ca/itm/Pan-Tilt-Camera-Servo-Gimb... (includes the servos)
or make one of your own using scrap wood pieces and glue
Step 3: Installing Python

If you have programmed in Python (2.7) before, you can skip this step.
The language I used for the programs that track the faces and send the coordinates to the Arduino is Python so it must be installed in your computer to be able to run the code.
I personally use PyCharm (download here: https://www.jetbrains.com/pycharm/) as my main python IDE but you can use other IDE's like WingIDE, or just use a text editor and terminal. Most of the time, I just use Sublime Text and Terminal (built-in command line tool for a Mac). But, if you've never programmed or used Python before, I recommend starting with a simple free IDE like WingIDE (download here: https://wingware.com).
My code uses Python 2.7 so download that from here: https://www.python.org/downloads/release/python-2...
You can also use homebrew (this only applies to Mac users) to install python by typing the following line to terminal:
brew install python
Step 4: Installing OpenCV and NumPy


If you already have OpenCV and NumPy installed in your computer you can skip this step.
The libraries I am using are OpenCV and NumPy so both libraries must be installed in your computer. OpenCV is an open-sourced computer vision library used to find faces in still images. I've adapted my code to work on frames of a live video. While, NumPy is a powerful numeric calculations library for Python.
For Windows users install OpenCV by following this guide: http://docs.opencv.org/3.2.0/d5/de5/tutorial_py_s...
For Mac users I often had trouble installing it the way OpenCV recommended so I use homebrew to install it. Follow this set of instructions on how to install homebrew and OpenCV: https://gist.github.com/stilist/cd7fdfabbf9ec5ed8...
Installing OpenCV can be a hit-or-miss sometimes, so test if you have OpenCV using the snippet of code below.
import cv2
If you do not get any error messages when you run it, then you have installed it successfully
To install NumPy, open your command line tool (Terminal for Mac/Linux users and Command Prompt for Windows users) and type the following
pip install numpy
Pip is a package that comes when you install Python in your computer so it works cross-platform.
Similarly, if you want to check if NumPy has been installed successfully, run the following snippet of code below:
import numpy
Step 5: Install ArduinoIDE


If you already have ArduinoIDE installed in your computer you can skip this step.
You can download the ArduinoIDE for the Arduino website: https://www.arduino.cc/en/Main/Software
Setup your your Arduino by connecting it to your computer and selecting the correct board and com port.
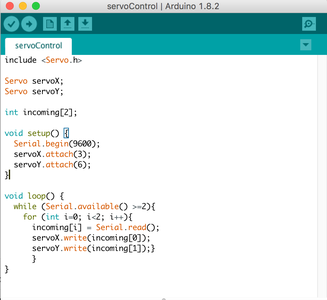
Step 6: Wiring the Servos

The wiring for this project is pretty straight forward. Follow the diagram above.
Step 7: Printing/Assembling the Camera Gimbal

You can 3d print this camera gimbal designed by Jake King:
http://www.thingiverse.com/thing:71492
Make sure that before you place the servos onto the camera gimbal that you centre it first. You can centre a servo by applying +5V VCC to the red pin and GND to the black pin. The servo will automatically rotate to the centre position.
Step 8: Run the Code
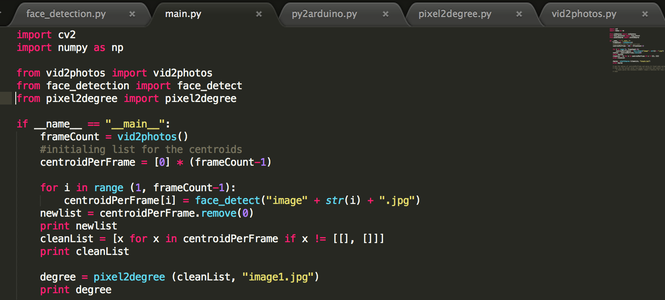


You can download the code from my Github. I will update this as I continue to improve the code.
https://github.com/raptor16/FacialRecognitionCamer...
First run the main.py using your Python IDE or if you are using terminal like I am, type python main.py. This will launch the video capture mode of your camera.
Then, compile and upload the Arduino sketch.
To exit the video capture mode, go to the screen that is running the video capture -- Python IDLE -- and hit "q" to quit.
Step 9: Calibrating the Camera

Once you run the code, you will get two prompts. One is the average distance of the person the track from the camera and the other is the field of view of the camera.
Step 10: More...

Change the training data, so if you want to film your cat for example, copy and paste the pictures of your cat to the training folder and the camera will be tracking your cat. You can learn more about training the HaarCascade here: http://memememememememe.me/post/training-haar-cas...
Run the code in a Raspberry Pi, which is a pretty much the same steps since I use a Mac and Raspberry Pis are computers that run on Linux. Now, you'll have a more compact and portable camera setup.
If you want to improve the system you can also try playing with the code and controlling Depth and z-axis zoom functionality.
Step 11: Vote for Me!

I've entered this instructables to both the robotics and the photography contest. Please vote for me if you liked it.

Participated in the
Photography Contest 2017

Participated in the
Robotics Contest 2017


