Angular 2 Tutorial – Simple “Hello World” App Example
Angular 2 reached release candidate status a couple of weeks ago. As Angular 2 is making its way to a final release, now is a good time to take a look at the framework, what it does and what the main differences with Angular 1 are. In this tutorial, we will go through different examples and build a small sample traffic light application using Angular 2 to illustrate some of those new concepts. Let’s get started with components.
Components are the most important thing to know about Angular 2. An application will always have a root component that contains all other components in a tree structure. Think of a component as a widget, a piece of content that can be reused in your application.
@Component({
  selector: 'my-app',
  template: `
    <div>
      <h2>Hello {{name}}</h2>
    </div>
  `
})
export class App {
  constructor() {
    this.name = 'Angular2'
  }
}
The main HTML file that loads that component looks like this (here is a link to the actual live example):
<body>
    <my-app>
      loading...
    </my-app>
</body>
The first thing you probably noticed in the above code is: What is that language? It does not look like Javascript! And it is not.
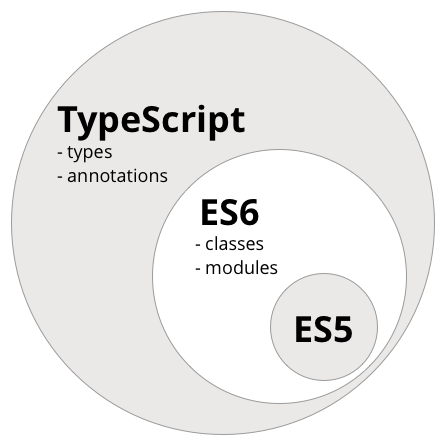
Angular 2 was mainly built for TypeScript, a strict superset of Javascript and ES6, which means that any Javascript code is also valid Typescript code. In the end, TypeScript code is transpiled down to Javascript code so your browser will never see any Typescript in the final analysis.
This illustration is worth a thousand words when it comes down to explaining what TypeScript is:
Our first TypeScript Angular 2 component code has a selector, which is basically the name of the HTML element where our component will be inserted. Then we define an HTML template, and a class which is the equivalent of the old Angular 1 controller.
Our HTML template has an Angular expression {{name}}, which is bound to this.name in the component class. As a result, that component actually renders Hello Angular 2 once loaded.
Recommendation
If your company is hiring a JavaScript developer, check out this JavaScript test prepared by our professionals. It will allow you to identify the best talents very easily!
Bindings
If you’re familiar with Angular 1, your probably know about ng-model, which is the way to achieve two-way data binding in Angular 1. It turns out that ng-model also exists in Angular 2 with a slightly different syntax:
<input type="text" [(ngModel)]="person.name" />Why those brackets and parentheses? Well, it seems weird at first but it does make a lot of sense once you know that brackets allow you to define a one-way data binding from your Javascript to your HTML, and parentheses define a one-way data binding from your HTML to your Javascript code.
For instance, the following code means that the text input would get its value updated when your Javascript object person.name gets updated, but not the other way round as it’s a one-way data binding:
<input type="text" [value]="person.name" />In the following example, we do the exact opposite as we use parentheses to trigger a function call when a specific event occurs, in that case a click on our text input. That’s the main use case for parentheses:
<input type="text" (click)="doSomething()" />Here is a link to an example of how to use [(ng-model)] in Angular 2.
Inputs and outputs
We know that Angular 2 applications are basically a tree of components. How do those components share data between them? How do they communicate?
Let’s assume we have a new Hello World component that would take a custom message as a parameter:
<hello-world [message]="myMessage"></hello-world>Then our Hello World component would basically look like this, using the @Input() decorator to bind a class attribute to the value passed in the message input attribute:
@Component({
  selector: 'hello-world',
  template: `
    <div>
      <h2>Hello {{message}}</h2>
    </div>
  `
})
export class Hello {

  @Input()
  message : String;
}
The full example for this can be seen here. That’s the easiest way to pass a value from one component to another, using HTML attributes bound to component class attributes.
It’s also possible for a component to emit an event, using the @Output() decorator. The syntax of the emitter component looks like this. Here I just send an event whenever my internal DIV gets clicked on:
@Component({
  selector: 'hello-world',
  template: `
    <div (click)="handleClick()">
      <h2>Hello {{message}}</h2>
    </div>
  `
})
export class Hello {

  @Input()
  message : String;

  @Output()
  onClick : EventEmitter = new EventEmitter();

  handleClick(){
    this.onClick.emit("I got clicked pretty bad");
  }
}
Any component using that Hello World component would then register a callback on my custom onClick event as follows:
<hello-world [message]="myMessage" (onClick)="myCallback($event)"></hello-world>You can find the full example here. In that example, I actually pass an event object that is then retrieved by the parent component and rendered as a message.
Dependency injection
Angular has always been using dependency injection and pushes it one step further with dependency injection, which is as simple as adding parameters to the component constructor:
constructor(private service : TrafficControllerService) {

  }
Even better, using the private declaration in the above TypeScript code automatically makes service a class attribute of my component class.
Conclusion
Angular 2 brings a lot of changes to the table. Most of those changes greatly simplify Angular, and as a result the learning curve for Angular 2 will definitely be much easier than for Angular 1. Take a look at this sample traffic light application to see all of the above concepts used in a very simple app that uses two different components, a service and a main component to bootstrap it all.
We did not cover all of the new concepts of Angular 2 in this article, yet the above examples illustrate how much we can do with very little code in the end, which is what will make Angular 2 a very popular framework – possibly even more than Angular 1.
Want to learn Angular 2? This is Angular 2 Tutorial – Simple “Hello World” App ExampleClick To TweetAlain Chautard is a published Angular JS expert and organizer of the Sacramento Angular JS meetup group in California. He shares his thoughts and current projects on his website www.alainchautard.com while running his own software consultancy at www.interstate21.com
Coding skills assessment
If you're looking to hire software engineers and want to ensure that you only interview qualified candidates, we've created coding tests that can significantly simplify your hiring process:
Nice tutorial. Thank you!
Great Tutorial for beginner .. Good job. (Y)
Nice tutorial for Angular 2 biggners
Nice tutorial. Thank you!
Good starting point, well explained.
great!
I apply this example but i received one error for import ‘angular/core’.can you tell me anyone why it is through error.
Great!
It is very useful for the beginners…….!!!
Very useful
Great!
It is very useful for the beginners…….
Should the light be working in the plnkr code? Thanks for making this!
…and you need all that libraries just to show “loading…”? WTF??
https://plnkr.co/edit/SWALWyYhTBv9IRGGoNsc?p=preview does not seem to work well…
Regards,
Jan
does also not work: “Loading lights here…”: https://plnkr.co/edit/KpDLgX9fym27XVPwaERo?p=preview
Hey Guys, If you would like to Learn CRUD, Pagination, Sorting with Angular 2 and Codeigniter 3 You can refer this blog
angularjscrudpagination.blogspot.com