How to use a Raspberry Pi with the Internet of Things
IoT programming

Ah, the good old Internet of Things. It’s starting to coalesce into something less gimmicky and more useful, but how do you get started with integrating it into your own projects?
If you’re planning on using your Raspberry Pi, the answer will likely involve coding of some kind, and in most cases, that coding will be done in Python.
This is all well and good, but if you’re new to programming or your Raspberry Pi is running headless, you’ll want a more user-friendly environment to interact with it, which is where Wyliodrin comes in.
It’s an open-source web platform that’s specifically designed for programming and monitoring embedded devices such as the Raspberry Pi, Arduino and others.

It’s visual friendly and comes with its own visual programming language that’s a drag and drop visual interface that echoes Scratch.
In this tutorial, we’re going to look at getting you set up with Wyliodrin. We’ll examine how to connect it to your Raspberry Pi, code in both Python and visual programming and get you set on your way.
It’s open source, but there’s a tiered pricing plan. Free accounts limit you to two devices and three projects when using it through its web-based interface, but if you use its Chromium-based application, Wyliodrin STUDIO, you’ll find there are no limits on the number of projects you can set up offline. We’ll show you how.
Get daily insight, inspiration and deals in your inbox
Get the hottest deals available in your inbox plus news, reviews, opinion, analysis and more from the TechRadar team.
First, you need to sign up for a free Wyliodrin account on your main PC (the following instructions assume you’re running Ubuntu 16.04). If you’ve not already done so, install Chromium, then open it and browse to www.wyliodrin.com and click ‘Sign up/in’.
You can sign in using Facebook, Google or GitHub—just click the relevant link to do so. When the main screen appears, click ‘Add a device’ to begin.
The quickest way to get Wyliodrin running on your Raspberry Pi is to download the fully-formed Raspbian image with Wyliodrin included.
Advanced users can, however, add it on to an existing Raspbian installation, although be warned: it’ll take hours to complete and we strongly recommend you back up your install.
First, boot or ssh into your Raspberry Pi and download the Raspberry Pi install script:
$ wget “https://raw.githubusercontent.com/Wyliodrin/wyliodrin-server/master/scripts/install_raspberrypi.sh”
Once downloaded, open raspi-config (sudo raspi-config) and make sure the filesystem has been expanded.
You also need to select ‘Advanced Options’ and select ‘A6 SPI – Enable/Disable automatic loading’.
Repeat for ‘A7 I2C – Enable/Disable automatic loading’ and ‘A8 Serial – Disable serial shell’. Now sudo nano /boot/config.txt and add this line dtparam=i2c1=on.
Save and exit, then sudo nano /etc/modules and add the following two lines:
i2c-dev
i2c-bcm2708
Save and exit, and now run the script:
$ chmod +x ./install_raspberrypi.sh
$ ./install_raspberrypi.sh
Once installed, add your Raspberry Pi to Wyliodrin as outlined in the main text, then download the wyliodrin.json file that’s generated, transferring it to your Raspberry Pi’s boot partition. Reboot your Raspberry Pi and – if all is well – you should find it’s now visible in Wyliodrin, ready for you to program.
Set up on the Raspberry Pi
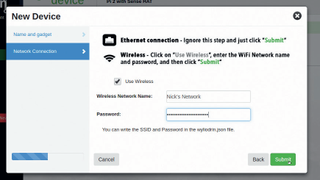
Next, confirm your Raspberry Pi is selected as the Gadget type, give it a suitably descriptive name and click ‘Next’. If you’re connecting via Ethernet, click ‘Submit’; otherwise tick ‘Use Wireless’ to enter your network’s SSID and password before moving on.
From here you need to click the link to download the image (in ZIP format) to your Downloads folder. If you’d rather add Wyliodrin to an existing Raspbian installation, check the box (see our boxout Install 'Wyliodrin Manually').
While you wait, scroll down a bit further and click the ‘following file’ link to download a file called wyliodrin.json— for now save it under Downloads.
Once downloaded, extract its contents, pop in a blank, formatted microSD card and open Disks. Locate your micro SD card and make a note of its device name, e.g /dev/sdb. Now open a Terminal window and enter the following two commands:
$ cd Downloads
$ sudo dd if=wyliodrin_raspberry_pi_2016_03_24.img of=/
dev/sdb
Replace 'wyliodrin_raspberry_pi_2016_03_24' with the name of the image if it’s different, and /dev/sdb with your card’s device name. Wait while the Raspbian image is copied to the card.
Once complete, open Nautilus to your Downloads folder, then copy the wyliodrin.json file to the boot volume that should have appeared in the left-hand pane before clicking the ‘Eject’ button next to boot to eject the microSD card safely.
Next, insert the card into your Raspberry Pi and switch that on. Wait for around two minutes, then check your account in Chromium—if all is well, you’ll see the Raspberry Pi is listed as online.
Next, you need to add any required libraries to your Raspberry Pi, which you can do remotely from your browser. Click the ‘Settings’ button next to the Online indicator and choose ‘Local Shell’.
You’ll see a button marked eth0 (192.168.x.y), with 192.168.x.y revealing your Pi’s IP address. Click this and a new window will open, logged in with your Pi user credentials.
This shell works like any other, so if you’re planning to add the libraries to e.g. support your Sense HAT , enter:
$ sudo apt-get update
$ sudo apt-get install sense-hat
$ sudo reboot
Once rebooted, you’re ready to switch attention back to your main PC. You can administer and run projects directly from this web browser—click the tour prompt when it appears to quickly familiarise yourself with the interface.
However, for the purposes of this tutorial we’re going to switch focus to the Wyliodrin STUDIO application. It’s a Chromium extension that enables you to manage your projects offline — install it through the Chrome store.
An app icon will appear under chrome://apps, click this to launch Wyliodrin. A shortcut icon will appear in the launcher, which you can lock for easy access going forward.
You’ll be shown a splash screen—click ‘Exit’ and then click the ‘Connect’ button in the top right-hand corner of the Wyliodrin window. Your Raspberry Pi should show up as an option, so click it to make the connection.
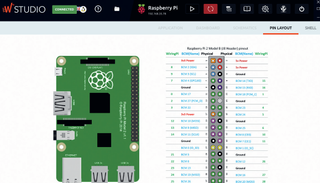
Enter your Raspberry Pi’s username (pi) and password (raspberry) and it should open the Pin Layout screen, revealing the wiring for your Pi’s 40-pin header.
You’ll see the main screen is split into five tabs: Application, Dashboard, Schematics, Pin Layout and Shell.

The Shell tab gives you remote access to your Raspberry Pi. The Application tab displays your project’s code, while Dashboard contains elements you can use to monitor your Raspberry Pi remotely.
Schematics works in conjunction with an application called Fritzing for those designing and building hardware-based projects.
You can see it in action by running some of the example scripts, e.g. the LED Blink shows you a Raspberry Pi, plus breadboard, LED, resistor and two male/female jumper wires needed to complete the project.
Above these you’ll see a series of buttons. There’s a play/stop button that runs your script through your Pi, and next to this is a File Explorer button that allows you to remotely browse your Raspberry Pi’s storage.
You can create new folders and upload files from your PC to here. Next to this is Package Manager, which basically lists all installed JavaScript and Python modules, and provides easy access to a selection of other libraries not yet installed—each one comes with a description, and examples include Django, MySQLdb and NTLK (Natural Language Toolkit).
There’s also a Task Manager for remotely killing processes, a network manager for viewing your current network settings and a handy disconnect button.
