An MVC-like WordPress Development with ACF and Timber
- Development
- Lubos Kmetko
- 10 min read

Improve your WordPress themes with ACF, Timber and a grain of inspiration from the MVC pattern.
You would expect that because WordPress is so popular, WordPress theme development would be easy. In fact, it can become quite messy especially for beginners. Why is that?
The official Theme Development Standards and Twenty themes promote fetching and displaying data in the same place. They don’t encourage separating core site functionality to a plugin. So what you usually end with are templates with cryptic loop constructs and gigantic functions.php file. In this tutorial, I’ll show you how you can make your themes cleaner by borrowing some development principles from the MVC (Model-View-Controller) pattern.
Let’s make it clear, WordPress is not an MVC framework; it implements the event-driven architecture. However, we won’t be making it to what it’s not; we’ll be just loosely thinking about our application parts at they were separated to Model, View, and Controller.
To help us with this task, we will use two fantastic WordPress libraries – Advanced Custom Fields and Timber.
Sample Site: Dream Team
Here’s the app, we’ll be building – a Dream Team site! Click on the images to see its live preview.


The site has two primary type of pages:
- The team list page with persons’ names and images linking to person detail page
- The person detail page with the following data
- photo
- name
- position
- description
- quote
- a list of blog posts by the person
- a link to interview with the person
- links to display a previous/next person
Additionally, we can display individual blog posts.
Setup: Chisel
To start with the development, we will install and setup WordPress with Chisel, a Xfive tool for easy installation and development of WordPress projects. Chisel installs Timber automatically and allows us to install ACF too.
If you haven’t worked with Chisel, install Node.js and then run from the command line:
npm install -g yo generator-chiselCheck out Installation documentation for more info.
Then set up the project with the following command:
yo chiselSelect WordPress Website project type and enter your WordPress configuration details once you are prompted to do so. Don’t forget to choose ACF plugin.
Once the installation is complete, run dev task:
npm run devto start a Browsersync server which proxies to your WordPress instance.
Model: ACF and WordPress
Model in MVC represents data and relation among them. What data have we got in our Dream Team app? WordPress comes with built in data like blog posts, pages or comments but since these data are already modeled, they are not our concern.
What is unique to our application (our problem domain) is Team, more specifically a Team Member, because the Team is just a list of team members.
To define new data type in WordPress we will use a custom post type. To make our application more manageable we will define Team custom post type in a functionality plugin:
<?php
/**
 * Register custom post types
 *
 * @package Dreamteam
 */
namespace Dreamteam;

class RegisterPostTypes {
  /**
    * Run the actions
    */
  public function run() {
    add_action('init', array($this, 'register_team_member_post_type'));
  }

  /**
  * Register Team Member Post Type
  *
  * @access public
  * @return void
  */
  public function register_team_member_post_type() {
    register_post_type( 'team',
      array(
        'labels' => array(
          'name'          => __( 'Team' ),
          'singular_name' => __( 'Team Member' ),
          'all_items'     => __( 'All Team Members' ),
          'add_new'       => __( 'Add Team Member' ),
          'add_new_item'  => __( 'Add New Team Member' ),
          'edit_item'     => __( 'Edit Team Member' ),
        ),
        'exclude_from_search' => false,
        'has_archive'         => true,
        'public'              => true,
        'rewrite'             => true,
        'show_in_nav_menus'   => false,
        'show_ui'             => true,
        'supports'            => array('title', 'editor', 'thumbnail')
      )
    );
  }
}
This will allow us to enter new team members in the WordPress admin.
Get the whole functionality plugin from this repository. Place it in the wp-content/plugins directory and activate in the WP admin.
Note: In the newer versions of Chisel we don’t use functionality plugin – you would store your custom post types in the theme folder – Chisel/Extensions/DataType.php.
Next, we will use ACF plugin to model the team member according to our application requirements. We know that he or she has the following characteristics:
- photo
- name
- description
- position
- quote
- interview
- list of articles
Note: You should be able to follow this tutorial with a free version of ACF, but a Developer license of the PRO version is worth of investment for any developer who makes a living out building WordPress themes.
If you have checked the functionality plugin code, you could notice that we have fields already available for the photo, name, and description. These are regular post title, featured image and content which we enter into the editor field. We don’t have to create fields for these, but we could if we have not enabled them in the custom post type definition.
To create remaining fields go to Custom Fields / Fields Group and Add new. Name it Team and add the fields as follows:
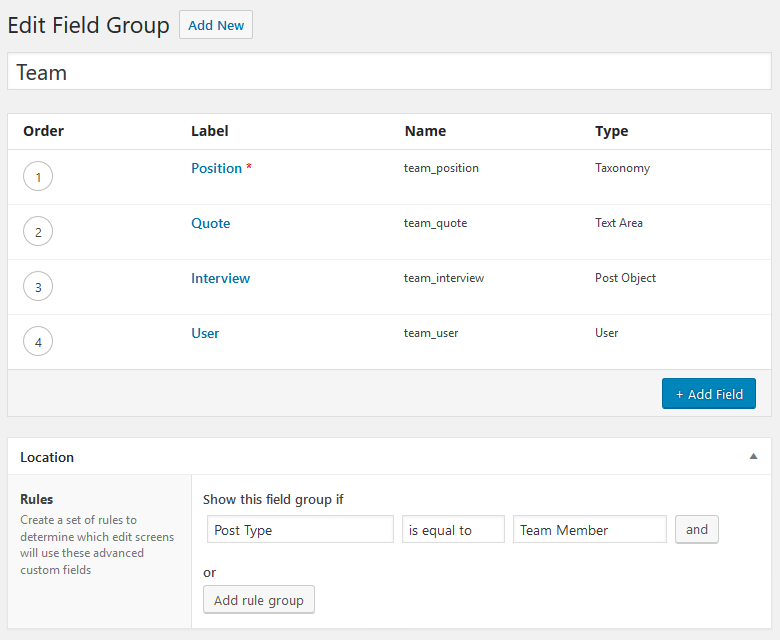
Let’s explain what’s going on here:
First of all, we show this field group on our custom post type Team Member.
For the position, we choose type Taxonomy so we can add and manage positions easily. To do this, we will get back to our functionality plugin and register taxonomy there. Check out the file here.
Then we can select which taxonomy should be displayed:
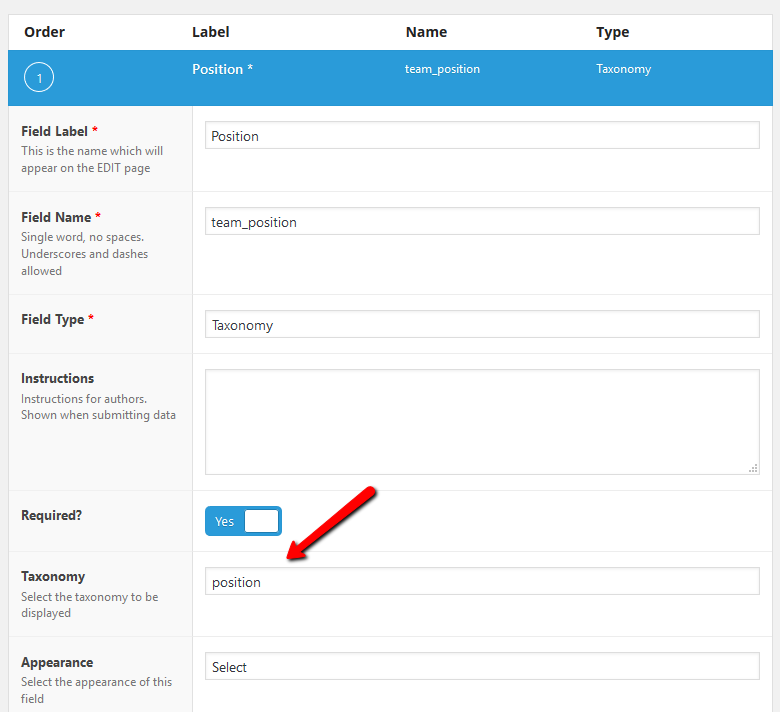
The Quote field is just a simple text area.
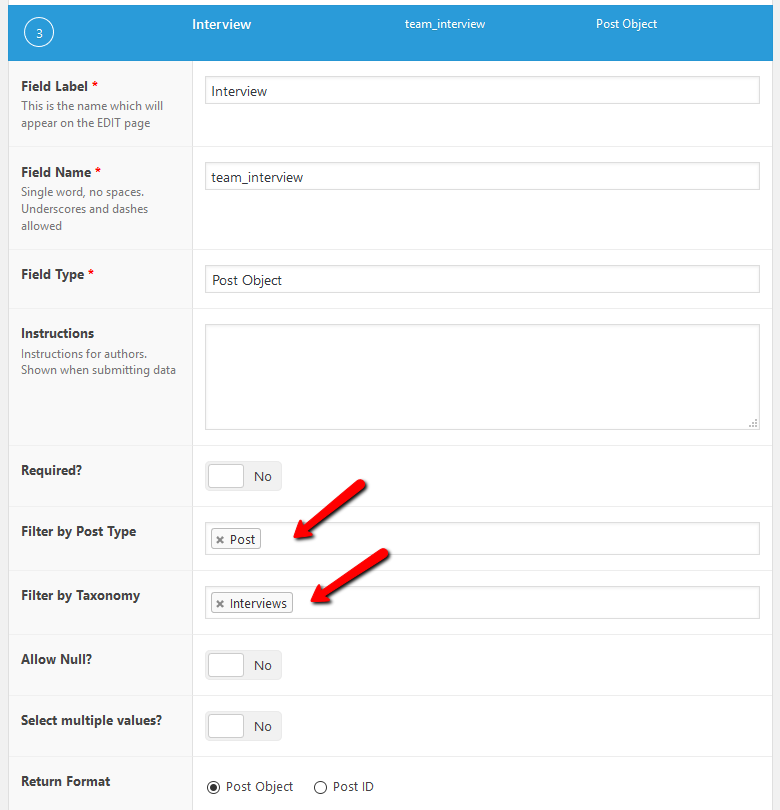
The Interview will be a blog post with an interview with the person. We can limit this field to the post type post and category Interviews if we have created such category for our blog posts.
Finally, we need to ensure that we can display a list of articles written by a team member. To do this, we associate a team member with a WordPress user who can write blog posts.
This setup is suitable when we have many team members from whom only a few are authors, so we don’t want to create and manage WordPress user accounts for all team members.
Of course, if all our team members are authors too, we could add the field group to the form for adding WordPress users. In such case, a rule for displaying the field group would be Show this field group of User form is equal to Add / Edit.
Now we can add some data in WP admin. Go to Team / Add Team Member and add a few team members. Create WordPress users for some of them, so they can publish articles.
Controller: WordPress and Timber
Once we have our data modeled and created, we will take a look at the controller part. The controller in MVC routes requests to our application and take care of getting data from the model and sending them to the view for displaying.
In WordPress, the template hierarchy determines how requests are routed. We will use Timber to get data from the model and send them to the view.
We will have two controllers:
- team page index
- team member detail
You can create Team page with Chisel command.
yo chisel:page "Team"This will create a Team page and also its Twig template in templates/page-team.twig. Rename this to team.twig to match the PHP file we will create shortly.
Make the Team page the front-page in WordPress admin – go to Settings / Reading, select Front page displays: A static page and select the Front page: Team.
Then create PHP template team.php which we will use as a controller and enter the following code to it:
<?php
/**
 * Template Name: Team
 * Description: The template for displaying team page
 *
 * @package  dreamteam
 */

$context = Timber::get_context();
$context['team'] = Timber::get_posts( array( 'post_type' => 'team', 'posts_per_page' => -1 ) );

Timber::render( array( 'team.twig' ), $context );
What do we do here? First, we get context which is a Timber object storing various common data needed across the site. The context already contains the post data because it was globally added in functions.php. Then we get all team members. We assign this newly acquired data to the context variable so we can pass them to the view in the last step.
Finally, select template Team for the page Team in the WP admin.

For displaying team member detail, we will create new PHP template single-team.php. WordPress will automatically route requests to /team/[slug]/ to this template and allow us to get a proper team member.
Use this code in the template:
<?php
/**
 * The Template for displaying single team page
 *
 * @package dreamteam
 */

$context = Timber::get_context();

// Get posts of the associated user
$user = $context['post']->get_field('team_user');
if ($user) {
	$context['user_posts'] = Timber::get_posts(array('author' => $user['ID'], 'post_type' => 'post', 'numberposts' => 3 ));
}

// Get user's interview
$interview = $context['post']->get_field('team_interview');
if ($interview) {
	$context['interview'] = new TimberPost($interview);
}

Timber::render( array( 'single-team.twig' ), $context );
As before, we get the context and then we get the last three blog posts of the associated user if we set up a one for the team member.
To get the user’s interview, we get the value for the team_interview custom field and then use it to get an actual post with the TimberPost method.
Finally, we’ll call the render method to pass all data to the view and display it.
View: Timber
Now that we have acquired all data we need, it’s easy to display them in the view – which is exactly what the view in MVC is responsible for.
One of the main reasons which make Timber so easy to work with is that it uses Twig template engine for displaying data.
Twig syntax is very intuitive and flexible. Let’s take a look at the template for the team index page which is stored in templates/team.twig
{% extends "layouts/base.twig" %}

{% block content %}
  {% if post.title %}<h1 class="c-team__heading">{{post.title}}</h1>{% endif %}
  {% if team is defined %}
    <ul class="o-layout o-layout--2 c-team">
      {% for member in team %}
        <li class="o-layout__item c-team__item {% if loop.index is divisible by(2) %}c-team__item--reverse{% endif %}">
          <a href="{{member.link}}" class="c-team__link">
            <h2 class="c-team__title">{{member.title}}</h2>
            <img src="{{member.thumbnail}}" alt="{{member.title}}" class="c-team__image">
          </a>
        </li>
      {% endfor %}
    </ul>
  {% endif %}
{% endblock %}
First, we use the base template which contains overall page layout, and then we display our custom content.
We can display whatever variable we have assigned to the context in our controller. The team variable contains a list of team members, so we just iterate over them and display data we need.
Similarly, we display team member details page in templates/single-team.twig:
{% extends "layouts/base.twig" %}

{% block content %}
  <a href="/" class="c-top-link">Home</a>
  <div class="o-layout o-layout--2 c-person">
    <div class="o-layout__item">
      <img src="{{post.thumbnail}}" alt="{{post.title}}">
    </div>

    <div class="o-layout__item c-person__info">
      <h1 class="c-person__info__name">{{post.title}}</h1>
      <h2 class="c-person__info__position">{{TimberTerm(post.team_position).title}}</h2>
      <div class="c-person__info__description">
        {{post.content}}
      </div>
    </div>

    <div class="o-layout__item c-person__quote">
      <h2 class="c-person__quote__title">A Grain of Wisdom</h2>
      <blockquote class="c-person__quote__text">
        <p>{{post.team_quote}}</p>
      </blockquote>
    </div>

    <div class="o-layout__item c-person__links">
      <h2 class="c-person__links__title">Articles</h2>
      {% if user_posts %}
        <ul class="c-person__links__list">
        {% for user_post in user_posts %}
          <li class="c-person__links__item"><a href="{{user_post.path}}" class="c-person__links__link">{{user_post.title}}</a></li>
        {% endfor %}
        </ul>
      {% else %}
        <p>Sorry, this person is too lazy to write anything.</p>
      {% endif %}

      <h2 class="c-person__links__title">Interview</h2>
      {% if interview %}
        <a href="{{interview.path}}" class="c-person__links__link">{{interview.title}}</a>
      {% else %}
        <p>Sorry, nobody wanted to interview this person.</p>
      {% endif %}

      {% if post.next.link is not empty %}
        <a href="{{post.next.link}}" class="c-person__links__nav">Previous</a>
      {% endif %}
      {% if post.prev.link is not empty %}
        <a href="{{post.prev.link}}" class="c-person__links__nav c-person__links__nav--next">Next</a>
      {% endif %}
    </div>

  </div>
  <!-- / c-person -->

{% endblock %}
As you can see, displaying data is pretty self-explanatory, just remember what type of data is that. For example, the post is a Timber\Post object. Refer to documentation to see what properties and methods the particular object has. Here we could easily retrieve prev and next links with the built-in methods.
Conclusion
In this tutorial, we have shown how we can better organize our themes by borrowing some principles from the MVC pattern. To achieve this, we have used two powerful WordPress libraries – Advanced Custom Fields and Timber.
By thinking about our application in terms of MVC, we can focus on each concern one at a time – modeling data and relation among them in the model, routing requests and getting data in the controllers, and finally data presentation in the view. Splitting WordPress theme development this way makes it faster, more flexible and resulting code easier to maintain.
You can review and download the Dream Team theme on GitHub.


