- Do I Need to Know AI to Build a Bot?
- Getting Started
- Creating Environment Variables
- Create a Facebook Page and App
- Welcome Screen
- Setting up the Database
- Defining the Model Class
- Putting It All Together
- Going Live with Your Facebook Chat Bot
- Conclusion
- Frequently Asked Questions (FAQs) about Building a Facebook Chat Bot with Node and Heroku
Building a Facebook Chat Bot with Node and Heroku was peer reviewed by Joan Yin and Camilo Reyes. Thanks to all of SitePoint’s peer reviewers for making SitePoint content the best it can be!
At last year’s f8 conference, Facebook launched the Messenger Platform, giving developers the ability to create bots that could have a conversation with people on Messenger or from a Facebook Page. With bots, app owners can better engage with their users by providing personalized and interactive communication that can scale for the masses. Since the launch, businesses and app owners have shown great interest in the chat bots. Just three months after the announcement, there was an estimated 11,000 bots built on the platform.
Businesses and app owners aren’t the only ones benefiting from chatbots. Users of these bots can enjoy a myriad of services such as:
- getting immediate customer support
- booking a flight
- buying a movie ticket
- getting Netflix movie recommendations
- getting the weather forecast
- keeping up with the news
- getting advice on what to wear
- getting ideas of what to have for dinner depending on the ingredients at hand
- entertainment.
The current interest in and appeal of chatbots is obvious and as the technology in artificial intelligence improves, the bots will get better at interacting with users.
In this article, we’ll look at how to create a Facebook chat bot that can interact with users via Messenger on behalf of a Facebook Page. We’ll build a bot that gives the user different details regarding a movie that they specified.
Do I Need to Know AI to Build a Bot?
Being skilled in AI will certainly help, especially in building sophisticated bots, but is not required. You can certainly build a bot without knowing machine learning.
There are two types of bots you can build. One is based on a set of rules and the other uses machine learning. The former is limited in the interactions it can offer. It can only respond to specific commands. This is the type of bot we’ll be building.
With bots that use machine learning, you get better interaction with the user. The user can interact with the bot in a more natural way as they would in a human to human interaction, as opposed to just using commands. The bot also gets smarter as it learns from the conversations it has with people. We’ll leave building this type of bot for a future article. Machine learning knowledge will not be necessary, though. Lucky for us, there are services such as wit.ai and Api.ai that enable developers to integrate machine learning (specifically Natural Language Processing – NLP) into their apps.
Getting Started
You can download the code for the completed demo app here.
For your chat bot to communicate with Facebook users, we’ll need to set up a server that will receive, process and send back messages. The server will make use of the Facebook Graph API for this. The Graph API is the primary way to get data in and out of Facebook’s platform. The server must have an endpoint URL that is accessible from Facebook’s servers, therefore deploying the web application on your local machine won’t work, you have to put it online. Also, as of version 2.5 of the Graph API, new subscriptions to the service have to use a secure HTTPS callback URL. In the tutorial, we’ll deploy the app to Heroku as all default appname.herokuapp.com domains are already SSL-enabled. We’ll use Node.js to build the web application.
To get started, first make sure Node is installed on your computer. You can check this by typing node -v in the Terminal. If installed, it will output the version number. Then install the Heroku Command Line Interface (CLI). We’ll use this later to push the app to Heroku. Use heroku --version to verify that the CLI is installed.
Create the project directory and initialize a package.json file with the following commands.
$ mkdir spbot
$ cd spbot
$ npm init
Follow the prompts to set your preferences for the project.
After the package.json file has been generated, open it and add a start property to the scripts object. This lets Heroku know what command to execute to start the app. During project setup, I defined app.js as the entry point of the app, thus I’m using node app.js as the value of start. Change this according to your project’s settings.
{
  "name": "spbot",
  "version": "1.0.0",
  "description": "SPBot Server",
  "main": "app.js",
  "scripts": {
    "test": "echo \"Error: no test specified\" && exit 1",
    "start": "node app.js"
  },
  "author": "Joyce Echessa",
  "license": "ISC"
}
Install the following Node packages.
$ npm install express request body-parser mongoose --save
Create a .gitignore file in your project’s root directory and include the node_modules folder, to prevent it from being committed.
node_modules
In your project’s root directory, create a file labeled app.js (or index.js, if you went with the default name). Modify it as shown:
var express = require("express");
var request = require("request");
var bodyParser = require("body-parser");

var app = express();
app.use(bodyParser.urlencoded({extended: false}));
app.use(bodyParser.json());
app.listen((process.env.PORT || 5000));

// Server index page
app.get("/", function (req, res) {
  res.send("Deployed!");
});

// Facebook Webhook
// Used for verification
app.get("/webhook", function (req, res) {
  if (req.query["hub.verify_token"] === "this_is_my_token") {
    console.log("Verified webhook");
    res.status(200).send(req.query["hub.challenge"]);
  } else {
    console.error("Verification failed. The tokens do not match.");
    res.sendStatus(403);
  }
});
The first GET handler will be for our own testing – to know if the app has been successfully deployed. The second GET handler is the endpoint that Facebook will use to verify the app. The code should look for the verify_token and respond with the challenge sent in the verification request.
You can paste your own token into the code. Such data is best saved in an environment variable, which we’ll do shortly after we create a project on Heroku.
Deploying to Heroku
For the Facebook platform to connect with our backend application, we first need to put it online.
Create a Git repository and commit the project’s files with the following commands:
$ git init
$ git add .
$ git commit -m "Initial commit"
Register for a free Heroku account if you don’t already have one.
From your terminal, login to Heroku and create an application.
$ heroku login
$ heroku create
$ git push heroku master
$ heroku open
On running the heroku open command, the link to the running app will be opened in your default browser. If everything went well, you will get a page with the text Deployed! on it.
Creating Environment Variables
Before we continue, let’s create an environment variable on Heroku to hold the app’s Verify Token.
Open your Heroku Dashboard and select the app that you just deployed. Go to the app’s Settings and click on the Reveal Config Vars button. Enter VERIFICATION_TOKEN as the Key and your token as the Value and click Add.
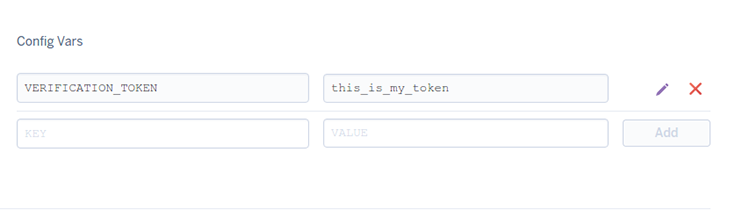
In your code, modify your token string ("this_is_my_token") to process.env.VERIFICATION_TOKEN. Commit your changes and push them to Heroku.
Create a Facebook Page and App
With the server up and running, we’ll now create a Facebook app and the Page it will be associated with. You can create a new Page or use an existing one.
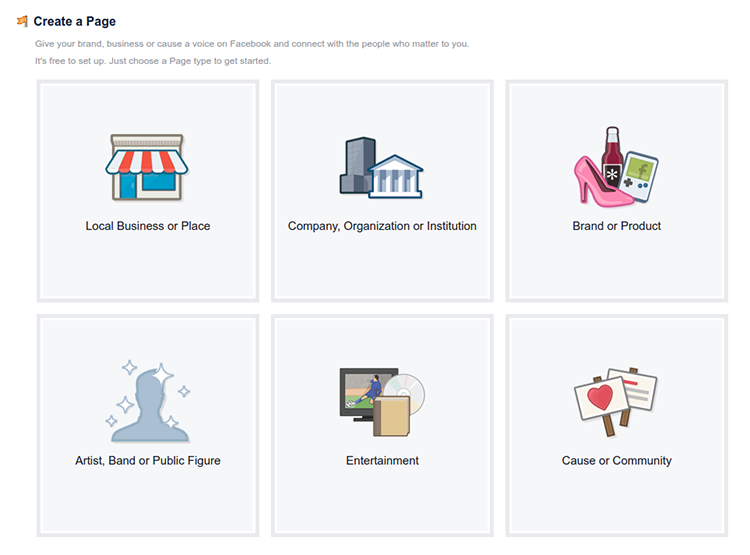
To create a Facebook Page, log in to Facebook and head over to Create a Page. Select a Page Type from the given options. I chose Entertainment.
Then select a Category and Name for the Page.
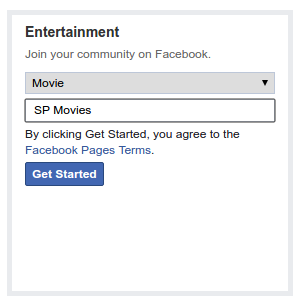
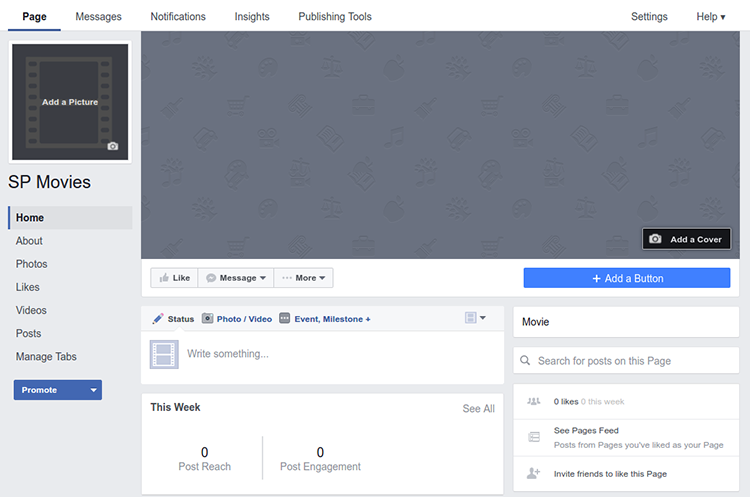
Ater clicking on Get Started, the Page will be created and you will be asked for more details regarding your app (description, website, profile picture, target audience, e.t.c). You can skip these setup steps for now.
To create a Facebook App, head over to the Add a New App page and click on the basic setup link below the other platform choices.
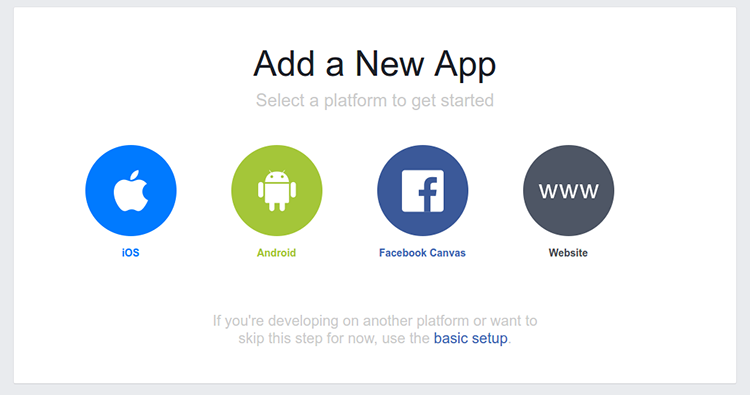
Fill in the necessary details. Select Apps for Pages as the Category.

On clicking Create App ID, the app’s dashboard will be opened.
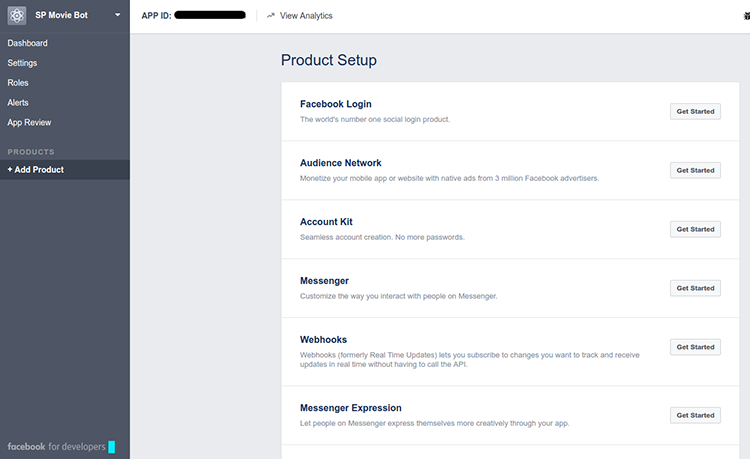
From the Product Setup on the right, click on Get Started in the Messenger section. You will then be taken to the Messenger Settings page shown below.
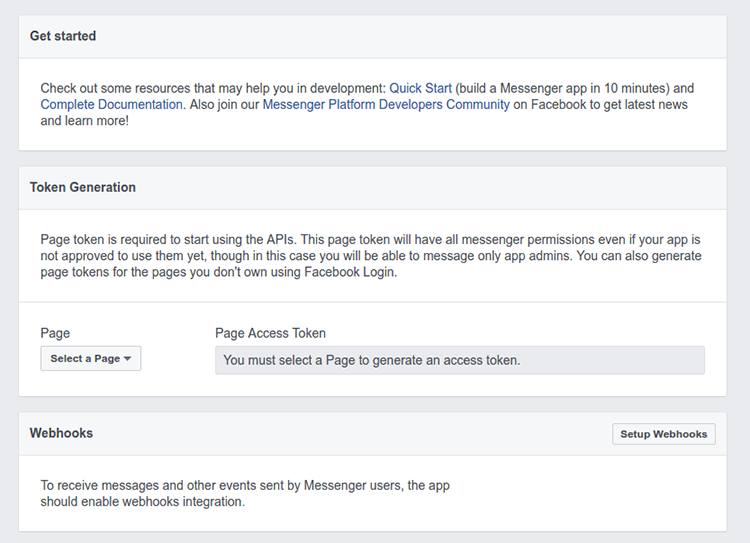
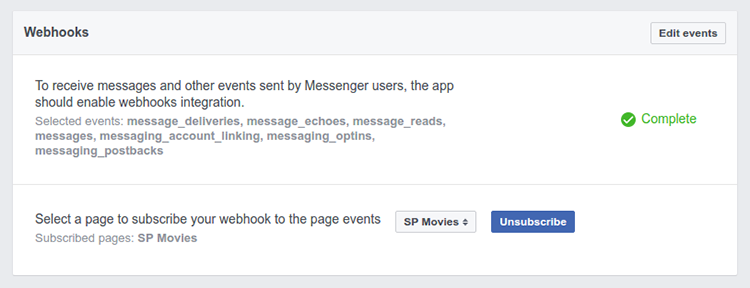
To receive messages and other events sent by Messenger users, the app should enable webhooks integration. We’ll do this next. Webhooks (formerly Real Time Updates) let you subscribe to changes you want to track and receive updates in real time without having to call the API.
In the Webhooks section, click Setup Webhooks
Enter a callback URL where the updates will be sent (the endpoint URL defined in the backend app i.e. <your-app-url>/webhook), enter a Verify Token (the token used in the backend app, i.e. the value stored in process.env.VERIFICATION_TOKEN) and check all the checkboxes. These specify which events the app will be subscribed to. We’ll see what these do a little later on.
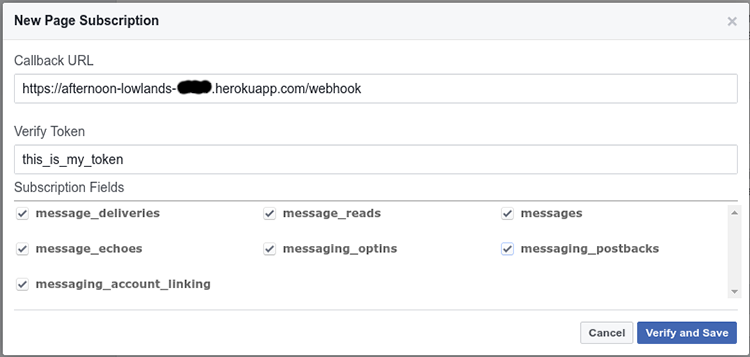
On successfully enabling webhooks, you should see Complete in the Webhooks section and a list of the events subscribed to. If you get an error, make sure you have entered the correct URL for the webhook endpoint (ending with /webhook) and also make sure the token used here is the same one you used in the Node app.

In the Token Generation section, select your Page from the dropdown menu. After authentication, a Page Access Token will be generated for you.
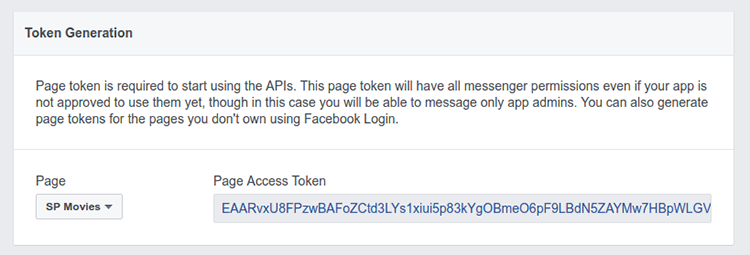
Create another environment variable on Heroku and set its Key to PAGE_ACCESS_TOKEN and the generated token as the Value. Note that the generated token will not be saved in the current page it is shown in on Facebook. Each time you go to that web page, the Page Access Token field will be blank and when you select your Facebook Page from the Page dropdown menu, a new token will be generated. However, any previous tokens created will continue to function. So make sure you copy the token before closing the web page.
In order for your webhook to receive events for a specific page, you must subscribe your app to the page. In the Webhooks section, select the page to subscribe to.
Welcome Screen
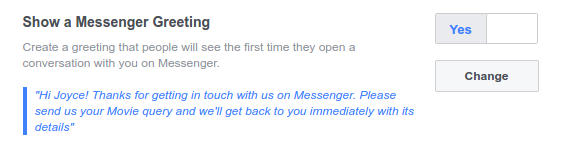
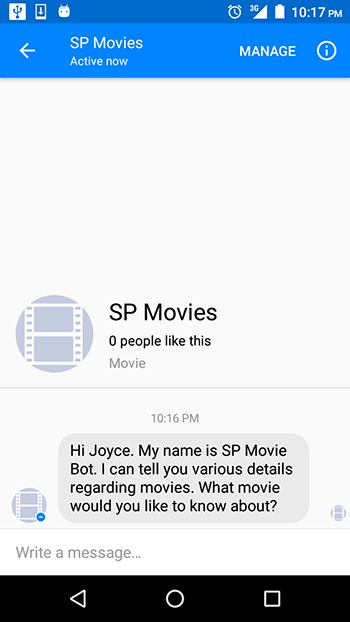
When a user starts a new conversation with your bot, the first thing they will see is the Welcome Screen. This screen will show your Page’s name, description, profile picture and cover photo. You can customize the screen by setting Greeting Text that will be used instead of the Page description. You can use this to set an introductory message that will let the user’s know what to expect from your bot.
By default, to start a conversation it is the user that sends the first message to your bot. You can, however, enable a Get Started button that will enable your bot to send the initial message. The button will send an event to your server that you can then respond to.
To set the greeting text, open your Page and go to its Settings.
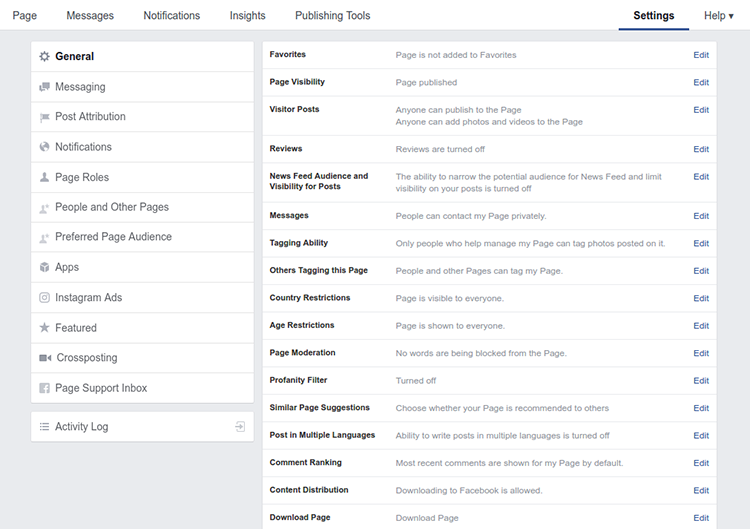
Select Messaging from the left panel and then turn on Show a Messenger Greeting on the right panel. Set the message to your liking.
To enable the Get Started button, replace the PAGE_ACCESS_TOKEN string in the following statement with your token and paste the command in Terminal.
curl -X POST -H "Content-Type: application/json" -d '{
  "setting_type":"call_to_actions",
  "thread_state":"new_thread",
  "call_to_actions":[
    {
      "payload":"Greeting"
    }
  ]
}' "https://graph.facebook.com/v2.6/me/thread_settings?access_token=PAGE_ACCESS_TOKEN"
The above makes a request to the Facebook Graph API. If the request is successful, a Get Started button will appear on the Welcome Screen of a new conversation. A user clicking on the button will trigger the postback received callback. Your bot can then respond to this postback.
Postbacks can be triggered by different types of components – a Postback button, Get Started button, Persistent menu or Structured Message. You can set any string as the payload. On the backend, we’ll then use this string to identify the postback sent as a result of tapping the Get Started button. To receive postback messages, your app must be subscribed to postbacks on your webhook. We did this earlier by checking the messaging_postbacks checkbox when we were setting up the webhook.
If the Get Started button is successfully set, you will get the following response.
{
  "result": "Successfully added new_thread's CTAs"
}
Remember the Welcome Screen and Get Started button only appear for new conversations. When coding and testing your bot, you can start a new conversation by deleting the current one.
To process the postback message, paste the following in your Node app.
// All callbacks for Messenger will be POST-ed here
app.post("/webhook", function (req, res) {
  // Make sure this is a page subscription
  if (req.body.object == "page") {
    // Iterate over each entry
    // There may be multiple entries if batched
    req.body.entry.forEach(function(entry) {
      // Iterate over each messaging event
      entry.messaging.forEach(function(event) {
        if (event.postback) {
          processPostback(event);
        }
      });
    });

    res.sendStatus(200);
  }
});

function processPostback(event) {
  var senderId = event.sender.id;
  var payload = event.postback.payload;

  if (payload === "Greeting") {
    // Get user's first name from the User Profile API
    // and include it in the greeting
    request({
      url: "https://graph.facebook.com/v2.6/" + senderId,
      qs: {
        access_token: process.env.PAGE_ACCESS_TOKEN,
        fields: "first_name"
      },
      method: "GET"
    }, function(error, response, body) {
      var greeting = "";
      if (error) {
        console.log("Error getting user's name: " +  error);
      } else {
        var bodyObj = JSON.parse(body);
        name = bodyObj.first_name;
        greeting = "Hi " + name + ". ";
      }
      var message = greeting + "My name is SP Movie Bot. I can tell you various details regarding movies. What movie would you like to know about?";
      sendMessage(senderId, {text: message});
    });
  }
}

// sends message to user
function sendMessage(recipientId, message) {
  request({
    url: "https://graph.facebook.com/v2.6/me/messages",
    qs: {access_token: process.env.PAGE_ACCESS_TOKEN},
    method: "POST",
    json: {
      recipient: {id: recipientId},
      message: message,
    }
  }, function(error, response, body) {
    if (error) {
      console.log("Error sending message: " + response.error);
    }
  });
}
Whenever someone interacts with your bot or sends your page a message, an update will be sent via your Webhook integration. To get the messages, you have to listen for POST calls at your webhook. All callbacks will be made to this webhook.
In the POST handler above, we iterate over the messaging entries sent to the app. Sometimes messages are batched and sent together, so an entry may contain multiple objects. We then iterate through each entry’s messaging event and check for its type. The following shows the different callback messages that can be sent to the app.
- Message Received callback – The Message received callback is sent when a person sends your bot a message. You must have subscribed to the
messagesevent when you setup your webhook. - Postback Received callback – The Postback Received callback is sent when a person clicks on a button that has been configured to send you a postback. In order to get a callback from a postback, you have to have subscribed to the
messaging_postbacksevent when you setup your webhook. - Message Delivered callback – This callback will occur when a message a page has sent has been delivered. You must have subscribed to the
message_deliveriesevent when you setup your webhook. - Authentication callback – This callback will occur when the Send-to-Messenger plugin has been tapped. You must have subscribed to the
messaging_optinsevent when you setup your webhook. - Message Read callback – This callback will occur when a message a page has sent has been read by the user. You must have subscribed to the
message_readsevent when you setup your webhook. - Message Echo callback – This callback will occur when a message has been sent by your page. You may receive text messages or messages with attachments (image, video, audio, template or fallback). You must have subscribed to the
message_echoesevent when you setup your webhook. - Checkout Update callback (BETA) – This callback will occur when using the Buy Button with a flexible-amount transaction. This allows you to update pricing based on a person’s shipping address. You must have subscribed to the
messaging_checkout_updatesevent when you setup your webhook. At the moment, this is not available outside the US. - Payment callback (BETA) – This callback will occur when a person taps the pay button from the checkout dialog rendered by the Buy Button. You must have subscribed to the
messaging_paymentsevent when you setup your webhook. At the moment, this is not available outside the US.
If the event is a Postback, we call the processPostback() function where we check the payload value. Remember, we had set Greeting as the payload of the Get Started button, so here we first check if the messaging event was sent as a result of clicking that button. If so, we use the User Profile API to get the user’s first name and use this to personalize the message that will be sent back to them. From the API, you can get their first name, last name, profile picture, locale, timezone, and gender.
The message is then sent to the sendMessage() function which POST’s it to the Messenger Platform. Back in the Webhook POST handler, we return a 200 OK HTTP response.
It is important to return a 200 response as fast as possible. Facebook will wait for a 200 before sending you the next message. In high volume bots, a delay in returning a 200 can cause significant delays in Facebook delivering messages to your webhook.
If your webhook returns an error (i.e. not a 2XX status) or times out (i.e. takes longer than 20 second to respond) and keeps doing so for over 15 minutes, you’ll be sent a warning alert.
If the webhook continues to fail for 8 hours, then Facebook will send you an alert letting you know that the webhook is being disabled, then your app will be unsubscribed. Once you’ve fixed the issues, you must re-add your webhook and re-subscribe the app to the page.
Commit the changes and push them to Heroku.
To test the bot, you can start a conversation with your page either from facebook.com, the facebook mobile app or using your Messenger short URL https://m.me/PAGE_USERNAME (we’ll see how to create a username shortly).
On Facebook and messenger, you can find the Page by searching for the page name.
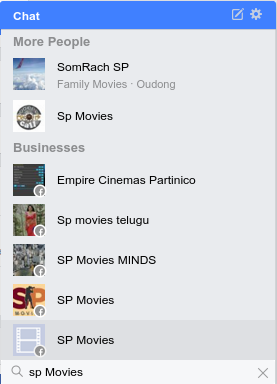
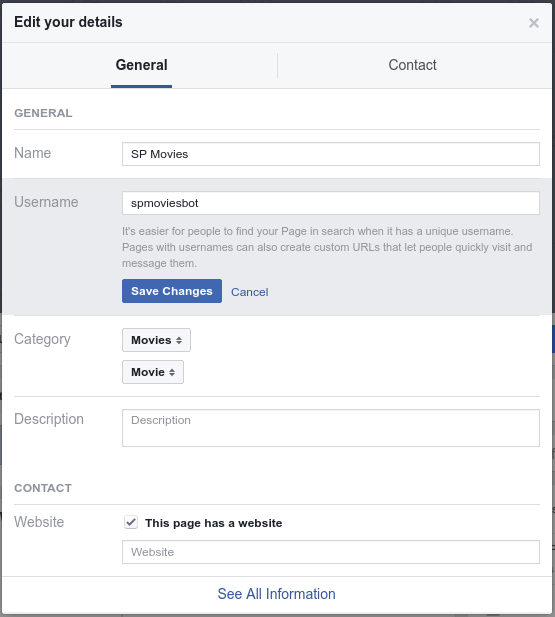
As you can see from the above, you can’t always guarantee that the page’s name will be unique. Your users might select the wrong page. To prevent this you can set a unique username for the page. To do this, go to your Page’s home page and select Edit Page Info from the More dropdown menu.
Then set the Username.
Now if you search for @page_username you’ll get the right page. You can also go to https://m.me/PAGE_USERNAME to start the interaction.
Below, you can see the greeting text we set for the Welcome Screen as well as the Get Started button.
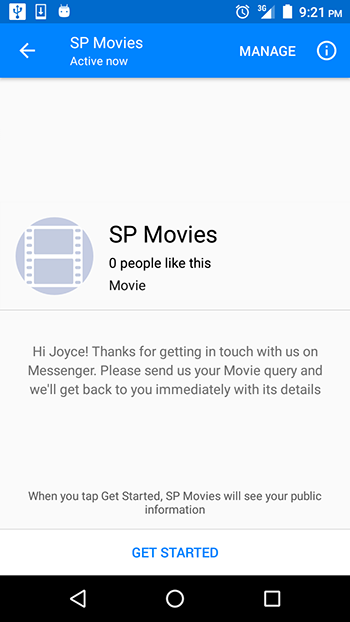
On tapping the button, you should see the message sent from the server.
If you enter any text, you won’t get back any response. We’ll take care of this next.
Setting up the Database
When the user enters a movie name, the bot will use the Open Movie Database API to get the details of the movie. The API request we’ll use will only fetch the first matched result, therefore the movie returned might not always be what the user wanted. Because of this, the bot will first confirm with the user to see if it got the movie right and after that, the user can get details like the movie’s plot, cast, IMDB rating, etc. They can also enter another movie name and get its details instead.
Because of this back and forth, the bot will need to remember the user’s current movie entry. Facebook doesn’t keep a session open with your webhook, so any data you store in a session object will be lost on the next request. We’ll instead save this data in a database – MongoDB to be specific. We’ll use mLab’s add-on on Heroku.
mLab is a Database-as-a-Service for MongoDB. On Heroku, while you can use the free sandbox mlab plan, you will need to have a credit card saved on Heroku for verification. If you do not want to provide your card details, then you can register an account on the mLab website, create a free-tier sandbox database there and link to that from your code (more on this shortly).
To use the addon on Heroku, go to the app’s dashboard and select the Resources tab. Search for mlab and select the result. On the dialog window that pops up, select the Sandbox - Free plan from the dropdown menu and click on Provision. You should see a confirmation of the chosen add-on.

If you check your environment variables on Heroku, you will see one with your MongoDB’s URI already set up.

Setting up a database via the mLab website
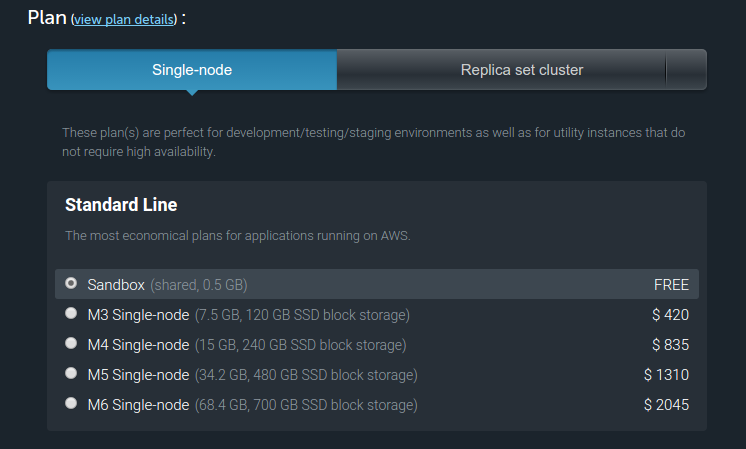
If you prefer setting up the MongoDB database on the mLab website, then register for an account there and head over to the Create new deployment page. Change the Plan setting to Single-node and then select Sandbox from the Standard Line section.
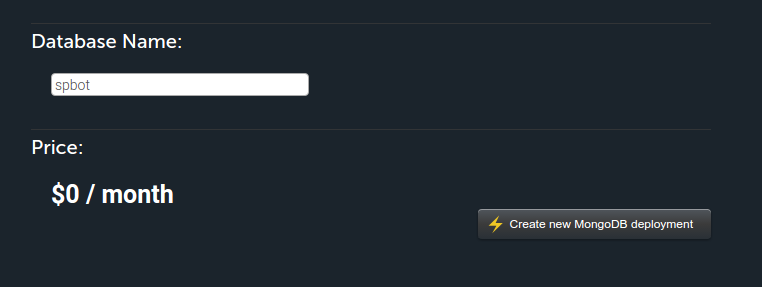
Set a name for your database and complete the process by clicking the Create new MongoDB deployment button.
On the page that follows, select the database you just created from the displayed table. A page will be opened that will show instructions on how to access the database.
Select the Users tab, and click the button Add database user. Fill out a username and password, and click Create. This creates a new set of credentials you can use to allow your app access to the DB.
In the top-half of the page, find and copy the database URI — it will look like mongodb://<dbuser>:<dbpassword>@dsxxxxxx.mlab.com:55087/spbot. Insert the dbuser name and password that you just created. On Heroku, create an environment variable named MONGODB_URI and paste in the database’s URI as its value.
Defining the Model Class
Back in the Node app, create a file labeled movie.js and save it in a folder labeled models. Paste the following into the file:
var mongoose = require("mongoose");
var Schema = mongoose.Schema;

var MovieSchema = new Schema({
  user_id: {type: String},
  title: {type: String},
  plot: {type: String},
  date: {type: String},
  runtime: {type: String},
  director: {type: String},
  cast: {type: String},
  rating: {type: String},
  poster_url: {type: String}
});

module.exports = mongoose.model("Movie", MovieSchema);
The above creates the movies database model. The user_id will be the user’s ID obtained from the Messenger Platform while the other fields will be fetched from the movies API. We’ll only store the user’s last searched movie, so the database will only have one record per user.
We could have omitted the user_id field and just used the user’s ID as the _id of each record created. This would have worked since the user IDs are unique for the Facebook Page. If you are going to do this, you should be aware that user IDs are page-scoped. This means that the IDs of users are unique for a given page, but a user can have a different id for different pages.
You need only to be aware of this if your bot is serving different Pages (yes, a bot can serve multiple pages). Thus, if your bot is serving several pages it might be faulty to identify the users by their user IDs only and it will also be faulty to use the user ID for the record’s _id field since this has to be unique and you won’t be able to guarantee this uniqueness across Pages.
Putting It All Together
With the database and model set up, we can now finish up the chatbot. The code will be presented in parts, but if you want to paste the whole code into your project, here is the link to the app.js file.
Start off by setting the database connection. Mongoose should have already been installed previously with other modules.
var mongoose = require("mongoose");

var db = mongoose.connect(process.env.MONGODB_URI);
var Movie = require("./models/movie");
Modify the webhook’s POST handler as shown.
// All callbacks for Messenger will be POST-ed here
app.post("/webhook", function (req, res) {
  // Make sure this is a page subscription
  if (req.body.object == "page") {
    // Iterate over each entry
    // There may be multiple entries if batched
    req.body.entry.forEach(function(entry) {
      // Iterate over each messaging event
      entry.messaging.forEach(function(event) {
        if (event.postback) {
          processPostback(event);
        } else if (event.message) {
          processMessage(event);
        }
      });
    });

    res.sendStatus(200);
  }
});
We’ve added a check for events that are of type message, passing them to the processMessage() function.
function processMessage(event) {
  if (!event.message.is_echo) {
    var message = event.message;
    var senderId = event.sender.id;

    console.log("Received message from senderId: " + senderId);
    console.log("Message is: " + JSON.stringify(message));

    // You may get a text or attachment but not both
    if (message.text) {
      var formattedMsg = message.text.toLowerCase().trim();

      // If we receive a text message, check to see if it matches any special
      // keywords and send back the corresponding movie detail.
      // Otherwise, search for new movie.
      switch (formattedMsg) {
        case "plot":
        case "date":
        case "runtime":
        case "director":
        case "cast":
        case "rating":
          getMovieDetail(senderId, formattedMsg);
          break;

        default:
          findMovie(senderId, formattedMsg);
      }
    } else if (message.attachments) {
      sendMessage(senderId, {text: "Sorry, I don't understand your request."});
    }
  }
}
Here, we first check if the message was sent via the Message Echo Callback. This callback will occur when a message has been sent by your page. For instance, the first message we sent to the user (the greeting) will be sent back to our Webhook. We don’t want to process any of our own messages so we put a check for this.
We then check if the message is a text or attachment (image, video, audio). In the case of the latter, we send an error message to the user. For text messages, we check if the input matches certain keywords that will indicate what detail of the movie the user wants. At this point, the user will have already made a query of a movie and the movie will be saved in the database. The getMovieDetail() function queries the database and returns the particular record.
function getMovieDetail(userId, field) {
  Movie.findOne({user_id: userId}, function(err, movie) {
    if(err) {
      sendMessage(userId, {text: "Something went wrong. Try again"});
    } else {
      sendMessage(userId, {text: movie[field]});
    }
  });
}
If the user’s query didn’t match any of the set keywords, the bot assumes the input is for a movie query, so this is passed to the findMovie() function which calls the Open Movie Database API with the input.
function findMovie(userId, movieTitle) {
  request("http://www.omdbapi.com/?type=movie&t=" + movieTitle, function (error, response, body) {
    if (!error && response.statusCode === 200) {
      var movieObj = JSON.parse(body);
      if (movieObj.Response === "True") {
        var query = {user_id: userId};
        var update = {
          user_id: userId,
          title: movieObj.Title,
          plot: movieObj.Plot,
          date: movieObj.Released,
          runtime: movieObj.Runtime,
          director: movieObj.Director,
          cast: movieObj.Actors,
          rating: movieObj.imdbRating,
          poster_url:movieObj.Poster
        };
        var options = {upsert: true};
        Movie.findOneAndUpdate(query, update, options, function(err, mov) {
          if (err) {
            console.log("Database error: " + err);
          } else {
            message = {
              attachment: {
                type: "template",
                payload: {
                  template_type: "generic",
                  elements: [{
                    title: movieObj.Title,
                    subtitle: "Is this the movie you are looking for?",
                    image_url: movieObj.Poster === "N/A" ? "http://placehold.it/350x150" : movieObj.Poster,
                    buttons: [{
                      type: "postback",
                      title: "Yes",
                      payload: "Correct"
                    }, {
                      type: "postback",
                      title: "No",
                      payload: "Incorrect"
                    }]
                  }]
                }
              }
            };
            sendMessage(userId, message);
          }
        });
      } else {
          console.log(movieObj.Error);
          sendMessage(userId, {text: movieObj.Error});
      }
    } else {
      sendMessage(userId, {text: "Something went wrong. Try again."});
    }
  });
}
If a movie is found, its details are saved together with the user’s ID. If a record with that user ID has previously been created, then it will instead be updated. We then create a Structured Message and send it to the user.
Apart from text, the Messenger Platform allows you to send back images, video, audio, files and Structured Messages. Structured Messages are templates that support different kinds of use cases. The Button Template allows you to send text and buttons. The Generic Template allows you to define an image, title, subtitle, and buttons. In our app, we use the generic template.
Modify the processPostback() function as shown.
function processPostback(event) {
  var senderId = event.sender.id;
  var payload = event.postback.payload;

  if (payload === "Greeting") {
    // Get user's first name from the User Profile API
    // and include it in the greeting
    request({
      url: "https://graph.facebook.com/v2.6/" + senderId,
      qs: {
        access_token: process.env.PAGE_ACCESS_TOKEN,
        fields: "first_name"
      },
      method: "GET"
    }, function(error, response, body) {
      var greeting = "";
      if (error) {
        console.log("Error getting user's name: " +  error);
      } else {
        var bodyObj = JSON.parse(body);
        name = bodyObj.first_name;
        greeting = "Hi " + name + ". ";
      }
      var message = greeting + "My name is SP Movie Bot. I can tell you various details regarding movies. What movie would you like to know about?";
      sendMessage(senderId, {text: message});
    });
  } else if (payload === "Correct") {
    sendMessage(senderId, {text: "Awesome! What would you like to find out? Enter 'plot', 'date', 'runtime', 'director', 'cast' or 'rating' for the various details."});
  } else if (payload === "Incorrect") {
    sendMessage(senderId, {text: "Oops! Sorry about that. Try using the exact title of the movie"});
  }
}
Here we add two checks for the Correct and Incorrect payload messages. These will be attached to buttons that the user will use to let the bot know if it presented the correct movie.
Commit your code and push it to Heroku, then try sending messages to the bot.
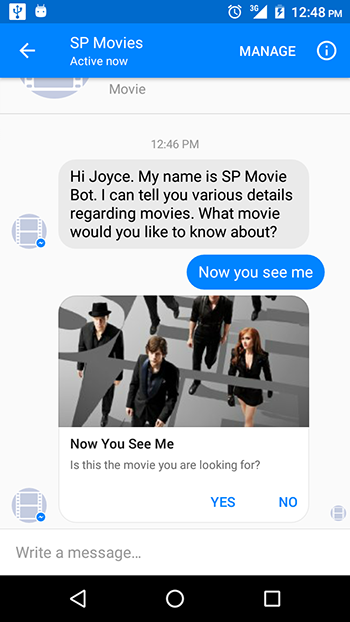
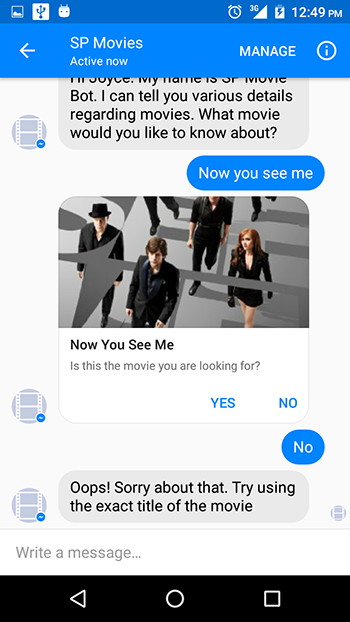
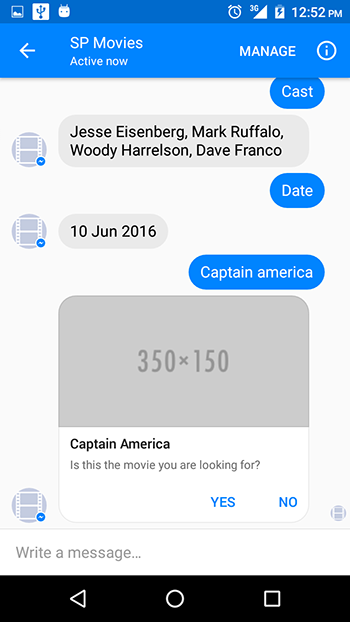
When you send a query to the bot, if it finds the movie, it sends back a structured message that checks if the correct movie was fetched.
On the web (and iOS), this looks a bit different.
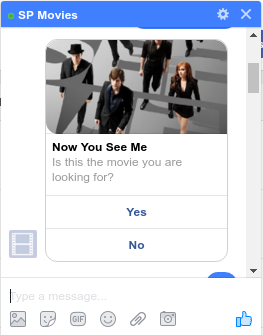
Structured messages can have different types of buttons as shown:
- URL button: Open a URL in the in-app browser
- Postback button: Send a postback to your webhook when you want to send an action to your bot
- Call button: Call a phone number
- Share button: Open a share dialog so that messages can be shared with friends
- Buy button: Open a checkout dialog for purchases
In our example, we use two Postback buttons and set their payload values to Correct and Incorrect. If you look at the processPostback() function, you’ll see the checks for these two payloads. If the No button is tapped, the following message will be returned:
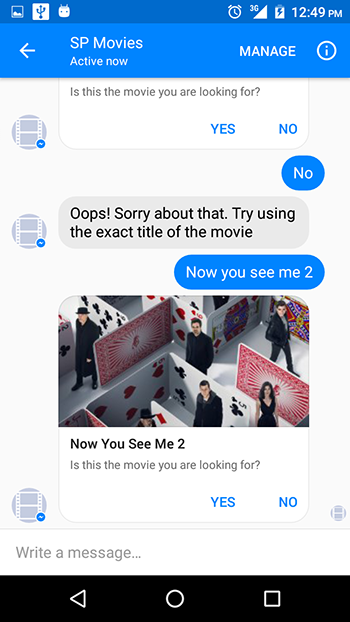
The user can then make another query.
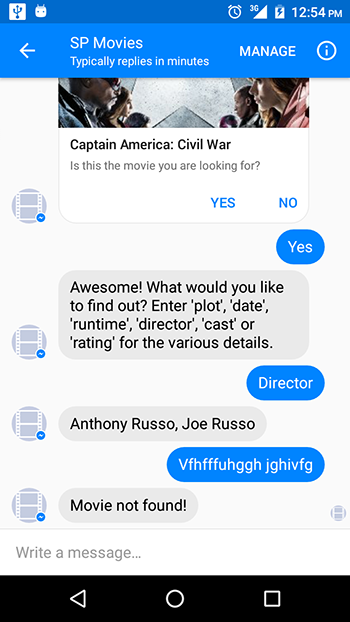
And on confirming that it is the correct movie, they will get further instructions from the bot on how to proceed.
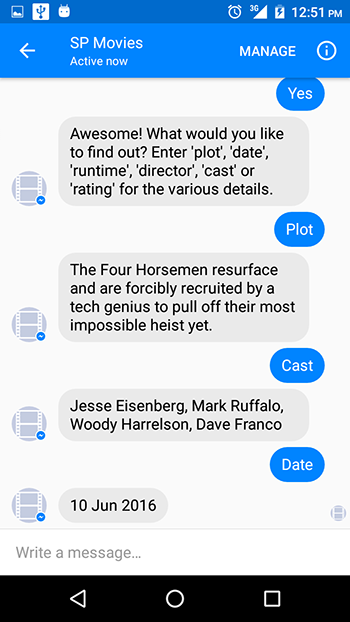
Remember, we check for these keywords in processMessage().
You have to make sure that the structured message you send is well-formed, otherwise it won’t be shown to the user. In the demo app, I noticed that there are some movies returned by the movies API that are missing some details in some of their fields. In such cases, the value of the field is N/A. In our structured message, we are using two fields from the object returned by the API – the Title and the Poster (URL for the movie poster). If a movie is found, it will always have a Title, so there is no need to confirm this, but if the movie doesn’t have a Poster and you don’t provide an alternate URL for this, the structured message will fail to be shown. So make sure the attributes in your structured messages always have values.
In our case, we link to a placeholder image in case none was returned.
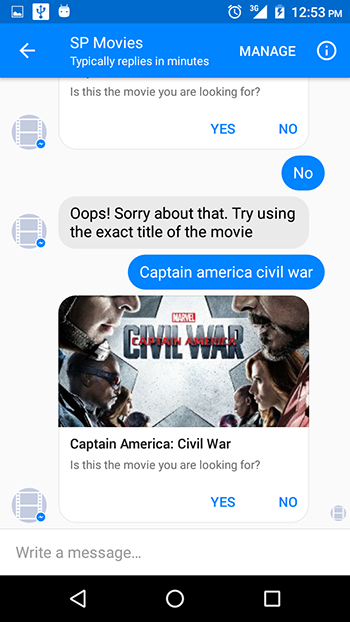
If no movie is found matching the user’s query, the bot lets them know that.
Going Live with Your Facebook Chat Bot
When you’re ready to release your app to the public, it must go through an approval process. Before the app is approved, only you and testers you invite will be able to interact with it. The submission process to the review team is out of the scope of this tutorial, but this guide will tell you what you need to do.
Conclusion
In this tutorial, we’ve built a simple Facebook chat bot that is capable of getting requests from a user on Messenger and responding to them. The bot is far from perfect, however. When a user is interacting with it, they are limited to a strict set of commands. This isn’t how people talk to each other. The bot can be improved in a way that will enable users to interact with it in a more natural way as they would in a human to human interaction, as opposed to just using commands. This can be done by integrating Natural Language Processing into the bot. To do this, you can build your own NLP engine or use a service such as wit.ai which enables you to add NLP into your apps. wit.ai is owned by Facebook and is free to use for both personal and commercial projects.
What do you think of chat bots and their increasing use? If you own a Facebook Page, would you consider letting a bot handle interactions with your users? Let me know what you think in the comments.
Want to learn more about bots? Check out our new Premium course on creating a Skype bot with the Microsoft Bot Framework!
Frequently Asked Questions (FAQs) about Building a Facebook Chat Bot with Node and Heroku
How can I ensure my Facebook chatbot is secure?
Security is a crucial aspect when building a Facebook chatbot. To ensure your chatbot is secure, you should always validate the tokens you receive from Facebook. This can be done by checking the signature in the header of the webhook POST request. Additionally, always use HTTPS for your webhook and never expose your app secret or page access token.
How can I test my Facebook chatbot?
You can test your chatbot directly on Facebook Messenger. Once your bot is set up, you can send messages to it and see how it responds. You can also use the built-in testing tools provided by Facebook for developers.
Can I use other programming languages to build a Facebook chatbot?
Yes, you can use other programming languages to build a Facebook chatbot. While this guide uses Node.js, Facebook’s Messenger Platform supports several other languages including Python, Ruby, and PHP.
How can I improve the performance of my Facebook chatbot?
To improve the performance of your chatbot, consider implementing a caching mechanism. This can help reduce the load on your server and improve response times. Additionally, ensure your code is optimized and free of unnecessary computations.
How can I handle multiple users interacting with my chatbot at the same time?
To handle multiple users, you can use the ‘sender.id’ provided by Facebook in each message to distinguish between different users. This allows you to maintain separate conversations with each user.
Can I integrate my Facebook chatbot with other services?
Yes, you can integrate your chatbot with other services. For example, you can use APIs to connect your chatbot to a database, a weather service, or even a machine learning model.
How can I make my chatbot understand natural language?
To make your chatbot understand natural language, you can use a Natural Language Processing (NLP) library or service. Facebook provides built-in NLP for basic tasks, but for more complex tasks, you might want to use a service like Dialogflow or Wit.ai.
How can I update my Facebook chatbot?
You can update your chatbot by making changes to your code and deploying them to Heroku. Remember to test your changes thoroughly before deploying them to ensure they don’t break your chatbot.
How can I monitor the performance of my Facebook chatbot?
You can monitor the performance of your chatbot using the analytics provided by Facebook for developers. This can help you understand how users are interacting with your chatbot and identify any issues.
Can I monetize my Facebook chatbot?
Yes, you can monetize your chatbot. Facebook allows businesses to use chatbots for customer service, sales, and marketing. You can also use your chatbot to promote products or services, or even charge users for premium features.
 Joyce Echessa
I am a web developer who dabbles in mobile development from time to time. You can find me on Twitter @joyceechessa to see what I’m up to.