This article was peer reviewed by Claudio Ribeiro. Thanks to all of SitePoint’s peer reviewers for making SitePoint content the best it can be!
I am a little obsessed with Twitter. It’s how I communicate with most of the developers I’m not fortunate to live in the same city as. I’m a little less obsessed with IoT projects, but then it’s harder to find the time to work on them than it is to check Twitter.
Unless I can do both at the same time.
Ever since the IoT week, I’ve been meaning to work on a project that will let me know when someone wants to speak to me. Something that looks cool, and is at the same time non-invasive. This is what I’ve come up with…
![]()
Most of this code can be found on Github. I’ve tested it using PHP 7.1.
In this post I talk a lot about pins. I use this word to mean the pins coming out of components, as well as the Arduino sockets these pins go into. They’re often called terminals or ports. When I talk about pins, I just mean a place you can connect components or wires to. I’m quite specific each time though, so you’ll be fine!
The Project
The project we’re going to work on is a simple notification system, connecting a single RGB LED, a proximity sensor, and a PHP script to gather notifications. As notifications are received, the RGB LED will cycle through them, fading the LED to the appropriate color for each notification type.
Say someone has mentioned us on Twitter. The LED should periodically cycle to the Twitter blue. Then, if someone sends us an email, the LED should cycle between the Twitter blue and the GMail red. We could extend this to the Fitbit green, the Facebook blue and so on.
If we’ve seen the Twitter notification, we should be able to wave our hand in front of the proximity sensor, and Twitter blue should be removed from the rotation, leaving GMail red etc.
The Hardware
We can use just about any RGB LED. As long as we can control the color it fades to, we can simulate the social network notifications we’re after. Really, just about any common anode RGB LED. If you get one that doesn’t include resistors, be sure to add those into your circuit. I’ll touch on that later…
The more IoT work you do, the more likely you are to run into the terms anode and cathode. A common anode RGB LED is one that connects one pin to the positive pin on your micro-controller or battery, and three pins to ground, depending on the combination of colors you’re after.
Connecting the red pin to ground will close the circuit so that current flows through the red portion of the LED. Connecting the red pin to a Pulse Width Modulation (or PWM) port on our Arduino, and grounding the port by half will reduce the amount of current flowing through the red portion of the LED.
Grounding the various pins by varying amounts will lead to many different colors – as many as you can define as CSS colors.
Next, we need some kind of proximity sensor. The easiest (in my opinion) is an infrared transceiver. You could also use an ultrasonic transceiver, but they’re better at mid-range (as they have a minimum sensing distance, so you’ll have to be further away from the sensor).
Finally, we need an Arduino. You can use another micro controller, but this post will refer specifically to Arduino, because I have three within arms-reach, and nothing else to test on.
Connecting Things Together
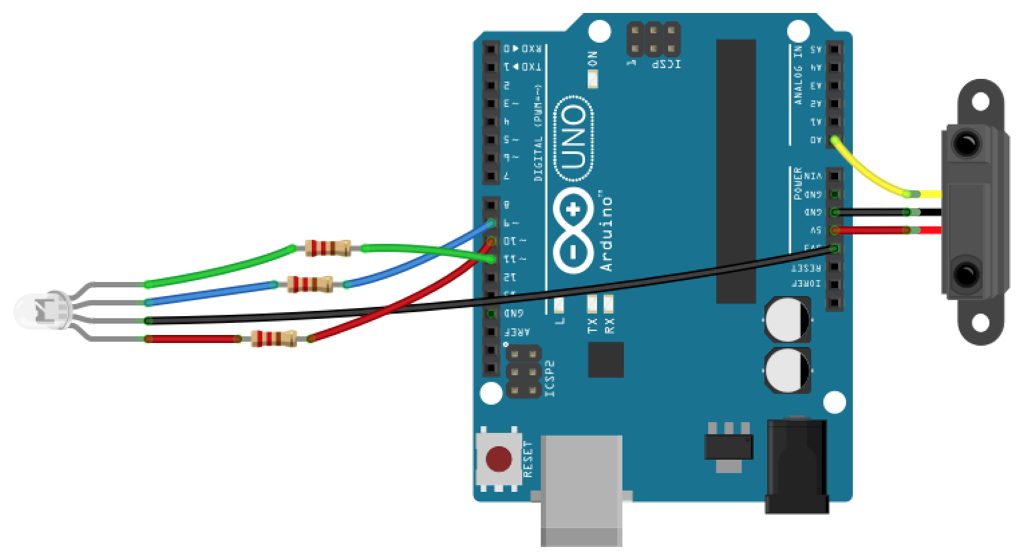
This is a relatively simple circuit, as far as they go. I’m by no means an expert, but I did manage to find the data sheets for the infrared sensor and RGB LED I bought; so connecting them up wasn’t too troubling.
The important bits are that our LED pins are connected to PWN ports, so that we can gradually adjust the amounts of red, green, and blue, and that the sensor pin is connected to an analog port (in this case A0).
You may be wondering why we don’t connect the LEG pins to analog ports, or why we don’t connect the sensor to a PWM port. PWM is designed to simulate degrees of on/off, but the way that is done is by turning something on for a fraction of a second.
With the right frequency of on/off cycles, LEDs only appear to be partially bright. That’s a side-effect of our eyesight, in much the same way as thirty static images played in quick succession can appear to represent motion video.
We need the sensor connected to the analog port because we really do need a gradual measurement, and A0 will give us that.
My RGB LED is fine with 3.3v and 200mA of current (before the resistors). So I can connect that to the 3.3v pin, and leave the 5v pin for the sensor’s power supply.
My sensor also has a pin to enable/disable the sensor readings. I’ll code for this, but keep in mind that your sensor might also have this. If it does, connect it to any unused output pin (like 0–8 or 12–13) and make sure you set that pin to high.
We also need to connect the Arduino USB port to an open USB port on development machine.
The Software
Now let’s look at the software we’ll use to control things. Before we start telling the Arduino what to do, we should define some services:
namespace Notifier;

interface Service
{
    /**
     * Queries the service to trigger notification
     * alerts. Returns true if there are new
     * notifications to show.
     *
     * @return bool
     */
    public function query();

    /**
     * Marks the most recent notifications as seen.
     */
    public function dismiss();

    /**
     * Returns the name of this service.
     *
     * @return string
     */
    public function name();

    /**
     * Returns an array of pin color values,
     * for a common-anode RGB LED.
     *
     * @return int[]
     */
    public function colors();
}
This is from src/Service.php
Each service we connect to needs to have a way for us to query for new notifications. Once we dismiss a notification type, we’ll also need to let the related service know.
Well need to be able to identify each service by a friendly name, and we’ll also need to know which light colors to associate with the service.
Connecting To Twitter
Communicating with Twitter means dealing with OAuth. There’s no point writing yet another abstraction for this, so we’re going to use a fairly popular Twitter library:
composer require endroid/twitter
We’re also going to need to create and store various API keys. Head over to https://apps.twitter.com/app/new and create a new application. You can use any callback URL, since we’re going to override it anyway.
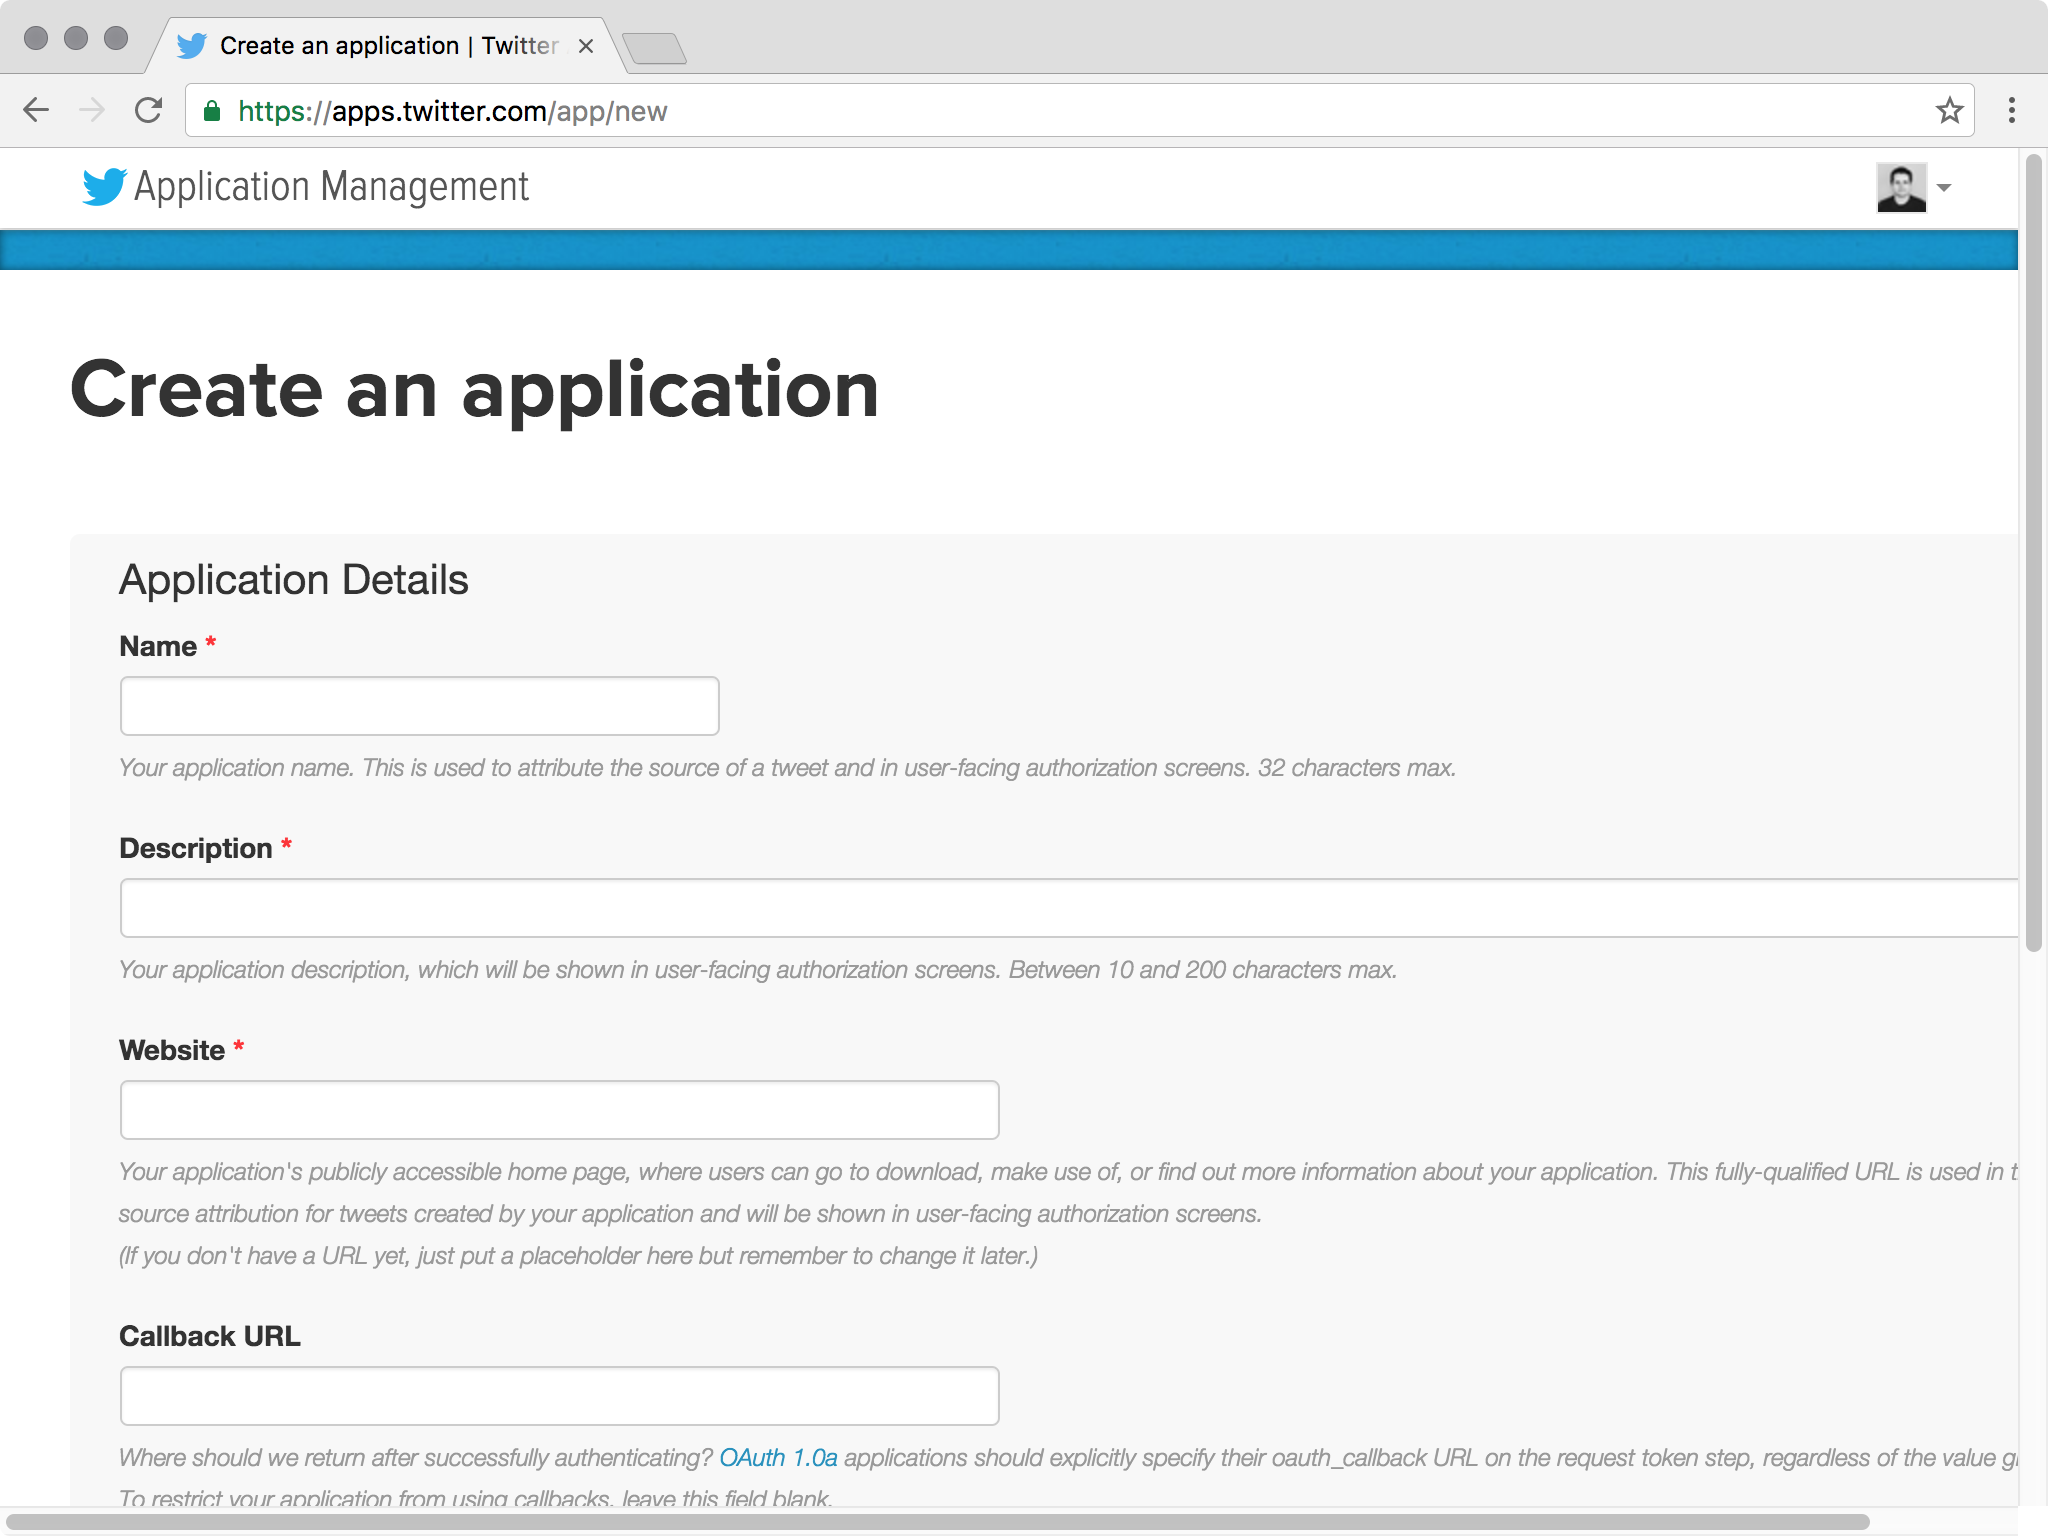
Creating new Twitter applications
Note the consumer and access tokens and keys. Committing these kinds of things to Github is usually a terrible idea, so instead we’ll store them as environment variables. Let’s create a couple of files (called .env and .env.example):
SERVICE_GMAIL_USERNAME=
SERVICE_GMAIL_PASSWORD=

SERVICE_TWITTER_CONSUMER_KEY=
SERVICE_TWITTER_CONSUMER_SECRET=
SERVICE_TWITTER_ACCESS_TOKEN=
SERVICE_TWITTER_ACCESS_TOKEN_SECRET=
This is from .env.example
Before doing anything else, create a .gitignore file, and add .env to it. That’s where we will store the secret things, so we definitely don’t want to commit it to Github.
Next, let’s create the Twitter notifier service:
namespace Notifier\Service;

use Notifier\Service;
use Endroid\Twitter\Twitter as Client;

class Twitter implements Service
{
    /**
     * @var Client
     */
    private $client;

    /**
     * @var bool
     */
    private $new = false;

    /**
     * @var int
     */
    private $since;

    /**
     * @param string $consumerKey
     * @param string $consumerSecret
     * @param string $accessToken
     * @param string $accessTokenSecret
     */
    public function __construct($consumerKey, ↩
        $consumerSecret, $accessToken, $accessTokenSecret)
    {
        $this->client = new Client(
            getenv("SERVICE_TWITTER_CONSUMER_KEY"),
            getenv("SERVICE_TWITTER_CONSUMER_SECRET"),
            getenv("SERVICE_TWITTER_ACCESS_TOKEN"),
            getenv("SERVICE_TWITTER_ACCESS_TOKEN_SECRET")
        );
    }
}
This is from src/Service/Twitter.php
Generally, it’s a good idea to create dependencies like the Client outside the class, and bring them in as constructor parameters. But this client is just an implementation detail, and I have no interface to hint against. I think it’s OK to create a new instance inside.
The getenv function gets environmental variables – the same ones we defined in .env. We’ll load them shortly.
Let’s create the query method:
/**
 * @inheritdoc
 *
 * @return bool
 */
public function query()
{
    if ($this->new) {
        return true;
    }

    $parameters = [
        "count" => 1,
    ];

    if ($this->since) {
        $parameters["since_id"] = $this->since;
    }

    $response = $this->client->query(
        "statuses/mentions_timeline",
        "GET", "json",
        $parameters
    );

    $tweets = json_decode($response->getContent());

    if (count($tweets) > 0) {
        $this->new = true;
        $this->since = (int) $tweets[0]->id;
    }

    return $this->new;
}
This is from src/Service/Twitter.php
We’re going to be querying this service often, and until we dismiss the tweet notifications, we want them to continue showing on the LED. Therefore, if we previously found new tweets, we can return early.
If we’ve already queried Twitter for new tweets, we add its ID into the request parameters. That means we’ll only return new tweets in subsequent API requests.
We already connected with the client in the constructor. So, we can immediately call the client->query method, fetching tweets from the mentions timeline. If there are any new tweets since the since ID, we report new tweets.
We just need to complete the interface:
/**
 * @inheritdoc
 */
public function dismiss()
{
    $this->new = false;
}

/**
 * @inheritdoc
 *
 * @return string
 */
public function name()
{
    return "twitter";
}

/**
 * @inheritdoc
 *
 * @return int[]
 */
public function colors()
{
    return [1 - 0.11, 1 - 0.62, 1 - 0.94];
}
This is from src/Service/Twitter.php
We’ll see how to use this class shortly.
Connecting To Gmail
We don’t have to use OAuth to connect to GMail, but we do have to enable IMAP, and generate an application-specific password. If you don’t already have IMAP enabled with PHP, refer to your installation’s/operating sytem’s help for doing that. When building from source, you can generally install it with the --with-imap flag. That also works with Homebrew on OS X:
brew install phpXX --with-imap
XX is your PHP version number like 56 or 71
To create a new application-specific password, head over to https://security.google.com/settings/security/apppasswords :
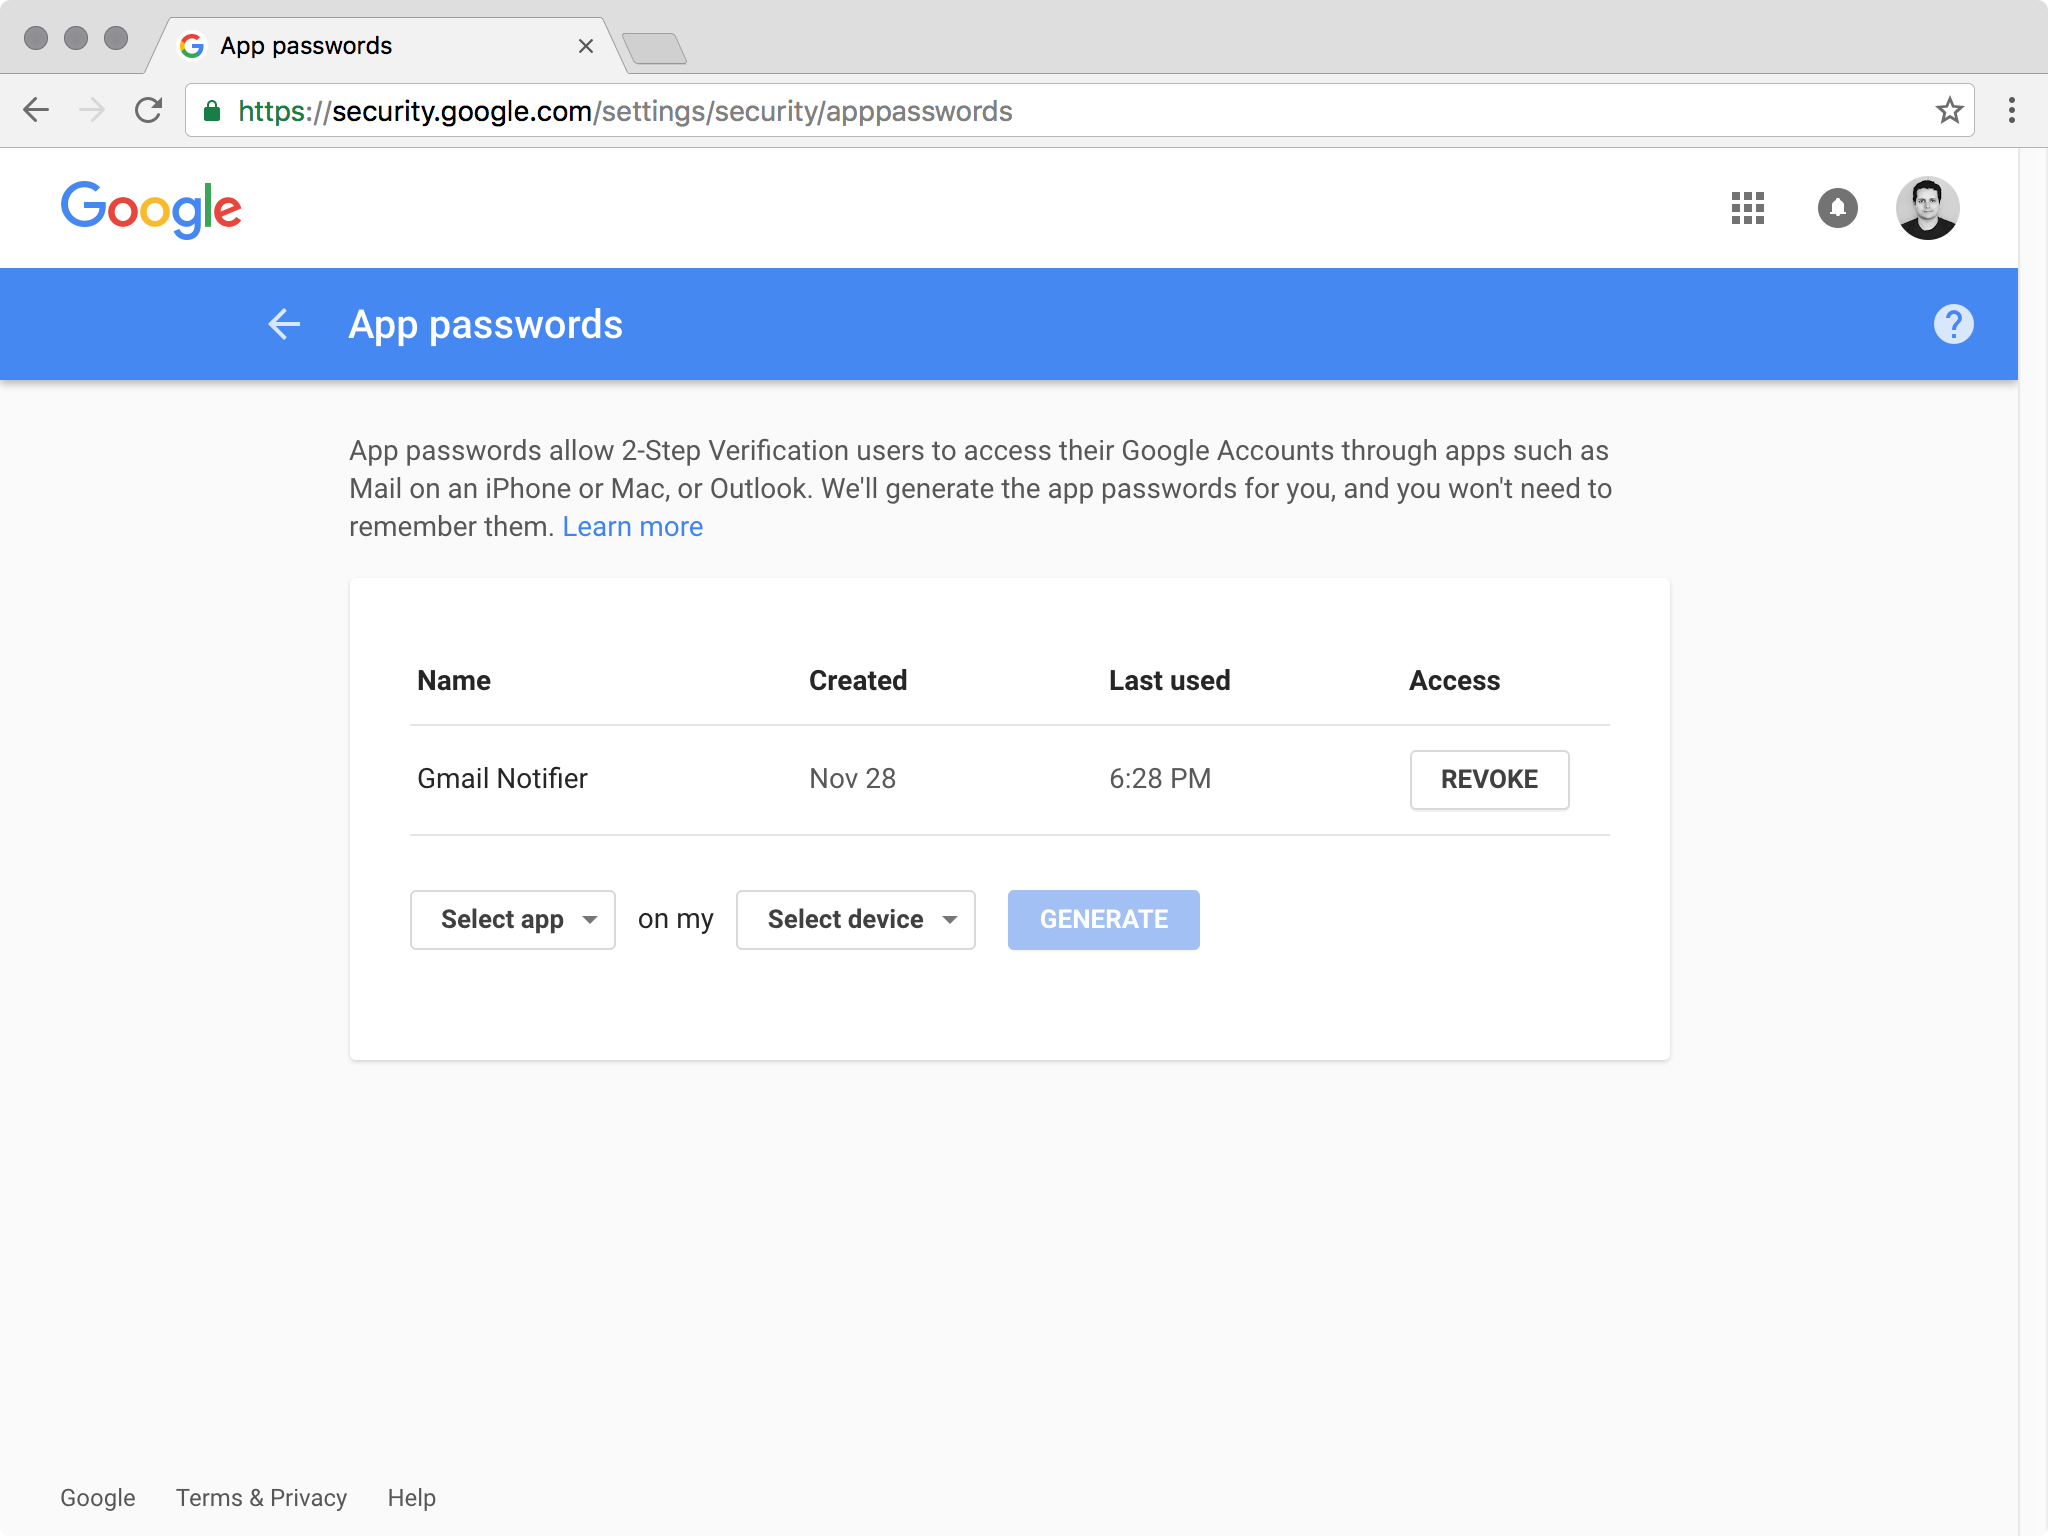
Creating new Google application-specific passwords
Once you have a new password, set it in .env, along with the email address you created it for. Next, let’s connect to GMail:
namespace Notifier\Service;

use Notifier\Service;

class Gmail implements Service
{
    /**
     * @var bool
     */
    private $new = false;

    /**
     * @var array
     */
    private $emails = [];

    /**
     * @var string
     */
    private $username;

    /**
     * @var string
     */
    private $password;

    /**
     * @param string $username
     * @param string $password
     */
    public function __construct($username, $password)
    {
        $this->username = $username;
        $this->password = $password;
    }
}
This is from src/Service/Gmail.php
This looks similar to how we began the Twitter service class, but instead of creating a new Twitter client, we’re going to use imap_open to get a new inbox resource.
As I discovered earlier, we need to reconnect each time we want to check for new emails. A curious side-effect of this IMAP client…
Next, we need to create the query method:
/**
 * @inheritdoc
 *
 * @return bool
 */
public function query()
{
    if ($this->new) {
        return true;
    }

    $inbox = imap_open(
        "{imap.gmail.com:993/imap/ssl}INBOX",
        $this->username, $this->password
    );

    if (!inbox) {
        return false;
    }

    $emails = imap_search($inbox, "ALL", SE_UID);

    if ($emails) {
        foreach ($emails as $email) {
            if (!in_array($email, $this->emails)) {
                $this->new = true;
                break;
            }
        }

        $this->emails = array_values($emails);
    }

    return $this->new;
}
This is from src/Service/Gmail.php
As I mentioned earlier, we need to reconnect to the IMAP server each time we want to see new emails. So, we do that, searching for all emails in the inbox. Then we compare what is returned with the list of previously cached message IDs. If there are any new ones, we report new emails.
Let’s finish up the rest of the interface implementation:
/**
 * @inheritdoc
 */
public function dismiss()
{
    $this->new = false;
}

/**
 * @inheritdoc
 *
 * @return string
 */
public function name()
{
    return "gmail";
}

/**
 * @inheritdoc
 *
 * @return int[]
 */
public function colors()
{
    return [1 - 0.89, 1 - 0.15, 1 - 0.15];
}
This is from src/Service/Gmail.php
Curiously, the RGB colors used in the YouTube and GMail logos are 226, 38, and 28. We subtract these from one because common-anode LEDs are brighter the lower PWM value we set. That’s because the lower PWM value we set, the more we ground the color pins, and grounding the pins leads to stronger current flow through the LEDs.
Let’s put these together with the Arduino code…
Connecting To Arduino
We don’t have a lot of time to go through the basics of Arduino PHP programming. Fortunately, I wrote another excellent post about it. Follow the instructions there, being sure to install the Gorilla extension (if you’re on OS X).
Once we’ve installed Firmata, we can install the Carica libraries:
composer require carica/io dev-master@dev
composer require carica/firmata dev-master@dev
In addition, we also need to install that environment variables library:
composer require vlucas/phpdotenv
We can get things started by loading the environmental variables, and connecting to the Arduino:
require __DIR__ . "/vendor/autoload.php";

use Dotenv\Dotenv;

(new Dotenv(__DIR__))->load();

use Carica\Io;
use Carica\Firmata;

$loop = Io\Event\Loop\Factory::get();

$board = new Firmata\Board(
    Io\Stream\Serial\Factory::create(
        "/dev/cu.usbmodem1421", 57600
    )
);

print "connecting to arduino...";

$board
    ->activate()
    ->done(function () use ($loop, $board) {
        print "done" . PHP_EOL;
    });

$loop->run();
This is from notifier.php
If you’re unsure what port to use (in place of my /dev/cu.usbmodem1421), type the following:
ls /dev | grep usbmodem
Try each of the returned items, until you can successfully connect to the Arduino. Once that’s there, let’s initialize the pins:
// diode pins

$board->pins[10]->mode = Firmata\Pin::MODE_PWM;
$board->pins[10]->analog = 1;

$board->pins[11]->mode = Firmata\Pin::MODE_PWM;
$board->pins[11]->analog = 1;

$board->pins[9]->mode = Firmata\Pin::MODE_PWM;
$board->pins[9]->analog = 1;

// sensor pins

$board->pins[12]->mode = Firmata\Pin::MODE_OUTPUT;
$board->pins[12]->digital = 1;

$board->pins[14]->mode = Firmata\Pin::MODE_ANALOG;
This is from notifier.php
Not much to say about this. Each RGB LED pin is set to PWM mode, and their values are set to 1 (so that they LED appears to be off). Since my infrared sensor has an enable/disable pin, I need to set that pin to 1 (enabled). Finally, we set the sensor read pin mode to analog.
Next, let’s connect to Twitter and GMail:
print "connecting to services...";

$services = new SplQueue();

$services->enqueue([
    new Notifier\Service\Twitter(
        getenv("SERVICE_TWITTER_CONSUMER_KEY"),
        getenv("SERVICE_TWITTER_CONSUMER_SECRET"),
        getenv("SERVICE_TWITTER_ACCESS_TOKEN"),
        getenv("SERVICE_TWITTER_ACCESS_TOKEN_SECRET")
    ), false
]);

$services->enqueue([
    new Notifier\Service\Gmail(
        getenv("SERVICE_GMAIL_USERNAME"),
        getenv("SERVICE_GMAIL_PASSWORD")
    ), false
]);

print "done" . PHP_EOL;
This is from notifier.php
We can enqueue each service we want to connect to in an SPLQueue. It’s a useful abstract for first-in-first-out (or FIFO) object storage. The second boolean parameter is whether of not the service has new notifications to display. We’ll change this as new notifications are detected and dismissed.
Now, let’s set up a repeating check for new notifications:
$loop->setInterval(function () use (&$services) {
    $remaining = count($services);

    while ($remaining--) {
        $next = $services->dequeue();
        $next[1] = $next[0]->query();
        $services->enqueue($next);
    }
}, 1000 * 5);
This is from notifier.php
We can use the event loop’s setInterval method, which reoccurs every 1000 millisecond * 5 (or 5 seconds). We step through each service in the queue, pull it out, set whether or not it should display new notifications, and then put it back into the queue.
This is strange syntax, to be sure. But it’s just a side-effect of using the queue.
Now we need to loop through the services again, changing the LED to their color in a rotation. We can set this to show one notification type every 4 seconds:
$service = null;

$next = function () use ($loop, $board, &$next, ↩
    &$services, &$service) {

    $remaining = count($services);

    while ($remaining--) {
        $next = $services->dequeue();
        $services->enqueue($next);

        if ($next[1]) {
            print "showing {$next[0]->name()}" . PHP_EOL;

            $service = $next;
            break;
        }
    }

    if (!$service) {
        print "no notifications" . PHP_EOL;
        return;
    }

    $colors = $service[0]->colors();

    $board->pins[10]->analog = $colors[0];
    $board->pins[11]->analog = $colors[1];
    $board->pins[9]->analog = $colors[2];

    $loop->setTimeout(function () use ($board, &$service) {
        $board->pins[10]->analog = 1;
        $board->pins[11]->analog = 1;
        $board->pins[9]->analog = 1;

        $service = null;
    }, 1000 * 1.5);

};

$loop->setInterval($next, 1000 * 4);
This is from notifier.php
We use a similar loop syntax to loop over each service until we find one that needs to be displayed. If we find one, we pull it off the front of the queue and put it back at the end.
Then, we fetch its colors and set the pins to the appropriate value. After 1.5 seconds, we turn the pins off again (by setting them back to 1). This $next function is called every 4 seconds.
Finally, we want to be able to dismiss notification types, by waving our hand in front of the infrared sensor:
$loop->setInterval(function() use ($board, ↩
    &$services, &$service) {

    if ($service !== null && ↩
        $board->pins[14]->analog < 0.1) {

        $remaining = count($services);

        while ($remaining--) {
            print "dismissing {$service[0]->name()}" ↩
                . PHP_EOL;

            $next = $services->dequeue();

            if ($next[0]->name() === $service[0]->name()) {
                $service = null;
                $next[0]->dismiss();
                $next[1] = false;
            }

            $services->enqueue($next);
        }
    }
}, 50);
This is from notifier.php
If there is a service currently displaying a notification, and the sensor is reading a value below 0.1, we take that to mean that there’s a hand in front of the sensor (and that it is dismissing the notification type).
We loop through the services, telling the matching service to stop displaying notification alerts. We also call the dismiss method, so that the service will start checking for new messages again. This check happens every 50 milliseconds.
Conclusion
There are so many interesting things we can do using Arduino and PHP. This is just one useful project. While I was finishing this post, it let me know about multiple new emails and tweets. Now all I have to do is package it up in a project box, and I’ll be able to take it to work!
Did you enjoy this? Perhaps you have ideas for the next project I can work on. Let us know in the comments below.
Frequently Asked Questions (FAQs) about Twitter and Gmail Notifications with PHP and Arduino
How can I set up Twitter and Gmail notifications with PHP and Arduino?
Setting up Twitter and Gmail notifications with PHP and Arduino involves a few steps. First, you need to have a Twitter and Gmail account. Then, you need to install the PHP and Arduino software on your computer. Once installed, you can use the PHP script to connect to your Twitter and Gmail accounts and retrieve notifications. The Arduino software is used to program the hardware that will display the notifications. You can customize the PHP script and Arduino program to suit your needs.
Can I use other programming languages besides PHP for this project?
Yes, you can use other programming languages besides PHP for this project. However, PHP is a popular choice because it is widely used, easy to learn, and has a large community of developers who can provide support. Other languages you could use include Python, JavaScript, or Ruby.
What hardware do I need for this project?
The hardware you need for this project includes an Arduino board and a computer. The Arduino board is a microcontroller that can be programmed to interact with various electronic components. The computer is used to write and upload the program to the Arduino board.
How can I customize the notifications I receive?
You can customize the notifications you receive by modifying the PHP script. For example, you could change the script to only retrieve notifications from certain Twitter accounts or to filter out certain types of Gmail messages. You can also customize the way the notifications are displayed on the Arduino board.
Can I use this project to receive notifications from other social media platforms?
Yes, you can use this project to receive notifications from other social media platforms. You would need to modify the PHP script to connect to the API of the social media platform you want to receive notifications from.
How can I troubleshoot issues with this project?
If you encounter issues with this project, there are several steps you can take to troubleshoot. First, check to make sure your PHP script is correctly connecting to your Twitter and Gmail accounts. If the script is not connecting, check your account credentials and internet connection. If the script is connecting but not retrieving notifications, check the API documentation for Twitter and Gmail to make sure you are using the correct endpoints and parameters.
How can I stop receiving notifications?
If you want to stop receiving notifications, you can simply turn off the Arduino board or disconnect it from your computer. If you want to stop receiving notifications from a specific account or type of message, you can modify the PHP script.
Is this project suitable for beginners?
This project is suitable for beginners who have a basic understanding of programming and electronics. However, if you are completely new to these topics, you may find it challenging. There are many resources available online to help you learn the necessary skills.
Can I use this project for commercial purposes?
Yes, you can use this project for commercial purposes. However, you should be aware that Twitter and Gmail have usage limits for their APIs, which may restrict the number of notifications you can retrieve in a certain period of time.
What are the benefits of this project?
This project has several benefits. It allows you to receive real-time notifications from your Twitter and Gmail accounts, which can help you stay up-to-date with important messages. It also provides a fun and practical way to learn about programming and electronics.
 Christopher Pitt
Christopher is a writer and coder, working at Over. He usually works on application architecture, though sometimes you'll find him building compilers or robots.