
 The Alpha A6500 is Sony's best all-round mirrorless camera with an APS-C sensor to date. The original A6000 was the first mirrorless to confidently take-on sports and fast action. The A6300 then improved the focus and live feedback even further, while adding weatherproofing and great quality 4k video. Now the A6500 gives it broader appeal by adding built-in stabilisation, a touch-screen, deeper buffer and Bluetooth for hassle-free low-power location tagging. The built-in IS may not be quite as good as Olympus, but greatly improves composition, still shooting and movie filming with unstabilised lenses, and while the touch capabilities are under-used, you can at least tap to reposition the AF area or pull-focus while filming. While it's the continuous autofocus and fast bursts that continue to set it apart from rivals, the upgrades have made it a much more compelling camera overall than its predecessor. Sony needs to do some work on its controls and user interface, not to mention updating some features that should be standard at this price, but they don't hold it back from a highly recommended award.
Sony Alpha A6500 review
-
-
Written by Gordon Laing
In depth
The Sony Alpha A6500 is an upper mid-range mirrorless camera with a 24 Megapixel APSC sensor, built-in stabilisation, touchscreen, 4k video and a powerful AF system that’s perfect for action shooters. Announced in October 2016, it comes only eight months after the A6300, but doesn’t replace it. The A6300, and indeed the A6000, remain on sale, but the A6500 becomes the new flagship APS-C e-mount body.
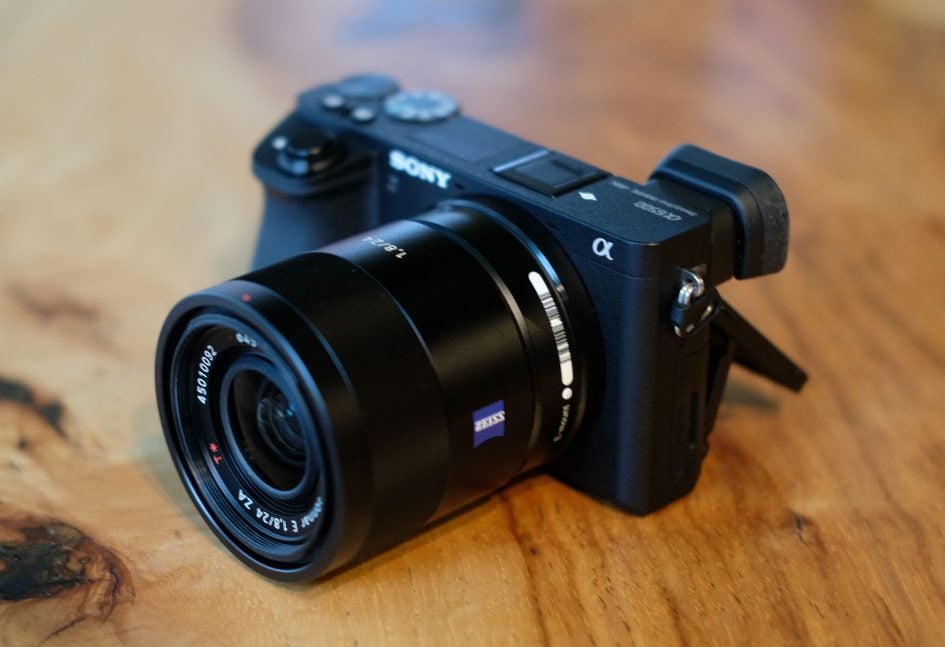
Externally the A6500 shares almost the same flat-topped weather-proof body as the A6300, but deepens the grip, enlarges the shutter release and adds a third Custom button. Like the A6300 you can compose with an XGA OLED electronic viewfinder or a 3in / 920k dot screen that can tilt up or down. Sadly the screen still can’t angle forwards to face the subject – so useful for vlogging as well as selfies – but in an important upgrade, the A6500 screen finally becomes touch-sensitive, allowing you to tap to reposition the AF area or pull-focus while filming.
Another major upgrade is built-in five-axis sensor-shift stabilisation which Sony claims is good for five stops of compensation. Like the A6300, the A6500 sports 425 embedded phase-detect AF points and 11fps continuous shooting (or 8 with live feedback), but thanks to a new front-side LSI, you can shoot longer bursts of over 20 seconds. There’s also 4k video up to 30p and 1080 up to 120p. Meanwhile the built-in Wifi / NFC is now complemented by Bluetooth to maintain a low-power link with a smartphone to embed GPS positions as you shoot. It’s the most capable APS-C body from Sony to date, but is it right for you? Find out in my in-depth review where I’ve compared it against key rivals from Olympus, Fujifilm and Sony itself!
Sony Alpha A6500 video review / podcast
In the video below, Doug Kaye and I discuss everything you need to know about the Sony Alpha A6500! I also have an audio podcast of this discussion below, or you can subscribe to the Cameralabs Podcast at iTunes.
Check prices on the Sony Alpha a6500 at Amazon, B&H, Adorama, or Wex. Alternatively get yourself a copy of my In Camera book or treat me to a coffee! Thanks!
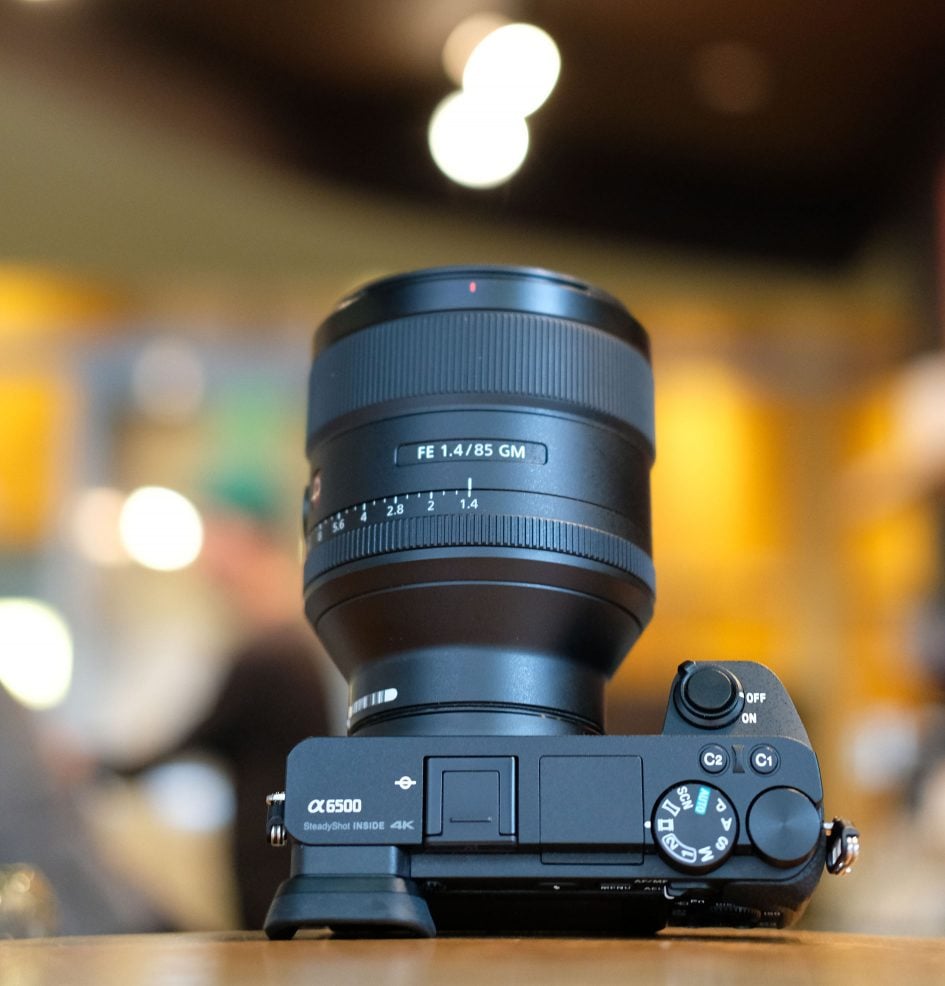
Sony Alpha A6500 design and controls
Externally the Sony A6500 looks a great deal like its predecessor, the A6300, sharing the same flat-topped body shape and essentially the same control layout. Sony has made a number of worthwhile physical upgrades though: the grip is now noticeably deeper and features a slightly indented inner area for your finger-tips, making it more comfortable to hold; there’s also a new LCS-EBG body case which deepens the grip further, while making the body slightly taller, which should prevent your little finger from dangling. Meanwhile the addition of a new Custom button on the top surface as well as a wider diameter shutter release are both welcome, but it’s the touch-screen which really makes the biggest difference for day-to-day shooting – and I’ll come to that in a moment.
Like the A6300 before it, the A6500 enjoys sealing against dust and moisture. I didn’t get a chance to use the A6500 in bad weather, but I have shot with the A6300 in drizzle and had it splashed with no issue. Sony describes both as enjoying similar sealing to the A7 series.
Ergonomically the deeper grip certainly improves the comfort over the earlier A6300 and A6000, and it’s easy to hold comfortably and securely even with a hefty full-frame lens on the front. For the record, the body measures 120x67x53mm and weighs 453g with battery, making it shorter than most cameras which feature a built-in viewfinder, although like its predecessor this has necessitated the use of a shorter 16:9-shaped screen, more of which later.
I personally prefer the style of cameras with central viewfinder humps, like Sony’s full-frame A7 series, and I also prefer their ability to deploy 3:2 or 4:3 shaped screens, but there’s no denying these bodies are taller as a consequence. It’s also worth mentioning the A6500 is only barely thicker than its predecessor and just 50g heavier despite now including built-in sensor-shift stabilisation – an impressive achievement.
The A6500’s controls are identical to the A6300 other than a wider shutter release button, a third Custom button on the top of the body and of course the touchscreen. As such the A6500 inherits the twin control dial system of the A6300, both operated by thumb: one in the upper right corner and the other a small flat wheel on the rear which also tilts to provide four-way navigation.
Controls are always a personal thing, but I’m not particularly fond of those on the A6000 series. The one at the top is too stiff and the one on the rear surface too small, more suited to a compact camera. In my view these bodies would really benefit from having twin dials on the top surface, one operated by your finger and the other by your thumb, and ideally I’d want them to be larger and more tactile too: clicking with positive feedback. Companies like Olympus, Fujifilm, Canon and Nikon do this best in my opinion and adopting a similar approach would transform the day-to-day operation of the A6500.
In better news, there’s plenty of customization available: you can configure any of the three C custom function buttons with no fewer than 67 options, along with changing the default function of the Centre, Left, Right and Down buttons, in addition to the Focus Hold and switchable AEL / AF-MF control.
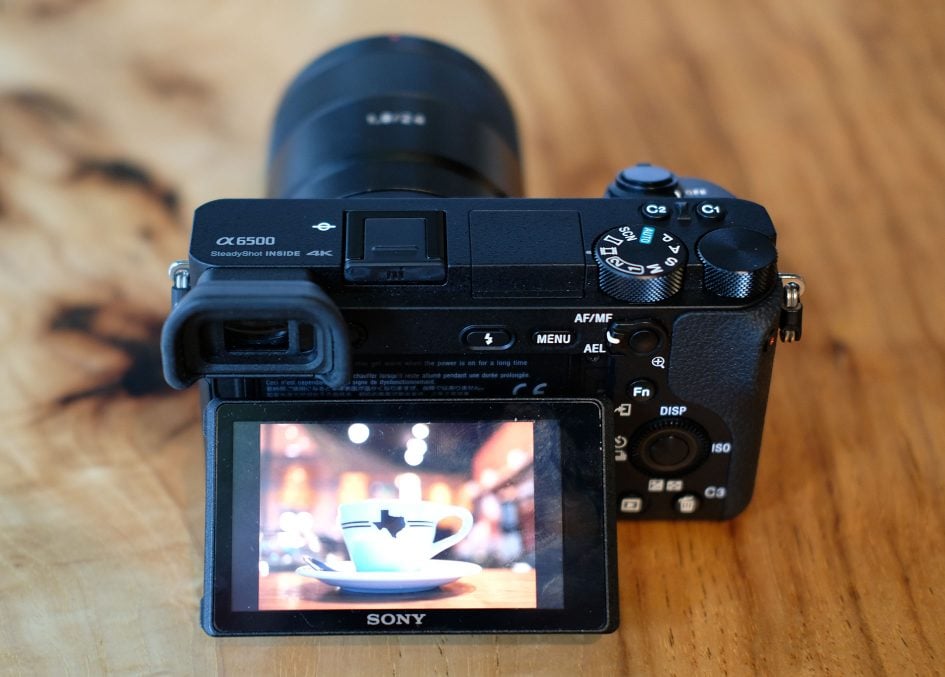
Better still, the screen is now touch-sensitive, an upgrade I’ve been requesting for years. It’s so nice to finally be able to tap to reposition a single AF area, or to pull-focus while filming movies – much faster than tapping the rocker control. Here’s an example video I filmed with the FE 85mm f1.4 with its aperture wide-open, tapping to pull-focus between the near and distant subjects. The depth of field here is very shallow which, coupled with the close distances, makes for a big challenge for the AF system, but as you’ll see, the A6500 does a great job. For me, the combination of a confident focal-plane phase-detect AF system with a touch-screen is one of the joys of modern photography and videography.
Download the original file (Registered members of Vimeo only)
Like some mirrorless rivals, Sony’s also implemented a touchpad feature where, if desired, you can drag the AF area around using the touchscreen while composing through the viewfinder. If, like me, you compose with your left eye to the viewfinder, you may understandably be concerned about inadvertently repositioning the AF area with your nose, but you can configure the touchpad to only use the right half or even right quarter of the screen – or switch it off entirely if preferred. In use I found choosing the right-half option managed to prevent my nose from causing problems, although the actual response in any mode felt strangely sluggish – I’d push my finger across the screen but have to wait a moment before the actual active AF box followed. I hope this can be improved in a firmware update.
Sadly Sony has also been somewhat conservative about what you can use the touchscreen for – indeed beyond repositioning the AF area, the answer is not a lot. In playback you can double-tap to magnify an image before pushing it around the screen, but you can’t swipe through images or pinch to zoom. When playing a video a big play icon appears invitingly in the middle of the screen, but tapping it doesn’t do a thing.
None of the menus respond to touch, despite a touch-friendly tabbed design for the main pages and the super-imposed function menu. Weirdest of all though are the text-entry options for the Wifi, Bluetooth and copyright sections, some of which support touch entry and others which don’t. The A6500’s user interface actually has two different keyboard layouts, one displaying a full Qwerty keyboard that is touch-enabled and the other displaying a phone text style keypad which isn’t touch-sensitive. Not only is this inconsistent, but there’s no way of switching keyboards during entry, so for some text entry – most annoyingly when setting-up PlayMemories online – prepare yourself for a lot of tapping on the rocker wheel. It really illustrates how the user interface is designed by multiple teams who clearly aren’t communicating. But don’t get me wrong, I remain delighted the A6500 features a touchscreen and dearly hope they’re deployed on the RX and A7 series in the future too – but there are plenty of opportunities to exploit them further as illustrated by Olympus, Panasonic and Canon.
I should also add I have three more complaints concerning the A6500’s screen, regarding its shape, articulation and brightness. Like the A6300 and A6000 before it, the A6500 employs a 16:9 shaped screen, like a widescreen TV, in order to accommodate a viewfinder above it in the short flat-topped body. This may be ideal when shooting widescreen movies, but displays narrower 3:2 shaped photos with black bars running down the left and right sides, resulting in a noticeably smaller image than the competition. I’d much sooner than A6500 had a 3:2 shaped screen.
In terms of articulation, the A6500’s screen, like its predecessors, continues to only tilt up by 90 degrees or down by about 45 degrees. This may allow you to comfortably compose at waist height or overhead when in the landscape / horizontal orientation, but doesn’t help at all if you prefer to shoot in the portrait / tall shape. In addition, you still can’t flip the screen all the way up to face the subject for selfies or filming pieces to camera, which sadly rules out this otherwise excellent camera for practical vlogging. A side-hinged screen would fix all of this, although I do understand it would involve thickening the body.
In terms of brightness, the A6500’s screen is rather dim by default – presumably to save power – and like its predecessors I had to select the ‘Sunny Weather’ mode to see the image outdoors. While I don’t mind sacrificing battery to boost the brightness the big problem comes when filming 4k movies or 1080 at 120p when the Sunny Weather option is greyed-out and the screen remains dim. This makes it very hard to compose with the screen when filming 4k or high frame rate 1080p outdoors, and virtually impossible in bright sunlight; instead you’ll be relying on the viewfinder. While I didn’t have the A6300 alongside for a direct comparison, I also felt the screen brightness seemed a fraction dimmer on the A6500, perhaps due to the touch capabilities. I’m confirming if this is indeed the case, but even if they’re the same, the fact is the A6500 screen, like the A6300 before it, becomes virtually useless when filming 4k or high frame rate 1080.
While I am pleased Sony has implemented touch controls on the A6500, the screen overall remains the camera’s weak point. The shape, basic articulation, poor visibility when filming 4k, and limited touch options means it continues to fall behind the competition.
The viewfinder is at least very good though, with the A6500 inheriting the 0.39in OLED panel of the A6300 with its 2.3 Million dot / 1024×768 resolution and 0.7x magnification. It’s not the largest image at this price point, but the detail and clarity matches its rivals. You can now also choose between a 50 / 60fps or 100 / 120fps refresh rate, the latter providing a more responsive experience when following fast action, albeit at the cost of higher battery consumption and an occasionally choppy view depending on the subject and handling.
As before there’s a wealth of overlays viewable on-screen or through the viewfinder, including a choice of guide lines, a live histogram and a dual-axis leveling gauge. There’s also focus peaking and zebra patterns for aiding focus and exposure, especially useful when filming video.
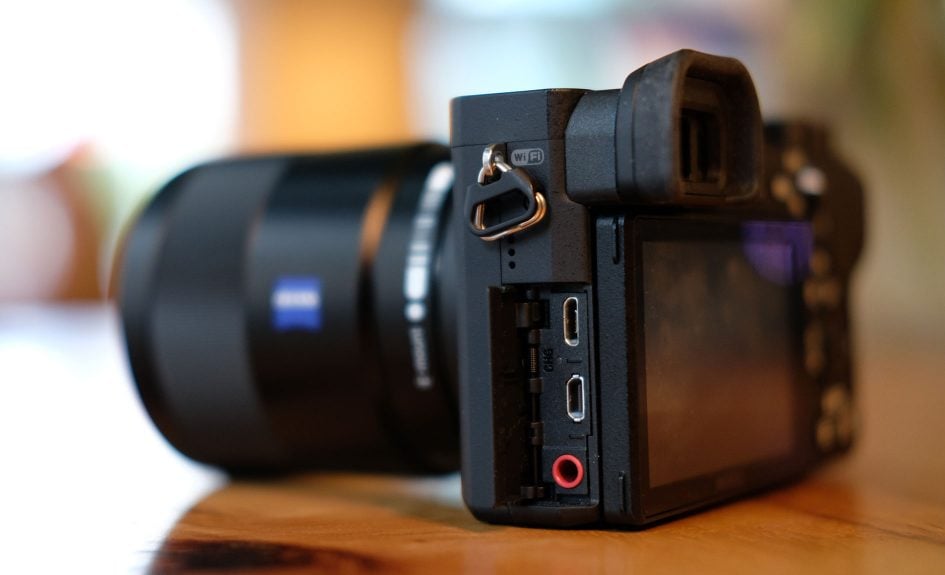
In terms of connectivity, the A6500 is the same as the A6300: there’s a Micro USB for output and charging, a Type-D Micro HDMI port, and a 3.5mm microphone input; like most models at this price there’s no headphone jack, although unlike some rivals, there’s no means to add one with an accessory. As before the A6500 is equipped with Wifi and NFC, but now complements them with a low-power Bluetooth option which can be used to tag location details from your phone as you shoot – I’ll detail these wireless capabilities later.
The A6500 is powered by the same NP-FW50 Lithium Ion pack that’s common across the Alpha mirrorless series. Sony quotes it being good for around 310 shots with the viewfinder or 350 with the screen under CIPA conditions, which is actually around 15% less than quoted for the A6300. Also remember if you’re filming video, brightening the screen for use outdoors, exploiting the built-in IS or using Wifi, you should expect it to deplete more quickly. That said, I managed to record 56 minute’s worth of 4k video on a full charge which isn’t bad.
If you had to seek-out AC power to recharge the Sony cameras, their relatively small batteries would be cause for concern, but like previous models, the A6500 can charge its battery internally over USB. So if you have a laptop, a portable battery or a vehicle adapter, you could top-up or even fully recharge the battery while you’re out and about – and you can of course also use any number of existing AC-USB adapters to do the job too which greatly simplifies packing for a trip.
While many rivals can also be recharged over USB, they all ignore the power source as soon as they’re turned on. In contrast, the A6500, like other recent Sony bodies, can also be powered over USB which is great when doing an extended timelapse or lots of filming. It also eliminates the need to buy an AC adapter for constant power.
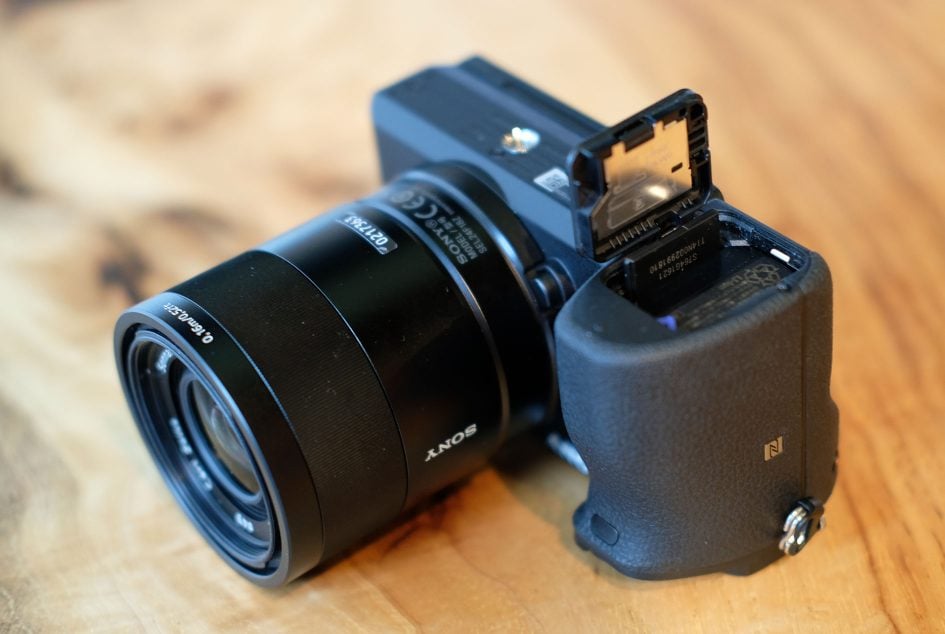
While I appreciate Sony’s approach to battery power and charging, I’m not fond of having the SD memory card slot in the battery compartment on a camera of this class. Mount the A6500 on a tripod and you’ll invariably block this compartment, forcing you to fully dismount before you can swap a card. I don’t mind this approach on cheaper cameras or those which are tiny, but I feel a camera pitched at the price and level of the A6500 should really have its SD slot more accessibly located in the grip at the side – and while we’re at it, it also really needs twin SD slots to keep up with the competition. Remember twin SD slots aren’t just to protect against corruption – you can set them to overflow so there’s no interruption when shooting, or configure them to record RAW or movies on one and JPEGs on the other. Or simply duplicate not just for backup, but to hand one to a client straightaway. It’s become a common feature on cameras aimed at this end of the market and the A6500 is lacking in this regard.
Finally, like its predecessor, the A6500 features a small popup flash (Guide Number 6 at 100 ISO) along with a hotshoe supplemented by electronic contacts to support Sony’s Multi Interface Shoe accessories – these include an adapter for XLR microphones. Unlike some rivals at this price though, there’s no PC Sync terminal for studio lighting.
Sony Alpha A6500 lenses and stabilisation
The Sony A6500 is equipped with an E-mount which, with the camera’s APSC sized sensor, applies a 1.5x field reduction to all lenses. The A6500 also becomes Sony’s first E-mount camera to feature built-in stabilisation and I’ll detail the performance in just a moment.
At the time of writing Sony offered 16 native E-mount lenses designed exclusively for use with APSC sensors (ten zooms and six primes) with focal lengths between 10 and 210mm (15 and 315mm equivalent); note three of the 16 lenses are variations of the popular 18-200mm range though. In addition you can mount any of the growing number of full-frame FE lenses without an adapter, although again with the 1.5x crop factor.
Eagle-eyed Sony followers will note the number of E-mount lenses designed exclusively for the APSC format has barely changed since the launch of the A6000 several years ago. Indeed apart from the recently launched and reassuringly expensive movie-oriented 18-110mm f4G OSS, the company has concentrated entirely on releasing lenses for its full-frame FE mount, which again are compatible with the cropped models, albeit with the 1.5x field-reduction mentioned earlier.
On the surface this seems a sensible strategy since the original 16 E-mount lenses cover most bases, while the newer FE lenses are compatible, high quality and provide an upgrade path to full-frame if desired. Indeed if you own Sony APSC and full-frame bodies, you effectively enjoy two different coverages from each FE lens in your bag. The only problem for me lies with the more affordable general-purpose E-mount zooms that take you from wide to short telephoto. The 16-50mm Power Zoom, typically bundled with most of Sony’s APSC bodies, was designed for compact size over quality and becomes quite soft and distorted at the wide-end. The more expensive Zeiss 16-70mm f4 should present a premium alternative, but I’ve been disappointed by the wide-end on the copies I’ve tested. This leaves the 18-105mm f4G OSS, although I’ve not personally spent much time with it.
Ultimately now Sony is pitching the latest A6000 series bodies ever-higher, I think there’s justification for an equally high-end general-purpose E-mount zoom to go with them. I’m happy with the 16-50 or 16-70 ranges, but how about with weather-sealing, a constant f2.8 focal ratio and optics that really do the 24 Megapixel sensor justice?
I should however add the A6500 works well with many adapted lenses from other formats, particularly recent Canon and Sigma lenses via the right adapters; indeed Sigma’s high-end zooms for APSC sensors could provide the premium option the body deserves. Sony’s own range of A-mount lenses also enjoy full support from the embedded phase-detect AF system via the simple LA-EA3 adapter.
Moving on, the A6500 becomes the first Sony APSC body with built-in SteadyShot stabilisation that shifts the sensor to provide compensation with any lens you mount – including those from third parties, again making that Sigma 18-35mm f1.8 look rather tempting even with an adapter inbetween.
The A6500 features five-axis stabilisation, correcting X and Y axes along with pitch, yaw and roll, with Sony claiming up to five stops of compensation. The stabilisation works with any lens and when filming movies, but when OIS lenses are fitted, the optical stabilisation takes care of the horizontal and vertical compensation, leaving the other three axes to the body. In terms of stabilisation options, the body-based SteadyShot is either On or Off, and you can choose whether it detects the focal length automatically or enter it manually from 8 to 1000mm.
I was particularly interested to see how well the A6500 could stabilise lenses without optical stabilisation, so performed a number of still photo and movie tests with the E 24mm f1.8 and FE 85mm f1.4 primes; the latter in particular would provide a tough challenge with its 128mm equivalent field-of-view. Here’s how it looks fitted on the A6500.
Starting with still photos, I fitted the FE 85mm f1.4 and took a series of images in a bar at progressively slower shutter speeds with and without stabilisation enabled. I started at 1/125 and held the camera carefully with both hands and composed with the viewfinder.
Before looking at the results, the first thing to mention is the benefit of stabilisation during composition. I shake a fair amount, so handholding a reasonably large and heavy 128mm equivalent lens without stabilisation inevitably results in a wobbly view when composing. Half-pressing the shutter on the A6500 starts-up the stabilisation with a very quiet whir and after about a second or so of warm-up time, the view steadies itself nicely. This steady view makes it considerably easier to compose, especially at longer focal lengths and for me is one of the most valuable benefits of stabilisation. But again for the maximum benefit, whether composing or shooting, you’ll need to half-press the shutter release for at least a second first; to be fair, this is the same as many other stabilised systems.
I then took the following composition without stabilisation, starting at 1/125, a speed close to the accepted wisdom of one-over-the-equivalent focal length to avoid shake, before then slowing the exposure by one stop at a time.

Above: Sony Alpha A6500, FE 85mm f1.4, 1/8 with SteadyShot
Without stabilisation, I needed a shutter speed of 1/125 for a sharp result and anything slower resulted in steadily worse blurring. Enabling SteadyShot stabilisation allowed me to achieve a similar result at speeds down to 1/8, corresponding to four stops of compensation. This may not be the five claimed, but is still a great result and made shooting with this unstabilised prime so much more practical. Here’s 100% crops of the versions without and with stabilisation at 1/8 and the difference is striking.

Above: Sony A6500 with FE 85mm f1.4 (128mm equiv) SteadyShot off (left), on (right) at 1/8
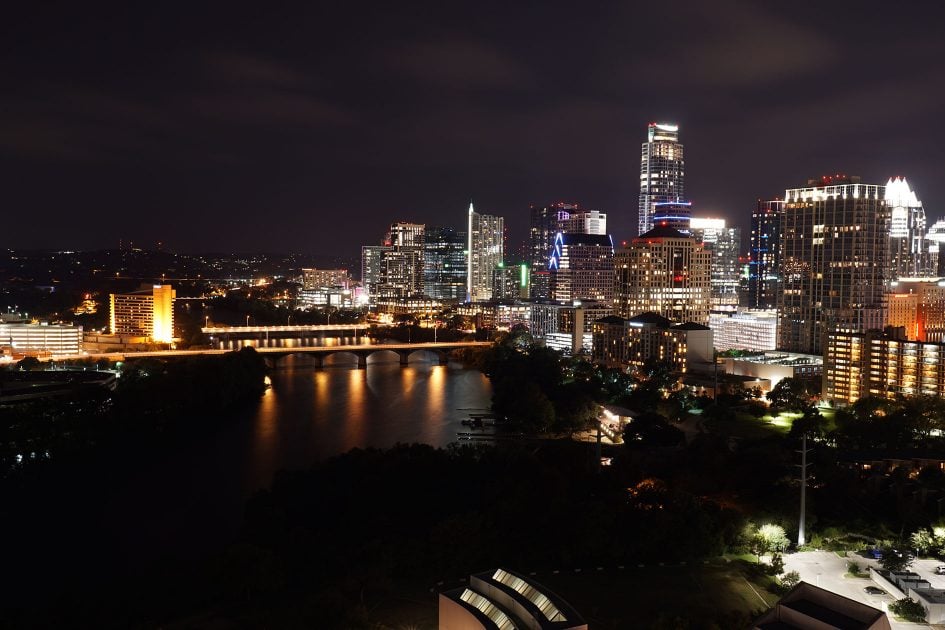
In the test above, I shot with the camera held carefully and with the viewfinder to my eye for an additional point of contact. To put the system under a tougher test I shot a city night landscape with the camera and FE 85mm f1.4 lens held high overhead to peer over a glass balcony, using the screen tilted down for composition. This represented a far less secure and comfortable hold than the first test, with more wobbles as a result. Here’s the full view for reference.

Above: Sony Alpha A6500, FE 85mm f1.4, 1/30 with SteadyShot
As a 128mm equivalent lens, I again started with shutter speeds of 1/125 and slowed them by a stop at a time. As before, I required a shutter of 1/125 to successfully handhold the FE 85mm f1.4 without stabilisation enabled. With SteadyShot enabled, the view again became much easier to compose but under the conditions there was less compensation, only allowing me to reduce the speed to 1/30 for a crisp result. So this time, the tougher conditions meant I only enjoyed two stops of compensation over the unstabilised version, but again a benefit none-the-less especially during composition. Below is how they both looked at 1/15 where the stabilisation didn’t quite correct all the wobbles, but still delivered a better result.

Above: Sony A6500 with FE 85mm f1.4 (128mm equiv) SteadyShot off (left), on (right) at 1/30
Next I wanted to try out the stabilisation for movies, so I started with the Sony Zeiss E 24mm f1.8 prime lens and filmed a handheld pan back and forth with the camera held out in front of me, composing with the screen. As you can see in the video below, filmed in 4k at 24p, the camera has successfully ironed-out any wobbles to deliver a nice smooth clip; it’s so much better than filming without stabilisation and makes this prime very usable for video.
Download the original file (Registered members of Vimeo only)
Stabilising a 36mm equivalent focal length though isn’t a particularly tough challenge, so next it was back on with the FE 85mm f1.4 lens, again filming the night scene with the camera held high over-head (to clear the balcony) and with the screen tilted down. Considering the less than optimal conditions and the longer effective focal length of 128mm, I’d say the A6500 has done a very respectable job. There’s a couple of jitters in there, but on the whole the footage looks very good and when filmed with a little more care it’s easy to achieve an even better result.
Download the original file (Registered members of Vimeo only)
So the built-in stabilisation proved effective for both stills and video, and valuable for composition as well as capture. Like other built-in stabilisation systems, it breathes new life into unstabilised lenses, particularly primes or third party options, allowing you to shoot in low light or film smooth footage handheld without stands or gimbals. It’s also important to add it irons-out many of the minor wobbles which previously triggered the sensor’s rolling shutter artefacts; so while rolling shutter can still be an issue on the A6500, it’s less so than its predecessor thanks to the stabilisation.
The big question though is how it compares to the best-in-class body-based stabilisation from Olympus. In my early tests with the EM1 Mark II, I managed to handhold similarly stable 4k video at 300mm equivalent (body alone) or at 600mm equivalent (coupled with a Sync IS lens). Meanwhile in tests with stills, I’ve consistently managed to achieve four to five stops of compensation even with the camera held out in less than optimal conditions. So from my own tests I’d say the Olympus system remains superior in terms of stops of compensation, but equally it’s important to remember it’s shifting a smaller sensor with a lower pixel count too. Sony’s bigger APSC sensor means you can shoot at sensitivities around a stop higher with similar quality, especially at higher ISOs, which narrows the gap.
The bottom line is Olympus may still have the edge in eerily steady stabilisation, but Sony’s done a great job on the A6500. In my tests with both stills and video, it greatly enhanced the composition as well as the final result. Again it transforms the use of unstabilised prime lenses and immediately makes the A6500 Sony’s most desirable APSC body to date.
Sony Alpha A6500 shooting modes
The Alpha A6500 mode dial shares the same settings as the A6300 before it: so you get the usual PASM modes, along with Auto, SCN, Sweep Panorama, Movie and two Memory Recall positions. You can start filming video in any relevant mode by simply pressing the red record button, but by first putting the camera into the Movie mode, it’ll preview the appropriate composition frame and offer access to the dedicated movie options.
Like the A6000 and A6300 before it, the A6500 offers a mechanical shutter speed range between 1/4000 and 30 seconds with a Bulb option and a fastest flash sync of 1/160. Inherited from the A6300 are an electronic front curtain option (enabled by default to eliminate shutter shock) and a fully electronic shutter indicated by the Silent Shooting option. As the labeling suggests, the fully electronic shutter operates in complete silence, but runs the risk of skewing artefacts, especially if you’re panning quickly to follow action. To be fair this is par for the course with the majority of electronic shutters right now, but the Sony continues to miss out on the faster electronic shutter speeds offered by most rivals, so while most offer 1/8000, 1/16000 or even 1/32000 electronic shutters, the A6500 still only offers a maximum of 1/4000.
As Sony steadily increases the price of the latest A6000 models, their top shutter speeds are increasingly looking out of place. A top mechanical shutter speed of 1/4000 is disappointing for a camera pitched at this price point, especially since the AF system and burst speeds are so well-suited to sports and action photography. Most rivals at this price offer 1/8000 mechanical shutters, not to mention electronic shutters that are faster still. It’s not just about freezing fast action either – I often use fast shutter speeds to exploit bright apertures in bright conditions, and when testing the A6500 with the lovely FE 85mm f1.4 wide-open, I frequently found myself bumping against the 1/4000 shutter in daylight even with the sensitivity turned down to 100 ISO. I know I could fit an ND filter, but I prefer not to put anything in front of my lenses unless absolutely necessary. The bottom line is the A6500 shutter mechanism should be upgraded to make the most of the other features, not to mention to keep up with the competition. In some good news though it is at least rated for a decent number of actuations: Sony quotes 200,000 frames.
I should also note many cameras now offer a variety of long exposure options that easily take you beyond 30 seconds. Olympus and Panasonic have long offered 60 second options directly accessible in Manual or Shutter Priority, and Bulb timers which automatically close the shutter after a preset amount of time are becoming increasingly common. I think Sony could do with something similar in all of its mirrorless cameras – the closest you’ll get is the downloadable Touchless Shutter app (still inexplicably in ‘Beta’) which starts and ends an exposure with a wave in front of the viewfinder sensor. This works well, but like all Sony’s apps, requires you to download it first before then using a separate menu system which annoyingly doesn’t offer all the standard settings. While I like the idea of the apps in theory, I think Sony should rethink its operating system and user interface from scratch and integrate the best of the apps directly into the core not just for consistency but because I reckon many owners may not even be aware they’re available. In the meantime, here’s a 20 second exposure with the A6500 with long exposure NR disabled. I hope to try some longer exposures in the future and will report back with how it fares with several minutes.
Above: Sony Alpha A6500 long exposure: 20 seconds, 100 ISO, E 24mm f1.8
Metering can be set between Spot (with small and large options, the latter effectively becoming the camera’s version of Center-weighted), Entire Screen, and new to the A6500, Average and Highlight. Highlight detects the brightest areas and prioritises the metering for them, ignoring potentially darker areas around them – great for compositions against dark backgrounds. Meanwhile Average considers the entire image but better takes the needs of tracking into account.
I mostly used the Entire Screen option and found it did a good job at evaluating the scene, but I should point out another new option which many will miss: the spot-metering can now be linked to the active AF area if desired. This is a feature highly valued by wildlife photographers, particularly birders, who frequently use spot-metering to expose for a potentially small and dark subject against an overcast sky or dim background. On the majority of cameras, spot metering may provide the exposure birders desire, but it’s generally locked to the center of the frame, which may rarely match the subject’s actual position especially when it’s in motion. What you really want is the spot metering to follow the active AF area as it tracks a subject moving around the frame, but previously this was a feature limited to the most expensive pro DSLRs from Canon and Nikon. Olympus was the first mirrorless company I’ve come across to include spot metering linked to the AF point on the PEN F and OMD EM1 Mark II, and now the Alpha A6500 joins this exclusive club. This option, coupled with the effective continuous autofocus and fast burst shooting, will make the A6500 very attractive to bird photographers.
Auto ISO is also quite sophisticated on the A6500. Not only can you set a minimum and maximum sensitivity for Auto ISO to choose from, it’s also focal-length aware, so as you mount – or zoom to – longer focal lengths, the minimum shutter speed is automatically raised. For example, I fitted the FE 70-200mm f2.8 zoom and with the standard Auto ISO setting found it selecting a minimum shutter of 1/125 at the 70mm end and 1/320 for the 200mm end, which roughly corresponds to accepted wisdom for minimum hand-holdable shutters when the effective focal length is taken into account (remember the cropped APSC frame here). It would be even cleverer still if it were aware of stabilisation, whether in the lens or body, but I haven’t seen that deployed on any system yet.
I should also mention Auto ISO can be set to Slow, Slower, Fast or Faster, to encourage it to reduce or bump-up the minimum shutter speeds. For example when shooting static scenes with stabilized lenses (or with the body-based stabilisation), I often set the Auto ISO to Slow or Slower, allowing it to deploy slower shutters in order to enjoy lower ISOs and better quality. In contrast, when wanting to freeze action, I’d select Auto ISO with Fast or Faster to encourage quicker shutter speeds than are necessary to just eliminate camera-shake.
Auto Exposure Bracketing is available on the A6500 for three or five frames at 0.3 to 3EV increments, or in nine frames at 0.3 to 1EV increments. You can set the drive mode to Single or Continuous for any of these bursts. White Balance, DRO and flash bracketing are also available.
The A6500’s Picture Effects are greyed-out if you’re shooting RAW or RAW+JPEG, which is daft as it’d be nice to only have the effect applied to a JPEG and keep a RAW as backup. Olympus does this much more sensibly with its ART filters, which are only applied to JPEG files, leaving the RAW file (if enabled) as a backup, and even lets you grab all (or a selected bunch) of the ART filters in one go with ART filter bracketing.
The D-R menu is where you’ll find the Dynamic Range Optimiser (DRO) and in-camera HDR options, the former available in Auto or set Levels of one to five, and the latter available as Auto or in increments of one to six EV. The HDR mode takes three images at the desired interval and combines them in-camera into a single JPEG file, and you can trigger it with a single shutter press or a self-timer. If you have RAW or RAW+JPEG selected, the HDR options are greyed-out. Here’s a comparison between a single frame below left and a maximum six EV HDR version below right, along with their histograms – as if you needed any evidence to see the difference in tonal range! The maximum effect isn’t for me, but the milder versions can be quite effective.
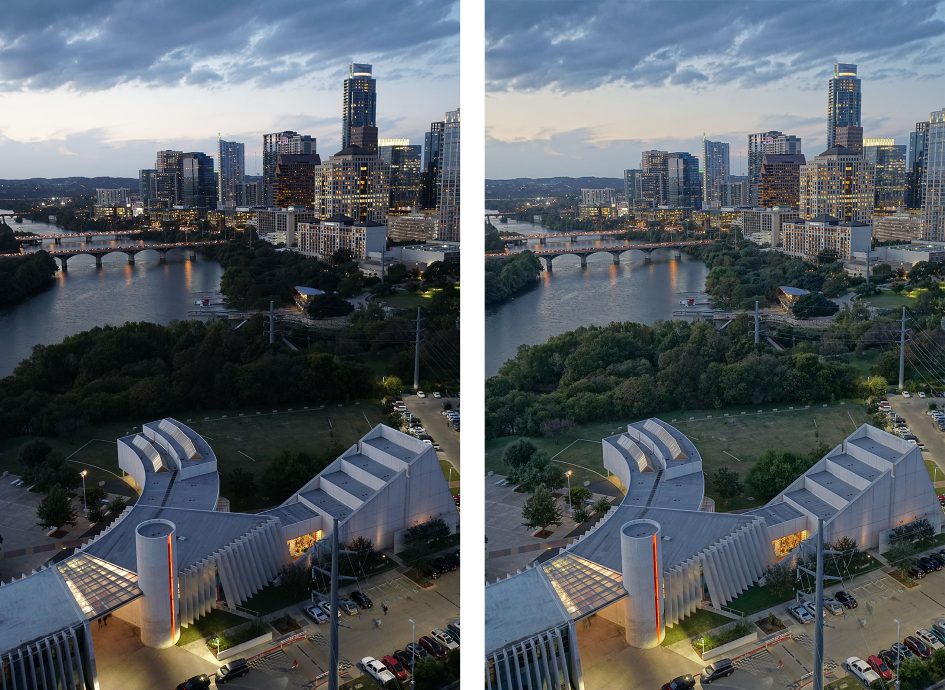

Above: Sony Alpha A6500 HDR, disabled (left), enabled with 6EV range (right)
The SCN mode on the dial lets you choose from nine presets, including the usual suspects like Portrait, Landscape and Sunset, but also including the composite Handheld Twilight and Anti Motion Blur modes which take a burst and combine them to reduce shake and noise.
The Sweep Panorama mode enjoys its own dedicated position on the mode dial, and selecting it unlocks two options on the first menu page (although why Sony doesn’t let you set things in advance while you’re in other modes continues to frustrate me). Like previous Sony cameras you can choose between Standard and Wide for the size, and Right, Left, Up or Down for the direction. After that it’s just a case of holding the shutter release button down as you pan the camera in the selected direction, sometimes being told to do it again in case you were too slow or fast. Note unlike Sony’s fixed lens cameras, you can adjust the optical zoom on your lens before shooting a panorama, but be warned the camera becomes fussier about your technique as you zoom-into longer focal lengths. Here’s a couple of examples with the Sony Zeiss 24mm f1.8 lens held vertically.

Above: Sony Alpha A6500 vertical panorama using e 24mm f1.8

Above: Sony Alpha A6500 vertical panorama using e 24mm f1.8
Like other Sony cameras, the Sweep Panorama works fairly well and gives the A6500 a fun advantage over many rival system cameras. You often need to refine your technique and I’d recommend taking a couple at each attempt to make sure but it remains a fun and effective way of grabbing panoramic views.
Sony Alpha A6500 focus and continuous shooting
Sony’s A6500 boasts one of the most sophisticated autofocus and burst systems of any camera, whether mirrorless or DSLR. It inherits the fabulous embedded phase-detect AF system of the A6300 and enhances it with a new front-side LSI component which chews through data even faster to extend burst depth. The result is the best camera at its price point for shooting fast action, although if you can live with smaller bursts, the A6300 gives you the AF system at a lower price.
Like the A6300 before it, the A6500 employs a hybrid AF system featuring both contrast-based and phase-detect technologies, the latter embedding a whopping 425 points across almost the entire surface of the sensor. Meanwhile the contrast-based system employs 169 areas.
In practice the A6500 typically uses a coarser array to identify the subject before then surrounding it with a smaller frame containing the full density of AF points. Depending on the mode, this small but dense array of AF points then follows the subject around the frame like a swarm of tiny square bees.
Like the A6300 you can refine the AF coverage with Wide (which covers the entire frame), Zone (which reduces the area and lets you reposition it), Center, Flexible Spot (which lets you position a single area of three sizes), Expand Flexible Spot (which considers a small area around a single point) and Lock-on AF which tracks a subject based on its shape and colour. Lock-on AF is available with Wide, Zone, Center, Flexible Spot or Expand Flexible Spot. To make it work you position the active AF area over the subject (or in the case of Wide and Zone, hope that it’s automatically identified), then simply keep the shutter half-pressed for the camera to subsequently track it.
If Face Detection is enabled, it over-rides any of the AF area modes and focuses on the nearest human face instead, wherever it is on the frame, and in AF-C mode it’ll do a good job at tracking kids running around.
Taking portraiture further, the A6500 also inherits Eye Detection that unlike most rivals works with the phase-detect AF system when the camera’s set to Continuous AF. It works well, although inexplicably you still can’t deploy it automatically. Instead it’s assigned to a button which must be pressed after the face detection has already identified a person. The AF square around the face is then replaced by a tiny square over the identified eye and you can focus with that instead. That’s fine, but I’d much sooner just enable eye detection in a menu and have the camera do it automatically from then on without having to press additional buttons, as with most rival camera systems. I can’t think of a situation when I’d want face detection but not eye detection, and if I did, I could simply switch eye detection off. Once again a case of Sony leading with technology but neglecting the usability.
I am however pleased to report the A6500 enjoys a big improvement over its predecessor when it comes to repositioning the AF area in Zone and (Expand) Flexible Spot modes – rather than entering the correct adjustment mode and incessantly tapping the rear thumb wheel, you can now simply tap the desired area on the screen – hallelujah!
As before you can set the camera to Single AF, Continuous AF or a choice of manual focus options. In Single AF, the A6500 employs the phase-detect AF to get close to the point of focus, then finishes the job with a contrast-based feedback loop – as such there’s a small amount of hunting at the end of the process but it all takes place quickly and confidently. Sony reckons it now has the fastest AF system, quoting 0.05 seconds, and in my tests it certainly felt very snappy in fair conditions. I wouldn’t say it’s quicker than, say, Olympus or Panasonic’s best-performing mirrorless cameras, but it’s certainly no slower.
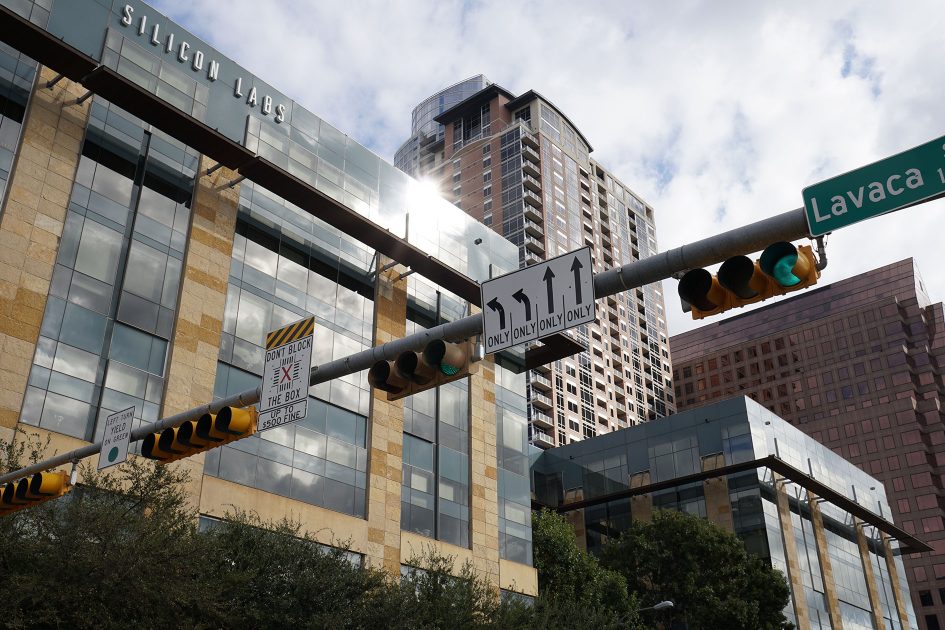
Sony rates the AF system as operating at light levels down to -1 EV with an f2 lens, which remains modest compared to the competition: the Olympus OMD EM1 Mark II and Sony’s own A7r Mark II will focus at -2EV, Fujifilm’s XT2 works at -3EV, while Panasonic’s latest Lumix models keep focusing at -4 EV. In practice there’s little between them in daylight or even dusk, but as soon as you’re shooting at night, whether people at events or especially dim landscapes beyond the reach of the respective AF illuminators, you really begin to notice a difference. To be fair it has to get pretty dark and the subject become distant for the A6500 to struggle, but it does happen before the best of its rivals – I noticed the A6500 begin to struggle when faced with the night view of Austin you’ll see elsewhere in this review. Again it’s a slightly unusual limitation for a camera at its price.
In Continuous AF, the A6500 exploits its dense array of phase-detect AF points and improved tracking software to deliver a compelling experience for action and sports shooters. I used its predecessor, the A6300, at the 2016 Tour de France with a high degree of success and you can read about my experience in my Mirrorless at the 2016 Tour de France article.
The performance – in AF terms anyway – is unchanged on the A6500 which is fine as it’s already good enough for most. But I still wanted to put it through its paces anyway, especially as I now had access to the FE 70-200mm f2.8 G Master lens with its shallower depth of field than the f4 version I used at the Tour.
I tried the A6500 with a wide variety of subjects in motion, including tennis players, leaping dogs, rowers (from the water), college lacross and basketball players, and horses racing towards or away from me. I mostly used either the FE 70-200mm f2.8 GM or the FE 85mm f1.4 GM; I typically shot in Manual mode, setting both lens apertures wide-open, selecting the fastest shutter speed of 1/4000 and leaving the exposure-balancing to Auto ISO.
Like the A6300 before it, the results were impressive with a very high degree of keepers, although like any AF system you will need to spend some time learning which modes work best for various conditions – and frequently unlearning what you’ve found on other systems.
When the subject would quickly appear in the frame, I found the Wide area did a great job at not just identifying them, but also focusing very quickly on them – this is an ideal choice for unpredictable kids, pets or close-range sports like tennis or basketball from the sidelines. Here’s some examples shot with the Wide area.

Above: Sony Alpha A6500 using Wide Area AF

Above: Sony Alpha A6500 using Wide Area AF and e 10-18mm

Above: Sony Alpha A6500 using Wide Area AF and FE 70-200mm f2.8

Above: Sony Alpha A6500 using Wide Area AF and FE 70-200mm f2.8
When the subject is more predictable you can deploy the smaller Zone and (Expand) Flexible Spot options, each drilling-down on the areas covered. These are great for avoiding distracting backgrounds, but like most AF systems will prioritise whatever’s closest in the area under consideration. So if there’s road in front of a cyclist, splashes in front of a wakeboarder or sand being kicked-up from a horse, these may each persuade the AF system to focus in front of the desired subject. The answer then is to choose the smaller areas. For example, I find Expand Flexible Spot and Flexible Spot more successful with approaching cyclists, runners or horses than Zone. Here’s some examples, and I’ll add a sequence soon.
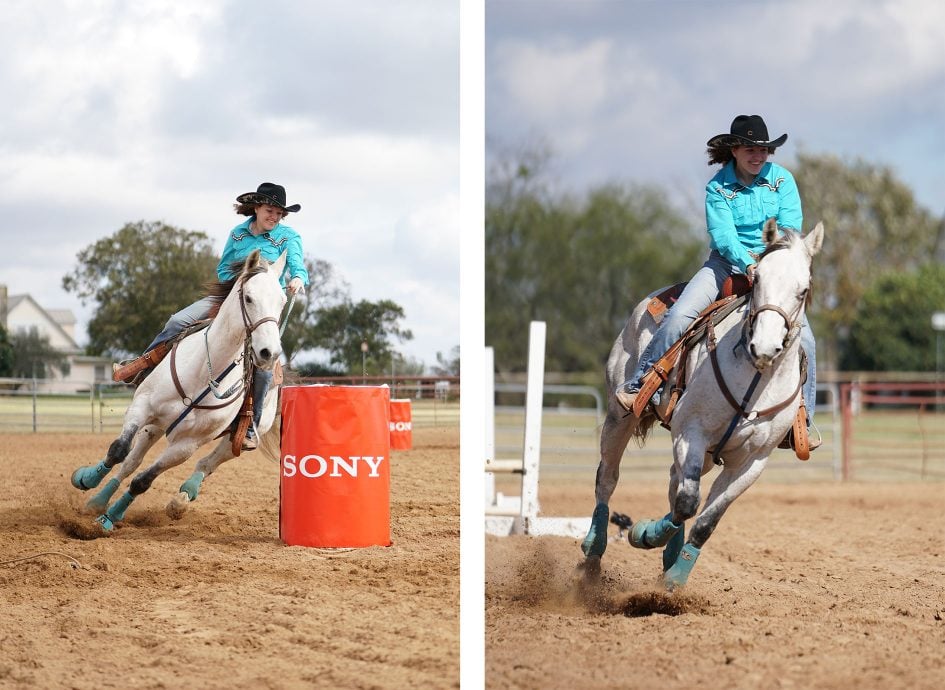
Above: Sony Alpha A6500 using Expand Flexible Spot AF and FE 70-200mm f2.8
If the subject stands out from the background, ideally in colour or tone, you can enjoy some success with the Lock-on AF options. Place the target over, say a tennis player wearing white against a green lawn court, half-press the shutter and watch the AF area follow them around quite effectively. I found Expand Flexible Spot worked particularly well with Lock-on AF, but in situations where it struggled to track, I’d quickly revert to a fixed AF area and attempt to keep that over the subject by recomposing.
The key to success is to relearn, experiment and embrace the new technologies rather than trying to wrangle the camera into working like a previous model you may be familiar with.
As mentioned earlier, the face detection also works really well and is ideal for keeping people sharp as they move towards the camera or across the frame. Eye-detection works well too and it’s great to have it working with the phase-detect system in Continuous AF, but as noted earlier the implementation remains unnecessarily convoluted.
Ultimately the AF system of the A6500 is a triumph, out-performing most rivals in coverage, density, tracking or speed and taking on more expensive DSLRs at their own game. But the competition aren’t standing still. Fujifilm’s XT2 may have a smaller area of PDAF coverage but if you keep the action within it you’ll enjoy respectable tracking. The Olympus OMD EM1 Mark II in my initial tests is also performing very well for continuous AF and I look forward to pitching it against the Sony and Fuji.
Revealingly one area where the Olympus leads over its mirrorless rivals is the actual type of phase-detect points it employs. So far most embedded phase-detect AF systems have employed a large and dense spread of simple vertical-type sensors, which are sensitive to common horizontal patterns. In contrast, most DSLR viewfinder AF systems feature at least one cross-type sensor which are sensitive to both vertical and horizontal patterns; some go even further with all cross-type arrays or with dual cross-type sensors in the central area. Meanwhile the OMD EM1 Mark II becomes one of the first mirrorless cameras to deploy cross-type phase-detect sensors and, like DSLRs with cross-type sensors, it’s visibly more confident at acquiring some subjects under some conditions.
So which approach is best? A huge array of basic AF points, or a less dense array of more sophisticated / sensitive points? In practice it really depends on the subject and situation. If the A6500 successfully identifies the subject it’ll keep it in sharp focus as it moves around the entire frame, but you may find systems with cross-type sensors do a better job at the initial acquisition.
At this point traditional DSLRs owners and mirrorless sceptics will however point out the big gotcha: it doesn’t matter how good the AF system is if you can’t effectively follow an erratic subject through the viewfinder, and this is something that’s traditionally been an issue for live view systems which mirrorless cameras rely on for their composition.
Previously when shooting bursts at the top speeds, an electronic viewfinder or screen would be unable to show a live image and instead play back the last image captured. This looks a little odd and makes it harder to follow unpredictable subjects like tennis or football players, as you’re seeing what’s just happened, not what’s happening right now. You subsequently have to anticipate or guess where the action is headed and try to stay ahead of the actual camera, but of course that can be hard or even impossible if the subject is moving unpredictably. In contrast the only delay to delivering the optical viewfinder image on a DSLR when the mirror flips back down is the speed of light, which means it’s easy to follow the action with real-time feedback.
To tackle this issue the A6500 inherits the two High Speed burst modes of the A6300: the top speed H+ option continues to shoot at 11fps with the usual lack of live update. The second H option, introduced on the A6300, is a slightly slower mode shooting at 8fps, but critically displaying a live image between every frame. In practice this looks a lot like shooting with the optical viewfinder a traditional DSLR – at least in terms of blackout – and allows you to much more easily follow a subject as they move around.
It’s a simple trick, slowing the system down to provide sufficient time to provide a live image, but it transforms the shooting experience while still matching or exceeding the speed of most DSLRs. The cool thing is you can still use the old 11fps option to shoot subjects approaching or receding predictably like cyclists, but switch to the only slightly slower 8fps mode when the subject is more erratic like a tennis or football player. Fujifilm offers something similar on the XT2, but has to slow down to 5fps for live feedback, and since its top speed without the optional grip is 8fps, the Sony out-guns it in this regard. Meanwhile Olympus has made huge improvements to the OMD EM1 Mark II which in theory can outclass pretty much anything speed wise, but I’m withholding judgment until I’ve fully tested it.
Moving onto bursts, the earlier A6300 was no slouch but the A6500 becomes even better. The addition of a front-side LSI (Large Scale Integrated circuit), burns through data faster than before, in turn extending the effective buffer depth. Sony quotes up to 269 Large Fine JPEGs or a whopping 107 RAW frames, versus 47 Fine JPEGs or 21 RAW frames on the A6300. To put this to the test I fitted a freshly-formatted UHS-I SD card, set the shutter to 1/500, the sensitivity to 400 ISO and timed a selection of bursts.
Set to Large Fine JPEG and the fastest H+ / 11fps mode, I fired-off 319 frames in 28.73 seconds before the camera showed any evidence of slowing down; this corresponds to 11.1fps. Set to the H / 8fps mode with live feedback, I managed 330 frames in 39.57 seconds before slowing, for a speed of 8.34fps. Switching to RAW in the fastest H+ / 11fps mode, I managed 110 frames in 9.82 seconds for a speed of 11.2fps, while in the H / 8fps mode with live feedback, I managed 116 frames in 13.81 seconds for a speed of 8.4fps.
If you enter playback immediately after shooting you’ll see a countdown showing how many images are left to write to the card. On my card it took 20 seconds to write 100 JPEGs or 34 seconds to record 50 RAW files. During this time you can’t enter the main menu, but you can playback those recorded so far.
In my burst tests the A6500 confirmed Sony’s quotes and is nothing short of spectacular in this regard. You’re able to shoot RAW files at up to 11fps for around ten seconds, or JPEGs at 11fps almost 30 seconds. There’s really very few situations I can think of where the action would continue for longer periods, and it represents a big upgrade over the A6300 which in my tests shot JPEGs and RAWs at 11fps for much shorter periods of four and two seconds respectively. Even slowed to 8fps, the A6300 ‘only’ managed ten second bursts of large JPEGs.
Compare them to the pricier sports-oriented Nikon D500 which in my tests shot JPEGs at 10fps for 12 seconds or RAWs at 10fps for 3.2 seconds before slowing down. The bottom line is thanks to the processing muscle of the front-side LSI, the A6500 can simply keep shooting for much longer even at its top speed – basically the action will invariably finish before the camera runs-out of buffer.
So by coupling the already fabulous AF system of the A6300 with greatly improved and industry-leading buffer depth, the A6500 becomes one of the most desirable cameras for capturing sports and action, whether DSLR or mirrorless. Its rivals are gradually catching up and in some specialist aspects beating it, but in terms of overall performance the A6500 is seriously impressive.
Sony Alpha A6500 Wifi
The Sony A6500 has built-in Wifi with NFC to aid negotiation with compatible devices, and in a new feature for Sony, now also includes Bluetooth to maintain a lower power connection with a smartphone to acquire and embed location data.
Wifi on the A6500 allows you to wirelessly browse and transfer JPEG images onto an iOS or Android smartphone using a free app, and also remote control the camera with your phone or tablet. The A6500 can additionally download apps directly to extend its capabilities, a feature first introduced on the NEX-6, and a capability that remains unique to Sony (if we’re not counting Android-powered cameras from the likes of Samsung or Panasonic).
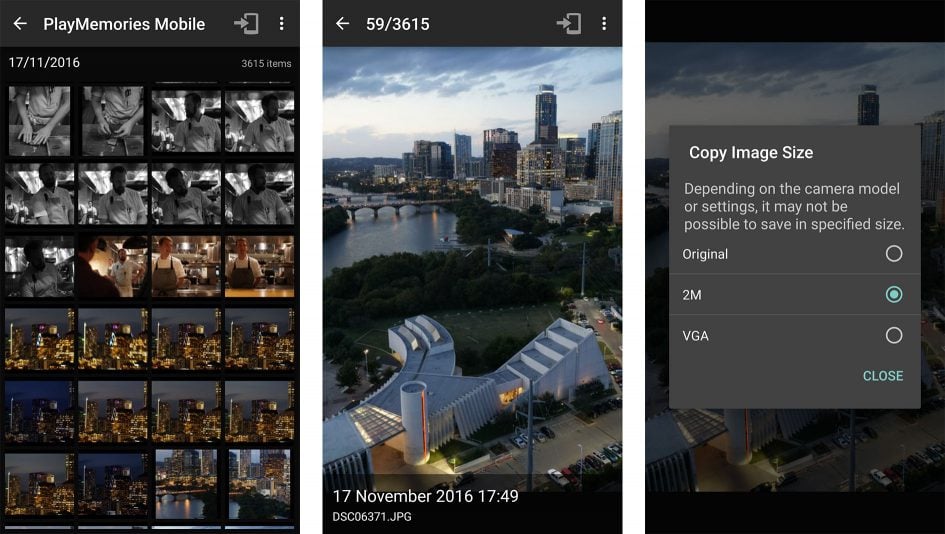
I’ll start with transferring images from the A6500 to a smartphone and for my tests I used my Samsung Galaxy S7, onto which I’d previously installed Sony’s free PlayMemories app. If you have an NFC-equipped device, such as my GS7, the entire process is incredibly simple: just choose the image you want to send in playback on the camera, then hold it against your phone. The NFC then instructs the camera and phone to connect (automatically taking care of network names and passwords), before then transferring the image and finally disconnecting. It all happens without a single button press and remains the best implementation I’ve seen for copying images from camera to phone.
If you don’t have NFC, or for some reason it doesn’t work, you’ll need to connect to the A6500’s Wifi network manually. First go to the Wireless section and choose the option to Send to Smartphone. This then gives you the choice of either selecting the desired image on the camera, or browsing the camera’s memory using your handset. Selecting either configures the A6500 as a Wifi access point which your phone needs to connect to. Next you’ll need to fire-up the PlayMemories app on your phone and connect to the camera.
If you opt to select the image on the camera, it’ll then be sent straight to the phone. If you select the option to choose with your smartphone, you’ll see the camera’s memory presented in a thumbnail view – just select the desired image and again it’ll be copied over. A menu in the PlayMemories app lets you choose whether the image is sent in its original 24 Megapixel format or resized down to VGA or 2 Megapixels. Full sized 24 Megapixel JPEGs take a few seconds to copy over; like most Wifi camera apps, you can’t transfer RAW files, and while you can playback non-AVCHD movie files, I couldn’t find a way to copy them onto my phone either.
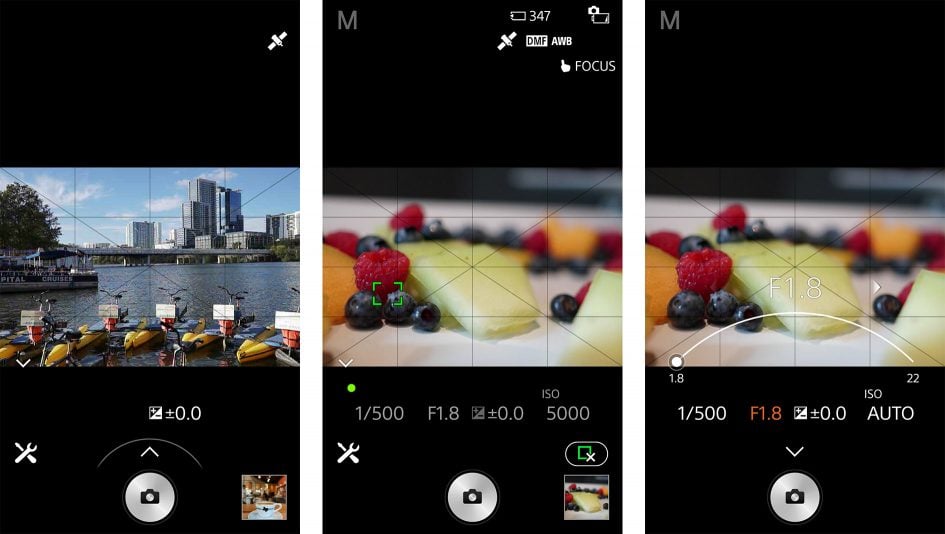
Next I’ll cover remote control which requires the Smart Remote app to be installed on the camera – as luck would have it, Sony embeds this into the A6500 to get you started in the World of apps, no doubt in an attempt to get you comfortable with the idea and possibly purchase some more in the future – although there is a catch I’ll mention in a moment.
Once again, Sony makes things really easy for owners of NFC phones. With the camera powered-up and ready to shoot, simply hold your phone against the NFC logo on the side of the body and the A6500 will automatically fire-up the Smart Remote app, connect itself to your phone (again taking care of Wifi network names and passwords), then start the PlayMemories app. So without a single button press, you’ll find your self ready to remote-control the camera with your phone. Brilliant! If you don’t have a phone with NFC, you’ll need to first select the Smart Remote from the App menu on the A6500. This sets the camera up as an access point for the PlayMemories app on your phone to connect to.
Once you’re remote-controlling your camera, you’ll be able to see what it sees, adjust the exposure compensation and take a photo when desired. But out-of-the-box you won’t be able to change the aperture, shutter speed or ISO, nor even reposition the AF area. There is however a solution: a free update to the in-camera Smart Remote app unlocks full exposure control along with the chance to tap anywhere on your phone’s screen to move the AF area.
To update the app, you’ll need to connect the A6500 directly to the internet, log into the PlayMemories service (using an account you’ve previously set up on a computer), choose Smart Remote in the camera’s Application menu, then select the update option. Mercifully, the on-screen keyboard used to enter the initial Wifi details and then your PlayMemories credentials can now be tapped, greatly easing this setup process, but there’s still quite a lot to type in. Alternatively you can download an app via a browser on a laptop or desktop, then connect the A6500 to transfer it.
If all goes smoothly, you’ll have the latest version of Smart Remote now sporting a wealth of manual control. It’s great the camera offers this degree of control, but a shame you still need to go looking for it, as I’m sure many owners won’t jump through the required hoops. Indeed I know they won’t. I’ve lost count of the amount of times I’ve met people with Sony cameras who wonder why mine supports remote exposure control when there’s doesn’t. I suspect the approach is to encourage more signups, but I fear it backfires more often than it converts, leaving many owners with a camera not offering its full potential. Even if there are new features available, Sony really ought to ship its cameras with a more up-to-date version of Smart Remote than the basic one right now. I should also mention Canon, Fujifilm, Panasonic and Olympus all offer powerful smartphone remote control out of the box without any updating on their latest models, so Sony really needs to do the same.
If you do get round to updating the Smart Remote app, you’ll notice a selection of other apps you can download to extend the capabilities of the camera, some free, some costing up to $9.99. Arguably the most powerful app is Timelapse which has gradually become more sophisticated over several updates. It now works alongside a new Angle Shift Add-On ($4.99) that lets you perform pans, tilts and zooms within a timelapse video, all generated in-camera. There’s also a Sky HDR app which captures and combines two different exposures to simulate a graduated ND filter and darken skies.
A Beta section in the download section also lets you access apps under development. One of the more interesting ones is the Touchless Shutter app (currently free in beta) which cleverly exploits the viewfinder eye sensor to trigger the shutter – simply wave your hand close to the viewfinder and the camera takes the shot. Better still, it also works in Bulb mode with a wave to start an exposure and another wave to end it.
There’s also apps to simulate the effect of long exposures by combining multiple frames and ones designed to better capture light or star trails. It’s all good fun, but the question is whether most or even all of these should simply be part of the standard camera operating system. After all most rivals offer built-in timelapse facilities, Panasonic offers an additional stop motion mode, and Olympus continues to raise the bar for cunning long exposure options.
I also find Sony’s apps aren’t always accessed or adjusted in an intuitive manner. Rather than integrating new functions into the existing menus, they’re all kept in a dedicated Apps section. I’m sorta okay with that, but once you fire-up an App, you’ll find it has its own multi-page menu system, including options to set the image quality. Yep, a separate image quality menu just for that app that works independently of the main image quality menu for the camera. So you may have the main menu set to, say, RAW+JPEG, then enter an App assuming it’ll inherit that setting, only to discover later that you’ll need to set it separately. This has caught me out in the past when using, say, the Touchless Shutter app. I assumed it would be capturing images using my main quality settings, but was in fact using a default setting of JPEG only. Why would I want to have different quality settings just because I’m using an App, or miss out on some other key settings? Sony really needs to think more carefully about how the Apps integrate with the camera. Just one menu system please.
On previous Sony cameras I’d also lament the lack of decent GPS logging or tagging at this point, but the A6500 resolves this properly by being the first Alpha to support a Bluetooth link with your smartphone. In theory you pair the camera and phone like any other Bluetooth accessories, after which they maintain a low-power link, requesting and embedding GPS co-ordinates as you shoot. In this respect it’s like Nikon’s SnapBridge technology.
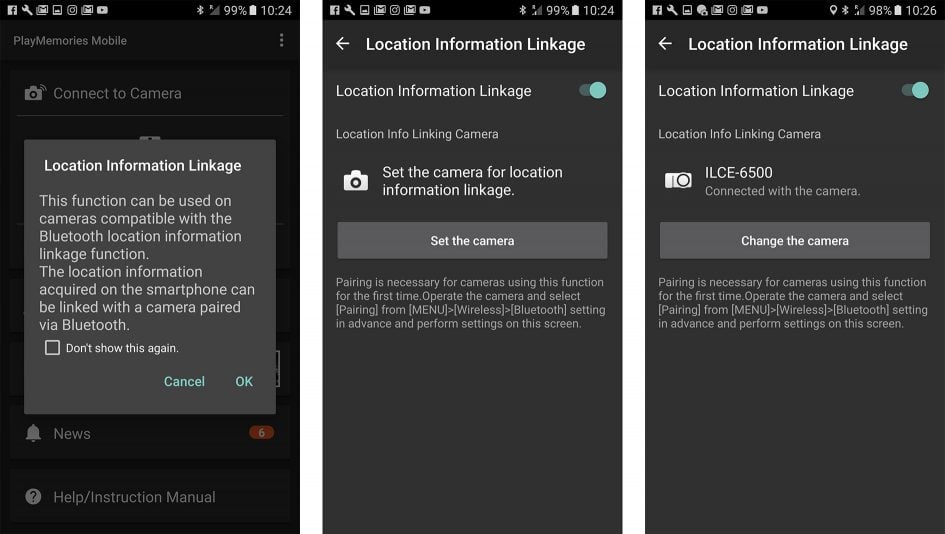
In practice it’s almost that simple, but requires an additional step to get started. First you’ll need to pair the camera and phone, by enabling Bluetooth on the former and searching for it on the latter. Once both are paired, all you need to do is fire-up the PlayMemories app on your phone. Under the Location Information Linkage option you’ll need to set the camera that will receive the GPS data and there on the list you should see the A6500 which you previously paired. Once selected, you should see the World / map icon on the A6500 screen change to indicate it’s connected and receiving location information, after which you should be good to go. Anything you shoot from this moment onwards will be tagged by the position provided by your phone without further interaction, and the camera will automatically re-establish the link when powered off and on again. Similarly your phone will automatically reconnect when it’s been powered off and on again.
In practice it works seamlessly and I didn’t notice a significant impact on battery life while it was running – Bluetooth should certainly be more power-friendly than attempting to maintain a Wifi link to transfer location details as Fujifilm currently does. The only issue, as with all smartphone solutions, is the accuracy being limited to the actual phone. I found my GS7 can often be a few meters out when kept in my pocket, so if I’m after the most accurate co-ordinates during a session, I try to keep my phone in the top of my backpack. You can see the impact of accuracy in the following photo and corresponding map where my phone reckons I’m on the other side of the road – albeit only about 15m away.
The addition of Bluetooth to the A6500 to handle location-embedding has enhanced what was already one of the best wireless implementations around. Where most cameras force you to select and confirm a number of processes before they’ll transfer an image or start the remote control, PlayMemories will do either with a single tap, so long as you have a compatible phone with NFC of course. I remain frustrated by the need to update the internal Smart Remote app when this really ought to be fully-operational out-of-the box, but it is at least a one-time process. I’ll keep plugging-on at Sony, but in the meantime if you do own an Alpha or Cyber-shot with Wifi, please remember to update it to get the full feature-set.
Sony Alpha A6500 movie mode
The Sony A6500 becomes one of the best-equipped cameras for movie recording. It essentially takes the powerful feature-set and great quality of the earlier A6300 and enhances it with the addition of built-in stabilisation and a touch-screen which finally lets you tap to pull-focus.
Like its predecessor, the A6500 can internally record 4k movies at up to 30p and 1080 video at up to 120p for slow motion. As before you have full manual control over exposure and the choice of applying one of nine Picture Profiles which include S-Log 2 and S-Log 3 (the latter available in S-Gamut3.Cine and S-Gamut3 flavours) for capturing flatter output, ready for grading; there’s also a useful Gamma Display Assist option so you don’t need to guess how the footage will look at the point of capture.
You can film at any sensitivity from 100 to 25600 ISO; or starting at 800 ISO if you’re exploiting S-Log 2 or S-Log 3 from Picture Profiles 7, 8 and 9. I have several movie samples below filmed with and without Picture Profiles for your own comparison. It’s also possible to set the shutter and aperture manually and if desired lock both and opt for Auto ISO to take care of differences in brightness.
Audio can be recorded using the internal stereo microphones or with an external microphone connected to the 3.5mm input. Sadly Sony didn’t take the opportunity to squeeze in a headphone jack though, and it’s not available on a grip accessory either.
If you’re shooting 4k UHD video, you have the choice of XAVC S encoding at 60 or 100Mbit/s, and at frame rates of 24 / 30p for NTSC or 25p for PAL. You may wonder why there’s no Cinema 4k on the Sony cameras, even the A7s II – I believe this is due to a limitation of the codec.
If you choose the XAVC S HD option, you can film 1080p at 24, 30, 60 or 120p for NTSC or 25, 50 or 100p for PAL, all at 50Mbit/s apart from the 120p / 100p modes which are offered at 60 or 100Mbit/s. To support any of the XAVC S modes, you’ll need an SDXC memory card.
Note the screen is fairly dim by default but sadly cannot be brightened to the Sunny Weather option when filming in 4k or 1080 at 100 / 120p. So if you’re using these modes in bright conditions, you’ll almost certainly want to film with the viewfinder.
The 120p / 100p modes allow you to slow the footage down by five or four times on 24p or 25p timelines respectively. If you film in 1080 / 100p / 120p, the camera will capture audio and playback at the same frame rate in real-time – so if you want to see the footage slowed-down, you’ll need to interpret the footage on your timeline. Alternatively in a new feature on the A6500, Sony’s offered a selection of ‘S&Q’ modes, inherited from the pro camera lineup, which automatically interpret the footage to the desired frame rate. This means your clip is already in slow motion and good to go, although I still prefer filming in 1080 / 100p / 120p as unlike the S&Q modes, it includes audio which could prove useful later. Still, it’s nice to have the choice. Here’s a compilation of 120p clips interpreted on a 24p timeline for a five-times slowdown.
Download the original file (Registered members of Vimeo only). Slow motion compilation filmed in 1080 / 120p, slowed-down five times on a 24p timeline.
Set the camera to AVCHD and you can film 1080 in 24p (at 17 or 24Mbit/s), in 60i (at 17 or 24Mbit/s), or 60p (at 28Mbit/s). That’s with the camera set to NTSC. In PAL mode it’ll use the same bit rates but for 25p, 50i and 50p. Finally the MP4 mode offers 1080 at 30p (16Mbit/s), 60p (28Mbit/s) or 720 at 30p (6Mbit/s) all for NTSC and again 25p and 50p for PAL.
It’s possible to switch the camera between NTSC and PAL modes, opening up all frame rate options but doing so involves a reboot and reformatting of the memory card – I believe to conform with AVCHD standards. If you set the camera to a mode that’s not native to its original location – for example setting an American model to PAL or a European model to NTSC – then it’ll remind you of your foreign preference every time you power-up, demanding an OK press to continue. While offering a useful reminder, this can get annoying over time, so I’d prefer if Sony had an option to disable it – after all, the working frame rate is still displayed on-screen so I don’t think many DPs will get caught-out. This reminder is common across all Sony cameras which let you switch regions. After switching regions, you’ll also need to reformat the memory card, or insert one that was formatted previously with that region setting. It all seems unnecessarily complex when many rivals just offer all the global frame rates from a single menu.
Like the A6300 before it, the A6500 will record 4k in 24p and 25p by taking the full-frame width with no cropping. Set it to 4k / 30p though and the data rate remains a little too high to sample the entire frame, so the camera applies a crop of approximately 1.23x horizontally. I’ve pictured the impact of this in the composite image below with the full image showing the full view, as captured in 4k at 24p and 25p, while the outer edge of the red frame indicates the cropped coverage at 4k / 30p.

Above: Sony Alpha A6500 4k movie coverage: full-width at 24p and 25p; outer edge represents crop at 30p
For the record, Fujifilm’s XT2 applies a 1.17x crop to all 4k frame rates, while Panasonic’s GX80 / GX85 applies a 1.1x crop when filming 4k. The Olympus OMD EM1 Mark II doesn’t crop when filming 4k, but like the Lumix, it’s also using a smaller sensor. So Sony’s ability to use the full-frame width of an APS-C sensor, at least for 24p and 25p, is fairly unique in the market.
If you film 1080p between 24 and 60p, you’ll also enjoy the full frame width, although if you choose 100p or 120p for slow motion, there’s a small crop applied which I worked out about 1.14x horizontally. I’ve pictured the impact of this in the composite image below with the full image showing the full view, as captured in 1080p at 24p to 60p, while the outer edge of the red frame indicates the cropped coverage at 1080 / 100p / 120p.

Above: Sony Alpha A6500 1080p movie coverage: full-width at 24p to 60p; outer edge represents crop at 100 and 120p
So what’s the quality like? I filmed a detailed city view with the A6500 using the Sony Zeiss 24mm f1.8 lens at f5.6 in all of its movie modes to find out, then matched the coverage using the Fujifilm XT2 with a zoom to see how it compared. First, here’s the main view, filmed in 4k / 24p with links to lower resolution versions and those filmed with S-Log 2 and S-Log 3.
Download the original file (Registered members of Vimeo only). Sample movie filmed with a final production Sony Alpha A6500 in 4k / 24p using the Standard Creative Style and with Picture Profiles Off; I filmed with the Sony Zeiss 24mm f1.8 in Manual exposure mode at f5.6 and 100 ISO. I also have 1080p and flat versions available: Sony A6500 4k S-Log 2 movie, Sony A6500 4k S-Log 3 movie, Sony A6500 1080p movie, Sony A6500 1080p S-Log 2 movie.
Below I took 100% crops from the 1080 / 24p and 4k / 24p versions (left and right respectively) and it’s immediately clear how much more detail there is in the 4k version.

Above left: 100% crop from 1080 / 24p frame-grab, above right: 100% crop from 4k / 24p frame-grab
The result above is what you’d expect, but when you compare it to rival cameras, you realise that while the 4k footage is definitely very good, the 1080p footage is below par. For example, the 4k footage from the Fujifilm XT2 which I filmed at the same time looked essentially the same as the 4k from the A6500, but Fujifilm’s 1080p footage looked much crisper and contained genuinely more detail than 1080p on the A6500. So if you want the best-looking 1080 footage from the A6500, I’d recommend filming in 4k then down-sampling afterwards; this also gives you the opportunity to punch-in up to two times with no loss of quality. Of course filming in 4k will consume more memory, require more powerful editing solutions and limit you to 30p (or 24 / 25p with no crop), but it’s the way forward for the gain in quality. I’d only shoot natively in 1080p on the A6500 (or A6300) if I was either seriously running short of memory or needed to film between 50 and 120p.
At this point I’d like to comment on battery life and over-heating, which has been an issue in the past. Like many cameras, the A6000 series gets warm when filming video and after a short while can become quite hot. At a certain temperature, the camera automatically shuts itself down to prevent damage – or indeed operator discomfort. On the original A6000 I could only film around 15 to 20 minutes before it wanted to take a break – and remember this was in 1080p only. The A6300 was better in my tests, filming 29, 20 and 10 minute 4k clips consecutively before the battery gave-up and the camera felt very warm.
Since reviewing the A6300, Sony released a firmware update that basically turns-off (or increases) the temperature warning limit, allowing the camera to keep operating, albeit at higher temperatures you may not want to handhold. It’s basically at your own risk.
This ‘feature’ is now built-into the A6500 as standard, so to see the impact I fitted a fully-charged battery and started filming 4k / 24p in a room without AC; I had the screen flipped open to improve airflow and initially had the temperature warnings enabled. I filmed my first clip up to the 29:59 limit, after which just over half the battery had been consumed and the body felt warm, but not hot – that said, the temperature warning icon popped-up at the end of the recording. Undeterred, I started filming a second clip, but after just three and a half minutes the camera stopped recording, stating ‘internal temp too high, allow to cool’. I decided not to let the camera cool and instead set the Auto Power Off Temp from Standard to High and started filming another clip. This time the temperature warning icon appeared after two and a half minutes, but the camera kept recording, and after about eight minutes I’d describe the body as being pretty hot. The battery ended the experiment though, expiring after the clip reached 23 minutes. So I managed to record just over half an hour of 4k before the A6500 shut itself down when Auto Power Off Temp was set to standard, but extended this to just over 56 minutes when set to High. I think the A6500 could keep filming even longer given a fresh battery – or USB power – but it would be uncomfortably hot at this point.
To put this in perspective, in previous tests I’ve filmed 90 minutes worth of 4k across three half hour clips on a single charge using the Lumix GX80 / GX85 and it felt warm but not hot. Fujifilm’s XT2 limits you to ten minute clips of 4k, but I managed six of them – so 60 minutes worth – on one charge with the camera again feeling warm, but not hot; fit the optional battery grip and the clips can be half an hour each, and I filmed two and a half hour’s worth of them too, albeit using three batteries. Each model varies, but again the ability to film two half hour 4k clips per charge from an APS-C sensor without cropping and without additional accessories is pretty respectable. The latest Micro Four Thirds bodies may be able to film for longer per charge, but the sensor is smaller too.
Moving on, the A6500, inherits the ability to deploy its embedded phase-detect AF system while filming movies. Like its predecessor, this allows the camera to make smooth and confident adjustments with little or no visible hunting. Transforming the experience on the A6500 though is the presence of a touch-screen which finally allows you to tap to pull-focus.
As before it’s also possible to adjust not just the speed of refocusing (useful when pulling focus from one subject to another), but also the response time, preventing the camera from refocusing if something briefly interrupts the view.
Annoyingly there’s still no Single AF for movies which means the camera continues to decide when it’s going to refocus which may not necessarily be when you want it to. Of course you could switch from Continuous AF to Manual AF and enjoy focus peaking for assistance, but I’d still prefer to have more control over autofocus timing as even when the subject is static I don’t want the camera to wobble its focus to check. But the bottom line is the AF system does work very well and the ability to tap to reposition the AF area and pull-focus has greatly enhanced the overall usability. I featured a video near the start of the review which demonstrated focus-pulling with the FE 85mm f1.4, so here’s an alternative using the E 24mm f1.8 again wide-open. Here I set the AF to Continuous and simply tapped between the coffee glass in the foreground and the background to pull-focus – as you can see it works well and I dearly hope Sony implements touch-screens on future RX and A7 bodies too.
Download the original file (Registered members of Vimeo only). Sample movie filmed with a final production Sony Alpha A6500 in 4k / 30p using the Standard Creative Style and with Picture Profiles Off; I filmed with the Sony Zeiss 24mm f1.8 in Manual exposure mode at f1.8 and 1/30. I used the touch-screen to pull-focus here.
In addition to a touch-screen, the other big change for movies on the A6500 over its predecessor is the built-in stabilisation. To put it to the test I filmed handheld clips with 24mm and 85mm unstabilised prime lenses, effectively working at 36mm and 128mm after the APSC crop is applied. On the previous A6300, I wouldn’t have been able to handhold either lens without intolerable wobbling when filming, so the fact the footage below now looks usable is testament to how useful the built-in stabilisation is – and remember it’ll work with any lens you attach.
Download the original file (Registered members of Vimeo only). Sample movie filmed with a final production Sony Alpha A6500 in 4k / 24p using the Standard Creative Style and with Picture Profiles Off; I filmed with the Sony Zeiss 24mm f1.8 in Manual exposure mode at 100 ISO. This lens has no optical stabilisation, so you’re seeing the body’s built-in stabilisation here.
Download the original file (Registered members of Vimeo only). Sample movie filmed with a final production Sony Alpha A6500 in 4k / 24p using the Standard Creative Style and with Picture Profiles Off; I filmed with the G Master 85mm f1.4 in Manual exposure mode at f2, 1/25 and 1600 ISO. This lens has no optical stabilisation, so you’re seeing the body’s built-in stabilisation here.
Compared to Olympus, I’d say the recent OMD bodies enjoy the edge when it comes to built-in stabilisation, both for stills and video, and for the latter it’s most evident when you film while walking. Footage while walking looks acceptable on the A6500, but it’s eerily smooth on the OMD EM5 II and especially the OMD EM1 II, almost as if you’re using a gymbal. But for a first attempt on the A6000 series, the built-in stabilisation is still very good indeed and breathes new life into composing or filming with unstabilised lenses.
I should also add the built-in stabilisation helps in reducing some of the conditions under which rolling shutter artefacts rear their upgly jello heads. Don’t get me wrong, if you quickly swing the camera left or right, you’ll still see skewing artefacts on the A6500, but previously I also found I could easily trigger jello effects simply through camera shake – something that’s particularly an issue with small, light bodies fitted with unstabilised lenses. But with the built-in stabilisation, any tiny wobbles are effectively absorbed, in turn reducing or even eliminating jello effects when simply handholding unstabilised lenses. Again the rolling shutter is there on the A6500 if you go looking for it, but at least in one respect it’s now harder to trigger than on the A6300.
So now for some more movie clips.
Download the original file (Registered members of Vimeo only). Sample movie filmed with a final production Sony Alpha A6500 in 4k / 24p using the Standard Creative Style and with Picture Profiles Off; I filmed with the Sony G Master 70-200mm f2.8 at 70mm in Manual exposure mode at f11 and 1/50. The stabilisation here is a combination of body and optical.
Download the original file (Registered members of Vimeo only). Sample movie filmed with a final production Sony Alpha A6500 in 4k / 24p using the Standard Creative Style and with Picture Profiles Off; I filmed with the Sony Zeiss 24mm f1.8 in Manual exposure mode at f5.6 and 6400 ISO.
Download the original file (Registered members of Vimeo only). Ian Moore concert handheld footage.
Check prices on the Sony Alpha a6500 at Amazon, B&H, Adorama, or Wex. Alternatively get yourself a copy of my In Camera book or treat me to a coffee! Thanks!


