If you've ever found yourself wishing you had a magnifying glass with you, iOS 10 can now serve as an excellent replacement. The new Magnifier--not to be confused with the Text Size and Zoom features that makes your on-screen text bigger--uses your phone's camera and flashlight to make sure you can always read that receipt or dig out that splinter.
How to Enable the Magnifier
Before using the Magnifier, you'll have to enable it. In Settings, tap "General."

On the General settings screen, tap "Accessibility."

On the Accessibility screen, tap the "Magnifier" setting.

Turn on the "Magnifier" option. And if you want iOS to automatically set the default brightness and contrast when you open the Magnifier, go ahead and turn on the "Auto-Brightness" setting. You can always adjust them yourself when you're using Magnifier, regardless of whether "Auto-Brightness" is turned on.

And now that you've got Magnifier enabled, it's time to put it to use.
How to Use the Magnifier
To start the Magnifier, triple-click your Home button. If Magnifier is the only accessibility option you have enabled to use triple-click, Magnifier will open immediately. If you have more than one setting assigned to use triple-click, you'll see a pop up menu with your options. Just tap "Magnifier."

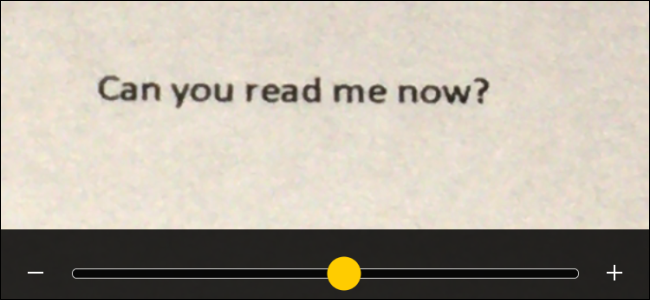
The Magnifier opens to its lowest level zoom, which is pretty much no zoom at all. Below on the left, you can see the default zoom on some 4-point type. Slide the "Zoom" slider, though, and all is revealed.


If you're in a dark room--say, trying to read a receipt in a dimly-lit restaurant--you can turn on your flashlight to illuminate things by hitting the "Flashlight" button with the lightning bolt. And don't worry, it uses a lower setting than the blinding default used by the normal flashlight (which, by the way, you can now change). If you're having trouble with the focus going in and out at higher zoom levels, tap the "Lock" button to lock the focus and stabilize things a bit.

Perhaps one of the best features of the Magnifier is the ability to freeze the frame and then look at it without having to hold your hand in place over what you're looking at. Tap the big "Freeze Frame" button at the bottom center.

Whatever you were looking at is captured and displayed full screen. You can move the screen around by dragging it and adjust the zoom level however you want. When you want return to the Magnifier, just tap the screen. Note that this doesn't actually save a picture of what you're looking at, but you can always take a screenshot of your captured image by pressing your Home and Power buttons at the same time.
Back on the main Magnifier screen, you also have a set of filters you can play with that might make what you're looking at a little more visible. Just tap the "Filters" button.
At the top of the controls, you can slide left and right to select different color filters like "Yellow/Blue," "Grayscale," "Red/Black," and more. You can also tap the "Invert Filters" button to invert the colors of whatever filter you have applied or just invert the normal colors if you have no filter applied. You can also use this screen to change brightness and contrast levels.
The filter you choose will stay applied until you turn it off by disabling the Invert Filters switch and sliding the filter setting back to none. This means that once you set a filter, you can return to the main Magnifier screen by tapping the "Filters" button again. There, you can adjust zoom levels or take a freeze frame while your filter is still applied.
All in all, Magnifier is a pretty handy addition for anyone, even if you don't have difficulty reading fine print.