Daniel Laan is a landscape photographer and writer from the Netherlands. Taking his camera on hiking trips through nature, preferably away from the hustle and bustle of modern life, he quickly realized that capturing landscapes has a meditative effect on him. The camera, but post-processing too, are the tools to not only to show the light, the land and the fleeting moment, but also share some of his thoughts.
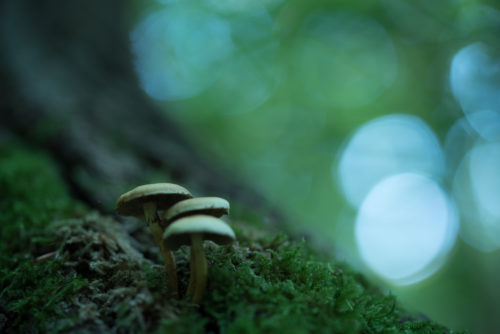
The thing with grand landscapes is: Sometimes the light just doesn’t happen. When you’ve got these flat, overcast days, you’re left wanting. That flat light is actually great for all kinds of macro photography, but I grew particularly interested in the strange and alien-looking world of fungi. Fungi are the cleaning crew of the forest as they take care of layers of fallen trees. In doing so, they provide vital nutrients back to the forest. They come in all shapes and sizes too. It’s a strange thing to say this, but I actually like taking pictures of their reproductive organs: Mushrooms. Just this fact alone fascinates me: Picking and eating one may be a tasty treat; the one next to it could kill you within minutes. And don’t forget about the supposed effects of magic mushrooms!
We’re going to create some magical (looking) mushrooms ourselves today, so gear up and start conceptualizing a fantasy world of your own.

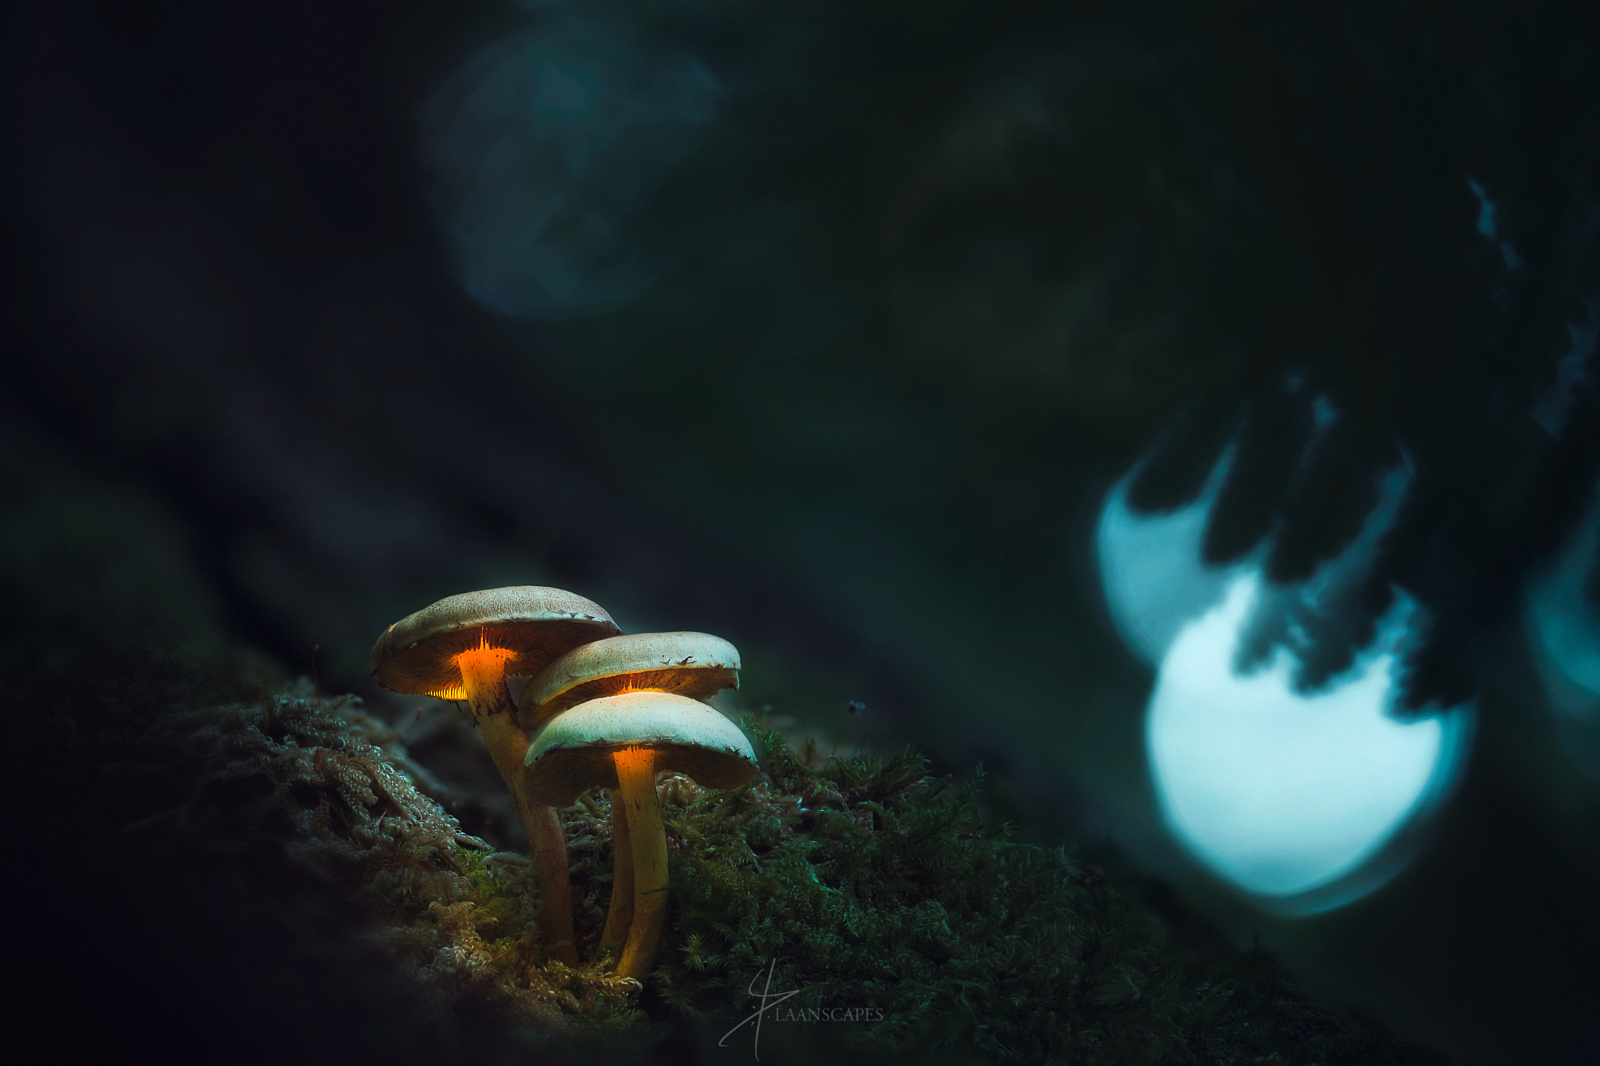
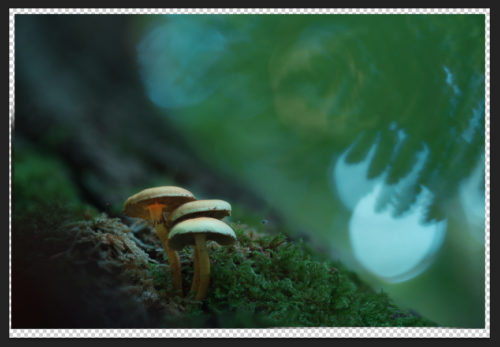
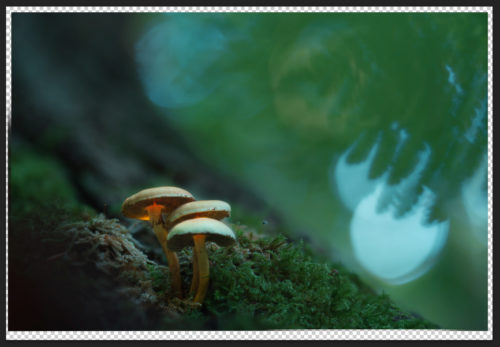
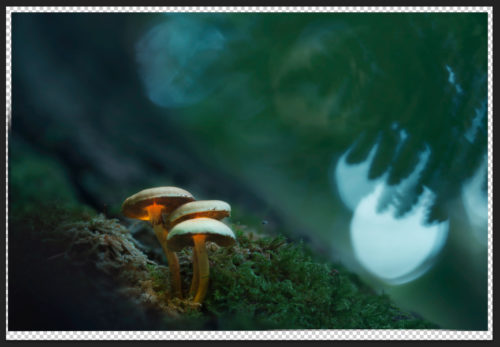
“Night to Remember” | 90mm | ISO 100 – focus stacked at 1/8 sec and f/3.5
Concept
As soon as I get out of the car and get a whiff of actual pine-scented air, I’m reminded of the impact nature has on my creativity. It’s the reason I like being a landscape photographer; out in the backcountry, when the light is great. The experience of it all outweighs taking pictures for me. When I step under the canopy, I can’t help but wonder what I want to shoot when I get there. Think “Alice in Wonderland” meets “Alien”. I want wacky, full of fantasy and a looming feel of malevolence. I imagine what it would feel like to be the height of an insect. What if you could walk among a forest of giant mushrooms? What if those mushrooms emitted light of their own; like street lamps or neon signs? This pre-visualization step is the most important step to successful fine art photography.
Technique
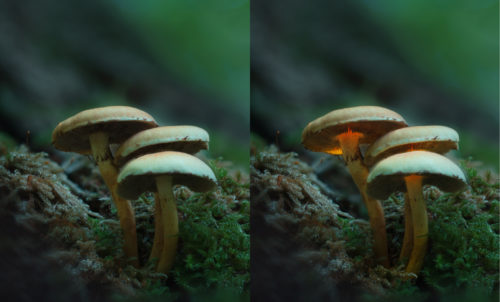
Most mushrooms are delicate things; easily transparent to light passing through them. So I will light paint with a head torch in such a way that they’re apparent light sources themselves. The mushroom’s fine tissue will tone the light just fine; no need for flash gels or red LED’s.
Making the image really sharp isn’t simply done by dialing in f/32. Instead, I’d like to shoot wide open to create spectacular bokeh effects in the background. But that has detrimental effects to the front-to back sharpness of the mushrooms. And this is where this becomes a seriously challenging type of photography. It’s technically demanding and sometimes utterly frustrating. I think I’ve mentioned before that today’s camera gear does not allow me to pursue my creative vision out of the box. I want crisp mushrooms, and creamy backgrounds.
Enter Focus stacking. Focus stacking is taking shots at various focus distances and merging them into one image. This creates a sharp subject but retains the blurry background we come to appreciate in macro photography. It’s imperative that these brackets align perfectly and have the same exposures throughout “the stack”.
But how do you adjust the focus without rotating the focus ring and inadvertently messing up the alignment? That’s much easier from a sturdy tripod, so pick your subjects carefully. I use the Sirui Carbon T-2204XL Traveller Tripod; a light and versatile piece of equipment from which I can invert the center column and hang the camera to obtain a lower vantage point. I also carry a beanbag to get even lower. For macro work, I use the Tamron 90mm f/2.8 SP Di MACRO 1:1 VC USD.
Looking for Mushrooms
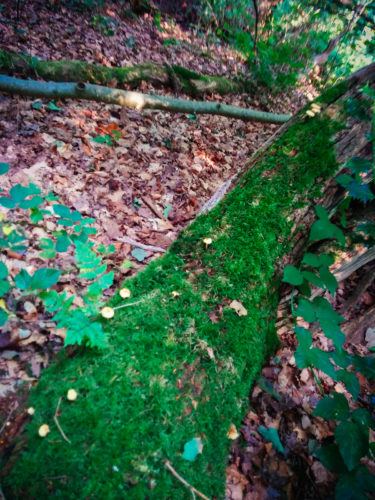
As I look up at these grand oak trees that dapple the fading daylight, a particular color palette starts to come to mind. I see the forest is bathed in the deep greens of late July, but there’s also a subdued type of cyan; a color which I can’t quite put my finger on. I decide that there will be a complementary color palette today. That helps enormously in your quest for spotting mushrooms. If you restrict your attention to yellow, orange and red, it’s much easier to find them among the shades of deep green. They’re there throughout the year as well; not just during the fall. Because they love moisture so much, it is true that fungi are more abundant and diverse in autumn, but I’ve found stunning specimens even in the driest of months. These particular fungi share the same environments with moss: damp and shaded areas of woodland with plenty of nutrients to feed on. Deadwood with moss in the shade of a large, leafy tree is a surefire way to find what you’re looking for.
Composition & Exposure
You get bonus points if you find shrooms that are elevated. That will help to get your camera underneath, pointing up to them. This is exactly why a shorter focal length is preferred. You can angle a shorter lens more toward the forest canopy, which gives you gorgeous bokeh if you dial in the right settings. Then the aperture also has amazing effects on the atmosphere of the image. Check out the shots below at different aperture settings.
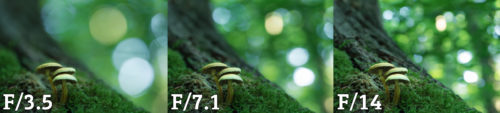
Buttery smooth backgrounds and large highlights. That’s wide open for you. At f/3.5, the aperture is actually wide open, but the camera calculates the effective aperture based on the focal distance. It had me scratching my head. At f/7.1 the depth-of-field becomes larger and the highlights drop in size. The background becomes rather nervous and distracting at even smaller apertures like f/14.

When you’ve found the composition you’re after, it’s time to make the image darker.
Dial in around -1EV and take note of the auto exposure settings. This makes the image feel more moody and atmospheric and helps to prevent overexposure in the areas you are about to light paint. Do make sure you’ve set your ISO to 100 and switch to manual mode. Dial in the settings from before.
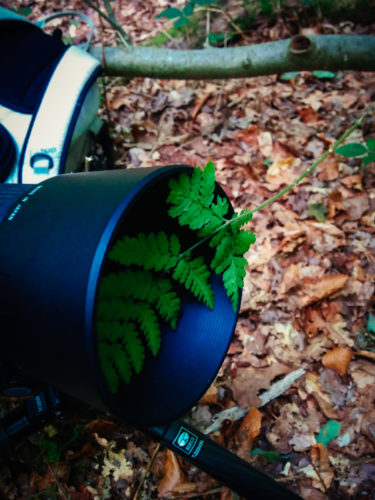
If you find the foreground is too sharp, you can always put a leaf inside the lens hood to soften it:
In the Spotlights
At this point, the fun really starts. Light painting is handwork. So we won’t be focus stacking due to variations in exposure. Focus on the areas under the mushrooms and close up the aperture a good amount. Remember to compensate the shutter speed. Now place the LED light over and slightly behind the mushrooms.
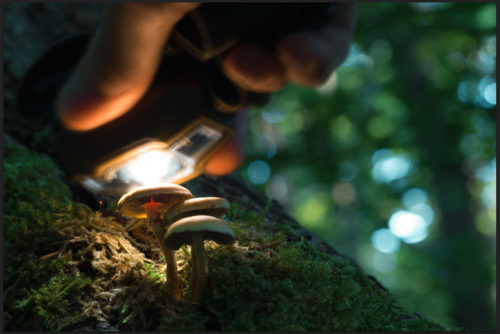
Place the light over different areas and adjust the focus if necessary. You control the brightness of the light with distance and intensity (dimming), not by the camera’s settings.
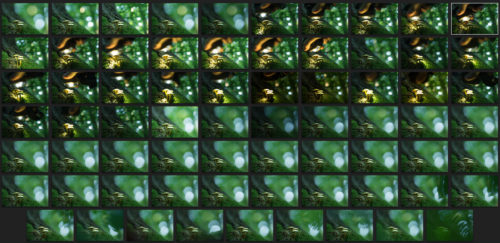
That’s it for shooting. I’ve took 69 exposures and light painted 25 of them in just under one hour. For me, there isn’t any value to capturing it all in a single image, apart from that it is a lot less work if you do.
Raw Conversion
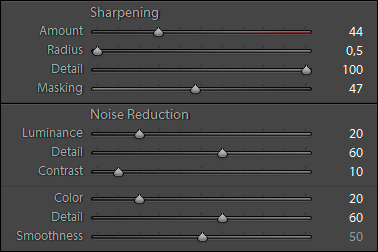
The most important advice I can give you here is to make sure you synchronize your settings among all those exposures. Just select them all before you start pulling all kinds of sliders. Another thing to note: This is not the final step in the editing process, so be *very* careful with saturation and contrast in this step. Leave the tone curve linear and rather decrease some contrast than increase it. If you find that your exposures are too dark, now is the time to increase the brightness. The same holds true for white balance. I like to keep the overall image more towards the blue in order to create a good visual separation between the lit parts of the mushrooms and their mysterious surroundings. Remember the complementary color contrast? As for detail and noise reduction, here are my settings:
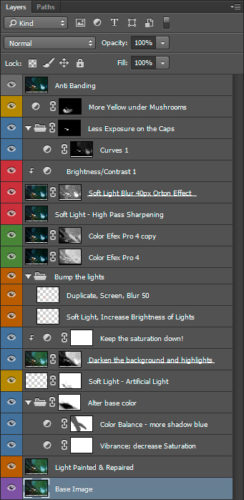
Create a Base
I like to use a dedicated focus stacking program like Helicon Focus to take care of a sharp image. For now, you can go to Edit > Auto-Align Layers. Select Projection: Collage. Leave both checkboxes unchecked and hit OK. After this is done, go to Edit > Auto Blend Layers and select Stack Images with Seamless tones and colors. Put the result in a separate layer, below everything else. After this, it’s time to group all those layers and tidy up a bit:

Put the elements of the focus stack inside a folder. Use these to repair any flaws you see now or later by masking in specific areas. These are also useful to select a nice, unstacked background from. I’ve also shot a background in which I (gently) grabbed a nearby sapling tree and held it behind the mushrooms. For the foreground, I blended in a shot where I put a leaf inside the lens hood.
This layering and masking gives the image much more depth and interest, while preventing any of the blurred elements getting in front of the critical subject. When you’re done, it’s time to merge these layers into a base layer. Label it accordingly and make sure it’s on the bottom in the layers palette before the next steps.
Make It Glow!
As soon as you begin masking in light painted areas, you will start to feel the magic of these mushrooms. No psilocybin required. Hide all layers except the stacked image. Then set the bottom of the light painted images to 50% opacity and zoom in. Make sure that the focus is spot on. Try with another exposure if it isn’t. Then check for alignment issues. Drag the image around until it aligns perfectly with the heart of the mushroom. The rest of the image isn’t important, because the next step is to alt-click the “Create Mask” icon in the layers palette to create a black mask. Select a soft brush at about 10% opacity. Start to paint very lightly with white on that black mask. More near the center, less around it. Try to create beautiful and natural-looking transitions and focus on one mushroom at a time.


Make the Image Sing
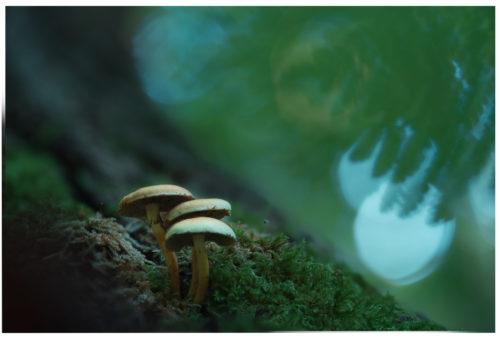
As we’re nearing the completion of this walkthrough, I want to show you what you can do from this point on. I’m far from done with the image. If the light was really emanating from the mushrooms, there are reflections we need to take care of. Create a new layer and set it to Soft Light. Eye drop one of the brighter colors already present in the absorbed light under the mushroom. Now gently paint on the areas where you would likely see light reflecting on. The base of the toadstools is very important in this step. The hats work like parasols; shielding the ground from the LED light.
Since I was looking for a complementary color contrast long before I even shot this image, this is a good time to check if there’s enough color separation between subject and background. With targeted Color Balance and Curves adjustments, I’ve toned down the overall saturation and shifted the shadows more towards the blue, while leaving the light of the mushrooms unaffected. Let’s see how this image is looking with all these adjustments before I leave with you with a final before and after.
Final Steps
The whole image looks a bit too saturated for my taste, so I want to tone it down to more moody grays and browns. Nik Color Efex is extremely helpful in these cases, but also introduces banding when you alter the contrast at the very last steps. To counteract that, I typically add this filter called Film Grain and set the grain size to 495. This grain will “bleed in” with the luminosity channel and helps to prevent banding in the output image for the web.
Coming back into Lightroom, you can do a final check on the histogram and dial in some adjustments for different media. For social, I add another layer of grain. It’s hardly visible, but with all this compression, the image will degrade visually and introduce banding.
I hope you like the result and have learned a thing or two in this long and complicated written tutorial. I can imagine that you’ve struggled to keep up. That’s the reason I’m hosting private Skype processing workshops. Landscapes, mushrooms, nightscapes; I’ll help you take your own image to the next level, no matter what your expertise in Photoshop is. Be sure to book an editing session through my website.
As autumn is right on our doorstep, I’m uploading more glowing mushrooms. And you will see them on 500px first! Follow my work on 500px to be the first to see them!
I’ll leave you with more images of my “magical” mushrooms. Thank you for your time!


Leave a reply