If you’re a PHP developer and currently running a blog with a static site generator such as Octopress or Jekyll, wouldn’t it be great if you could use your primary language for it? Yes, it’s healthy for us developers to use more than one language, but let’s be honest – we often want to add some functionality to our blogs, but it’s difficult to accomplish in unfamiliar syntax. In this article, we’ll set up Sculpin, a static site generator for PHP. Just like any other static site generator, it uses markdown files and HTML templates to generate your blog, so the transition should be easy.

Installing Sculpin
Installing requires use of the command line and an installed modern version of PHP (5.6 onwards preferably).wget https://download.sculpin.io/sculpin.phar
chmod +x sculpin.phar
sudo mv sculpin.phar /usr/local/bin/sculpin
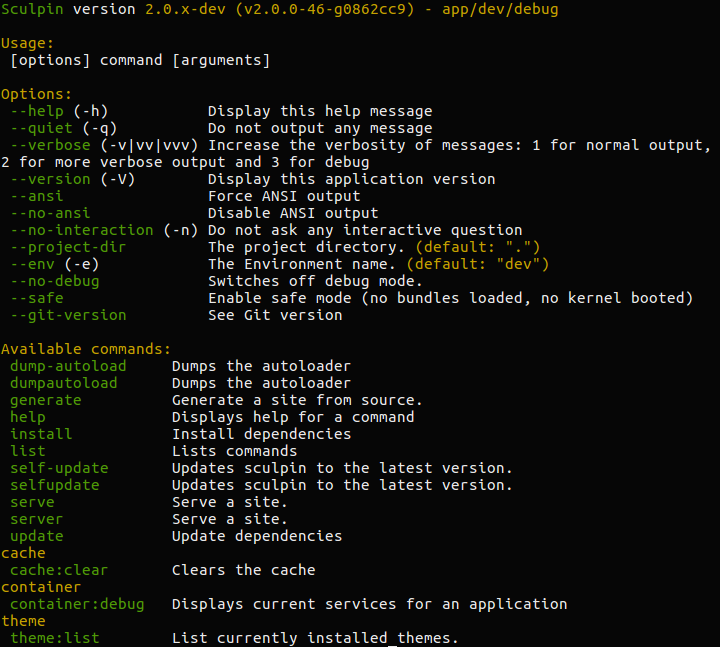
sculpin will list the commands that you can use:
Creating a Blog
Now that you have Sculpin installed, we can create a new blog. We’ll be using the Sculpin Blog Skeleton provided by the Sculpin team. Clone the repository and download it intomyblog.
git clone https://github.com/sculpin/sculpin-blog-skeleton.git myblog
myblog and execute sculpin install. This will install all the dependencies needed by Sculpin to run.
cd myblog
sculpin install
sculpin.json file to see the similarity). Sculpin actually bundles an alternative version of Composer, so Composer isn’t needed outside it. If you need third-party packages to be installed just add them inside the require object then execute sculpin install to install them. By default, the packages are installed inside the source/components directory.
Once Sculpin is done installing the packages, execute the following command to generate the site. The watch option means that the site will be automatically re-generated once you change any of the configuration files or the files inside the source directory. The server option runs a server which will serve the generated site. By default, this can be accessed at http://localhost:8000, but if you’re using a good VM environment, the setup will vary depending on your open ports. See this post about Spress, a Sculpin alternative to learn how to set it up in a VM.
sculpin generate --watch --server
output_dev folder. This is only used for development purposes. If you’re already going to deploy your blog over to something like Github pages, you have to specify the env option:
sculpin generate --env prod
output_prod directory which you can then push to Github pages. We’ll go through this in a later section.
Configuring Sculpin
We can configure Sculpin by snooping around the two files inside theapp/config directory:
sculpin_site.ymlallows us to edit global options such as the title of the blog, and our disqus username.sculpin_kernel.ymlallows us to specify the theme to be used by Sculpin, and the permalinks format.
Blogging Basics
If you’re coming from Octopress or Jekyll, you’ll feel right at home with Sculpin because it uses markdown files for blog posts, only instead of.markdown you’ll have to use the more standard .md as the file extension. Another thing to note is that the Sculpin CLI doesn’t have a command for generating a new markdown file for housing a blog post. This means that you’ll have to use the touch command to create a new file:
touch 2016-05-17-getting-started-with-sculpin.md
touch.php file which you can put in the root of your blog’s directory:
<?php
$date = date('Y-m-d');
if(!empty($argv[2])){
    $date = $argv[2];
}
$file = 'source/_posts/' . $date . '-' . str_replace('_', '-', $argv[1]) . '.md';

$title = ucwords(str_replace('_', ' ', $argv[1]));
$handle = fopen($file, 'w');
$data = "---
title: {$title}
tags: []
categories: []

---

";
fwrite($handle, $data);
php touch.php getting_started_with_sculpin
source/_posts/2016-05-17-getting-started-with-sculpin.md file.
If you want a postdated blog post, you can specify a date as the second argument:
php touch.php getting_started_with_sculpin 2017-01-01
---
title: Getting Started With Sculpin
tags: []
categories: []

---
Customizing the Site
Now it’s time to customize the site so it looks exactly how we want it. Here’s what the final output will look like: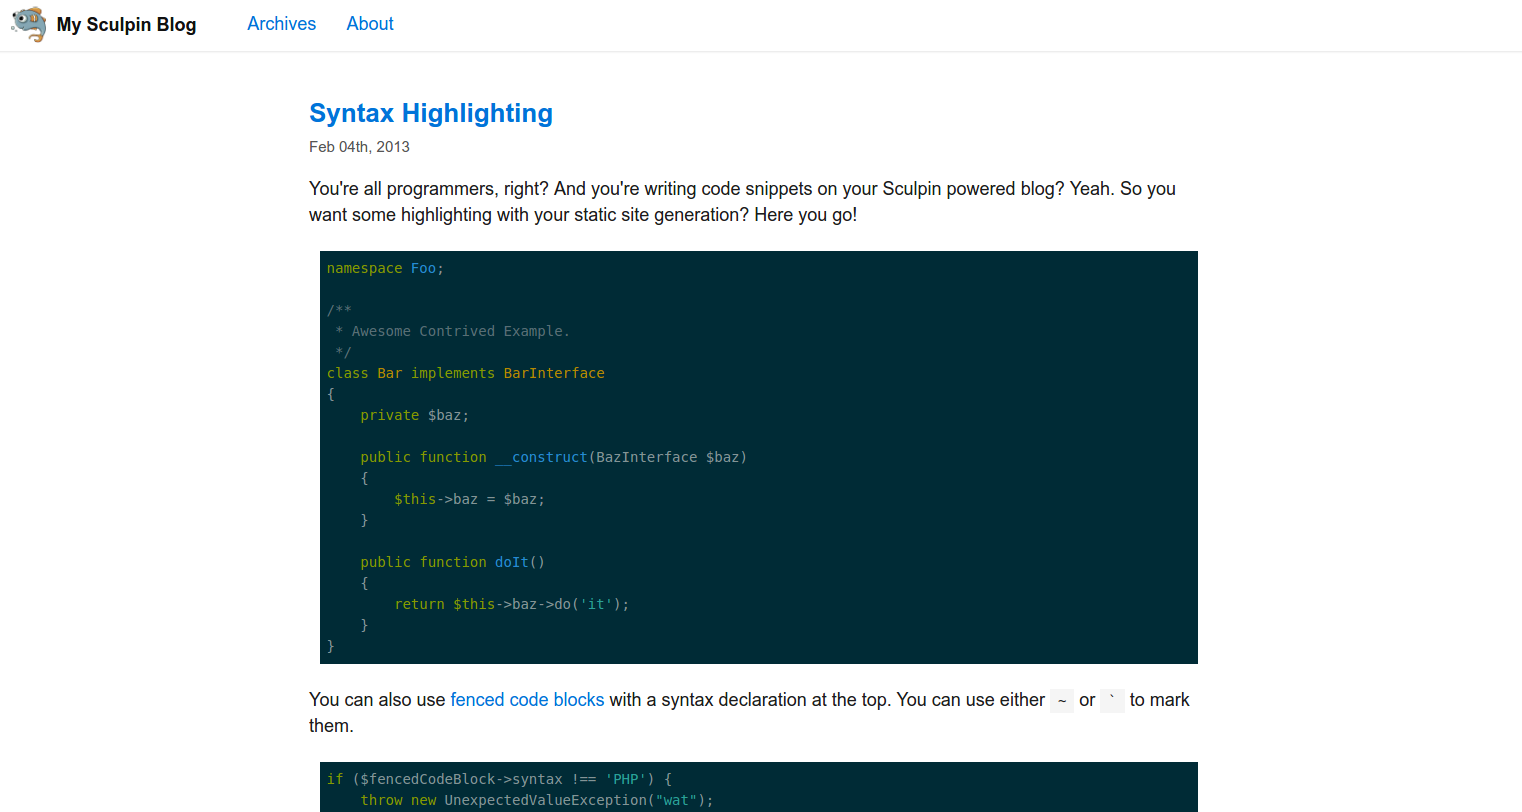 We’ll be primarily working inside the
 source directory, so go ahead and enter it. Once there, open the index.html file. This is the file that Sculpin serves for the homepage of the site. In the first few lines, you’ll see the meta block which is used for specifying the layout, the title of the page, the generator used in the page, and how many posts to show per page.
---
layout: default
title: Home
generator: pagination
pagination:
    max_per_page: 3
---
index.html inherits from the default layout. Layouts are stored in the _layouts folder. Templates use html files, so the actual file would be _layouts/default.html. Open that file up, clear its contents and paste the following:
<!DOCTYPE html>
<html lang="en">
<head>
<meta charset="UTF-8">
<meta name="viewport" content="width=device-width, initial-scale=1">
<title>{% block title %}{{ page.title }}{% endblock %} — {{ site.title }} — {{ site.subtitle }}</title>
<link rel="stylesheet" href="https://cdnjs.cloudflare.com/ajax/libs/picnic/4.1.2/picnic.min.css">
<link rel="stylesheet" href="https://cdnjs.cloudflare.com/ajax/libs/picnic/4.1.2/plugins.min.css">
<link rel="stylesheet" href="https://cdnjs.cloudflare.com/ajax/libs/highlight.js/9.4.0/styles/solarized-dark.min.css">
<link href="{{ site.url }}/css/style.css" rel="stylesheet" type="text/css" />
<script src="https://cdnjs.cloudflare.com/ajax/libs/highlight.js/9.4.0/highlight.min.js"></script>
<script>hljs.initHighlightingOnLoad();</script>
</head>
<body>
<header>
<nav>
<a href="/" class="brand">
<img class="logo" src="{{ site.url }}/images/jackson/76x76.png" />
<span>{{ site.title }}</span>
</a>
<input id="bmenub" type="checkbox" class="show">
<label for="bmenub" class="burger pseudo button">menu</label>
<div class="menu">
<a href="{{ site.url }}/blog">Archives</a>
<a href="{{ site.url }}/about">About</a>
</div>
</nav>
</header>
<div id="wrapper">
<main>
{% block content_wrapper %}
    {% block content %}{% endblock %}
{% endblock %}
</main>
<footer class="container">
© {{ "now"|date("Y") }} {{ site.title }}
</footer>
</div>
</body>
</html>
<main> tag for now. We’ll demistify the rest later.
Only the contents inside the <main> tag change. What it means is: render the block named content_wrapper, and inside it render the block named content. This is where Twig really shines because we can override the contents of an inner block (content) if we define an outer block (content_wrapper). We’ll see this in action when we look at the _views/post.html file later on. For now, just keep in mind that either the content_wrapper or the content block should be defined in the templates that will inherit from this template.
<main>
{% block content_wrapper %}
{% block content %}{% endblock %}
{% endblock %}
</main>
index.html inherits from layouts/default.html. But if you open the index.html file, you’ll see that we haven’t actually defined a content block. This is because Sculpin considers anything you add after the meta block to be the content. There is default content in there, added by the skeleton site, but we’ll use the content below. Let’s replace the default with the following:
{% for post in page.pagination.items %}
    <article>
        <header>
            <h2><a href="{{ site.url }}{{ post.url }}">{{ post.title }}</a></h2>
            <span class="date">{{ post.date|date('M dS, Y') }}</span>
        </header>
        <div>

        {% set break_array = post.blocks.content|split('<!-- more -->', 2) %}

        {{ break_array[0]|raw }}

        {% if break_array|length > 1 %}
        <p>
            <a href="{{ site.url }}{{ post.url }}">
                Read more
            </a>
        </p>
        {% endif %}

        </div>
    </article>
{% endfor %}

{% if page.pagination.previous_page or page.pagination.next_page %}
    <div class="nav-container">
        {% if page.pagination.previous_page %}
        <a href="{{ site.url }}{{ page.pagination.previous_page.url }}" class="right">Newer Posts</a>
        {% endif %}
        {% if page.pagination.next_page %}
        <a href="{{ site.url }}{{ page.pagination.next_page.url }}" class="left">Older Posts</a>
        {% endif %}
    </div>
{% endif %}
source/_posts directory. The code below loops through the posts based on the current page number. On the index page, this will only return the last three posts (posts are ordered from newest to oldest).
{% for post in page.pagination.items %}
<article>
    <!-- contents for each post here -->
</article>
{% endfor %}
{% if page.pagination.previous_page or page.pagination.next_page %}
    <div class="nav-container">
        <!-- pagination links here -->
    </div>
{% endif %}
max_per_page field in the template that’s currently being used.
pagination:
    max_per_page: 3
<header>
    <h2><a href="{{ site.url }}{{ post.url }}">{{ post.title }}</a></h2>
    <span class="date">{{ post.date|date('M dS, Y') }}</span>
</header>
<div>

{% set break_array = post.blocks.content|split('<!-- more -->', 2) %}

{{ break_array[0]|raw }}

{% if break_array|length > 1 %}
<p>
    <a href="{{ site.url }}{{ post.url }}">
        Read more
    </a>
</p>
{% endif %}

</div>
break_array which stores the first half and second half of the article as two separate array items. This looks for the <!-- more --> comment as the delimiter. HTML comments aren’t visible in the page, so it’s the perfect delimiter.
{% set break_array = post.blocks.content|split('<!-- more -->', 2) %}
break_array. The raw filter is used so that HTML gets rendered instead of escaped.
{{ break_array[0]|raw }}
break_array, and in that case we render a link for viewing the whole post.
{% if break_array|length > 1 %}
<p>
    <a href="{{ site.url }}{{ post.url }}">
        Read more
    </a>
</p>
{% endif %}
_layouts/default.html file. For the main stylesheet we use Picnic.css. We’re loading it from a CDN, but you can also download the files to your source/css directory and link to them.
<link rel="stylesheet" href="https://cdnjs.cloudflare.com/ajax/libs/picnic/4.1.2/picnic.min.css">
<link rel="stylesheet" href="https://cdnjs.cloudflare.com/ajax/libs/picnic/4.1.2/plugins.min.css">
<link rel="stylesheet" href="https://cdnjs.cloudflare.com/ajax/libs/highlight.js/9.4.0/styles/solarized-dark.min.css">
source/css.
<link href="{{ site.url }}/css/style.css" rel="stylesheet" type="text/css" />
style.css file:
#wrapper {
    width: 900px;
    margin: 0 auto;
}

nav .menu {
    float: left;
    margin-left: 20px;
}

nav .menu a {
    margin-left: 20px;
}

main {
    margin-top: 80px;
}

article {
    margin-top: 50px;
    border-bottom: 1px dashed #ccc;
    color: #1D1D1D;
}

footer {
    margin: 20px 0;
    text-align: center;
    color: #525252;
}

.right {
    float: right;
}

.left {
    float: left;
}

.nav-container {
    overflow: auto;
    padding: 30px 0;
}

article h2 {
    margin-bottom: 0;
    padding-bottom: 0;
}

.date {
    color: #565656;
    font-size: 15px;
}

pre {
    background: none;
}

@media screen and (max-width: 780px){
    #wrapper {
        width: 100%;
        padding: 10px;
    }
}
css/style.css) we have the highlight.js script and the initialization code which will apply the syntax highlighting.
<script src="https://cdnjs.cloudflare.com/ajax/libs/highlight.js/9.4.0/highlight.min.js"></script>
<script>hljs.initHighlightingOnLoad();</script>
Individual Post Page
Now that we’re done with the index page, it’s time to proceed with the template for individual post pages. The file in question is_views/post.html. Let’s put in the following:
{% extends "default" %}

{% block content_wrapper %}
    <article>
        <header>
            <h2>{{ page.title }}</h2>
            <span class="date">{{ post.date|date('M dS, Y') }}</span>
        </header>
        <div class="contents">
            {{ page.blocks.content|raw }}
        </div>
        {% if page.tags %}
            <p class="tags">
            Tags:
            {% for tag in page.tags %}
            <a href="{{ site.url }}/blog/tags/{{ tag|url_encode(true) }}">{{ tag }}</a>{% if not loop.last %}, {% endif %}
            {% endfor %}
            </p>
        {% endif %}
    </article>
{% endblock %}
{% extends "default" %}
post is considered to be a layout. In Sculpin, anything that you put inside these directories: _views, _layouts, _partials, includes is considered a layout. This means that any template can inherit from these files, or include the partials.
We mentioned content_wrapper; the block that we we’re trying to render in the _layout/default.html file. Inside it is the content block:
<main>
{% block content_wrapper %}
    {% block content %}{% endblock %}
{% endblock %}
</main>
content block doesn’t need to be explicitly defined because Twig assumes that anything below the meta block is the content. This means that we can actually have only the following code in _views/post.html and the post would still be rendered:
{% extends "default" %}
content block like so:
{% extends "default" %}

{% block content %}
<h1>I'm trying to override the content!</h1>
{% endblock %}
content block. This is where the content_wrapper block comes into play. By defining this block, we can override the content block. This is because the content_wrapper block is wrapping the content block. Now we can do things like output the title and the date of publication.
{% block content_wrapper %}
    <article>
        <header>
            <h2>{{ page.title }}</h2>
            <span class="date">{{ post.date|date('M dS, Y') }}</span>
        </header>
        <div class="contents">
            {{ page.blocks.content|raw }}
        </div>
        {% if page.tags %}
            <p class="tags">
            Tags:
            {% for tag in page.tags %}
            <a href="{{ site.url }}/blog/tags/{{ tag|url_encode(true) }}">{{ tag }}</a>{% if not loop.last %}, {% endif %}
            {% endfor %}
            </p>
        {% endif %}
    </article>
{% endblock %}
Adding Disqus
Adding Disqus for handling comments is very easy, as it comes built into the skeleton:{% if site.disqus.shortname and site.disqus.shortname != '' %}
<div id="disqus_thread"></div>
<script type="text/javascript">
/* * * CONFIGURATION VARIABLES: EDIT BEFORE PASTING INTO YOUR WEBPAGE * * */
var disqus_shortname = '{{site.disqus.shortname}}'; // required: replace example with your forum shortname
{% if page.disqus.identifier %}var disqus_identifier = '{{page.disqus.identifier}}'; {% endif %}
{% if page.disqus.title %}var disqus_title = '{{page.disqus.title}}';{% endif %}
{% if page.disqus.url %}var disqus_url = '{{page.disqus.url}}';{% endif %}
{% if page.disqus.category_id %}var disqus_category_id = '{{page.disqus.category_id}}';{% endif %}
/* * * DON'T EDIT BELOW THIS LINE * * */
(function () {
var dsq = document.createElement('script');
dsq.type = 'text/javascript';
dsq.async = true;
dsq.src = '//' + disqus_shortname + '.disqus.com/embed.js';
(document.getElementsByTagName('head')[0] || document.getElementsByTagName('body')[0]).appendChild(dsq);
})();
</script>
<noscript>Please enable JavaScript to view the
<a href="https://disqus.com/?ref_noscript" rel="nofollow">comments powered by Disqus.</a>
</noscript>
{% endif %}
app/config/sculpin_site.yml file with the Disqus shortname:
# Insert your disqus shortname
disqus:
   shortname: YOUR_DISQUS_USERNAME
Blog Archives
Just like every blog, ours also needs an archive page where readers can see all the previously published posts. Inblog.html, add the following:
---
layout: default
title: Posts Archive
generator: pagination
use:
    - posts

---
{% set year = '0' %}
<h2>Posts Archive</h2>
{% for post in page.pagination.items %}
{% set this_year %}{{ post.date | date("Y") }}{% endset %}
{% if year != this_year %}
  {% set month = '0' %}
  {% set year = this_year %}
{% endif %}
{% set this_month %}{{ post.date | date("F") }}{% endset %}
{% if month != this_month %}
  {% set month = this_month %}
  <h3>{{ month }} {{ year }}</h3>
{% endif %}
  <div>
    <a href="{{ site.url }}{{ post.url }}">{{ post.title }}</a>
  </div>
{% endfor %}

<div>
{% if page.pagination.previous_page or page.pagination.next_page %}
    <div class="nav-container">
    {% if page.pagination.previous_page %}
    <a class="previous" href="{{ site.url }}{{ page.pagination.previous_page.url }}" title="Previous Page"><span class="title">Previous Page</span></a>
    {% endif %}
    {% if page.pagination.next_page %}
    <a class="next" href="{{ site.url }}{{ page.pagination.next_page.url }}" title="Next Page"><span class="title">Next Page</span></a>
    {% endif %}
    </div>
{% endif %}
</div>
---
layout: default
title: Posts Archive
generator: pagination
use:
    - posts
---
{% for post in page.pagination.items %}
{% set this_year %}{{ post.date | date("Y") }}{% endset %}
{% if year != this_year %}
  {% set month = '0' %}
  {% set year = this_year %}
{% endif %}
{% set this_month %}{{ post.date | date("F") }}{% endset %}
{% if month != this_month %}
  {% set month = this_month %}
  <h3>{{ month }} {{ year }}</h3>
{% endif %}
  <div>
    <a href="{{ site.url }}{{ post.url }}">{{ post.title }}</a>
  </div>
{% endfor %}
index.html file. That is, it loops through all the items in the current page, only this time we’re grouping each post based on month and year.
Deploying to Github Pages
To deploy to Github pages, you’re going to need a Github account so go ahead and sign up of you haven’t already. Then, set up Git, generate an SSH key and add the SSH key to your Github account. If you’re new to all this, I recommend checking out Shaumik’s article on Git for Beginners. Once you’ve set up a Github account, create a new repository by using the following format for the name:your_github_username.github.io
sculpin generate --env prod
output_prod directory. Once generated, you can go ahead and delete the .git directory. If you remember from earlier, we have cloned the Sculpin Blog Skeleton. We’re not really going to contribute code to the repository so we can delete its local repo.
We now need to initialize a new git repository inside the output_prod folder. Navigate inside the directory and execute git init. Then, execute the following to commit the changes:
git add -A
git commit -m "create new blog"
git remote add origin git@github.com:your_github_username/your_github_username.github.io.git
git push origin master
http://your_github_username.github.io. Congrats!
Conclusion
In this tutorial, we looked at Sculpin, a PHP-based static site generator. As you have seen, Sculpin is a really good option for your static site generation needs. You can access the code used in this tutorial in this Github repo. Did you do any extensive customization on your Sculpin blog? Is there any other static site generator solution you’d prefer instead? Let us know!Frequently Asked Questions about Sculpin and Static Site Blog Customization
What is Sculpin and why is it used for static site blogs?
Sculpin is a static site generator tool written in PHP. It converts Markdown files, Twig templates, and standard HTML into a static HTML site that can be easily deployed. It is used for static site blogs because it is lightweight, fast, and secure. Unlike dynamic sites, static sites do not require a database, making them less vulnerable to hacking attempts. They also load faster because they do not have to retrieve information from a database each time a user visits the site.
How does Sculpin compare to other static site generators like Jekyll?
Both Sculpin and Jekyll are powerful static site generators, but they have some differences. Sculpin is written in PHP, while Jekyll is written in Ruby. This means that if you’re more comfortable with PHP, you might find Sculpin easier to use. Sculpin also has a focus on simplicity and speed, making it a good choice for smaller, simpler sites. Jekyll, on the other hand, has a larger community and more plugins, which can make it a better choice for more complex sites.
How can I customize my Sculpin blog?
Sculpin allows for extensive customization of your blog. You can create your own themes, add custom CSS, and even write your own plugins. The article provides a detailed guide on how to customize your Sculpin blog, including how to create a new theme, how to add custom CSS, and how to create a custom plugin.
Can I use custom fonts in my Sculpin blog?
Yes, you can use custom fonts in your Sculpin blog. You can either host the fonts on your own server or use a font service like Adobe Fonts or Google Fonts. The article provides a detailed guide on how to add custom fonts to your Sculpin blog.
How can I optimize my Sculpin blog for SEO?
There are several ways to optimize your Sculpin blog for SEO. First, make sure your site is fast and responsive, as site speed is a ranking factor for Google. Second, use descriptive, keyword-rich meta tags for each page. Third, use clean, SEO-friendly URLs. Finally, create high-quality, original content that provides value to your readers.
How can I add a comments section to my Sculpin blog?
Since Sculpin generates static sites, it doesn’t natively support comments. However, you can add a comments section to your Sculpin blog using a third-party service like Disqus. The article provides a detailed guide on how to add Disqus comments to your Sculpin blog.
Can I use Sculpin to create a multi-language blog?
Yes, you can use Sculpin to create a multi-language blog. You can create separate directories for each language, and then use the i18n plugin to manage translations. The article provides a detailed guide on how to create a multi-language blog with Sculpin.
How can I add social sharing buttons to my Sculpin blog?
You can add social sharing buttons to your Sculpin blog using a third-party service like AddThis or ShareThis. The article provides a detailed guide on how to add social sharing buttons to your Sculpin blog.
Can I use Sculpin to create a blog with dynamic content?
While Sculpin is primarily designed for static sites, it is possible to add dynamic content to your Sculpin blog using JavaScript or a third-party service like Firebase. However, keep in mind that adding dynamic content can make your site slower and more vulnerable to hacking attempts.
How can I deploy my Sculpin blog?
There are several ways to deploy your Sculpin blog. You can use a traditional web host, a cloud hosting service like AWS, or a static site hosting service like Netlify or GitHub Pages. The article provides a detailed guide on how to deploy your Sculpin blog.
 Wern Ancheta
Wern is a web developer from the Philippines. He loves building things for the web and sharing the things he has learned by writing in his blog. When he's not coding or learning something new, he enjoys watching anime and playing video games.