Jorge Coromina is an editor, translator, and passionate shutterbug. You can keep up with his work on 500px or by following him on Twitter.
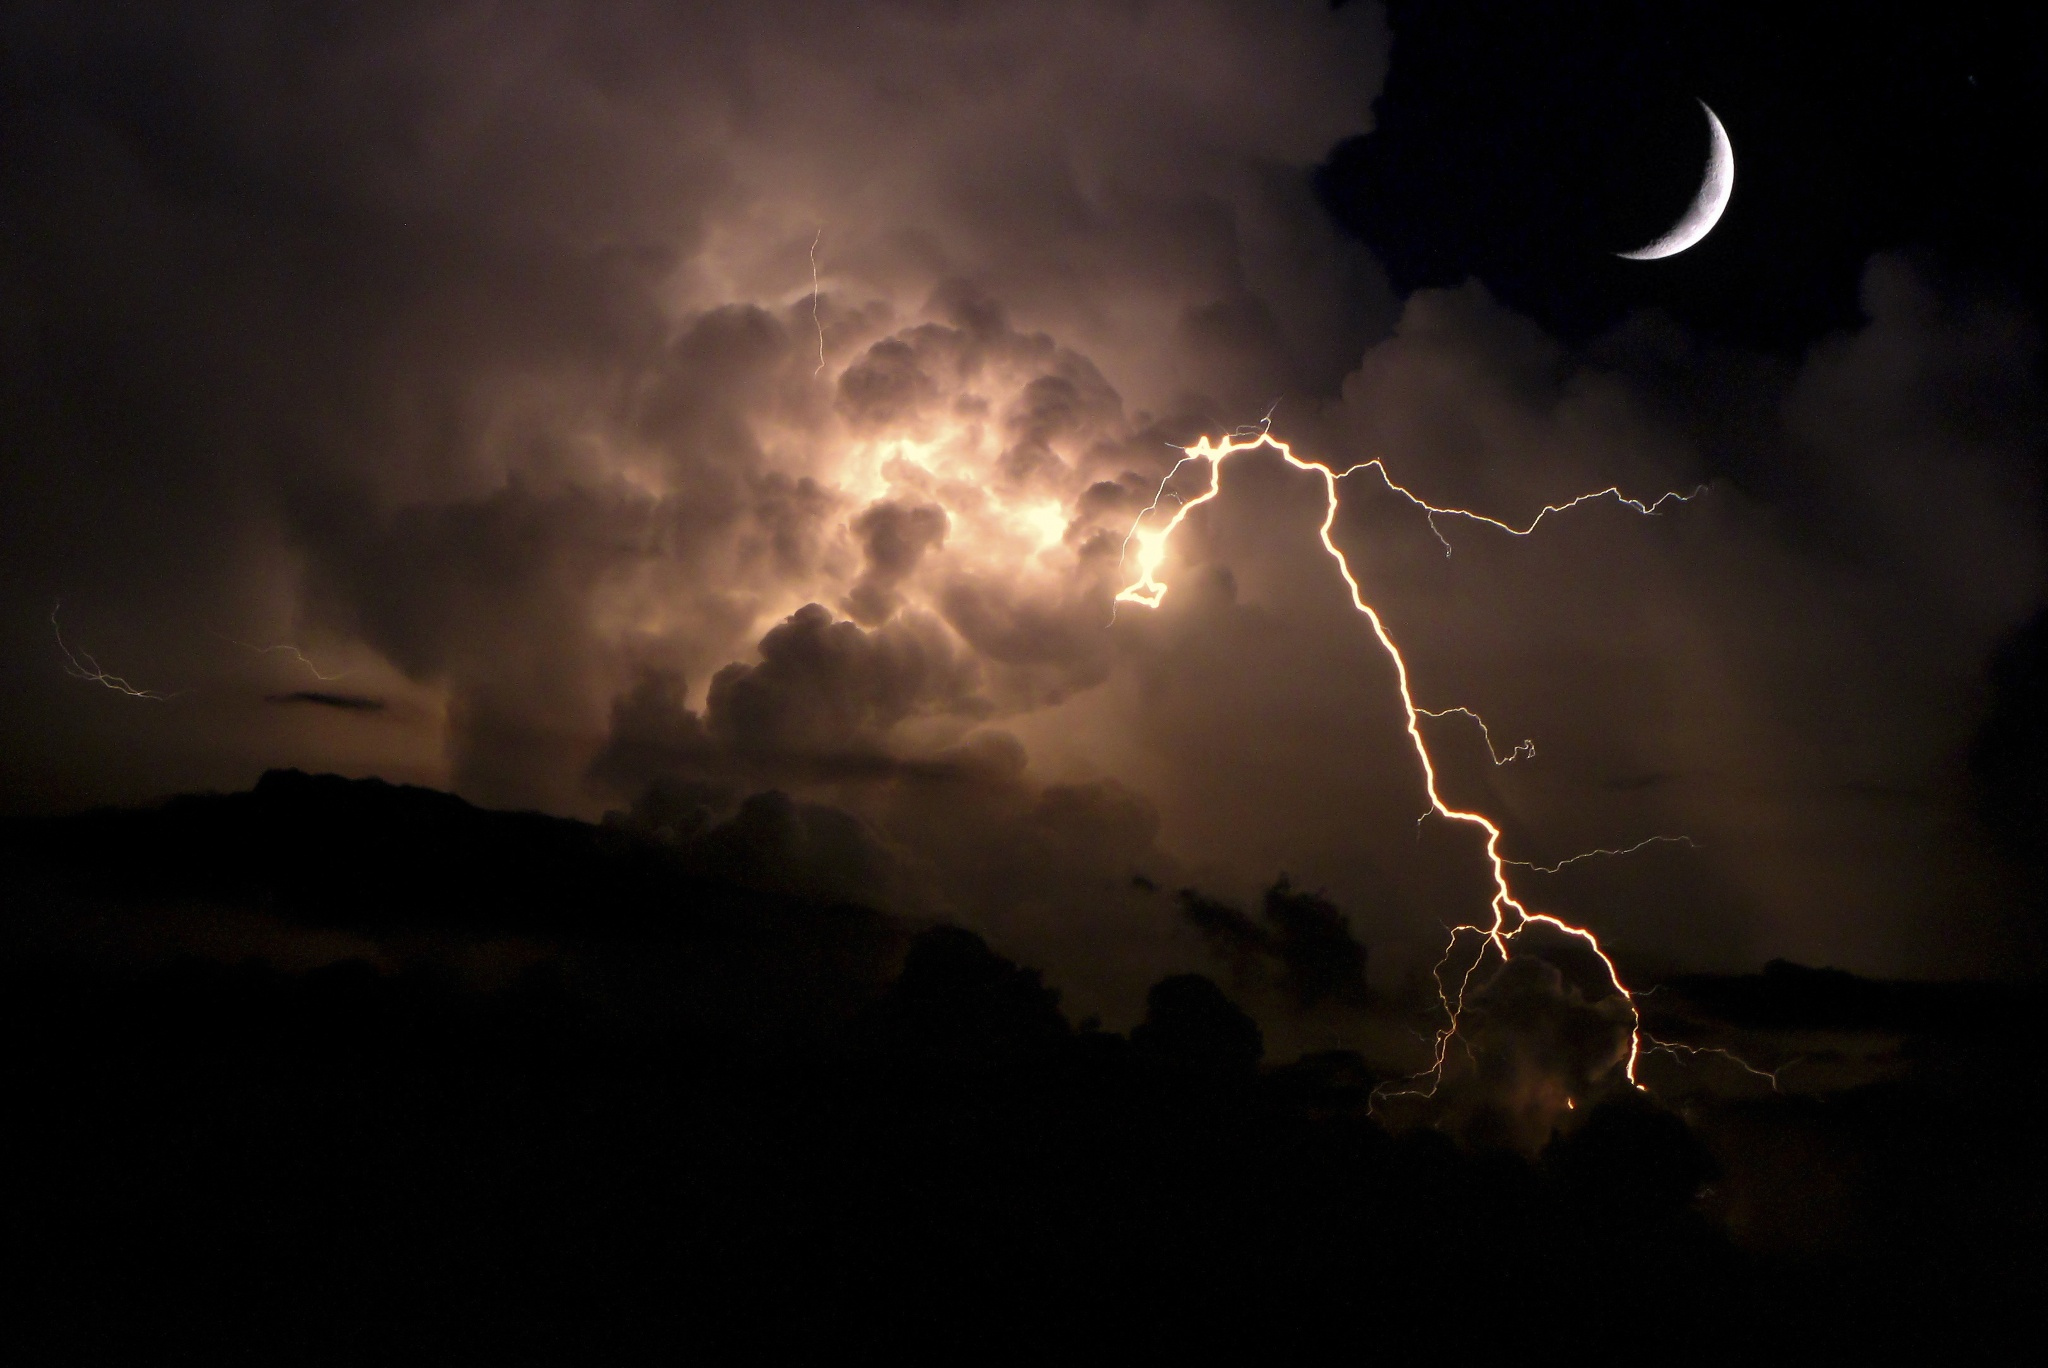
Thunderstorms are fascinating; especially the display of roaring lightning bolts that light up the sky. That fascination, though, is quite hard to capture in photography. In this tutorial, I’d like to share my views and experience in chasing T-storms and trying to photograph lightning.
But before we get down to business, it’s important to remind you of the unpredictability of lightning bolts as they strike down. You should remain in a safe location, well sheltered from those deadly discharges and the pouring rain. Your valuable gear should also be protected.

Gear
I use my Canon DSRL camera and the 18-55mm zoom lens. However, the very first pictures I took of lightning bolts were with my old bridge camera (fixed lens), which provided some pretty good shots.
As far as the lens is concerned, a prime lens is the perfect choice. Using a standard angle lens—such as either a 30mm prime for APS-C sensor cameras or a 50mm prime for full-frame cameras—will assist in capturing images of lightning that fill the frame.
A wide angle to standard angle zoom lens—such as a 16-35mm or 24-70mm—could also be used, but a prime lens will normally capture a sharper image than a zoom set at the same focal length.
Using a tripod is a must because of the long exposure time needed for this kind of nature photography. A release cable or remote shutter release will also be helpful, but they are fully optional because you can set your camera to self-shooting mode.
You will want to set an exposure time for between 20 and 30 seconds, for which a normal shot without lightning will be totally black. The settings I find that usually work for me are around f/8, ISO 100, and 30s for lighting that is very powerful and close; for lightning that is a bit farther off in the distance, I use something around f/5, ISO 100 and 30s.

Settings
These are the settings I use when shooting lightning bolts. Just remember that these are my settings—meaning this is what I recommend—however, you are free to experiment with other settings if you’re looking for different outcomes.
ISO: 100 – I set my camera’s ISO setting to 100 and leave it there when photographing lightning. This allows for longer shutter speeds with the minimum possible noise.
Aperture or f-stop: f/11 – As with the ISO setting, I set the aperture to f/11 and leave it there when photographing lightning. The main reason for this is to ensure as great a depth of field as possible without sacrificing any sharpness, or requiring shutter speeds that are too long.
Setting the aperture to f/16 will give an even greater depth of field, but the required shutter speed would be much longer, introducing the risk of a lightning bolt blowing out the frame or overexposing. Likewise, f/8 has similar issues.
However, having said that, I have successfully photographed lightning at both apertures, but with less success than if I had shot at f/11. I would recommend that you start out with an aperture of f/11, capture a few shots there, and then experiment with other apertures to see what can be achieved.

Shutter Speed: 10 to 30 seconds – The best time to attempt lightning photography is after dark, which means you’re going to use long shutter speeds. Lightning photography can happen as early as magic hour, but better results will be achieved close to or after dark.
The fastest shutter speed I use for lightning photography is 4 seconds. This allows the shutter to be open long enough to capture a strike if the lightning activity is fairly frequent.
The optimal shutter speed setting, in my opinion, is 10 seconds. This allows the shutter to be open long enough to capture lightning without over- or underexposing the image in most cases.
If you want to capture more than just one bolt, 30 seconds or B speed (bulb) is the right choice for you. That will depend on how often the bolts are striking, so bear in mind that if several strikes happen in a 30-second time span, your end result could be a picture that’s much too bright or overexposed. Take a few minutes to reckon how often the bolts are striking and then you could set a more adequate shutter speed.

Nevertheless, there are countless T-storms that come to pass in the early afternoon and sometimes in the morning. Overexposing the shot under those circumstances, in which much brighter light could sneak through the lens, requires just another add-on: a neutral density filter.
ND filters vary depending on how much light they let into the sensor. So, an ND8 filter means you’ll be stopping down a couple of notches or maybe more, while an ND400 Hoya filter renders in a whopping 10 to 12 f/stops. That would create a dark environment for your shot as if you were shooting in the middle of the night.
White Balance: Auto – Again, I set my camera’s white balance to the Auto and leave it there because this gives the greatest flexibility and control when post-processing in Lightroom or Photoshop, where I can fine-tune the white balance to suit my preferences for each individual image.
Image Format: RAW – Shooting in RAW allows you the most editing options when post-processing, or “developing,” your photographs in editing software.

The Shot
While the action will be in the sky, don’t forget to keep something in the frame to give relevance and perspective to the shot. Buildings are a favorite, but anything that can give an idea of the size of the storm works well.
It’s best to use manual focus when shooting in lightning situations, mainly because the view will probably be at night (but not always) with a fair amount of darkness. Rather than allow your camera to hunt around for something to focus on with each new shot, get a good manual focus on the sky and leave it there.
One extra recommendation: Lock up the mirror (if you’re shooting with a DSRL camera). This will prevent the picture from getting blurred due to the mechanical vibrations triggered by the mirror’s up-and-down movements.
And, above all, be patient and don’t forget to remain in a safe location!


Leave a reply