
In What's in a Projectile Physics Engine, we covered the theory and essential elements of physics engines that can be used to simulate projectile effects in games like Angry Birds. Now, we'll cement that knowledge with a real example. In this tutorial, I'll break down the code for a simple physics-based game that I've written, so you can see exactly how it works.
For those interested, the example code provided throughout this tutorial uses the Sprite Kit API provided for native iOS games. This API uses an Objective-C wrapped Box2D as the physics simulation engine, but the concepts and their application can be used in any 2D physics engine or world.
Building a Game World
Here is the sample game in action:
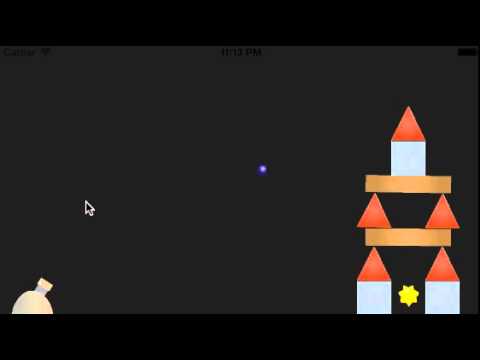
The overall concept of the game takes the following form:
- A structure of platforms with physics bodies are added to the level, building a tower.
- One or more objective objects are placed within the tower, each with a physics body assigned to it.
- A firing mechanism shoots a projectile body with an momentary impulse; when the projectile's body collides with the platforms' bodies, the simulation takes over and computes the results for us.
- If a projectile or a platform touches the objective, it fades from the scene, and the player wins! This collision is detected using the physics bodies, so that the simulation maintains its realism at the point of collision.
Our first use of physics will be to create an edge loop body around our screen's frame. The following is added to an initializer or -(void)loadLevel method:
1 |
//create an edge-loop physics body for the screen, basically creating a "bounds"self.physicsBody = [SKPhysicsBody bodyWithEdgeLoopFromRect:self.frame];
|
This will keep all of our objects within the frame, so that gravity won't pull our whole game off the screen!
Adding Objects
Let's look at adding some physics-enabled sprites to our scene. First, we will look at the code for adding three types of platforms. We will use square, rectangular, and triangular platforms to work with in this simulation.
1 |
-(void)createPlatformStructures:(NSArray*)platforms { for (NSDictionary *platform in platforms) { //Grab Info From Dictionay and prepare variables int type = [platform[@"platformType"] intValue]; CGPoint position = CGPointFromString(platform[@"platformPosition"]); SKSpriteNode *platSprite; platSprite.zPosition = 10; //Logic to populate level based on the platform type if (type == 1) { //Square platSprite = [SKSpriteNode spriteNodeWithImageNamed:@"SquarePlatform"]; //create sprite platSprite.position = position; //position sprite platSprite.name = @"Square"; CGRect physicsBodyRect = platSprite.frame; //build a rectangle variable based on size platSprite.physicsBody = [SKPhysicsBody bodyWithRectangleOfSize:physicsBodyRect.size]; //build physics body platSprite.physicsBody.categoryBitMask = otherMask; //assign a category mask to the physics body platSprite.physicsBody.contactTestBitMask = objectiveMask; //create a contact test mask for physics body contact callbacks platSprite.physicsBody.usesPreciseCollisionDetection = YES; } else if (type == 2) { //Rectangle platSprite = [SKSpriteNode spriteNodeWithImageNamed:@"RectanglePlatform"]; //create sprite platSprite.position = position; //position sprite platSprite.name = @"Rectangle"; CGRect physicsBodyRect = platSprite.frame; //build a rectangle variable based on size platSprite.physicsBody = [SKPhysicsBody bodyWithRectangleOfSize:physicsBodyRect.size]; //build physics body platSprite.physicsBody.categoryBitMask = otherMask; //assign a category mask to the physics body platSprite.physicsBody.contactTestBitMask = objectiveMask; //create a contact test mask for physics body contact callbacks platSprite.physicsBody.usesPreciseCollisionDetection = YES; } else if (type == 3) { //Triangle platSprite = [SKSpriteNode spriteNodeWithImageNamed:@"TrianglePlatform"]; //create sprite platSprite.position = position; //position sprite platSprite.name = @"Triangle"; //Create a mutable path in the shape of a triangle, using the sprite bounds as a guideline CGMutablePathRef physicsPath = CGPathCreateMutable(); CGPathMoveToPoint(physicsPath, nil, -platSprite.size.width/2, -platSprite.size.height/2); CGPathAddLineToPoint(physicsPath, nil, platSprite.size.width/2, -platSprite.size.height/2); CGPathAddLineToPoint(physicsPath, nil, 0, platSprite.size.height/2); CGPathAddLineToPoint(physicsPath, nil, -platSprite.size.width/2, -platSprite.size.height/2); platSprite.physicsBody = [SKPhysicsBody bodyWithPolygonFromPath:physicsPath]; //build physics body platSprite.physicsBody.categoryBitMask = otherMask; //assign a category mask to the physics body platSprite.physicsBody.contactTestBitMask = objectiveMask; //create a contact test mask for physics body contact callbacks platSprite.physicsBody.usesPreciseCollisionDetection = YES; CGPathRelease(physicsPath);//release the path now that we are done with it } [self addChild:platSprite]; } } |
We'll get to what all the property declarations mean in a bit. For now, focus on the creation of each body. The square and the rectangular platforms each create their bodies in a one line declaration, using the sprite's bounding box as the body size. The triangle platform's body requires drawing a path; this also uses the sprite's bounding box, but calculates a triangle at the corners and halfway points of the frame.
The objective object, a star, is similarly created, but we will use a circular physics body.
1 |
-(void)addObjectives:(NSArray*)objectives { for (NSDictionary* objective in objectives) { //Grab the position information from the dictionary provided from the plist CGPoint position = CGPointFromString(objective[@"objectivePosition"]); //create a sprite based on the info from the dictionary above SKSpriteNode *objSprite = [SKSpriteNode spriteNodeWithImageNamed:@"star"]; objSprite.position = position; objSprite.name = @"objective"; //Assign a physics body and physic properties to the sprite objSprite.physicsBody = [SKPhysicsBody bodyWithCircleOfRadius:objSprite.size.width/2]; objSprite.physicsBody.categoryBitMask = objectiveMask; objSprite.physicsBody.contactTestBitMask = otherMask; objSprite.physicsBody.usesPreciseCollisionDetection = YES; objSprite.physicsBody.affectedByGravity = NO; objSprite.physicsBody.allowsRotation = NO; //add the child to the scene [self addChild:objSprite]; //Create an action to make the objective more interesting SKAction *turn = [SKAction rotateByAngle:1 duration:1]; SKAction *repeat = [SKAction repeatActionForever:turn]; [objSprite runAction:repeat]; } } |
Ready, Set, Fire!
The cannon itself doesn't need any bodies attached, as it has no need for collision detection. We will simply use it as a starting point for our projectile.
Here is the method for creating a projectile:
1 |
-(void) addProjectile { //Create a sprite based on our image, give it a position and name projectile = [SKSpriteNode spriteNodeWithImageNamed:@"ball"]; projectile.position = cannon.position; projectile.zPosition = 20; projectile.name = @"Projectile"; //Assign a physics body to the sprite projectile.physicsBody = [SKPhysicsBody bodyWithCircleOfRadius:projectile.size.width/2]; //Assign properties to the physics body (these all exist and have default values upon the creation of the body) projectile.physicsBody.restitution = 0.5; projectile.physicsBody.density = 5; projectile.physicsBody.friction = 1; projectile.physicsBody.dynamic = YES; projectile.physicsBody.allowsRotation = YES; projectile.physicsBody.categoryBitMask = otherMask; projectile.physicsBody.contactTestBitMask = objectiveMask; projectile.physicsBody.usesPreciseCollisionDetection = YES; //Add the sprite to the scene, with the physics body attached [self addChild:projectile]; } |
Here we see a more complete declaration of some properties assignable to a physics body. When playing with the sample project later, try altering the restitution, friction, and density of the projectile to see what effects they have on the overall gameplay. (You can find definitions for each property in What's in a Projectile Physics Engine?)
The next step is to create the code to actually shoot this ball at the target. For this, we'll apply an impulse to a projectile based on a touch event:
1 |
-(void)touchesBegan:(NSSet *)touches withEvent:(UIEvent *)event { /* Called when a touch begins */ for (UITouch *touch in touches) { CGPoint location = [touch locationInNode:self]; NSLog(@"Touched x:%f, y:%f", location.x, location.y); //Check if there is already a projectile in the scene if (!isThereAProjectile) { //If not, add it isThereAProjectile = YES; [self addProjectile]; //Create a Vector to use as a 2D force value projectileForce = CGVectorMake(18, 18); for (SKSpriteNode *node in self.children){ if ([node.name isEqualToString:@"Projectile"]) { //Apply an impulse to the projectile, overtaking gravity and friction temporarily [node.physicsBody applyImpulse:projectileForce]; } } } }} |
Another fun alteration to the project might be to play with the impulse vector value. Forces—and therefore impulses—are applied using vectors, giving magnitude and direction to any force value.
Now we have our structure and our objective, and we can shoot at them, but how do we see if we scored a hit?
Collision Course
First, a quick pair of definitions:
- A contact is used when two bodies touch.
- A collision is used to prevent two bodies from intersecting.
Contact Listener
So far, the physics engine has been handling contacts and collisions for us. What if we wanted to do something special when two particular objects touch? To start with, we need to tell our game that we want to listen for the contact. We will use a delegate and a declaration to accomplish this.
We add the following code to the top of the file:
1 |
@interface MyScene ()<SKPhysicsContactDelegate>@end |
...and add this statement to the initializer:
self.physicsWorld.contactDelegate = self
This allows us to use the method stub depicted below to listen for contact:
1 |
-(void)didBeginContact:(SKPhysicsContact *)contact{ //code} |
Before we can use this method, though, we need to discuss categories.
Categories
We can assign categories to our various physics bodies, as a property, to sort them into groups.
Sprite Kit in particular uses bit-wise categories, meaning we are limited to 32 categories in any given scene. I like to define my categories using a static constant declaration like this:
1 |
//Create Physics Category Bit-Mask'sstatic const uint32_t objectiveMask = 1 << 0;static const uint32_t otherMask = 1 << 1;
|
Note the use of bit-wise operators in the declaration (a discussion on bitwise operators and bit variables is beyond the scope of this tutorial; just know that they are essentially just numbers stored in a very quickly accessed variable, and that you can have 32 maximum).


We assign the categories using the following properties:
1 |
platSprite.physicsBody.categoryBitMask = otherMask; //assign a category mask to the physics bodyplatSprite.physicsBody.contactTestBitMask = objectiveMask; //create a contact test mask for physics body contact callbacks |
Doing the same for the other variables in the project, let's us now complete our contact listener method stub from earlier, and also this discussion!
1 |
-(void)didBeginContact:(SKPhysicsContact *)contact{ //this is the contact listener method, we give it the contact assignments we care about and then perform actions based on the collision uint32_t collision = (contact.bodyA.categoryBitMask | contact.bodyB.categoryBitMask); //define a collision between two category masks if (collision == (otherMask| objectiveMask)) { //handle the collision from the above if statement, you can create more if/else statements for more categories if (!isGameReseting) { NSLog(@"You Win!"); isGameReseting = YES; //Set up a little action/animation for when an objective is hit SKAction *scaleUp = [SKAction scaleTo:1.25 duration:0.5]; SKAction *tint = [SKAction colorizeWithColor:[UIColor redColor] colorBlendFactor:1 duration:0.5]; SKAction *blowUp = [SKAction group:@[scaleUp, tint]]; SKAction *scaleDown = [SKAction scaleTo:0.2 duration:0.75]; SKAction *fadeOut = [SKAction fadeAlphaTo:0 duration:0.75]; SKAction *blowDown = [SKAction group:@[scaleDown, fadeOut]]; SKAction *remove = [SKAction removeFromParent]; SKAction *sequence = [SKAction sequence:@[blowUp, blowDown, remove]]; //Figure out which of the contact bodies is an objective by checking its name, and then run the action on it if ([contact.bodyA.node.name isEqualToString:@"objective"]) { [contact.bodyA.node runAction:sequence]; } else if ([contact.bodyB.node.name isEqualToString:@"objective"]) { [contact.bodyB.node runAction:sequence]; } //after a few seconds, restart the level [self performSelector:@selector(gameOver) withObject:nil afterDelay:3.0f]; } }} |
Conclusion
I hope that you've enjoyed this tutorial! We have learned all about 2D physics and how they can be applied to a 2D projectile game. I hope you now have a better understanding of what you can do to start using physics in your own games, and how physics can lead to some new and fun gameplay. Let me know in the comments below what you think, and if you use anything you've learned here today to create projects of your own, I'd love to hear about it.
A Note on the Example Project
I have included a working example of the code provided in this project as a GitHub repo. The fully commented source code is there for all to use.
Some minor portions of the working project unrelated to physics were not discussed in this tutorial. For instance, the project is built to be expandable, so the code allows the loading of multiple levels using a property list file to create different platform arrangements and multiple objectives to hit. The game over section, and the code to remove objects and timers, were also not discussed, but are fully commented and available within the project files.
Some ideas for features you could add to expand on the project:
- Different types of ammo
- Movable and scalable shot direction and magnitude
- More types and sizes of platforms
- Terrain
- Animation and sound effects
Have fun! Thanks for reading!


