When Paige succumbs to a mysterious illness, Patrick embarks in search of a cure. Join Emily and Patrick in the twelfth installment of the Delicious franchise as they face Emily’s Hopes & Fears. Our Delicious – Emily’s Hopes and Fears Walkthrough will guide you through all 65 levels, challenge levels, 3-star rankings and mice locations. But don’t wait too long; time is ticking.
Contents
- Basic Gameplay, Tips, and Tricks
- Walkthrough and Diamond Challenges
- Trophies
- Memorable Photo Moments
- All Mice Locations
- Video Walkthrough
Basic Gameplay, Tips, and Tricks
Delicious – Emily’s Hopes and Fears is a time management game in which you must complete restaurant services in order to progress. Each level consists of a single shift during which you must serve customers of various types in order to progress. Take orders, prepare food, serve customers, accept payment, and clean up in a timely manner. Customer patience is measured in hearts. Happy customers will leave tips, while angry customers may leave altogether. Reach the target amount of points for each day while keeping customers happy to progress.
Level Completion
Delicious: Emily’s Hopes & Fears features 7 restaurants, 65 levels, and 32 additional challenge levels. Each level can be completed with a one, two, or three star ranking depending on your score and profits for the day. Within each level is an additional mini-challenge you may choose to complete. Completing mini-challenges will reward you with additional score boosts, as well as diamonds, which can be traded to purchase gifts for Paige.
Preparing Food
Food preparation starts simple and increases in complexity as you progress through the game. Some restaurants may require you to prepare non-food products as well. Some items will need to be restocked throughout the day, while others require ingredients to be combined in order to create one complete serving. Additional food items may need to be cooked or poured before they can be served. New menu items will be unlocked as you progress through each level. Customize your menu to increase tips, lower preparation time, or even prevent things from spilling!
Cleaning
Customers who eat at tables will leave their dishes once they’ve finished. A “!” bubble will pop up indicating a table needs to be cleaned. If you don’t clean your tables in a timely manner, it may cause new customers to leave your restaurant. Many days will feature a dedicated cleaner who will help you with this task.
Entertainment
Customer patience can be increased by hiring an entertainer and directing them toward a table or customer. Entertainers restore hearts lost as a customer becomes impatient, and also encourage customers to leave bigger tips. Entertainers can only be used on table customers, though if someone is waiting in line to pay, entertaining their waiting table will increase their patience as well. You will need to purchase the entertainer from your restaurant shop in order to unlock them per restaurant.
Shop
Each restaurant features a shop in which you can purchase various upgrades and decorations to improve your restaurant. These upgrades can increase customer patience, happiness, tips, food preparation times, and even improve the server’s speed! Purchasing these upgrades can help service scores immensely, so be sure to invest where needed.
Menu
As you progress through levels, you will unlock new menu items for your restaurant. You will be given the option to make adjustments to your menu before the start of each level. Prerequisites needed to unlock locked items are displayed in the menu. Some items will increase stock, increase tips, or lessen the time needed to prepare them. Some items may even be burn or spill-proof! Customize your menu as needed to aid your service and achieve the highest scores possible.
Customer Types
Each restaurant features a unique set of customers with varying degrees of patience, order complexity, and tip amounts. These customers are shown at the start of each restaurant in the walkthrough below. Prioritizing which customers should be served in what order is essential to creating and maintaining large score combos. For example: Older customers tend to be much more patient, so if an older customer is thinking while a younger, more impatient one is walking in, there’s a good chance you can serve the two together, improving your score. Highest priority should always be set on keeping your highest-tipping customers happy.
The Serving Tray
In the lower left corner of the screen, you will see the serving tray. Items you prepare will be stored here. Items or tasks which are currently queued will be visible as a transparent icon in one of these tray slots. The size of the serving tray varies per day and restaurant, generally increasing in size as time goes on. Some challenges will require you to work with a smaller tray. You may choose to store more complex items that take longer to make on your tray to decrease preparation time later. If you make a mistake and prepare the wrong item, or would like to remove an item from your tray, simply click on it to cross it off and remove it.
Presents for Paige
You may notice a present icon in the upper right corner of your map. Here, you may choose to purchase gifts for Paige. Earn diamonds to purchase gifts. Each level and challenge offers one diamond to be earned. Their requirements are outlined in the guide below. Collect all the presents!
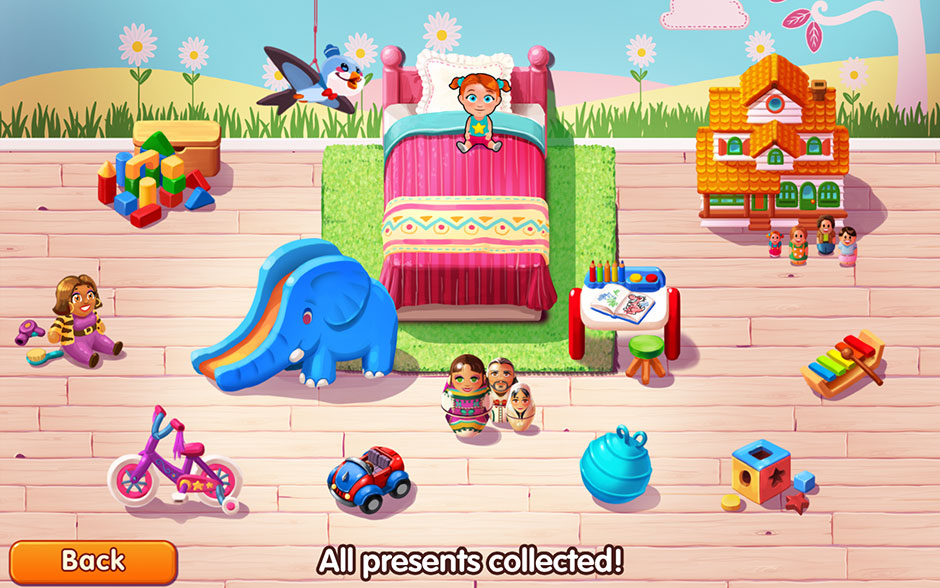
Delicious Emily’s Hopes and Fears Presents
Additional Tips and Tricks
- Stack your tasks!
–It’s always a good idea to click ahead and start on tasks, even if your server is still busy. This will help keep you on task and use your time more effectively. - Keep items stocked!
–At the start of each day, use the brief quiet as customers come in to immediately stock any and all items as much as possible. Continue to stock items during any quiet periods throughout the day. - Prepare items in advance!
–Some items require preparation time, and this can slow you down immensely if you don’t prepare them until a customer orders them. Prepare anything you can in advance, and use any burn or spill-proof items you unlock to increase your serving effectiveness. - Use the cash register to navigate faster!
– Click on the cash register to move to it. You can use this tip to stay in a more central location while customers make orders. - Where possible, accept payment in groups!
– It’s better to accept payment from multiple customers at once than a single customer. However, don’t keep them waiting too long: lost patience means lost profits. It’s better to check out a very happy customer quickly than to keep them waiting in hopes of a combo. However, if you see a customer which could fulfill this combo already on their way to the register, it’s usually safe to wait another moment. - Keep those tables clean!
– If a table isn’t clean, new customers won’t sit down to eat there. Many days will feature a helper which will clean tables for you, so as soon as you see the “!” icon, don’t hesitate to click it. - Listen for the mice!
– Every time a mouse pops up, you will hear a squeaking sound. If you’re not too busy, use these few seconds to seek out the mouse. If you miss them, not to worry: the mouse will pop up several times throughout the day in the same location. - Use entertainers to increase customer patience!
– Especially if a table customer is waiting in line to pay for a group, you can use an entertainer on their waiting table to increase the patience of both the table, and the customer waiting in line to pay. A heart needs to be gone completely before it can be restored, so timing can be key here. Don’t use an entertainer on a table if it’s currently at five full hearts. It’s better to save them a moment longer to restore patience, or use them somewhere else. - Serving counter customers can improve the patience of other counter customers!
– If you have multiple customers standing next to each other at the counter, and one has a flickering heart indicating waning patience, then serving the customer next to them can actually restore their patience temporarily. Try not to let these flickering hearts disappear entirely, because once they’re gone for a counter customer, they won’t come back. - Prioritize!
– It’s better to serve people which give higher tips before people who give lower tips, and it’s better to serve counter customers before table customers. Entertainers can always be used to restore the patience of waiting table customers. However, don’t wait too long, or you may prevent new customers from being able to sit! - Customize your menu!
– Struggling with a particular level or challenge? Try mixing up your menu to increase tips or preparation time as needed. - Reach for the stars!
– Each star level achieved will increase your profits and rewards! For a complete 3-star service walkthrough, consult our video guide below! - Resume where you left off!
– If you have to leave the game at any point, don’t worry! You can continue playing from whichever level you last left off. Simply use the arrow buttons located on the left and right sides of the screen to toggle between levels on the map. You can also hover your cursor on the left or right sides of the screen to move the map this way.
Bonuses
You can earn extra point bonuses by:
- serving complete orders
- collecting payment from multiple customers at once
- serving several orders in a single trip
- serving customers quickly
- completing the mini-challenge within a level
- finding the mouse
- upgrading your restaurant and/or placing special items on the menu
Delicious: Emily’s Hopes & Fears Walkthrough
RESTAURANT 1: Forest Picnic
Emily, Patrick, and the family are all set for a lovely day out. But when Paige starts to show signs of a mysterious sickness, the family begins to worry.
Customer Types:

Delicious Emily’s Hopes & Fears Forest Picnic Customer Types
Diamond Requirements:
Level 1: Keep ‘Em Happy- Make sure every customer is happy.
Level 2: Not The Ice Creams!- Don’t let any ice creams melt.
Level 3: Flower Story- Patrick tells a story to Paige.
Click on the “!” bubble that appears over Patrick’s head to have him tell the next part of the story.
Level 4: Timing It Well- Serve customers within 25 seconds of each other.
Level 5: Making Lunch- Prepare food for the O’Malleys.
A picnic table will appear to the left of the juice barrel. Click on it whenever you’re not serving customers to prepare the food. The task will be completed once the blue bar is filled.
*Challenge 1*: Breaking Tray- Work with a slowly breaking tray.
Level 6: Ecstatic Customers- Serve 2 ecstatic customers of each customer type.
*Challenge 2*: Mouse Invasion – Part 1- Catch all the mice, quickly!
Level 7: Various Creations- Make all products and variations.
*Challenge 3*: Real Restaurant- Table customers ask for a menu card.
Level 8: What a Mess- Clean up the picnic area.
Eight pieces of trash are scattered throughout the picnic area. Click on a piece of trash to place it on your tray, then throw it away in the trash can. Their locations are shown below.
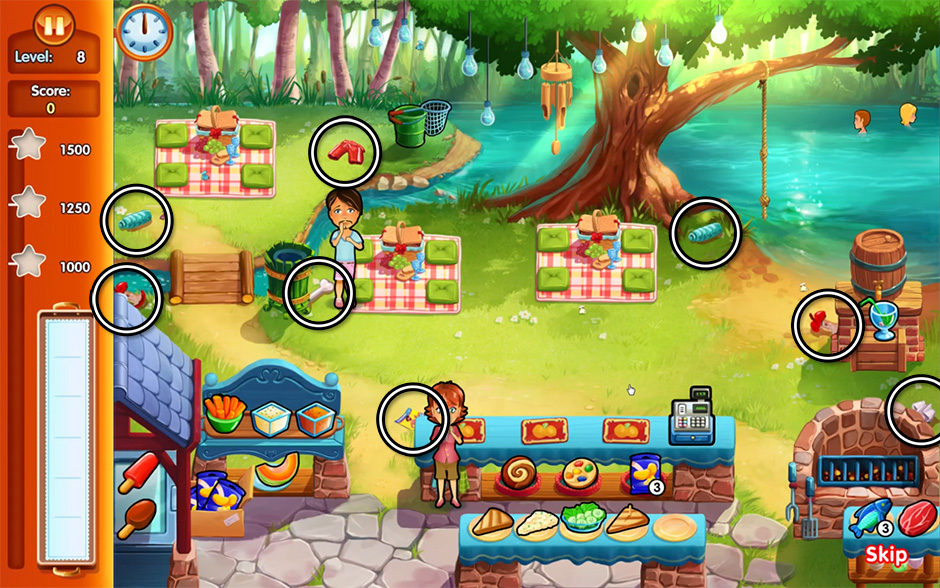
Delicious Emily’s Hopes & Fears Level 8 Trash Locations
*Challenge 4*: A Cloudy Day- Customers enter the restaurant in a bad mood.
Level 9: Make It Quick- Get the first star in the first half of the day.
*Challenge 5*: Memory- Memorize customers’ orders.
Level 10: Packing Food- Pack food for Patrick’s journey.
A brown bag will appear at the lower right corner of the main counter. When a bubble pops up with a food item, select that food item, then click on the brown bag to place it inside.
RESTAURANT 2: The Lumber Mill
Patrick’s bike breaks down, leaving him stranded at a lumber mill. Will Rusty or Mack be able to help him repair his bike and continue his journey?
Customer Types:

Delicious Emily’s Hopes & Fears The Lumber Mill Customer Types
Diamond Requirements:
Level 11: Try to fix the phone-Try to fix the phone so you can call Emily.
A meter will appear over the payphone on the left. As you fix it, the meter will fill. Click on it whenever you’re not helping customers. The task will be completed once the blue bar is filled.
*Challenge 6*: Keep On Moving!- Don’t stand still for longer than 8 seconds.
Use the cash register as your “check point”: you can click on it after completing a task to move to that location. Balance this with completing your tasks to keep yourself moving, without having to pick up or prepare extra items. Example: Once you’ve served a customer, stand still at that location until you only have 1-2 seconds left. Then, click on the cash register to move to that location, resetting the timer.
Level 12: A Whole Lotta Miles- Walk 500 yards.
The best way to complete this task quickly is to saw the log on the upper left into smaller sections with the round saw, then click on the cash register to move to that location. Repeat this time and time again to cover a lot of ground quickly.
Level 13: Could You Fix My Bike?- Fix the bike!… Pretty please?
Every time you see a customer with a “!” bubble over their head, talk to them immediately. Opting to speak with someone will interrupt you mid-task, however, so be sure to keep an eye on any simultaneous orders.
*Challenge 7*: Keep ‘Em Paired- Only customers paying in pairs give a score.
Try to time serving your customers so that you can have them pay in groups of two or more. It’s better to have a less-than-happy customer paired with a happy one then to have no pair at all.
Level 14: Quick Bonuses- Get 3 quick bonuses in a row.
Level 15: Collecting Stuff- Patrick is collecting his stuff to pack.
Eight of Patrick’s personal items are scattered throughout the area. Click on them to collect them. Their locations are shown below. The Journal does not count toward his items.

Delicious Emily’s Hopes & Fears Level 15 Item Locations
*Challenge 8*: TIMBER!!!- Patrick spills half of his products when a tree falls.
Items that are in mid-preparation and have not yet been added to your tray will be unaffected.
Level 16: Health Day- Don’t serve lumberjacks a buffet product.
You will need to ignore customers who ask for a buffet product in order to complete this goal. They will eventually leave angry. Don’t worry about giving them the other half of any order they may have, as they won’t pay you without the buffet item(s).
Level 17: Find The Tools!- Bring Mack her tools to try and fix the bike.
Mack (on the left) will ask for one of eight tools scattered throughout the area in random order. Click on the tool she asks for, then bring it to her. The tool locations are shown below.
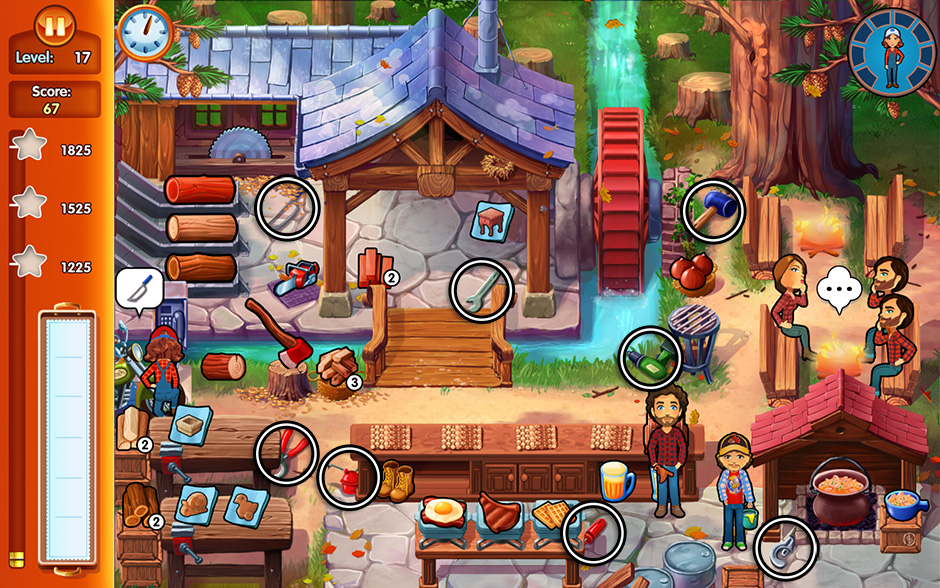
Delicious Emily’s Hopes & Fears Level 17 Tool Locations
*Challenge 9*: Breaking Appliances- Appliances break down, repair them!
A branch will cover the grill, and the ax will be snapped in half when these items require repairs.
Level 18: Stocking Products- Have every product fully stocked at one point.
Wood piles used for furniture and product assembly will need to be stocked with five logs each; the wood pile next to the wood splitting ax requires eight pieces to be considered fully stocked.
Level 19: Start The Bike- Try getting the bike to run by kick starting it.
Click on the bike whenever a “!” bubble appears over it.
*Challenge 10*: Showing My Good Side- Clean tables within 7 seconds.
Keep a close eye on your table customers. When a customer is about to leave, or if you don’t have any other tasks at a given moment, keep your cursor hovered over the table so that you can click it right away when the “!” bubble appears. It will take your hired help a few seconds to reach and clean a table, so you will need to click these quickly to avoid running out of time.
Level 20: Running Out- Don’t ever have 0 stock of something.
RESTAURANT 3: Emily’s Garden
It’s all Emily can do to keep Paige comfortable, but a looming heatwave causes customers to flood in in packs. Help Emily keep everyone cool in the face of heat.
Customer Types:
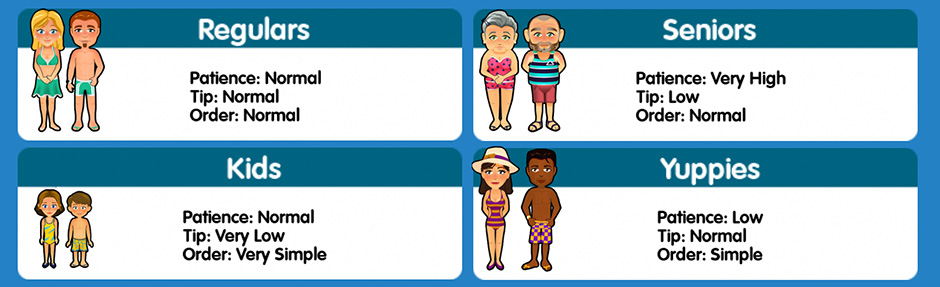
Delicious Emily’s Hopes & Fears Emily’s Garden Customer Types
Diamond Requirements:
Level 21: Having A Ball!- Throw a ball.
Click on Grace to have her throw her ball. You will need to do this 8 times before the day is over.
*Challenge 11*: Mouse Invasion – Part 2- Catch all the mice!
Level 22: Combo Crazy!- Get 25 combos, chains or bonuses.
Level 23: Ice Cream Frenzy- Make 18 ice creams.
The safest way to complete this goal quickly is to make ice creams between orders for customers. You can click on any excess ice creams on your tray to get rid of them. You do not have to serve 18 ice creams to have them count toward your total, only make them.
*Challenge 12*: Wave After Wave- Customers come in large groups.
Level 24: Hide & Seek- Find Grace.
Grace will pop up in various locations throughout the day. Click on her when she pops up. You will need to do this 8 times before the day is done.
Level 25: All Or Nothing- Serve full orders only.
You will need to serve all the items ordered by customer(s) at once in order to achieve this goal. Splitting orders will not work.
*Challenge 13*: Catering For Carl- Get that mouse what he wants!
Carl the mouse will pop up in various places throughout the day. Whenever he does, an order bubble will pop up over his head. Make the order and click on Carl to get him what he wants. Place priority on getting orders to Carl over customers in order to complete this challenge.
Level 26: Edward the Magician- Hand the feathers to Edward.
Eight feathers are scattered throughout the area. Click on a feather to place it on your tray, then click on Edward to pass the feathers to him. Their locations are shown below.
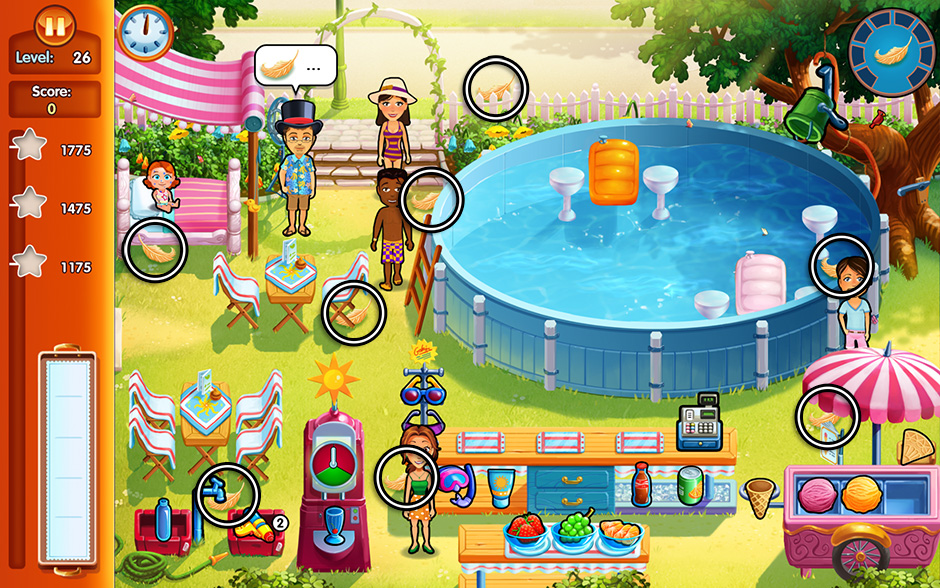
Delicious Emily’s Hopes & Fears Level 26 Feather Locations
Level 27: Limited Space- Use only 3 spots on your tray.
The easiest way to approach this objective is to handle one order at a time. This will limit the number of items on your tray by default. If you encounter a group of 4 customers, make sure you only bring 1-3 items, and make a second trip to bring the remaining items.
*Challenge 14*: Off Sick…- Cleaner’s off sick and there’s lots of table customers.
Take every chance you have between serving customers to clean tables.
Level 28: Cleaning Frenzy- Clean 3 tables in a row 3 times.
Each time a table of customers leaves, a “!” bubble will pop up over the table in need of cleaning. Do not click on tables to clean them until three of these bubbles have appeared. You may inevitably need to lose one or two tables of customers in order to complete this objective.
Level 29: Golden Minute- Serve 8 customers within a minute.
Take a moment longer as necessary to serve customers in order to serve them in quicker succession. A meter in the upper right corner of your screen will keep track of the number of customers served. The golden minute applies to any period of 60 seconds within your serving time and will not reset after a minute has passed.
*Challenge 15*: Party Time!- Serve all the party products.
Level 30: Entertainment Frenzy- Entertain at least 8 customers.
You need to have purchased the Entertainer in the Shop in order to complete this objective.
RESTAURANT 4: The Inuit People
Patrick’s journey takes him far to the north. However, when the cold overtakes him, it’s up to the Inuit people to help him. Can he repay the debt or will he be forced out into the cold?
Customer Types:
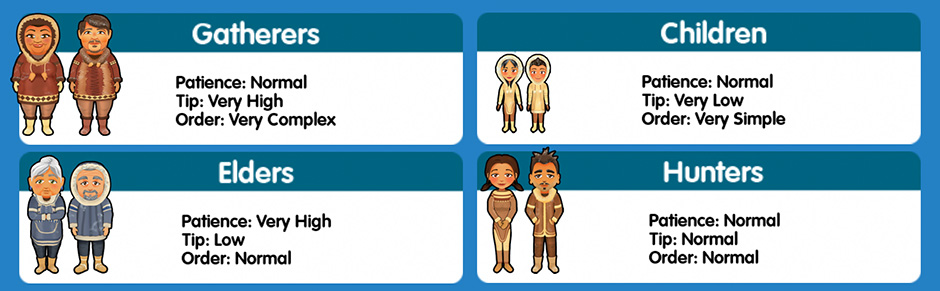
Delicious Emily’s Hopes & Fears The Inuit People Customer Types
Diamond Requirements:
Level 31: QUICKLY!- Get 12 quick bonuses.
*Challenge 16*: Fresh Fish- Deliver items before they go bad.
Any and all fish items now have a limited time to be delivered fresh to a customer. A meter on the upper right corner of your screen will keep track of how much time you have left. It’s best to deliver orders straight to customers on a per customer basis than to combine orders here. If a customer orders cooked fish, collect the cooked fish before collecting any other fish products to serve them in order to keep things fresher for longer.
Level 32: Patrick’s Stuff- Collect Patrick’s stuff.
Eight of Patrick’s things are once again scattered about the area. Click on them to collect them. Their locations are shown below.

Delicious Emily’s Hopes & Fears Level 32 Item Locations
Level 33: Burned Through My Boots- Walk 800 yards.
A simple tactic you can use to keep walking is to click on one of the fishing holes to restock fish, then click on the cash register. Repeat this process over and over between serving customers to keep Tapeesa on the move.
*Challenge 17*: Keeping It Fair- Alternate between table and counter customers.
You will need to alternate between serving table and counter customers. Attending to a paying customer does not count as serving a customer. The image displayed on the upper right will show which was the last type of customer you helped: sitting (table) or standing (counter). You can still check out table and counter customers together for combos.
Level 34: Keeping Warm- Knit a baby blanket.
Click on the blanket inside the tent between serving customers to knit the baby blanket. A meter will appear showing how far along you are. Once the meter is completely filled, the task will be complete.
Level 35: Chocolatier- Give the kids chocolate.
Children who want chocolate will stand next to the fishing holes with “!” bubbles. As soon as you see them, click on them to have Patrick offer them chocolate. Offering the kids chocolate will not interrupt Tapeesa’s work, so click on them as soon as you see them.
*Challenge 18*: On Thin Ice…- Patrick’s walking slower than usual.
The order in which you prepare items is critical in this challenge. It’s not a bad idea to have some cooked fish prepared in advance. As much as possible, click on items the customer wants that are closest to you first, and select the ones they want closest to them last. You should be collecting items on the way to customers instead of running back and forth. If a customer orders cooked fish and it’s not prepared yet, do not click to prepare a cooked fish, then gather other items as it cooks. This will slow you down in the long run. Instead, wait until it’s finished cooking, then move to collect the other items.
Level 36: No Weapons!- Don’t give the kids any weapons.
Do not serve any children who show up asking for weapons. They will eventually leave angry and clear the way for new customers.
Level 37: Patrick The Midwife- Collect the items for Tapeesa.
An older woman will appear on the upper right next to the fishing holes and request an item. Click on the item she requests, then click on her to bring it to her. The item locations are shown below.
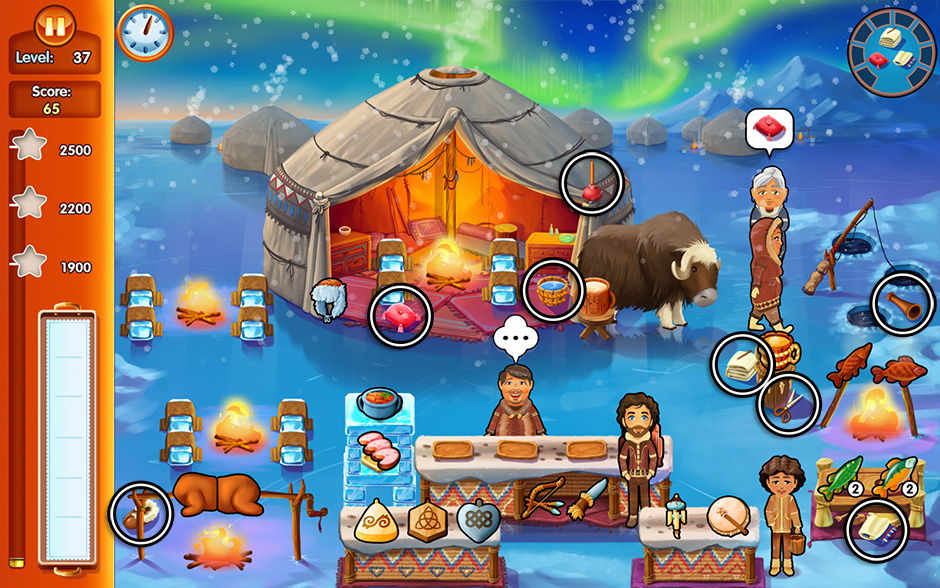
Delicious Emily’s Hopes & Fears Level 37 Item Locations
*Challenge 19*: Very, Very Hungry- Double orders for table customers.
Level 38: No time to waste…- Serve customers within 20 seconds of each other.
A meter in the upper right corner will show how long it’s been since you’ve served a customer. If you only have a single customer ordering, wait a handful of seconds before serving them in order to maximize your use of time. Elders are your most patient customers here, so waiting a little longer to serve them will often work to your advantage.
Level 39: Black-Fish- Don’t burn any fish.
Walleye, Northern Pike, and Eelpout are all burn-resistant fish. If you have two of any of these three on your menu, you will automatically complete the objective by the end of the day.
*Challenge 20*: Cold Days- If the table fires go out, people won’t sit there until you re-light them.
If a table fire goes out, place immediate priority on getting it re-lit again. It’s better to keep your customers waiting a little longer, especially if they’re Elders, than to leave fires unlit. However, if customers are starting to become unhappy, drop the fire for a moment and take care of them before resuming relighting.
Level 40: Catch Of The Day- Have at least 5 shoes on your tray at any point.
It’s best to work on this goal immediately from the start of the day. Click on any of the fishing holes over and over until there are 5 shoes on your tray. If it’s taking too long, serve customers as needed, then go right back to fishing for shoes. Once you’ve completed the objective, you can remove the shoes from your tray right away and resume normal service.
RESTAURANT 5: Patrick’s Flower Shop
With the heatwave only growing worse, Patrick’s flower shop is wilting. And the flowers aren’t the only ones: Paige isn’t faring much better. Emily embarks on a quest to save the flowers and keep Patrick’s memory close.
Customer Types:

Delicious Emily’s Hopes & Fears Patrick’s Flower Shop Customer Types
Diamond Requirements:
Level 41: Patrick’s Letter- Read Patrick’s Letter.
Patrick’s letter is sitting nearby, just above the register. Click on it to have Emily read it between waves of customers.
*Challenge 21*: Breaking Plant Table- The plant table will break throughout the day.
Watch the plant table carefully. When the table collapses, a meter will appear over it. Click on the plant table to repair it. As it nears completion, the meter will fill. The table will break repeatedly, so try to keep your plants stocked as possible before it breaks again.
Level 42: No Service- Don’t serve anyone for 30 seconds.
The easiest way to complete this objective is to wait 30 seconds at the very start of your service and not serve any customers until the objective is complete. Use this time to grow and stock up on plants for later in your day.
Level 43: A Few Angry Men- Serve exactly 2 angry customers.
The best way to complete this objective while still achieving a high score is to wait until your final two customers of the day. Give them the items they ask for, but wait to check them out. A customer qualifies as angry when they have two hearts or less above their head and their face has gone red.
*Challenge 22*: One Wrong Move- Play perfectly and have no extra items on your tray that have to be removed.
This challenge is rather straight-forward. Focus on serving one customer or group of customers at a time. It’s better to take an extra moment than to rush and make a mistake.
Level 44: Plenty of Space- Use only 2 spots on your tray.
Be careful of groups of 3 or 4 people. You will need to make two trips to fulfill their orders in order to complete this goal.
Level 45: Be Different!- Don’t make two of the same products after each other.
This can get tricky when people order the same thing back to back. In these cases, pick up a “temporary product” to put on your tray between the two same products ordered. You may also choose to wait for the next order to see if something different comes up. Make sure you keep track of the last item you made between customer waves, as this is the most likely place you will make a mistake.
*Challenge 23*: Entertainer Frenzy!- Entertaining someone adds 100 points to your score.
You will want to have the entertainer for your restaurant purchased for today’s challenge. Select the entertainer, then click on a table to have those customers entertained. You should entertain everyone you can as often as possible. Remember you can only entertain table customers.
Level 46: Call For Water- Call people to ask for water.
The purple phone on the left side of the counter will ring with a “!” bubble when you can call people to ask for water. In order to get here quickly, click on the cash register, then click on the phone. The moment you click on the phone, Emily will walk slower, so use the register as a way to get to the phone faster. Make sure any impatient customers are served before picking up the phone, otherwise place priority on the phone calls.
Level 47: Slow Grower- Grow only 1 plant at a time.
There’s a very simple way to keep on top of this. Click on one plant on your table to grow it, then once grown, click to harvest it. Once the first plant is done, move on to the second. Rinse and repeat; working from left to right is recommended. Once your stock of plants is filled to the maximum quantity, simply grown plants one at a time as needed.
*Challenge 24*: Why Won’t They Leave?- Ask table customers to pay.
Once table customers are finished with their servings, a “!” bubble will pop up over the table. Click on it to have Emily go to the table, prompting one of the table customers to get up and go to the register to pay.
Level 48: Grab A Bucket!- Take the bucket from Francois and water the flowers.
Francois will appear in the doorway of the shop. When this happens, click on him to take a bucket and go to water the flowers. Try to ensure that customer orders are fulfilled before doing this. If a customer is still thinking, or there is a pause between waves, this is an excellent time to water the flowers.
Level 49: Professional Tippers- Get 1,200 amount in tips.
There are two key tips to use here: 1)Serve customers quickly, and 2)Place items with increased tips on your Menu for the day.
*Challenge 25*: I don’t wait, I’m famous.- Serve the VIP first.
A radar in the upper right corner of your screen will blink with a “!” icon when a VIP is entering the shop. When VIPs enter, fulfill their orders first. If multiple VIPs enter, serve them in the order in which they entered the shop. VIPs look different from usual customers, so they will be easy to spot.
Level 50: It’s A Wrap!- Wrap Paige’s present from Emily.
A present for Paige will appear to the right of the cash register with a “!” bubble. Whenever you’re not serving a customer, click on the gift to wrap it. A meter will appear displaying your progress. The objective will be completed once the meter is completely filled.
RESTAURANT 6: The Monastery
Patrick braves freezing temperatures and arrives at a monastery high in the mountains. Will the monks be able to help him find the enlightenment he seeks, or was his journey for naught?
Customer Types:
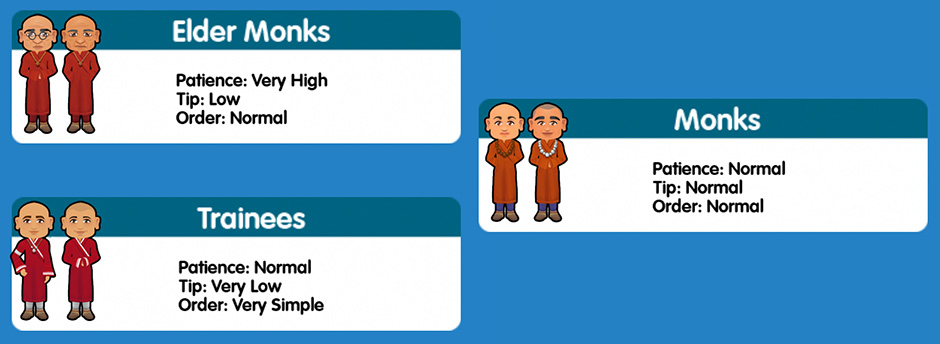
Delicious Emily’s Hopes & Fears The Monastery Customer Types
Diamond Requirements:
Level 51: Ecstatic, Ecstatic, Ecstatic!- Serve 25 ecstatic customers.
The easiest way to complete this objective is simply to serve customers as quickly and accurately as possible. Keep the customer types in mind today especially.
*Challenge 26*: Everything Breaks- Work with a slowly breaking tray.
Your tray will slowly decrease in size throughout the day. A sound cue will inform you when your tray has lost an additional spot. Once the number of spots has decreased to the point you can no longer fulfill orders in one go, you will need to make multiple trips.
Level 52: Wake Up Sleepyhead!- Try to wake up Patrick.
A “!” bubble will appear over Patrick’s head every so often. When this happens, click on it to try and wake him up. Try to do this before or after orders, and not during, as it may interrupt your sequence. You can click ahead to the next actions you would like to complete while trying to wake him.
Level 53: Lost Me Keys- Find the keys!
Eight keys will be scattered throughout the area and you will need to gather them all at some point during or throughout the day. Their locations are shown below.
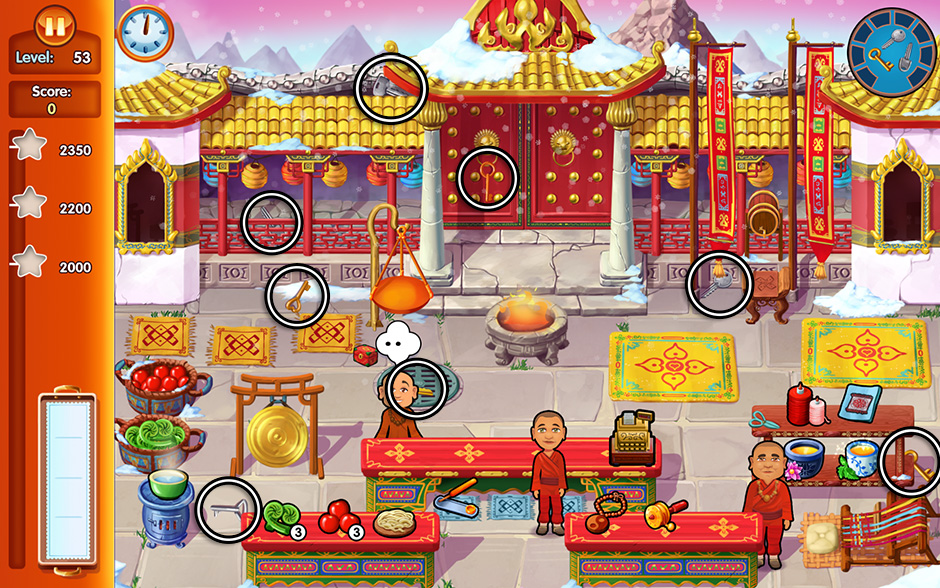
Delicious Emily’s Hopes & Fears Level 53 Key Locations
*Challenge 27*: Order Please!- Serve the people in the order they come in.
Perhaps one of the most difficult challenges. Reduce emphasis on combos today and instead focus on the order in which people enter. You only need to serve people in the order in which they come in. Checking a customer out does not count as serving, however if you have a line and as a result, a customer in line has not been served yet, you will need to take them into consideration. For example: If a customer is waiting in line and hasn’t been able to order yet, but a table customer has sat down and made an order, you must serve the customer in line first, because they came in first. Try to keep these sorts of backlog scenarios to a minimum.
Level 54: Open Sesame…- Try to open the door.
Click on Patrick in front of the door to have him try and open it. Since Patrick isn’t serving customers, you can click on him immediately once he’s done trying to open the door. This will allow him to have another go, without interrupting your orders or service of customers.
Level 55: Rope?- Finish the rope.
Click on the rope behind the meditation rugs to work on finishing it. A meter will pop up showing how far the rope is from completion. Work on the rope whenever you have a pause between customers. Be careful not to forget about the stove during the process.
*Challenge 28*: How Long Is A Day?- The Clock doesn’t work, how will you know when this day ends?
Treat this day just as you would any other. Make sure the stove doesn’t burn or boil over, and serve customers in combos as much as possible.
Level 56: Can’t Hold Their Ale…- Don’t serve alcohol to trainees.
Trainees can be identified by their younger faces and red robes. If a trainee asks for alcohol, you will need to ignore them until they eventually leave angry. Otherwise, you will fail the day’s objective.
Level 57: A Bonus For Efficiency- Serve 2 full trays of items.
There are six slots on your tray, so ideally you will want to grab items for a table order and a counter customer at the same time, then serve them back-to-back. Alternatively, you can serve three counter customers this way. Do this twice to complete the objective for the day. Remember you can use the entertainer to improve the patience and mood of table customers.
*Challenge 29*: Hungry, Hungry Monks- Table customers order 3 times instead of once.
Since you have fewer customers today, you will want menu items that provide higher tips. The spill-proof alcohol is also recommended if you have it. Much like the previous day, try to serve customers at least two at a time to get higher tips and combo bonuses.
Level 58: Candy Corn Cure- Find the candy corn.
Eight pieces of candy corn are scattered throughout the area. You will need to find them before the day is done. For a 3-star rating, use the same Menu tactics as outlined in the previous two days.
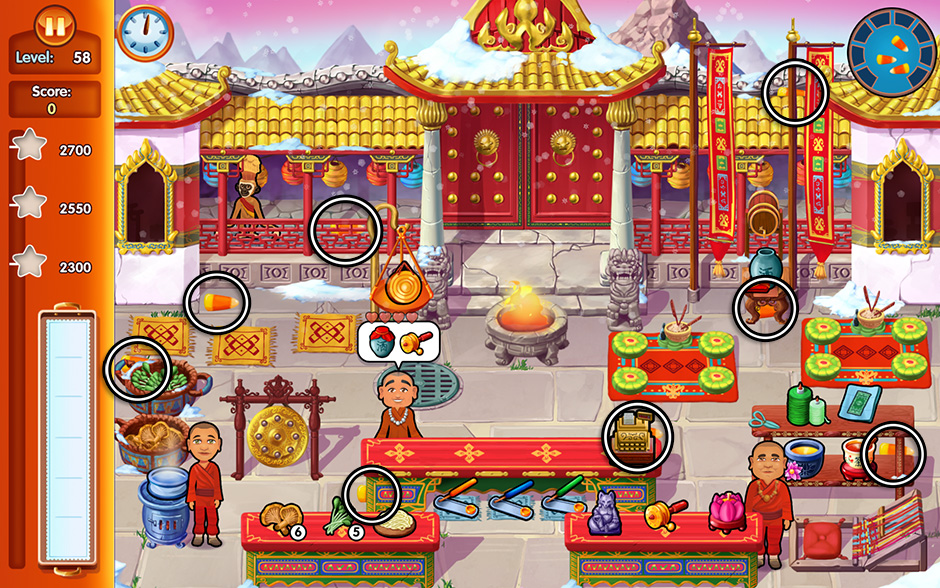
Delicious Emily’s Hopes & Fears Level 58 Candy Corn Locations
Level 59: YOU LOST THE ROPE?!- Find the rope.
A “!” bubble will pop up in various locations throughout the day. It’s recommended you click on the stove to keep it from boiling over before clicking on one of these bubbles. Try to look for the rope between customer orders, or after you’ve helped a customer pay. For a 3-star rating, use the same combos and Menu tactics as outlined in Challenge #29.
*Challenge 30*: Exhausted- Tired, tired monk. Try not to have him work too hard or he’ll start to walk slower.
The trick to this challenge is to treat various parts of the restaurant as “checkpoints”, particularly the stove and the cash register. For example: If you need to walk to the other side of the restaurant, instead of clicking on the item you need on the other side of the restaurant, click on one of these “checkpoint” locations in-between. This will help keep the monk from expending too much energy. Tables you serve also work as “checkpoints”. His energy meter resets very quickly if it’s not completely filled, so use this tactic to navigate the restaurant without slowing down.
Level 60: Packing Up- Help Patrick pack.
Patrick’s things are sitting on the ground just above the meditation rugs. Click on the pile of luggage to help pack it between customer orders. A meter will pop up displaying how close you are to finishing packing. Work on this every spare moment you have, not forgetting to check the stove now and then. Once the meter is filled, your goal will be completed.
RESTAURANT 7: Emily’s Garden II
Patrick is home again, and Paige and Emily couldn’t be happier to see him. Celebrate their family reunion as familiar characters, both past and present, swing by to pay them a visit.
Customer Types:

Delicious Emily’s Hopes & Fears Emily’s Garden II Customer Types
Diamond Requirements:
Level 61: Kids First- Serve 3 kids in a row.
This goal can be tricky. Keep a sharp eye out for a window of opportunity in which three child customers show up. The water bucket does not count as a serving; only table and counter customers who order items count. When this window is open, place priority on serving the children, using an entertainer to keep other tables patient as needed.
*Challenge 31*: Mouse Food- Get that mouse what he wants!
Just as with the previous mouse-serving challenges, a mouse will pop up in a random location asking for a particular item. When this happens, place priority on serving the mouse, then tend to your other customers. As long as you haven’t kept the other customers waiting too long beforehand, completing this challenge should be rather easy.
Level 62: Overachiever- Get the first star in the first half of the day.
Serve and check out customers in pairs of two or more as much as possible to keep your profits high. Use any tip-improving Menu items to further make this goal easier. Finding the mouse within the first half of the day will put an additional 100 points toward your score.
Level 63: Clean Up Time!- Throw away the junk that’s in the restaurant.
Seven trash items are scattered around the area. Click on them to place them on your tray, then click on the trash can (marked with an “!”) to throw them away. Their locations are shown below. Do this before the day ends to complete the objective.
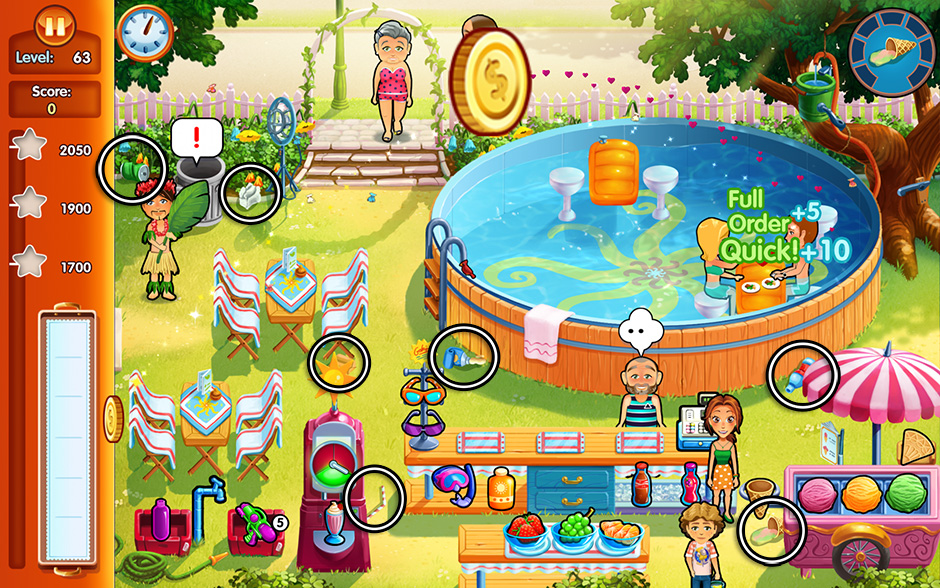
Delicious Emily’s Hopes & Fears Level 63 Trash Locations
*Challenge 32*: Mouse Invasion – Part 3- Catch all the mice!
Use the same tactics as with the previous two mice challenges. Mice will pop up all over. Click on them whenever you see them. If you miss any mice, don’t worry; mice will continue to pop up over and over quickly throughout the day. The most important thing to remember here is not to get so caught up in catching mice that you forget to serve your customers.
Level 64: The Product Challenge- Make all products and variations twice.
The easiest way to do this is to make products in pairs as quickly as possible while customers are ordering or walking in, starting with products on one side of your screen and working your way across. Example, starting from the right: Immediately make two ice cream cones using all three scoops, then make two ice cream cones using only two scoops, then make two ice cream cones using only one scoop. You do not have to do this back-to-back, but it helps keep things organized. Any orders customers make will go toward the goal. Simple items, such as sunglasses, count. Be sure to clear items off your tray after you’ve made pairs.
Level 65: Memory- Memorize the customers’ orders.
The simplest way to approach this is to serve customers as quickly as possible the moment they walk in. It’s highly recommended you have spill-proof milkshakes and always have a milkshake premade and ready to go. Customers will order many milkshakes today.
TROPHIES
Achieve various game milestones in order to unlock trophies. Below is a list of trophies and how to unlock them.
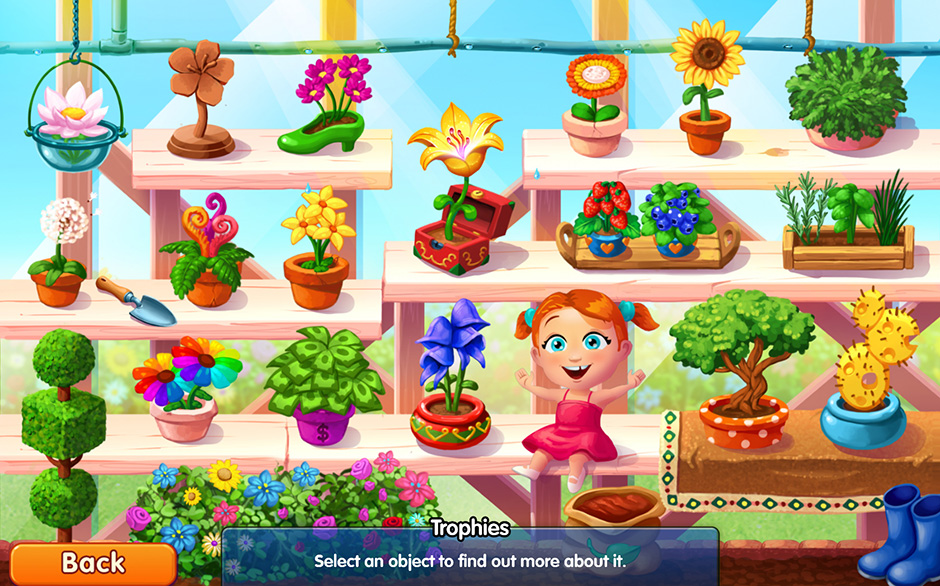
Delicious Emily’s Hopes and Fears Trophies
| Paige’s Flower | Finish Forest Picnic |
| Wood Carved Flower | Finish the Lumber Mill |
| Shoe-Grown Flower | Walk 100 miles |
| Fire Flower | Serve 250 hot products |
| Sunflower | Finish Emily’s Garden |
| Lazarus Plant | Finish Patrick’s Flower Shop |
| Herb Garden | Unlock all 213 products |
| Berry Tray | Serve 250 products quickly |
| THE FLOWER | Finish the Monastery |
| Star Flower | Achieve 3 stars on each day |
| Variety Fern | Have 4 variations of one product on your tray |
| Dandelion | Have 14 quick prepare products on your menu for the day |
| Decorative Buxus | Buy all items in all restaurants |
| Double Rainbow Flower | Finish all the Challenges and Bonus levels |
| Money Plant | Have 15 bonus tip products on your menu for the day |
| Monkshood | Win the last level of a restaurant with a minimum of 12 un-upgraded products |
| Paige Perfect! | Unlock and collect everything |
| Tapeesa’s Blanket | Finish the Inuit Village |
| Cheesy Cactus | Find all 65 mice |
| The Family Tree | Finish Emily’s Garden II |
| Flowerbed | Choose every product in every chapter at least once |
MEMORABLE PHOTO MOMENTS
At special times during the story, Memorable Photo Moments will occur. When these happen, a camera icon will pop up, allowing you to take a picture. Photos you take will be kept in a keepsake photo album you can view at any time from the level select screen. Memorable Photo Moments take place in the following locations:
| Level 1 | Getting a flower for Paige | At the end of level 1, Patrick will grab the rope swing and lean toward the water to grab a flower for Paige. |
| Level 5 | Having fun with Allison | At the start of level 5 in Paige’s bedroom, Allison tries to cheer up Paige. |
| Level 16 | Mack is a girl?! | At the start of level 16, Mack will remove her hat revealing she’s a woman, to Patrick’s surprise. |
| Level 19 | Imaginary ride | At the start of level 19, Patrick and Rusty will sit together in the old truck, taking an imaginary ride. |
| Level 26 | Washing away the spots | At the start of level 26, Grace will wander near the pool. The third time Francois jumps in, the water will splash her, washing away her spots. |
| Level 30 | Paige & Grace BFFs | At the start of level 30, Grace will sneak back to the garden, curling up with Paige for a nap. |
| Level 32 | Lovely hallucinations | At the start of level 32, the tent will fill with smoke, causing Patrick to hallucinate. |
| Level 38 | Baby Patika | At the start of level 38, the chief will introduce baby Patika to the tribe. |
| Level 44 | Missing Patrick | At the start of level 44, Emily will find Paige in the flower shop. They both miss Patrick. |
| Level 48 | Saving the flowers | At the start of level 48, Emily will discover Francois mixed up the chlorine and lime slush puppy by the pool. |
| Level 51 | End of the line | At the start of level 51, the monks will bring Patrick into the monastery. |
| Level 60 | Finding THE flower for Paige | At the start of level 60, Patrick returns from the tunnel, carrying the flower for Paige. |
| Level 60 | Smell the flowers | At the end of level 60, Patrick enters the hospital, where he awakens Paige with the flower. |
| Level 65 | Daddy is my hero | At the end of level 65, Patrick will sit and read a story with Paige. |
ALL MICE LOCATIONS
Hidden within each level is Carl the mouse, who will pop up from time to time. You will hear a squeaking noise when he does, at which point you should look for him before he disappears! Collect all the mice to earn the Cheesy Cactus trophy. A mouse hole next to each level will indicate whether or not you’ve found the mouse hidden in that location. There are 65 mice total, excluding challenge levels, during which mice do not appear. All mice locations are listed and shown below:
Restaurant 1: Forest Picnic
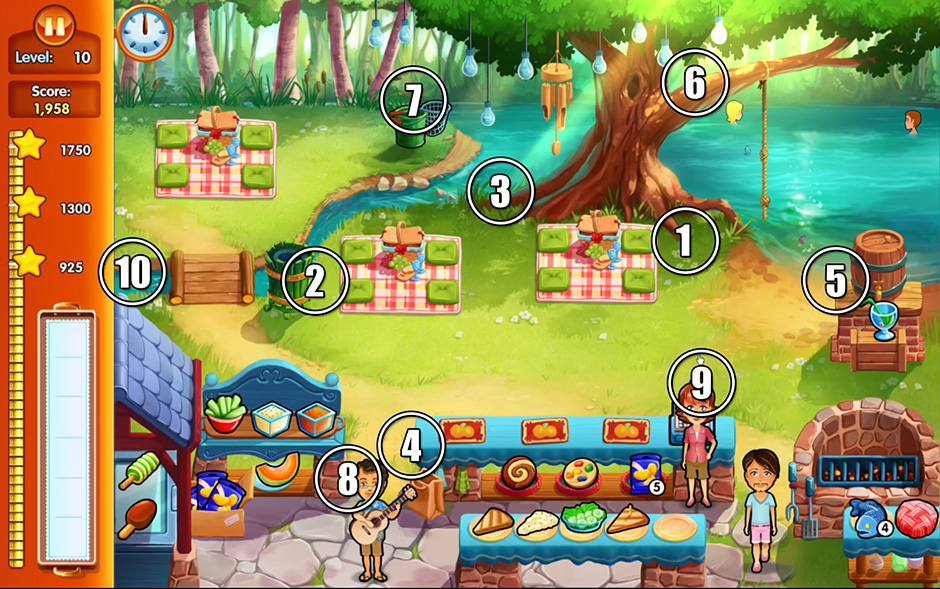
Delicious Emily’s Hopes & Fears Forest Picnic Mice Locations
- 1. At the foot of the large tree, to the right of the picnic blanket
- 2. To the right of the trash can
- 3. At the foot of the large tree, behind the roots on the far left
- 4. Behind the left side of the main counter
- 5. Behind the left side of the beverage barrel
- 6. Up in the large tree, at the base of the large branch on the right
- 7. Behind the bucket and net used for catching fish
- 8. At the bottom right of the dip and melon counter
- 9. Behind the cash register
- 10. In the water to the left of the bridge
Restaurant 2: The Lumber Mill
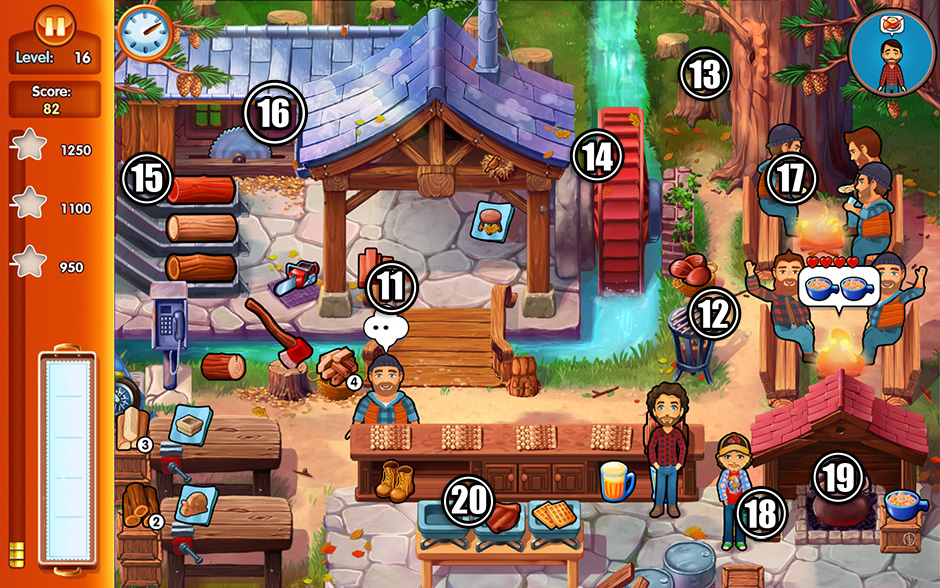
Delicious Emily’s Hopes & Fears The Lumber Mill Mice Locations
- 11. Behind the upper left corner of the bridge
- 12. Behind the upper right side of the nut toasting grill
- 13. On top of the first tree stump to the left of the large redwood tree in the upper right corner
- 14. Behind the upper left side of the water wheel
- 15. Behind the log chutes on the far left
- 16. In the window behind the circular saw blade
- 17. Just above the topmost table customers can sit at, at the center base of the large redwood tree
- 18. At the lower left corner of the large soup pot structure
- 19. Inside the soup pot
- 20. Between the first two trays of the buffet counter
Restaurant 3: Emily’s Garden
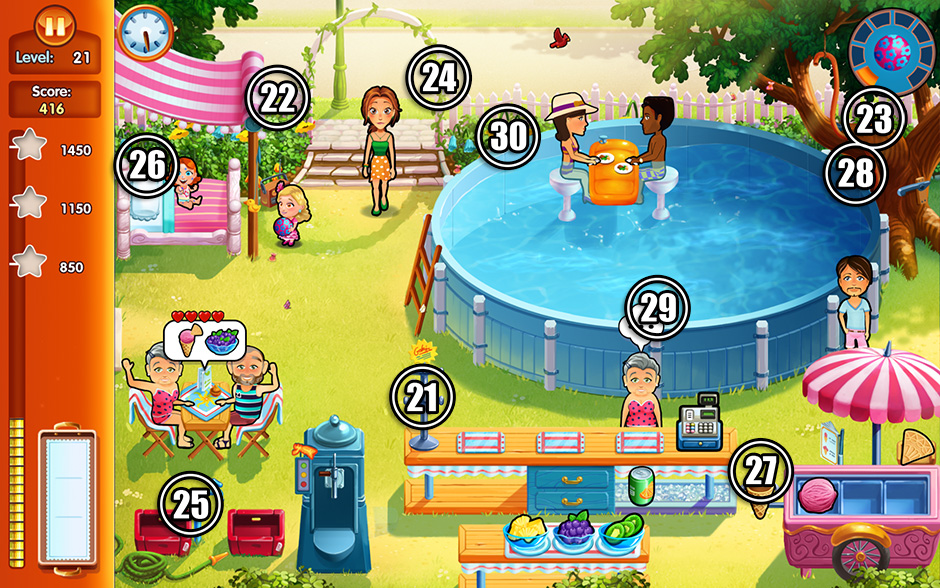
Delicious Emily’s Hopes & Fears Emily’s Garden Mice locations
- 21. Behind the sunglasses display
- 22. To the left of the gate archway, behind the flower hedge
- 23. Up in the tree, just beneath the goal display in the upper right corner
- 24. Behind the right post of the gate archway
- 25. Behind the water spigot in the lower left corner
- 26. Behind the pillow of Paige’s bed
- 27. Behind the ice cream cone holder
- 28. At the far right side of the pool, underneath the water bucket
- 29. At the mid lower edge of the pool
- 30. Behind the upper left corner of the pool, in the flower hedge
Restaurant 4: The Inuit People
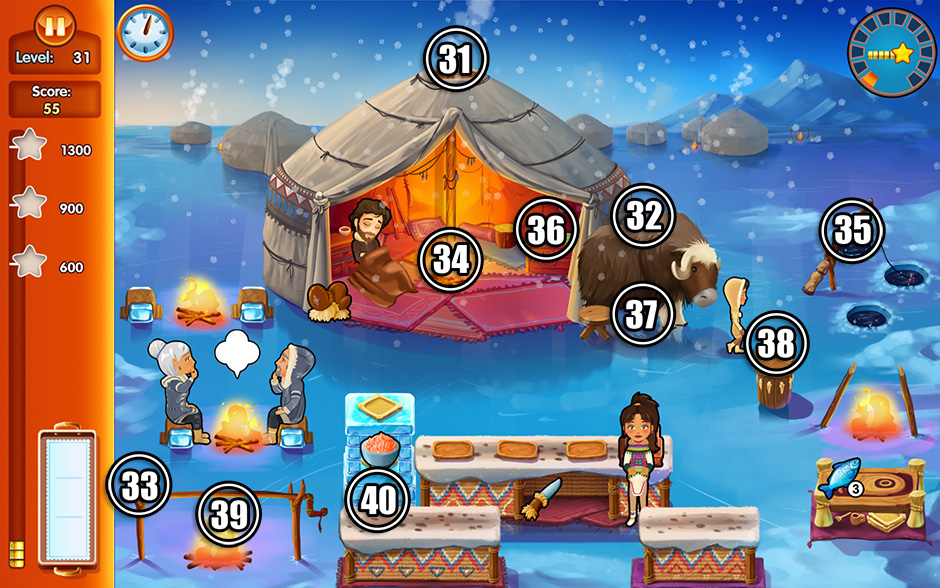
Delicious Emily’s Hopes & Fears The Inuit People Mice Locations
- 31. At the top of the tent
- 32. Behind the yak’s back
- 33. Behind the upper left corner of the roasting spit
- 34. Inside the tent, dead center
- 35. In the topmost fishing hole
- 36. On top of the cabinet on the right side inside the tent
- 37. Underneath the yak
- 38. In the chowder bowl next to the fire used for cooking fish
- 39. Behind the fire beneath the spit on the lower left
- 40. On the left side and behind the lower left counter
Restaurant 5: Patrick’s Flower Shop
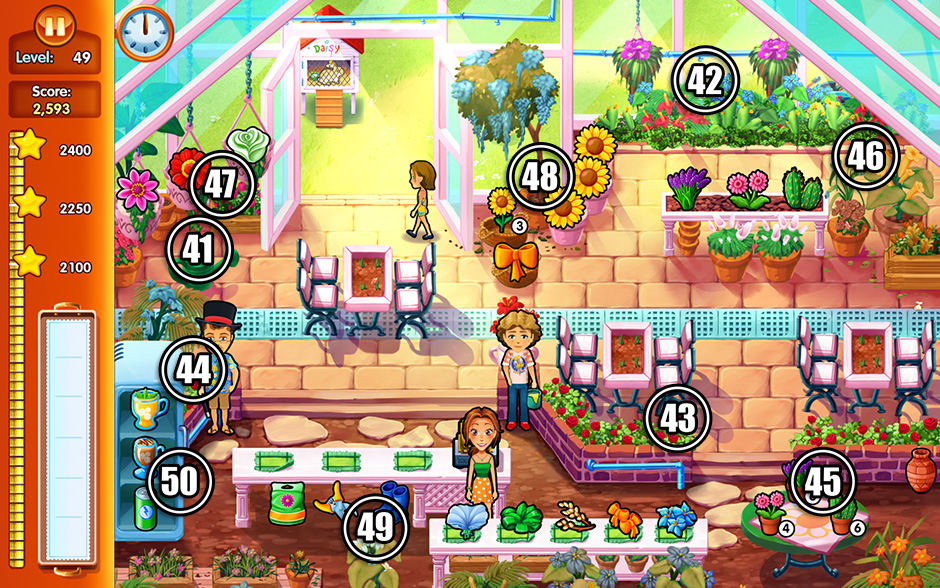
Delicious Emily’s Hopes & Fears Patrick’s Flower Shop Mice Locations
- 41. Behind the watering can at the upper left side of the shop
- 42. Behind the hedge between the two hanging flowerpots in the window toward the upper right
- 43. At the bottom right foot of the center table, behind the flowers
- 44. Behind the top right corner of the refrigerator
- 45. Behind the center to top right corner of the potted plants table (on the lower right, not the growing table)
- 46. To the upper right of the table used for growing potted plants, behind the two large plants to the right
- 47. In the window behind the flowers between the second and third hanging flower pots you can harvest from (toward the upper left, to the left of the door)
- 48. Behind the wisteria tree to the right of the doorway
- 49. At the bottom center of the main counter, behind the large potted plant
- 50. To the right of the refrigerator
Restaurant 6: The Monastery
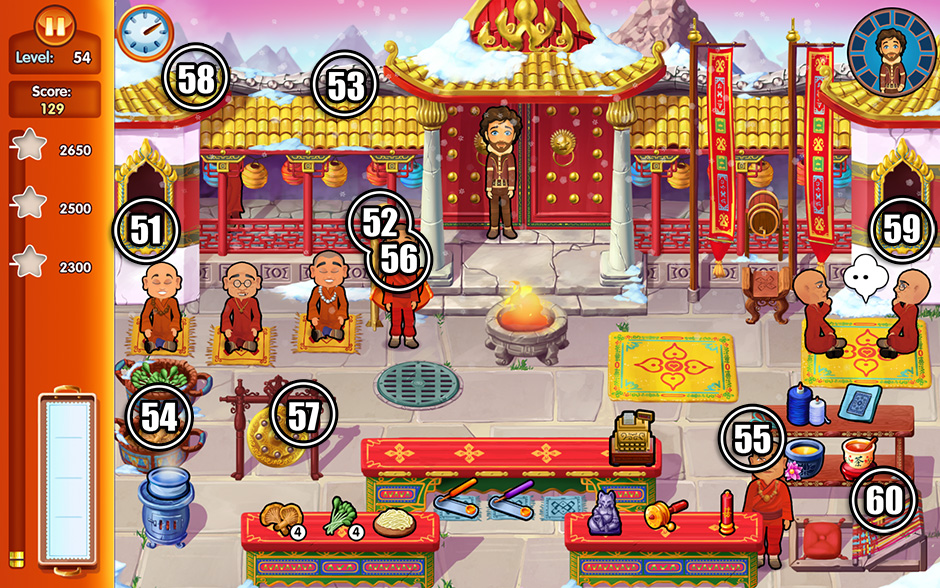
Delicious Emily’s Hopes & Fears The Monastery Mice Locations
- 51. In the far left window
- 52. Behind the bell stand, in the hall to the left of the leftmost white pillar
- 53. On top of the roof above the left hallway, toward the center-right side
- 54. In the first basket of noodle ingredients
- 55. To the left of the counter used for tea and tapestries
- 56. Behind the bell on the bell stand, to the immediate bottom left of the leftmost white pillar
- 57. Behind the upper right corner of the large gong
- 58. At the right corner of the far left roof
- 59. In the far right window
- 60. Behind the loom in the lower right corner
Restaurant 7: Emily’s Garden II
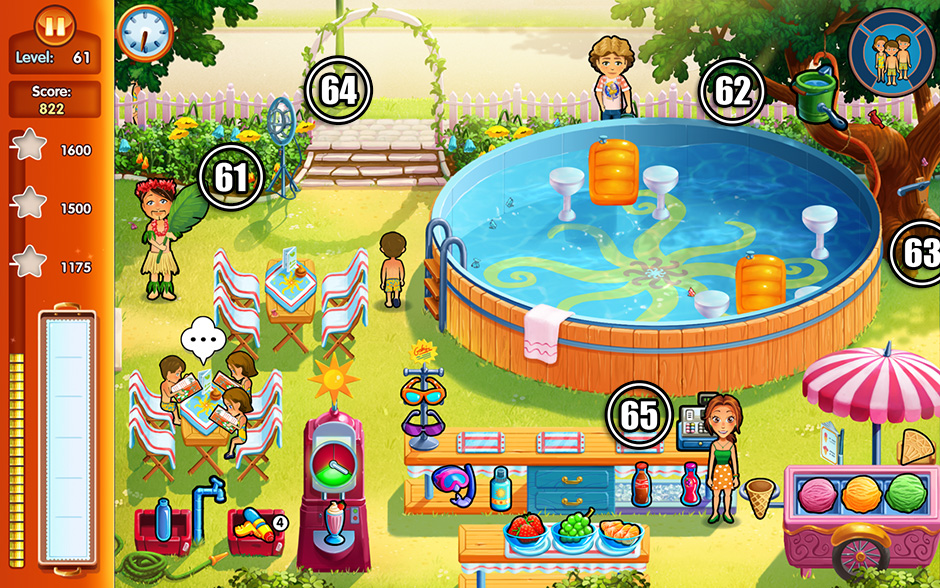
Delicious Emily’s Hopes & Fears Emily’s Garden II Mice Locations
- 61. At the foot of the flower hedge, to the left of the fan in the upper left corner
- 62. Behind the fence at the top right corner of the pool, beneath the tree leaves
- 63. At the foot of the large tree on the far right
- 64. Behind the green lamppost through the garden archway
- 65. Behind the main counter, to the left of the cash register
Video Walkthrough
Stuck on a level? Falling just short of that 3-Star ranking? Can’t find that pesky mouse? Our Delicious – Emily’s Hopes and Fears Video Walkthrough will guide you through various tips and tricks and show you firsthand how to complete every level at 100%.
Congratulations! You’ve completed our Delicious – Emily’s Hopes and Fears Walkthrough! For more great Delicious games, visit our blog!
Go to GameHouse to play this game!
The Delicious – Emily’s Hopes and Fears Walkthrough does not contain cheats, hacks, or serials.