Up until now, we’ve seen a number of different options for development environments. We’ve seen what Vagrant VVV and Chassis can do; both are great solutions, and both build on top of Vagrant. If you’ve started developing using Vagrant solutions, then good for you. But wait, there is one more option. In this article we will see what Docker is, and how to start using it in your WordPress projects.
Why Docker?
Docker is an open source platform that helps you build, run and deploy applications. In this article, we will start using Docker with WordPress, but it’s really easy to use with any other CMS or framework, and every language out there. Docker has been a buzzword in the DevOps community for sometime. Consider this: in its first 1.0 stable release, many cloud providers started adopting Docker. If you have used Heroku or other PaaS for a while, you may know that it’s easy to develop on them. With most PaaS providers, you have a web container, a database container, a container that saves files, and so on. Each container is different and communicates with each other via IPs and Ports. PaaS platforms also uses container technologies.
Docker does the same. You can create a container that runs your code (this may be Apache and PHP that runs PHP scripts), and one container that holds your database (MySQL, MongoDB, and so on). But you can also do this using Vagrant, and I must admit that Vagrant is quite good at what it does. It solves the problems usually associated with working on my machine in the development stage, and it also gets close to the production environment. On the other hand though, Docker makes the local environment and production the same.
My preferred Vagrant configuration is Homestead. Yes, the famous Laravel box. It’s very good for the majority of projects, but it also comes with two databases and many other software programs that you may not need. Docker performs better than classical hypervisor technologies. Docker is super fast for local development if you are using Linux. It can also be faster than traditional hypervisors, even if you’re not running Linux as your primary OS.
If you’ve been using Vagrant for a while and want to learn something new and cool, then this article is for you.
Introduction to Docker
Docker is built with the concept of containers. This is not a new idea. We’ve been using containers for many years. Android applications are also built on top of this concept. Docker consists of a Docker CLI and a daemon. You will only be working with the CLI. The CLI communicates with the daemon, and it’s the daemon that does the processing.
Containers are built from images, with some additional configuration. You can also create images from other images. Let’s say you want to use the Ubuntu 14.04 image. You also want to use Apache and PHP. You could use the Ubuntu image and then install Apache and PHP. This way you can create another image and share this image with others. Images are like blueprints for containers. Containers are built from those images. Compared with Vagrant, where you have a base OS which is Ubuntu, then using a tool like Puppet, you then instruct it to install Apache and PHP. You then ‘vagrant up’, and you’re ready to go with your local development.
Before starting this article, I highly recommend you to give the interactive tutorial a try.
Getting Practical with Docker
First of all, make sure you have Docker installed on your system. The ideal solution is to have Linux installed as your primary OS, particularly given that Docker uses the Linux kernel. But you can run Docker on Windows and Mac. There is a tool called Boot2Docker that is available for both Mac and Windows. For installation instructions, read their installation guides.
To make sure that Docker is installed properly on your system, run docker -v and docker will tell you what version is installed on your system.
There are two main things you need to know about Docker: Images and Containers. Images are like a blueprint for the containers. Images tell Docker what the container should be. You can’t run images; instead you build containers from them. On the Docker Hub you can see a list of images. There are images that come from the Docker Team, and images that come from the community.
To see what images are currently available on your system, execute:
docker images
This will give you a list of images downloaded on your system. If you haven’t used Docker in the past, you will receive the result of no images on your system.
Let’s download an image from Docker Hub. The most downloaded is the Ubuntu image. To download an image you should execute docker pull [imagename]:[tag] or docker pull [imagename].
docker pull ubuntu:12.04
or
docker pull ubuntu
Now check again for your images, using docker images. There are now two images. Tag names can be used as versioning, but not on their own. For example, in this PHP image, there are the same PHP versions with Apache, nginx or without any of them. You can find tag names on every image page (on Docker Hub). If no tag name is specified, then it pulls the image with tag name latest.
You can build containers using docker run [imagename]:[tag] or docker run [imagename]. If you do not specify a tag name, it will run the image with the tag latest. Then you can start setting up your containers using docker start [name_of_the_container]. If you don’t specify a name for the container, Docker will give the container random name. Let’s build a container:
docker run ubuntu
To run containers, you have to execute:
docker ps
But why is there no running container? Because the container has finished its process. To see the list of created containers so far, you’ll need to run docker ps -a. This will give you the list of all existing containers and some additional information like the container ID, the command that will be executed when the container starts, the image name, its status, port and name. When first creating the container, we didn’t gave it a name. Therefore, the container ID is its unique identifier. It can replace the container’s name in some cases. The port is a port that is public outside the container (the ports can be mapped between the Docker container and your system). You can delete a created container with:
docker rm [container name]
docker ps -a
To better understand how a container works, let’s analyze its Dockerfile. In the Ubuntu page on Docker Hub, you can see different tag names that link to a Dockerfile. Let’s see what Ubuntu 12.04 looks like.
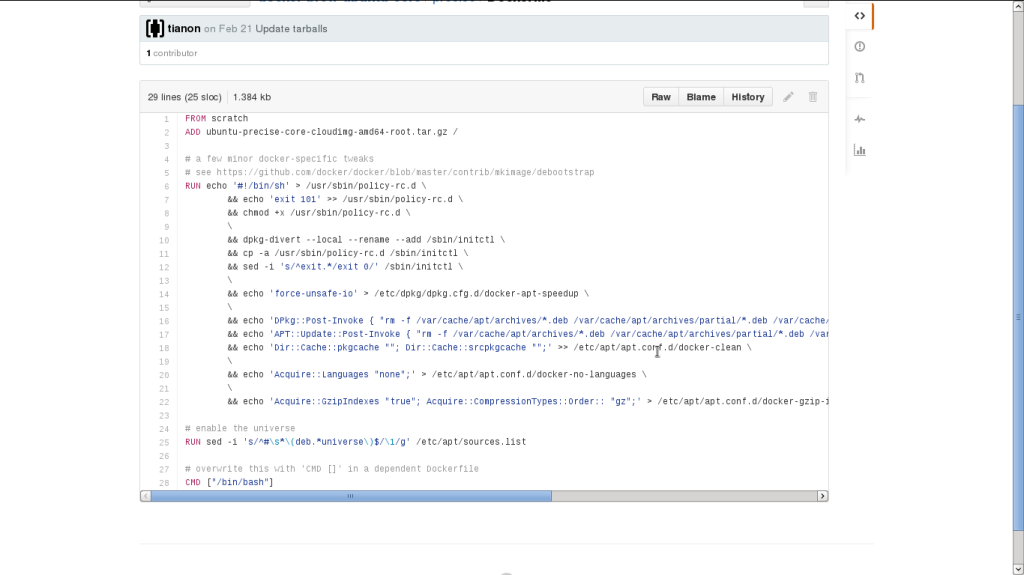
FROM is a way to tell Docker to use a base image, which is scratched in this case. You also can have other images that use the Ubuntu image. In their Dockerfile, you would see FROM ubuntu:14.04 or other versions of the Ubuntu image. In this case, scratch barely does anything.
Then it downloads the content of Ubuntu, runs some commands like we would do on the terminal (on nix systems). If you looked carefully, there was a command filed when we executed docker ps -a. In the end of the Dockerfile, the command that will be executed when the container is created, and every time it starts is, /bin/bash. This doesn’t do anything.
Now, let’s create another container, but this time with a name and different command, to run every time the container starts.
docker run --name ubuntucontainer ubuntu echo something
Do you see that this echoed something on the terminal? If you enter it again, docker ps -a you will see a new container with the given name, and with a different command this time. By adding something after the image name, Docker accepts it as a command.
But this is really boring. When we run a container, we want it to stay up for some time. But this really depends on the command it executes when it starts (or is first created). Create another container from the base Ubuntu image.
docker run ubuntu ping google.com
This will say that it cannot find ping. This is because ping is not installed by default. But we can do something else: build a container that runs the apt-get install -y ping command, and then create an image from that.
docker run ubuntu apt-get install -y ping
Then you have to find the container that was built. After that execute:
docker commit [containername]
You will find the new image like this:
docker images
Your new image doesn’t have a name but it has an image id. We can use this id to create a container from it. Using the four first characters is enough.
docker run [id] ping google.com
The problem here is that it doesn’t stop. We can make it to run in background mode.
docker run -d [id] ping google.com
Now execute docker ps to see the running containers. To see the output of the ping utility, use:
docker logs [container_name]
This will run forever (or until you shutdown your computer). To stop a running container, you can use:
docker stop [name_of_the_container]
If you enter docker ps, you will see that there are no running containers anymore.
Conclusion
In this article we discovered what Docker is. But we barely scratched the surface of all its functionality. Don’t despair though: there are three more articles coming. In the next article, we will see how to manually setup Docker for WordPress. After that, we will see how we can setup Docker more easily via the official WordPress image, and also using Docker Compose. So, make sure you stay tuned for more.
We want to hear from you. What do you think about Docker. Would you consider it on your next project? If you have a question please leave a comment below.
 Aleksander Koko
Aleksander is young developer who loves to play with the newest web technologies. In his free time, he reads about PHP, Firefox OS or experiments with a new language. Currently, his main interests are PHP design patterns, laravel, dart and cloud.