I know you’ve all been thinking it – how on earth do I create a countdown timer in PowerPoint? It’s one of life’s great mysteries, baffling great minds for generations. Here at BrightCarbon we couldn’t hold out any longer and we’ve decided to share the secret! Read on and become part of a very exclusive group…
Okay so maybe a countdown timer isn’t the most exciting thing to make, however in the creation of a timer we can demonstrate a really neat trick you can apply to help make objects move and animate in more interesting ways, with the use of transparency.
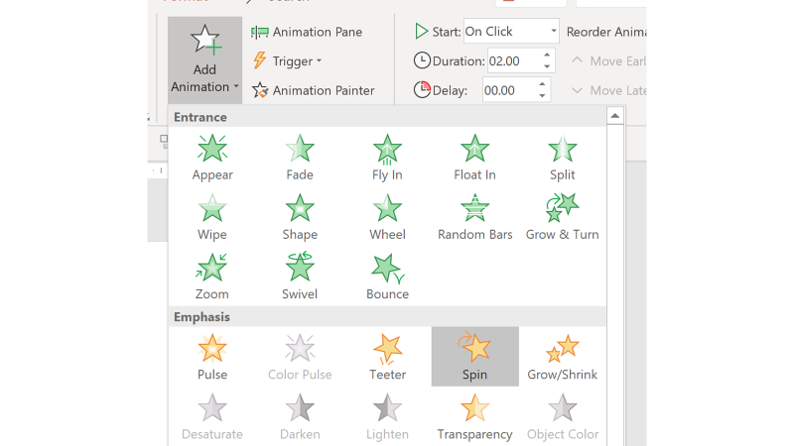
So the simplest way of creating your own countdown timer is by creating a second hand and then rotating it using the ‘spin’ animation.
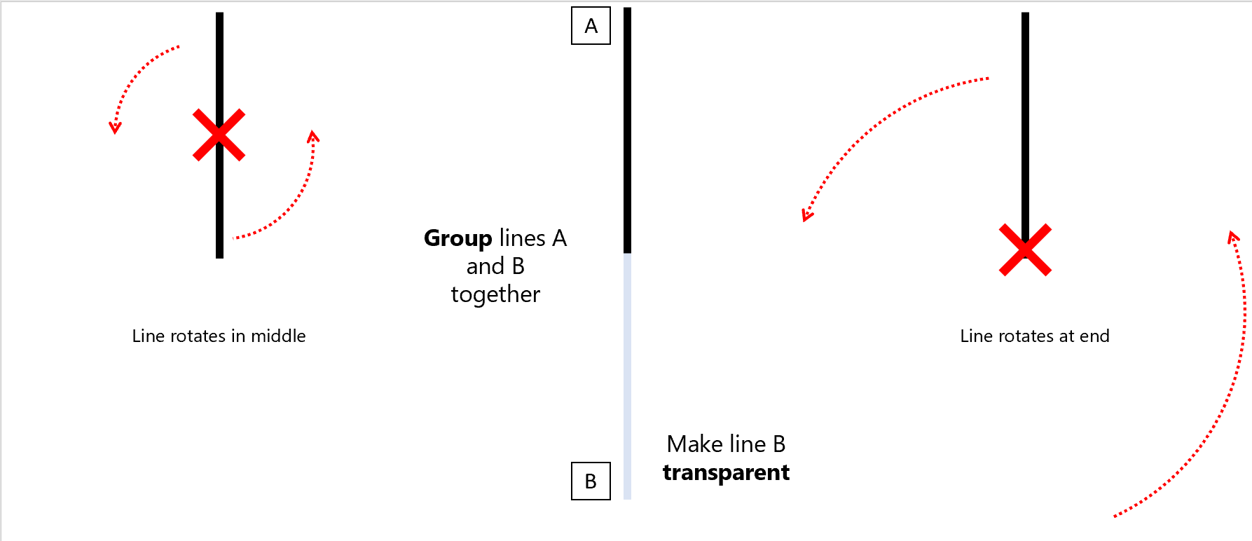
The first issue is that you can’t simply rotate the second hand as a single object, the animation assumes that the centre point of rotation is at the mid-point of the line. This is where our PowerPoint trick comes into play. In order avoid this issue regarding the centre point of rotation you will need to create another line, the same length of the initial line. Place this line at the end of the first line, group the two of them together and then make one of them 100% transparent.
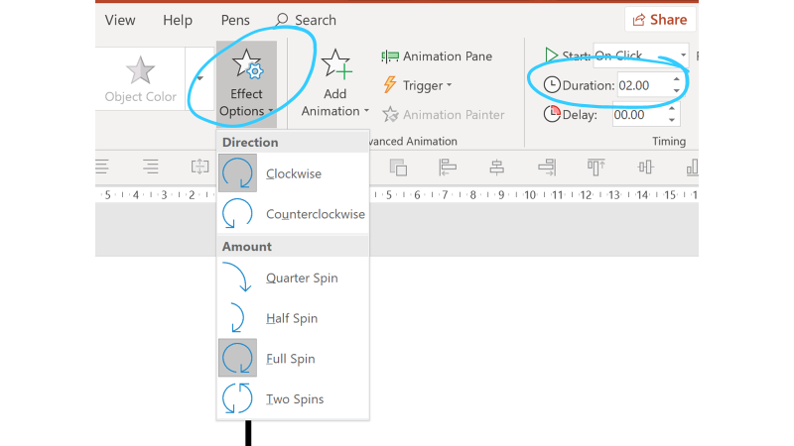
So now you need to select the grouped lines, and animate them with the spin option.
Once you’ve selected the animation, along the top ribbon you can click on Effect options, changing the rotation to clockwise. Then to the right, change the duration of the animation to last 60 seconds (rather than the default 2).
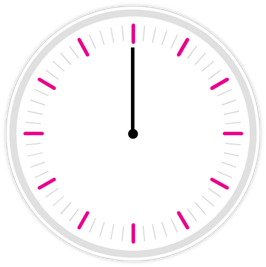
You now have (a very basic) 1 minute countdown timer. You can now think of ways to bring the timer to life, using PowerPoint objects to make it look more like a clock, or whatever device you think would work well.
We’ve created a short video showing how to carry out the exercise below:
To see how just how far you can take this effect in PowerPoint, we have developed a more advanced 1 minute countdown timer – hand and stopwatch, this includes numbers and a ticking second hand counting down from 60 seconds. Click the link to download the PowerPoint file:
Getting yourself a basic computer mouse is one of the quickest and most effective ways of revolutionising your presentation design. Think about it, no graphic designer in their right mind would work in their creative programs without wielding their mouse like a mighty sword
At BrightCarbon we've started to think that Shutterstock may have overtaken iStock as the commercial stock-photo site of choice for finding photos for presentation design. It's Shutterstock vs. iStock in our breakdown of the best stock-photo site.
When carrying out BrightCarbon's Advanced PowerPoint training course, showing Keyboard shortcuts to help people carry out every-day tasks much faster than normal is always a really big hit. Download our PowerPoint Keyboard Shortcuts PDF here...
Really glad you like the countdown timer, it was fun to create in some spare time one afternoon.
I’m afraid that as you’ve noticed, grouping the objects will lose the animations. There is a work around, but it’s a little tricky. You need to adjust the slide size of the countdown timer presentation. To do this click on the design tab, then page setup, make sure when you custom adjust the screen, the width and height are in the same ration as before (otherwise the objects will stretch/compress). Once slide is made smaller, open up the presentation you were wanting the countdown timer to appear smaller in, select all of the elements on the countdown timer slide, copy them and paste them into the other presentation. You’ll see that all of the elements have pasted in smaller than in the original. You’ll need to re-insert the audio clip as otherwise the animation won’t run past the first second. Lastly, the motion path on the thumb will need to be reduced slightly, as it’ll be pressing down a little too far.
Hope this makes sense, do let me know if you need me to go over in more detail.
Matt – It’s a bit tricky to adjust it to other timings, but possible using the animation pane on the right hand side. You’ll need to either increase the animations to make them last longer, or delete out some of the seconds on the slide to reduce the time. I use the selection pane to help select objects on the slide.
Sarah – thanks for the nice words.
Andre – pp-timer is really handy, good find. I guess the downside is that you have to pay for it, but the time saved in trying to create yourself probably makes this worthwhile. You could always use pp-timer to get the timings and then apply some of the above techniques to make the clock more designed to your own style.
Itai – once you’ve finished it, simply go to ‘save as’ and from the list of file options you can save it as a Windows Media Video or .MP4


Thanks you for a really nice tutorial and countdown 🙂
I would like to use a modified version in my presentation, but when i scale (and hold Crtl+Shift) the animation gets distorted.
If I group the animation first and scale it, then it scales fine, but the animation is lost.
Any tricks to scale it properly without removing the animation?
Thank in advance 🙂
Hi there Casper
Really glad you like the countdown timer, it was fun to create in some spare time one afternoon.
I’m afraid that as you’ve noticed, grouping the objects will lose the animations. There is a work around, but it’s a little tricky. You need to adjust the slide size of the countdown timer presentation. To do this click on the design tab, then page setup, make sure when you custom adjust the screen, the width and height are in the same ration as before (otherwise the objects will stretch/compress).
Once slide is made smaller, open up the presentation you were wanting the countdown timer to appear smaller in, select all of the elements on the countdown timer slide, copy them and paste them into the other presentation. You’ll see that all of the elements have pasted in smaller than in the original.
You’ll need to re-insert the audio clip as otherwise the animation won’t run past the first second.
Lastly, the motion path on the thumb will need to be reduced slightly, as it’ll be pressing down a little too far.
Hope this makes sense, do let me know if you need me to go over in more detail.
Vincent
Hi,
Great work. Very impressive.
How can I adjust this to be more flexible? 90 seconds for example, or 5 minutes etc…
Cheers,
Matt
Thank you so much for this. It looks so easy now – great work!
Nice tutorial, thanks! I’ve also been using PP Timer (www.pp-timer.com) lately. Must say they also did a pretty good job.
Great guide!
After I finish the timer how can I export it to a video editor?
Matt – It’s a bit tricky to adjust it to other timings, but possible using the animation pane on the right hand side. You’ll need to either increase the animations to make them last longer, or delete out some of the seconds on the slide to reduce the time. I use the selection pane to help select objects on the slide.
Sarah – thanks for the nice words.
Andre – pp-timer is really handy, good find. I guess the downside is that you have to pay for it, but the time saved in trying to create yourself probably makes this worthwhile. You could always use pp-timer to get the timings and then apply some of the above techniques to make the clock more designed to your own style.
Itai – once you’ve finished it, simply go to ‘save as’ and from the list of file options you can save it as a Windows Media Video or .MP4
i wanna see how u create this
This was very helpful and quite awesome 🙂 Thank you