Add a Drop-Down List To Any Google Spreadsheet
Greg Meyer 📊
Building repeatable data operations for B2B @ Mangomint • Writing ✍️ at finddataops.com
You've probably had the experience of creating a spreadsheet. Maybe, you create many spreadsheets every day. And one thing that it is common to all of them is that simple data entry - you know, the ability to make sure that people are entering things in the same format across multiple sheets - is a pain. The pain really becomes evident when you share a spreadsheet with multiple people.
Here's a simple hack to use that will improve any spreadsheet. The secret? Make lists of datatypes you use often, and build a way to pick them almost automatically in a pick list. Yeah, *data types* - I know it sounds nerdy, but just think of it this way: If you're building a content calendar, you want to make sure that people write "Blog Post" as the type of content they are building, not "blog post" or "Blog Ppppst" or whatever kind of bizarre suggestion auto-complete might make.
I know you're not a database administrator. And I also know that adding a light layer of automation on a spreadsheet will make it 10x better, from the ability to standardize the information to the benefit of being able to pivot data, to the simple OCD-like pleasure of making sure that everyone uses the same capitalization of the terms. And it's not even that hard.
Setting up a data-driven list in a Google Spreadsheet
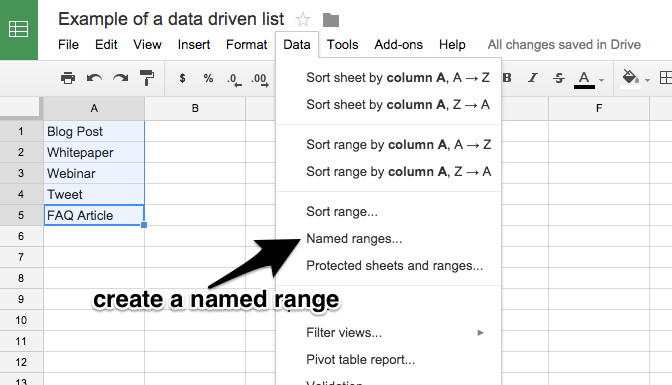
We're going to create a simple list like this one - you can use as many of these in your spreadsheet as you like.

Here are the steps:
- First, create a new Google Spreadsheet. If you're too lazy, use this one and copy it.
- Make sure you create a tab in your spreadsheet that holds data. Name it either "data" or something descriptive, in case you are building a bunch of different lists that pertain to the same kind of object or thing, like "Content Types".
- Create a range in your spreadsheet containing the terms that will populate your drop-down list. In this example I selected the terms I would use in a list of content types for a content calendar.
- Use Data > Named ranges... to create a named range, selecting the items you want to put in the range. Name this range without a space, e.g. "ContentTypes" which is the reference name for the range - you can also think of this as a variable.
Applying the data-driven list to an existing column
Now, on another tab in the same spreadsheet, create the columns you'd like to see in your spreadsheet, reserving one of the columns for the "drop-down list" you want to create having the contents of the Named Range you just created.
In this example, I created a content calendar list and wanted to make the ContentType column a drop-down list.

Here are the steps to do this:
- First, select the column or cells in the column for which you'd like to apply the Named Range.
- Then, right click the cell and select Data validation...
- In the Data validation dialog, enter the name of the Named Range. In this example, we're adding the range we added called "contentTypes"
The data validation dialog should look similar to the following:

Save the validation and voila! you now have a drop-down list in your spreadsheet.

Some variations you might consider for this trick might include:
- Changing the items in your named range to include a number so they sort numerically, e.g. "1 - Blog Post", "2 - Whitepaper"
- Using a filter on your content list (main tab) to show only ContentTypes having a value of "Blog Post"
- Using a pivot table to find the number of "Blog Posts" in a given month
- Adding additional drop-down lists to further automate your data entry across multiple tabs, e.g. for the content authors in your list.
Product Marketing & GTM Executive | Building high-growth strategies & teams
9yOoh, this is a good tip!