


Written and Media by: Charley Phillips.
[divide]
The holiday season is just around the corner. It seems as soon as Halloween is over is when the seasons change and Thanksgiving break can’t come any sooner. Here are some Thanksgiving friendly ideas that will spruce up your first of many holidays to come!

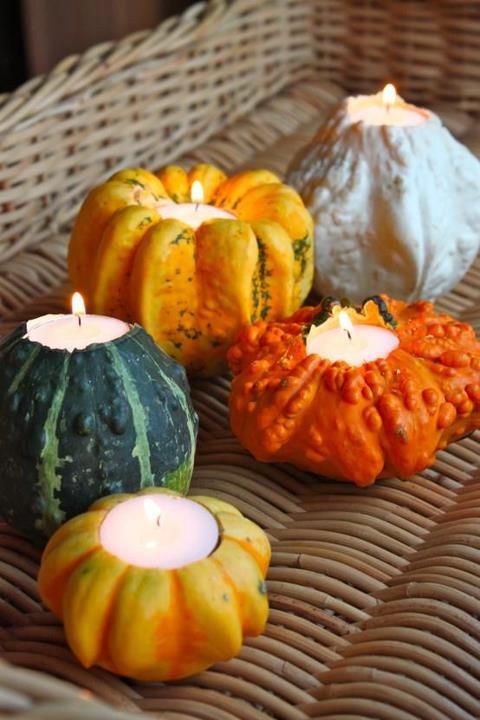
Pumpkins can still be relevant for the Thanksgiving times. Not only do they come in a nice, fresh, and yummy, pie form but they can also become a cute alternative to decorate your table! All you will need is a variety of little pumpkins, a drill, a spade drill bit the diameter of a tea light, tea lights, and a large knife (sharp enough to cut through a pumpkin). When all of your materials are gathered let the fun begin! First off, gently cut a piece off the bottom of the pumpkin so that it will sit flat on the table. Next, cut off the top of the pumpkin where you will want to drill the hole for the candle. Once you have cut off the top or stem, you can use the drill to create the whole for the tea light to go. Finally place the tea light into the pumpkin and there you have it! A simple and very lovely looking candle decoration!


[clear]
If you are going to attend a lot of holiday get togethers over break, here is a nice a cute treat to take with you. The cake pop craze happened not too long ago, but recently hasn’t been such a fad. These cake pops are not just the plain jane type, these are decorated to look like those tasty turkeys we see on November 27th. Depending on how detailed you want to decorate the pops, the simple ingredients are a cake mix (candiquik suggests a spice cake), ½ cup cream cheese frosting, 16 oz of melting chocolate, 40 Ritz crackers, 1 bag candy corn, and 40 lollipop sticks. Bake the cake in a 9in x 13in pan as directed. Make sure that the cake is completely cool before crumbling the cake into a large bowl. Add the frosting and mix together until combined. Once combined, create 1in balls and place them on a cookie sheet to chill for 2 hours in a refrigerator. While the pops are chilling, melt the chocolate until smooth. Once melted, dip the crackers into the chocolate (one-sided) and place the non dipped side onto wax paper. Take the candy corn and form ‘feathers’ around the chocolate side of the cracker. Take the sticks and place them into the cake pops. Dip cake pops in the melted chocolate, coating completely and allow excess coating to drip off. If you need to reheat the chocolate, make sure not to over heat it. Before the chocolate completely hardens, place a candy corn onto the center of cake pop to create a nose and also place the cracker on the back of the cake pop as well. If it doesn’t stick, you can dap some chocolate on the cracker as ‘glue’ to securely stick the two pieces together! Finally you can enjoy this one-bite treat with not feeling sleepy afterwards!

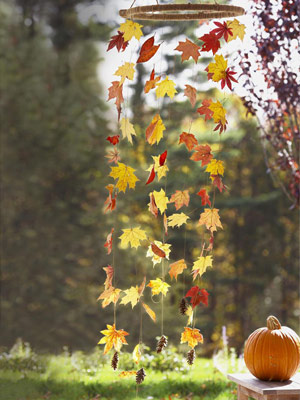
Since winter is coming, the leaves are changing and falling. This project can be resourceful for those who want to add some fall colors to their home. This cute hanging decoration can add some pop to your house’s porch! Collect leaves with intact stems and press in a heavy book for a few days. Wrap twine or ribbon around an 18-inch embroidery hoop (or any type of hoop) and secure ends with hot glue. Tie eight, 3-foot-long, waxed strings at even intervals around it, attaching pinecones at the bottoms as weights. Knot the string around each leaf’s stem, spacing randomly. Secure the hoop to some type of secure structure using twine. This is easy and fun to with your roommates or your family!
 I use to not like sweet potatoes. At one Thanksgiving feast, I tried this casserole and it was the best thing I had ever eaten. Since I was a kid, I was picky about certain foods. If you want to give the ‘WOW’ factor at your families Thanksgiving meal, try this out! Gather up all your ingredients; for the sweet potatoes: 8 sweet potatoes, 4 large eggs, lightly beaten, 1/2 cup milk, 1/4 cup packed dark brown sugar, 4 tablespoons (1/2 stick) unsalted melted butter, 1/2 teaspoon pure vanilla extract, coarse salt and freshly ground black pepper. The toppings you will need; 1/2 cup pecans, 1/4 cup packed dark brown sugar, 1/4 cup all-purpose flour, 3 tablespoons unsalted butter, softened.

Heat the oven to 350 degrees F. Place the potatoes on a rimmed baking sheet and bake until tender when poked with a fork, which will take about 1 hour. Once the potatoes are cooled, peel them and place them into a bowl. Mash potatoes until smooth. Stir in the eggs, milk, brown sugar, melted butter, and vanilla until combined. Season them with salt and pepper. To prepare the topping, combine the pecans, brown sugar, flour and butter, in the bowl of a blender or a food processor and set aside. Transfer the sweet potato mixture to a medium casserole dish and sprinkle with the topping. Place the casserole in the oven and bake until bubbly and browned on top (about 30 minutes)!
When this is cooking, the sweet and warmness of the casserole aroma fills the room and it mouth-watering good! Don’t worry about the calories, it’s Thanksgiving…right?
<br>
Want more fall DIY ideas? Check these articles by yours truly down below!


